
Vinegar and Vaseline trick: Sounds like a strange combination, right? But trust me, this unexpected duo is about to become your new best friend in the garden! For centuries, gardeners have been experimenting with natural remedies to keep their plants thriving. From ancient Egyptians using honey to protect seeds to modern-day enthusiasts concocting homemade fertilizers, the quest for the perfect gardening hack is a tale as old as time.
I know what you’re thinking: “Why would I ever put vinegar and Vaseline on my plants?” Well, the answer is simpler than you might imagine. Pests! Pesky critters can wreak havoc on your precious plants, turning your green oasis into a buffet. Instead of resorting to harsh chemicals, this vinegar and Vaseline trick offers a gentle, effective, and surprisingly affordable solution.
This DIY article will guide you through creating a simple yet powerful pest barrier that will keep snails, slugs, and other unwanted guests away from your prized blooms and veggies. So, ditch the expensive pesticides and get ready to unleash the power of this unexpected pairing. Your garden (and your wallet) will thank you!
DIY Miracle Cream: Erase Dark Spots and Scars with Vinegar and Vaseline!
Hey everyone! I’m so excited to share this amazing DIY beauty hack with you. I stumbled upon this trick while researching natural remedies for hyperpigmentation, and let me tell you, the results have been incredible! We’re talking about a simple, two-ingredient cream using everyday household items: vinegar and Vaseline. Yes, you read that right! This combination might sound a little strange, but trust me, it’s a game-changer for fading dark spots, scars, and even evening out your skin tone.
This isn’t an overnight miracle, of course. Consistency is key, and you’ll need to be patient. But with regular use, you’ll definitely notice a visible improvement in your skin’s appearance. So, let’s dive in and learn how to make this DIY miracle cream!
What You’ll Need:
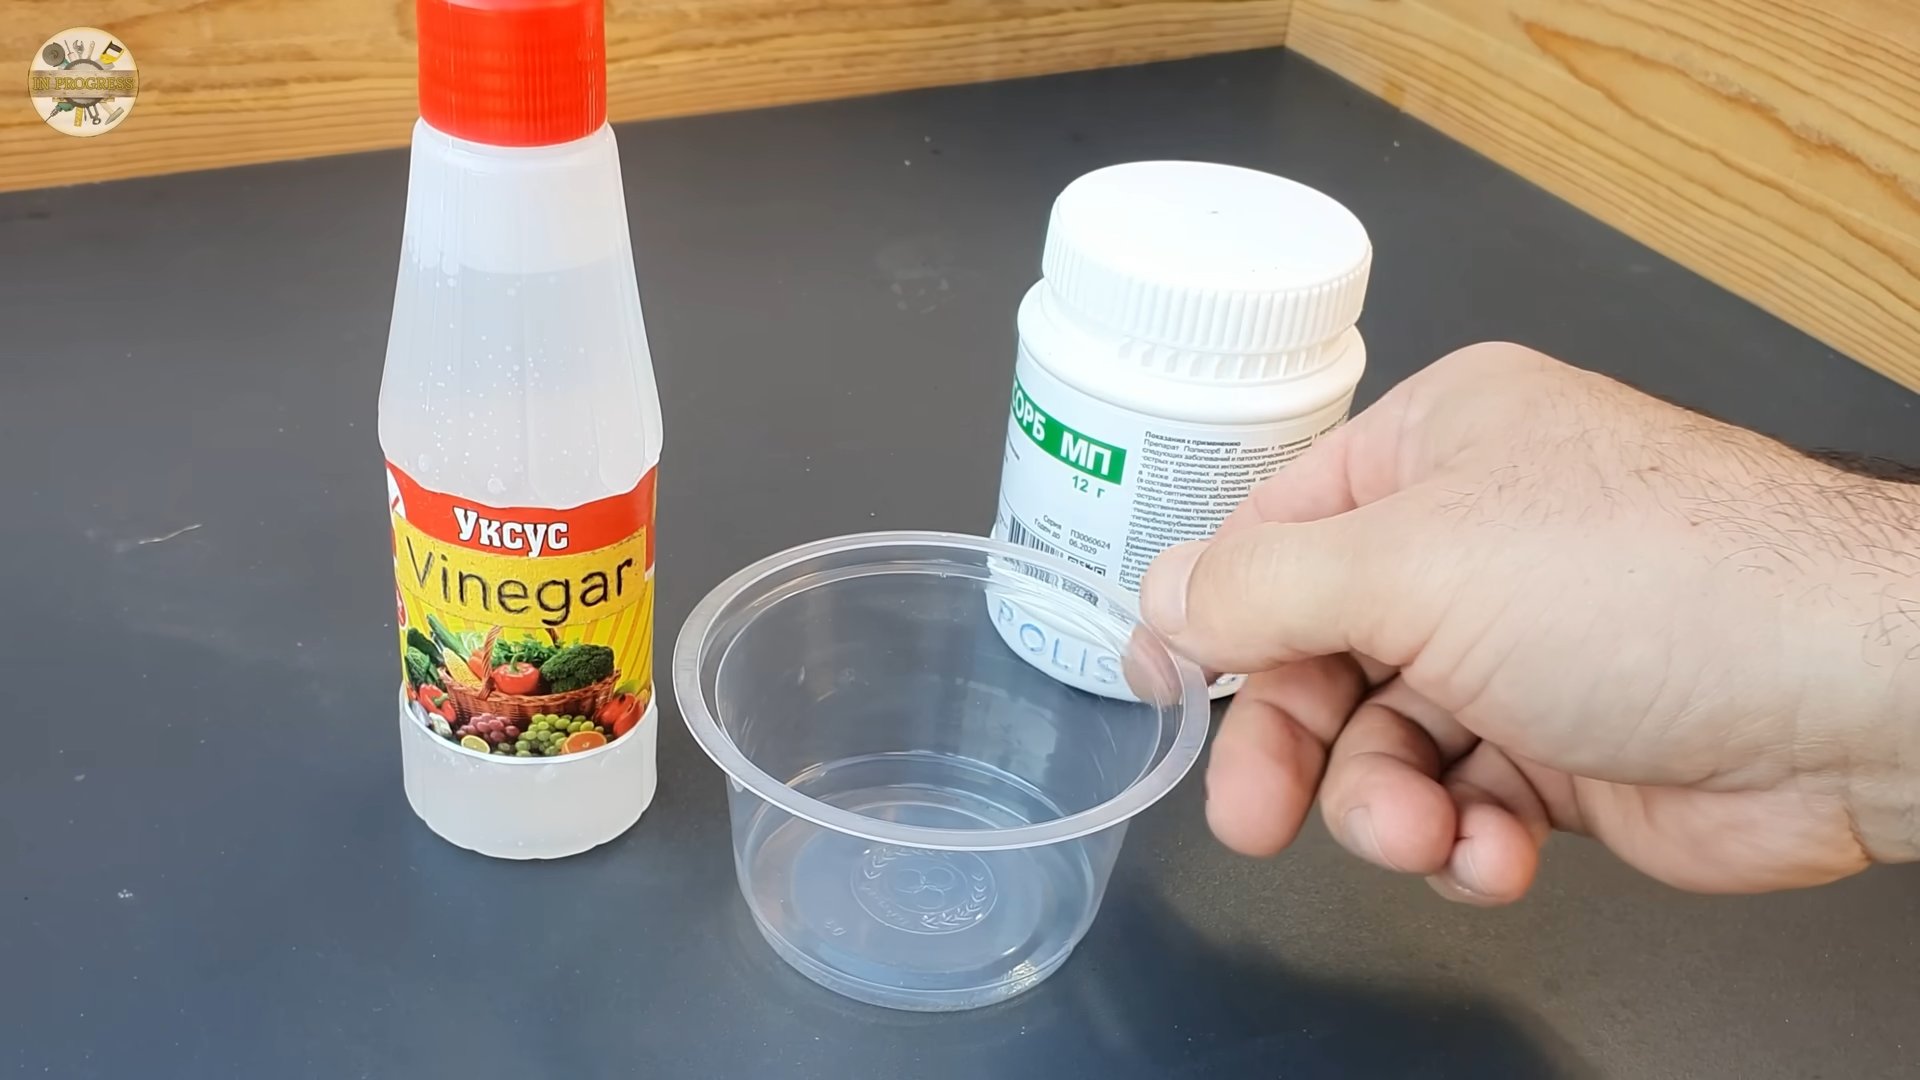
* White Vinegar (the regular kind you use for cleaning)
* Vaseline (Petroleum Jelly)
* A small, clean container with a lid (like an old lip balm container or a small jar)
* A mixing stick or spoon (plastic or glass is best)
* Cotton swabs or your fingertips for application
Why This Works: The Science Behind the Magic
Before we get started, let’s quickly understand why this combination is so effective.
* Vinegar (Acetic Acid): Vinegar contains acetic acid, a mild alpha-hydroxy acid (AHA). AHAs are known for their exfoliating properties. They help to gently remove dead skin cells from the surface of your skin, revealing brighter, more even-toned skin underneath. This exfoliation also helps to fade dark spots and scars over time.
* Vaseline (Petroleum Jelly): Vaseline is an occlusive moisturizer. This means it creates a protective barrier on the skin, preventing moisture loss. This is crucial because AHAs can sometimes be drying. Vaseline helps to keep your skin hydrated and protected, allowing the vinegar to work its magic without causing excessive dryness or irritation. It also helps to heal and protect the skin as it exfoliates.
Making the Vinegar and Vaseline Cream: Step-by-Step Instructions
Okay, now for the fun part! Here’s how to make your own DIY dark spot and scar-fading cream:
1. Prepare Your Workspace: Make sure you have a clean and well-lit area to work in. Gather all your ingredients and supplies.
2. Choose Your Ratio: This is where you can customize the cream to suit your skin’s sensitivity. I recommend starting with a 1:3 ratio of vinegar to Vaseline. This means one part vinegar to three parts Vaseline. If your skin is more sensitive, you can increase the Vaseline to a 1:4 or even 1:5 ratio. If your skin tolerates it well, you can try a 1:2 ratio, but be careful!
3. Measure the Ingredients: Using your chosen ratio, measure out the vinegar and Vaseline. For example, if you’re using a 1:3 ratio and a small container, you could start with 1 teaspoon of vinegar and 3 teaspoons of Vaseline.
4. Combine the Ingredients: Place the Vaseline in your small container. Add the vinegar to the Vaseline.
5. Mix Thoroughly: Using your mixing stick or spoon, mix the vinegar and Vaseline together until they are completely combined and form a smooth, homogenous cream. This might take a minute or two, but be patient and keep stirring until there are no streaks of vinegar or Vaseline remaining.
6. Store Your Cream: Once the cream is mixed, seal the container tightly with the lid. Store it in a cool, dark place. This will help to preserve the effectiveness of the ingredients.
Applying the Cream: A Gentle Approach
Now that you’ve made your cream, it’s time to learn how to apply it correctly. Remember, this is a potent mixture, so it’s important to be gentle and cautious.
1. Perform a Patch Test: This is absolutely crucial! Before applying the cream to your entire face or the area you want to treat, test it on a small, inconspicuous area of your skin, like behind your ear or on your inner arm. Apply a small amount of the cream and leave it on for about 30 minutes. Then, rinse it off with water. Wait 24 hours to see if you experience any irritation, redness, or itching. If you do, discontinue use immediately.
2. Cleanse Your Skin: Before applying the cream, make sure your skin is clean and dry. Use a gentle cleanser to remove any dirt, oil, or makeup. Pat your skin dry with a soft towel.
3. Apply a Thin Layer: Using a cotton swab or your fingertips, apply a very thin layer of the cream to the affected area. Avoid applying it to the delicate skin around your eyes and mouth.
4. Leave it On: Start by leaving the cream on for a short period of time, like 15-20 minutes. As your skin gets used to it, you can gradually increase the time to 30-45 minutes. I personally leave it on for about 30 minutes.
5. Rinse Thoroughly: After the allotted time, rinse the cream off your skin with lukewarm water. Make sure to remove all traces of the cream.
6. Moisturize: After rinsing, apply a gentle, fragrance-free moisturizer to your skin. This will help to keep your skin hydrated and prevent dryness.
7. Sun Protection is Key: This is non-negotiable! AHAs can make your skin more sensitive to the sun, so it’s absolutely essential to wear a broad-spectrum sunscreen with an SPF of 30 or higher every day, even on cloudy days. Reapply sunscreen every two hours, especially if you’re spending time outdoors.
Frequency of Use: Listen to Your Skin
How often you use this cream will depend on your skin’s sensitivity and tolerance.
* Start Slow: Begin by using the cream only once or twice a week.
* Observe Your Skin: Pay close attention to how your skin reacts. If you experience any irritation, redness, or dryness, reduce the frequency of use or discontinue use altogether.
* Gradually Increase: If your skin tolerates the cream well, you can gradually increase the frequency of use to every other day or even daily. However, I wouldn’t recommend using it more than once a day.
Important Considerations and Precautions:
* Not for Sensitive Skin Conditions: If you have eczema, rosacea, or other sensitive skin conditions, this cream may not be suitable for you. Consult with a dermatologist before using it.
* Avoid Open Wounds: Do not apply the cream to open wounds, cuts, or irritated skin.
* Discontinue Use if Irritation Occurs: If you experience any persistent irritation, redness, itching, or burning, discontinue use immediately and consult with a dermatologist.
* Pregnancy and Breastfeeding: If you are pregnant or breastfeeding, consult with your doctor before using this cream.
* Be Patient: It takes time to see results. Don’t expect to see a dramatic difference overnight. Be patient and consistent with your use, and you should start to notice an improvement in your skin’s appearance over time. I started seeing a noticeable difference after about 4 weeks of consistent use.
* Quality of Ingredients: Use good quality white vinegar and pure Vaseline for best results.
* Storage: Store the cream in a cool, dark place to maintain its effectiveness.
Hey everyone! I’m so excited to share this amazing DIY beauty hack with you. I stumbled upon this trick while researching natural remedies for hyperpigmentation, and let me tell you, the results have been incredible! We’re talking about a simple, two-ingredient cream using everyday household items: vinegar and Vaseline. Yes, you read that right! This combination might sound a little strange, but trust me, it’s a game-changer for fading dark spots, scars, and even evening out your skin tone.
This isn’t an overnight miracle, of course. Consistency is key, and you’ll need to be patient. But with regular use, you’ll definitely notice a visible improvement in your skin’s appearance. So, let’s dive in and learn how to make this DIY miracle cream!
What You’ll Need:
* White Vinegar (the regular kind you use for cleaning)
* Vaseline (Petroleum Jelly)
* A small, clean container with a lid (like an old lip balm container or a small jar)
* A mixing stick or spoon (plastic or glass is best)
* Cotton swabs or your fingertips for application
Why This Works: The Science Behind the Magic
Before we get started, let’s quickly understand why this combination is so effective.
* Vinegar (Acetic Acid): Vinegar contains acetic acid, a mild alpha-hydroxy acid (AHA). AHAs are known for their exfoliating properties. They help to gently remove dead skin cells from the surface of your skin, revealing brighter, more even-toned skin underneath. This exfoliation also helps to fade dark spots and scars over time.
* Vaseline (Petroleum Jelly): Vaseline is an occlusive moisturizer. This means it creates a protective barrier on the skin, preventing moisture loss. This is crucial because AHAs can sometimes be drying. Vaseline helps to keep your skin hydrated and protected, allowing the vinegar to work its magic without causing excessive dryness or irritation. It also helps to heal and protect the skin as it exfoliates.
Making the Vinegar and Vaseline Cream: Step-by-Step Instructions
Okay, now for the fun part! Here’s how to make your own DIY dark spot and scar-fading cream:
1. Prepare Your Workspace: Make sure you have a clean and well-lit area to work in. Gather all your ingredients and supplies.
2. Choose Your Ratio: This is where you can customize the cream to suit your skin’s sensitivity. I recommend starting with a 1:3 ratio of vinegar to Vaseline. This means one part vinegar to three parts Vaseline. If your skin is more sensitive, you can increase the Vaseline to a 1:4 or even 1:5 ratio. If your skin tolerates it well, you can try a 1:2 ratio, but be careful!
3. Measure the Ingredients: Using your chosen ratio, measure out the vinegar and Vaseline. For example, if you’re using a 1:3 ratio and a small container, you could start with 1 teaspoon of vinegar and 3 teaspoons of Vaseline.
4. Combine the Ingredients: Place the Vaseline in your small container. Add the vinegar to the Vaseline.
5. Mix Thoroughly: Using your mixing stick or spoon, mix the vinegar and Vaseline together until they are completely combined and form a smooth, homogenous cream. This might take a minute or two, but be patient and keep stirring until there are no streaks of vinegar or Vaseline remaining.
6. Store Your Cream: Once the cream is mixed, seal the container tightly with the lid. Store it in a cool, dark place. This will help to preserve the effectiveness of the ingredients.
Applying the Cream: A Gentle Approach
Now that you’ve made your cream, it’s time to learn how to apply it correctly. Remember, this is a potent mixture, so it’s important to be gentle and cautious.
1. Perform a Patch Test: This is absolutely crucial! Before applying the cream to your entire face or the area you want to treat, test it on a small, inconspicuous area of your skin, like behind your ear or on your inner arm. Apply a small amount of the cream and leave it on for about 30 minutes. Then, rinse it off with water. Wait 24 hours to see if you experience any irritation, redness, or itching. If you do, discontinue use immediately.
2. Cleanse Your Skin: Before applying the cream, make sure your skin is clean and dry. Use a gentle cleanser to remove any dirt, oil, or makeup. Pat your skin dry with a soft towel.
3. Apply a Thin Layer: Using a cotton swab or your fingertips, apply a very thin layer of the cream to the affected area. Avoid applying it to the delicate skin around your eyes and mouth.
4. Leave it On: Start by leaving the cream on for a short period of time, like 15-20 minutes. As your skin gets used to it, you can gradually increase the time to 30-45 minutes. I personally leave it on for about 30 minutes.
5. Rinse Thoroughly: After the allotted time, rinse the cream off your skin with lukewarm water. Make sure to remove all traces of the cream.
6. Moisturize: After rinsing, apply a gentle, fragrance-free moisturizer to your skin. This will help to keep your skin hydrated and prevent dryness.
7. Sun Protection is Key: This is non-negotiable! AHAs can make your skin more sensitive to the sun, so it’s absolutely essential to wear a broad-spectrum sunscreen with an SPF of 30 or higher every day, even on cloudy days. Reapply sunscreen every two hours, especially if you’re spending time outdoors.
Frequency of Use: Listen to Your Skin
How often you use this cream will depend on your skin’s sensitivity and tolerance.
* Start Slow: Begin by using the cream only once or twice a week.
* Observe Your Skin: Pay close attention to how your skin reacts. If you experience any irritation, redness, or dryness, reduce the frequency of use or discontinue use altogether.
* Gradually Increase: If your skin tolerates the cream well, you can gradually increase the frequency of use to every other day or even daily. However, I wouldn’t recommend using it more than once a day.
Important Considerations and Precautions:
* Not for Sensitive Skin Conditions: If you have eczema, rosacea, or other sensitive skin conditions, this cream may not be suitable for you. Consult with a dermatologist before using it.
* Avoid Open Wounds: Do not apply the cream to open wounds, cuts, or irritated skin.
* Discontinue Use if Irritation Occurs: If you experience any persistent irritation, redness, itching, or burning, discontinue use immediately and consult with a dermatologist.
* Pregnancy and Breastfeeding: If you are pregnant or breastfeeding, consult with your doctor before using this cream.
* Be Patient: It takes time to see results. Don’t expect to see a dramatic difference overnight. Be patient and consistent with your use, and you should start to notice an improvement in your skin’s appearance over time. I started seeing a noticeable difference after about 4 weeks of consistent use.
* Quality of Ingredients: Use good quality white vinegar and pure Vaseline for best results.
* Storage: Store the cream in a cool, dark place to maintain its effectiveness.
* Expiration: While the ingredients themselves don’t really “expire” in the traditional sense, I recommend making a fresh batch every month or two to ensure optimal potency and hygiene.
Troubleshooting: Common Issues and Solutions
* Skin Irritation: If you experience skin irritation, reduce the frequency of use or dilute the vinegar further by increasing the amount of Vaseline. You can also try applying a soothing balm or cream after rinsing off the vinegar and Vaseline mixture.
* Dryness: If your skin feels dry, make sure you’re using a good moisturizer after rinsing off the cream. You can also try applying a hydrating serum before moisturizing.
* No Results: If you’re not seeing any results after several weeks of consistent use, you may need to increase the strength of the vinegar solution (but be very careful!) or consider other treatment options. It’s also possible that this particular remedy simply isn’t effective for your skin type or the specific type of hyperpigmentation you’re trying to treat.
My Personal Experience:
I’ve been using this DIY vinegar and Vaseline cream for a few months now, and I’ve been really impressed with the results. I had some stubborn dark spots from sun damage on my cheeks, and they’ve definitely faded significantly. My skin also looks brighter and more even-toned overall. I started with a 1:4 ratio and gradually worked my way up to a 1:3 ratio.

Conclusion
So, there you have it! The vinegar and Vaseline trick – a simple, cost-effective, and surprisingly powerful solution for achieving radiant, healthy-looking skin. We’ve explored how this dynamic duo can work wonders, from gently exfoliating dead skin cells to deeply moisturizing and locking in hydration. It’s a testament to the fact that sometimes, the most effective remedies are found in the most unassuming ingredients.
Why is this DIY trick a must-try? Because it offers a gentle alternative to harsh chemical exfoliants and expensive spa treatments. It’s accessible to everyone, regardless of budget, and can be easily incorporated into your existing skincare routine. The combination of vinegar’s mild acidity and Vaseline’s occlusive properties creates a synergistic effect, leaving your skin feeling smoother, softer, and more revitalized. It’s a game-changer for those battling dryness, dullness, or even minor skin irritations.
But the beauty of this trick lies not only in its simplicity but also in its adaptability. Feel free to experiment with variations to suit your specific skin type and needs. For instance, if you have particularly sensitive skin, you might want to dilute the vinegar further with water or use apple cider vinegar, which is generally considered milder. You could also add a drop or two of your favorite essential oil, like lavender or chamomile, for added soothing and aromatherapy benefits. If you’re looking for an extra boost of hydration, consider mixing in a small amount of honey, a natural humectant that draws moisture to the skin. Remember to always patch test any new ingredient on a small area of your skin before applying it to your entire face or body.
Don’t be afraid to get creative and customize this DIY treatment to create your perfect skincare solution. The key is to listen to your skin and adjust the recipe accordingly.
We are confident that once you experience the transformative power of the vinegar and Vaseline trick, you’ll be hooked. It’s a simple yet effective way to achieve a healthy, glowing complexion without breaking the bank.
Now, it’s your turn! We wholeheartedly encourage you to give this DIY trick a try. We’re eager to hear about your experiences and the results you achieve. Did it help with dryness? Did you notice a difference in your skin’s texture? What variations did you try? Share your stories, tips, and feedback in the comments below. Let’s create a community where we can all learn from each other and unlock the secrets to beautiful, healthy skin, one simple ingredient at a time. Your insights could be invaluable to someone else who’s looking for a natural and effective skincare solution. So, go ahead, embrace the power of vinegar and Vaseline, and let your skin shine!
Frequently Asked Questions (FAQs)
What type of vinegar should I use?
White vinegar is generally recommended for this trick due to its consistent acidity. However, apple cider vinegar is a milder alternative that some people with sensitive skin prefer. Avoid using cleaning vinegar, as it is too harsh for skin application. Always dilute the vinegar with water, regardless of the type you choose. A good starting ratio is 1 part vinegar to 2 parts water, but you can adjust this based on your skin’s sensitivity.
How often can I use this vinegar and Vaseline trick?
It’s best to start slowly and observe how your skin reacts. For most people, using this treatment once or twice a week is sufficient. Overuse can lead to dryness or irritation, especially if you have sensitive skin. If you notice any redness, itching, or burning, discontinue use immediately and consult a dermatologist.
Can I use this trick on my face?
Yes, you can use this trick on your face, but proceed with caution, especially if you have sensitive skin. Always perform a patch test on a small, inconspicuous area of your skin (like behind your ear) before applying it to your entire face. Avoid the eye area, as vinegar can be irritating. If you experience any discomfort, rinse immediately with cool water.
Is this trick safe for all skin types?
While many people find this trick beneficial, it’s not suitable for everyone. People with very sensitive skin, eczema, rosacea, or other skin conditions should exercise caution and consult a dermatologist before trying it. If you have any open wounds, sunburn, or active breakouts, it’s best to avoid this treatment until your skin has healed.
Can I leave the vinegar on my skin overnight?
No, it’s not recommended to leave vinegar on your skin overnight. The acidity of vinegar can be irritating if left on for extended periods. Apply the diluted vinegar solution, leave it on for a few minutes (start with 1-2 minutes and gradually increase if tolerated), and then rinse thoroughly with cool water.
How long should I leave the Vaseline on my skin?
Vaseline can be left on your skin overnight, especially if you have dry skin. It acts as an occlusive, creating a barrier that prevents moisture loss. However, if you have oily or acne-prone skin, you might prefer to leave it on for a shorter period (e.g., 30 minutes to an hour) and then blot off any excess.
Can I use this trick to treat acne?
While vinegar has some antibacterial properties that might help with mild acne, it’s not a primary acne treatment. Vaseline, being an occlusive, can potentially trap oil and worsen acne in some individuals. If you have acne-prone skin, use this trick with caution and monitor your skin closely for any breakouts. Consider using a non-comedogenic moisturizer instead of Vaseline.
Can I use this trick to treat dark spots or hyperpigmentation?
Vinegar contains acetic acid, which has mild exfoliating properties that might help to lighten dark spots over time. However, it’s not a quick fix and requires consistent use. For more significant hyperpigmentation, consider using dedicated treatments like vitamin C serums, retinoids, or chemical peels under the guidance of a dermatologist.
What are some other variations of this trick?
As mentioned earlier, you can add a drop or two of essential oil (like lavender or chamomile) for added benefits. You can also mix in a small amount of honey for extra hydration. Some people also add a pinch of baking soda to the vinegar solution for a more exfoliating effect, but this should be done with caution as baking soda can be alkaline and potentially disrupt the skin’s pH balance.
What if I experience irritation after using this trick?
If you experience any irritation, redness, itching, or burning, discontinue use immediately. Rinse your skin thoroughly with cool water and apply a gentle, soothing moisturizer. If the irritation persists, consult a dermatologist. It’s always better to err on the side of caution when it comes to your skin.

Leave a Comment