
Tomato garden family plan: Imagine biting into a sun-warmed, juicy tomato, bursting with flavor, that you grew yourself, right in your backyard! That’s the magic we’re unlocking today with our ultimate guide to creating a thriving tomato garden as a family. For generations, cultivating tomatoes has been more than just gardening; it’s been a symbol of summer, a source of pride, and a way to connect with nature. From the ancient Aztecs who first cultivated these “plump things with a navel,” to Italian families passing down secret sauce recipes, tomatoes have a rich and delicious history.
But let’s be honest, sometimes getting those perfect, plump tomatoes feels more like a battle than a blissful experience. Pests, diseases, and unpredictable weather can quickly turn your gardening dreams into a frustrating reality. That’s where our DIY tricks and hacks come in! We’re going to share simple, effective, and budget-friendly solutions to common tomato-growing problems, ensuring you and your family can enjoy a bountiful harvest.
Why do you need these DIY tricks? Because a successful tomato garden family plan isn’t just about planting seeds; it’s about understanding the needs of your plants, working with nature, and creating a sustainable system that yields delicious results year after year. So, grab your gardening gloves, gather your family, and let’s dive into the wonderful world of homegrown tomatoes! I’m excited to share these tips with you!
Your Family Tomato Garden: DIY Guide for a Bountiful Harvest
Hello dear garden friends! I’m thrilled to take you into the world of tomato growing today. Together, we will plan and create a tomato garden that not only provides delicious fruits but is also a great project for the whole family. Don’t worry, even if you are absolute beginners, this guide will make it a breeze!
The Preparation: What You Need and Where to Start
Before we get started, it’s important that we prepare everything. This saves time and nerves!
- The Location: Tomatoes love the sun! Find a spot in the garden that gets at least 6-8 hours of direct sunlight per day.
- The Soil: Tomatoes need loose, well-draining soil. You should improve heavy clay soils with compost or sand.
- Choosing the Variety: This is where the fun begins! Think about which tomatoes you like to eat the most. There are countless varieties, from small cherry tomatoes to huge beefsteak tomatoes. Ask at the garden center which varieties are suitable for your region.
- The Seeds or Young Plants: You can either grow tomatoes from seed or buy young plants. For beginners, I recommend young plants as they are less susceptible.
- The Tools: You’ll need a shovel, a rake, a watering can or garden hose, possibly a trowel, and stakes or spirals for the tomato plants.
- Fertilizer: Tomatoes are heavy feeders and need plenty of nutrients. Get an organic tomato fertilizer or compost.
Step-by-Step Guide: From Bed to the First Tomato
Now for the real work! Follow these steps to create your tomato garden:
- Prepare the Soil: Loosen the soil thoroughly and remove weeds. Mix in compost or organic fertilizer to enrich the soil with nutrients. I personally love to mix in some horn shavings, which gives an extra nutrient kick!
- Planting: Dig holes that are slightly larger than the root balls of the tomato plants. Place the plants in them and fill the holes with soil. Make sure the plants are not too deep; the top root should still be visible.
- Watering: Water the plants thoroughly after planting. This helps them to establish themselves in the new soil.
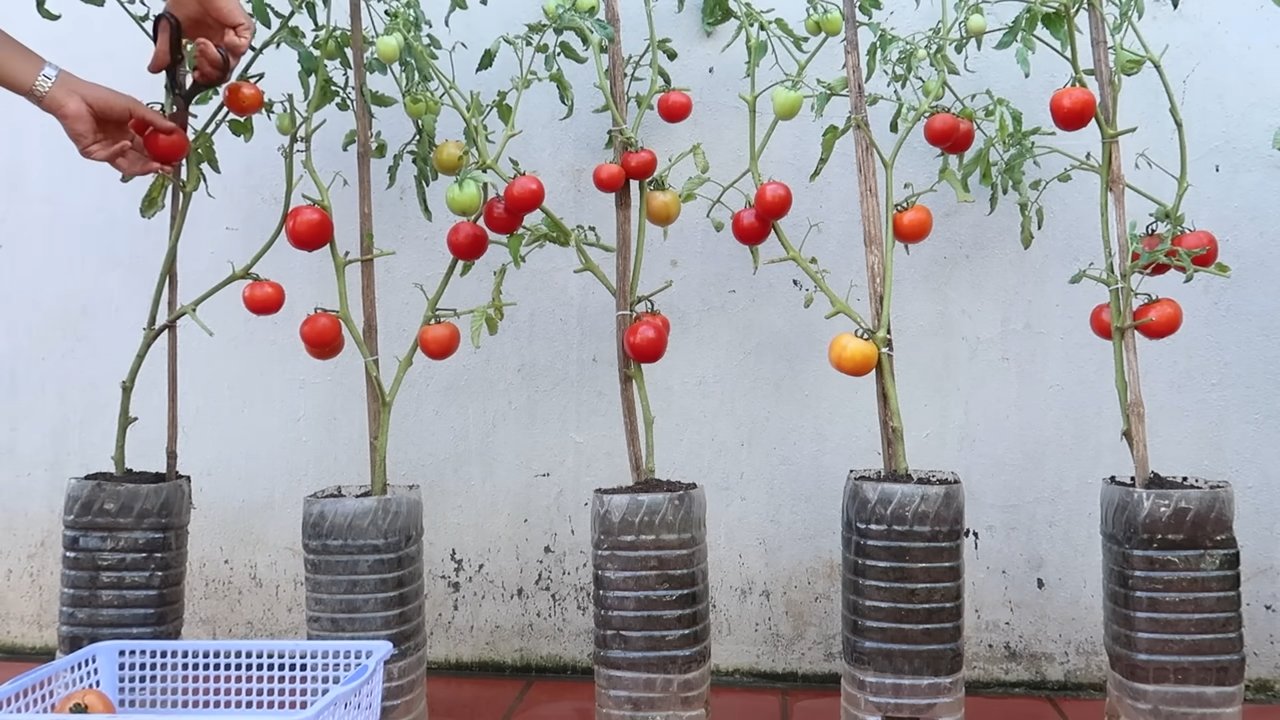
- Install Supports: Tomato plants grow tall and heavy, so they need support. Place stakes or spirals next to the plants and tie them loosely. I like to use spirals because the plants can simply grow up them.
- Mulching: Cover the soil around the plants with mulch. This keeps the moisture in the soil, suppresses weeds, and protects the tomatoes from splashing water. I like to use straw or grass clippings.
- Fertilizing: Start fertilizing about two weeks after planting. Use an organic tomato fertilizer and follow the instructions on the package.
- Pinching Out (Pruning): Tomato plants form so-called “suckers” in the leaf axils. These shoots take unnecessary energy from the plant and should be regularly removed. Simply break them off with your fingers while they are still small.
- Watering: Water the tomatoes regularly, especially in dry weather. Make sure the water does not get on the leaves to prevent fungal diseases. It’s best to water directly at the roots in the morning.
- Observing: Regularly check your tomato plants for pests and diseases. If necessary, you can use biological pesticides.
Special Tips for a Bountiful Harvest
Here are a few more tips that will help you achieve a particularly bountiful harvest:
- Tomato House or Polytunnel: If you live in a region with a cool climate, a tomato house or polytunnel can work wonders. They protect the plants from wind and rain and ensure higher temperatures.
- Grafting: Grafted tomato plants are more resistant to diseases and often produce higher yields. Ask for grafted plants at the garden center.
- Irrigation System: An automatic irrigation system saves time and ensures that the plants always get enough water.
- Companion Plants: Plant basil, marigolds, or nasturtiums next to your tomatoes. These plants repel pests and promote growth.
- Regular Harvesting: Harvest the tomatoes as soon as they are ripe. This encourages the plant to produce more fruit.
Common Problems and How to Solve Them
Problems can also arise when growing tomatoes. Here are some of the most common problems and how you can solve them:
- Blight: Blight is a fungal disease that manifests as brown spots on the leaves and fruits. Remove affected leaves and fruits immediately and spray the plants with a fungicide. Ensure good ventilation and avoid waterlogging.
- Aphids: Aphids suck on the leaves and weaken the plants. Spray the plants with a jet of water or use a biological insecticide.
- Whitefly: The whitefly is a small pest that stays on the underside of the leaves. Combat them with yellow sticky traps or a biological insecticide.
- Russet Mite: The russet mite causes crippled leaves and shoots. Remove affected plant parts and use an acaricide.
- Blossom-End Rot: Blossom-end rot appears as brown, leathery spots at the blossom end of the tomatoes. It is caused by a calcium deficiency. Fertilize the plants with a calcium-rich fertilizer and ensure even watering.
The Harvest: The Reward for Your Efforts
After all the work, the best part finally arrives: the harvest! When the tomatoes have reached their full color and are easily detached from the stem, they are ripe. Pick them carefully and enjoy the taste of homegrown tomatoes!
Ideas for Processing Your Tomato Harvest
You have a huge tomato harvest? No problem! Here are a few ideas for what you can do with it:
- Eat Fresh: Just like that, in a salad, or on bread – homegrown tomatoes simply taste the best!
- Cook Tomato Sauce: Make your own tomato sauce for pasta, pizza, or lasagna.
- Make Tomato Paste: Tomato paste is a great base for many dishes.
- Pickle Tomatoes: Pickle tomatoes in oil or vinegar to preserve them for longer.
- Dry Tomatoes: Dried tomatoes are a delicious snack or an ingredient for salads and pasta.
- Cook Tomato Soup: A warming tomato soup is perfect for cold days.
- Give Them Away: Share your bountiful harvest with friends and family!
I hope this guide has helped you create your own tomato garden. Happy gardening and a bountiful harvest! And remember: gardening is a learning process. Don’t be discouraged if not everything works out right away. With a little patience and practice, you will soon become a tomato expert
Conclusion
So, there you have it! Transforming your tomato garden into a thriving, family-friendly haven is not only achievable but incredibly rewarding. This DIY trick, focusing on companion planting and strategic layout, is a game-changer for anyone looking to maximize their yield, minimize pests, and create a beautiful, engaging space for the whole family. It’s more than just gardening; it’s about fostering a connection with nature, teaching valuable lessons to your children, and enjoying the fruits (or rather, vegetables!) of your labor together.
Why is this a must-try? Because it addresses the core challenges of tomato gardening – pests, disease, and inefficient space utilization – in a holistic and sustainable way. Companion planting, as we’ve discussed, naturally deters unwanted insects and attracts beneficial ones, reducing the need for harmful pesticides. The strategic layout ensures optimal sunlight exposure and airflow, minimizing the risk of fungal diseases. And most importantly, it transforms your garden into a vibrant ecosystem where everything works in harmony.
But don’t stop there! Feel free to experiment with variations. Try different companion plants based on your local climate and soil conditions. Basil and marigolds are classics, but consider adding nasturtiums to attract aphids away from your tomatoes, or borage to attract pollinators. You can also explore different trellising methods to maximize vertical space and improve air circulation. Consider adding a small seating area within the garden, creating a peaceful spot for relaxation and observation. Perhaps a small water feature to attract birds and beneficial insects. The possibilities are endless!
This DIY trick is not just about growing tomatoes; it’s about creating an experience. It’s about the joy of watching your children’s faces light up as they harvest their first ripe tomato, the satisfaction of knowing you’re providing your family with fresh, healthy food, and the pride of creating a beautiful and sustainable garden.
We wholeheartedly encourage you to try this DIY trick in your own tomato garden. It’s a simple, effective, and incredibly rewarding way to transform your gardening experience. And most importantly, share your experience with us! We’d love to hear about your successes, your challenges, and any variations you’ve tried. Post pictures of your thriving tomato garden, share your tips and tricks, and let’s create a community of passionate gardeners who are dedicated to growing the best tomatoes possible. Let’s cultivate a community where we all learn and grow together, one tomato at a time. So, get your hands dirty, embrace the challenge, and enjoy the delicious rewards of a thriving tomato garden! Remember, a successful tomato garden family plan starts with a little planning and a lot of love.
Frequently Asked Questions (FAQ)
What if I don’t have a lot of space for a tomato garden?
Even if you have limited space, you can still implement many of the principles of this DIY trick. Consider container gardening, using vertical gardening techniques like trellises or stacked planters, and focusing on companion plants that are compact and well-suited for containers. Dwarf or bush tomato varieties are also excellent choices for small spaces. The key is to maximize the space you have and choose plants that are appropriate for your environment. You can even grow tomatoes in hanging baskets!
What are the best companion plants for tomatoes in my specific region?
The best companion plants can vary depending on your climate and soil conditions. However, some general guidelines apply. Basil, marigolds, and nasturtiums are generally beneficial in most regions. For warmer climates, consider adding peppers or eggplant as companions. In cooler climates, try planting spinach or lettuce around your tomatoes. Research local gardening resources or consult with a local nursery to determine the best companion plants for your specific area. Local agricultural extension offices are also a great resource.
How do I protect my tomato plants from pests and diseases organically?
Organic pest and disease control starts with prevention. Ensure your plants have adequate sunlight, water, and nutrients. Companion planting can also help deter pests and attract beneficial insects. If pests do become a problem, consider using organic insecticides like neem oil or insecticidal soap. For fungal diseases, ensure good air circulation around your plants and avoid overhead watering. Copper-based fungicides can also be used as a preventative measure. Regularly inspect your plants for signs of pests or diseases and take action promptly.
How often should I water my tomato plants?
The frequency of watering depends on your climate, soil type, and the size of your plants. Generally, tomato plants need about 1-2 inches of water per week. Water deeply and infrequently, rather than shallowly and frequently. This encourages deep root growth, which makes the plants more drought-tolerant. Check the soil moisture before watering; it should be moist but not soggy. Avoid overhead watering, as this can promote fungal diseases. Drip irrigation or soaker hoses are excellent ways to water tomato plants efficiently.
What kind of fertilizer should I use for my tomato plants?
Tomato plants are heavy feeders and require regular fertilization. Use a balanced fertilizer that is specifically formulated for tomatoes. Look for a fertilizer with a higher phosphorus content, as this promotes fruit development. You can also amend your soil with compost or other organic matter to improve its fertility. Avoid over-fertilizing, as this can lead to excessive foliage growth and reduced fruit production. Follow the instructions on the fertilizer label carefully.
How do I prune my tomato plants?
Pruning tomato plants can improve air circulation, reduce disease, and increase fruit production. Remove suckers (the small shoots that grow between the main stem and the branches) to encourage the plant to focus its energy on fruit development. You can also remove yellowing or diseased leaves. Determinate tomato varieties (bush tomatoes) require less pruning than indeterminate varieties (vining tomatoes). Research the specific pruning requirements for your tomato variety.
How do I involve my family in the tomato garden?
Involving your family in the tomato garden is a great way to teach them about nature, healthy eating, and responsibility. Assign age-appropriate tasks to each family member, such as planting seeds, watering plants, weeding, or harvesting tomatoes. Create a designated area for children to plant their own vegetables or flowers. Make it a fun and educational experience by teaching them about the different parts of the plant, the importance of pollinators, and the benefits of eating fresh, healthy food.
What do I do if my tomato plants are not producing fruit?
There are several reasons why your tomato plants may not be producing fruit. Ensure they are getting enough sunlight (at least 6-8 hours per day). Check the soil pH; tomatoes prefer a slightly acidic soil (pH 6.0-6.8). Make sure they are getting adequate water and nutrients. Pollination can also be a factor; if you are not seeing bees or other pollinators in your garden, you may need to hand-pollinate your tomatoes. Temperature extremes can also affect fruit set; tomatoes prefer temperatures between 70-85°F.
How do I know when my tomatoes are ripe?
The color of the tomato is the best indicator of ripeness. Tomatoes should be fully colored and slightly soft to the touch. They should also easily detach from the vine. The exact color will depend on the tomato variety. Avoid picking tomatoes that are still green or hard, as they will not ripen properly off the vine.
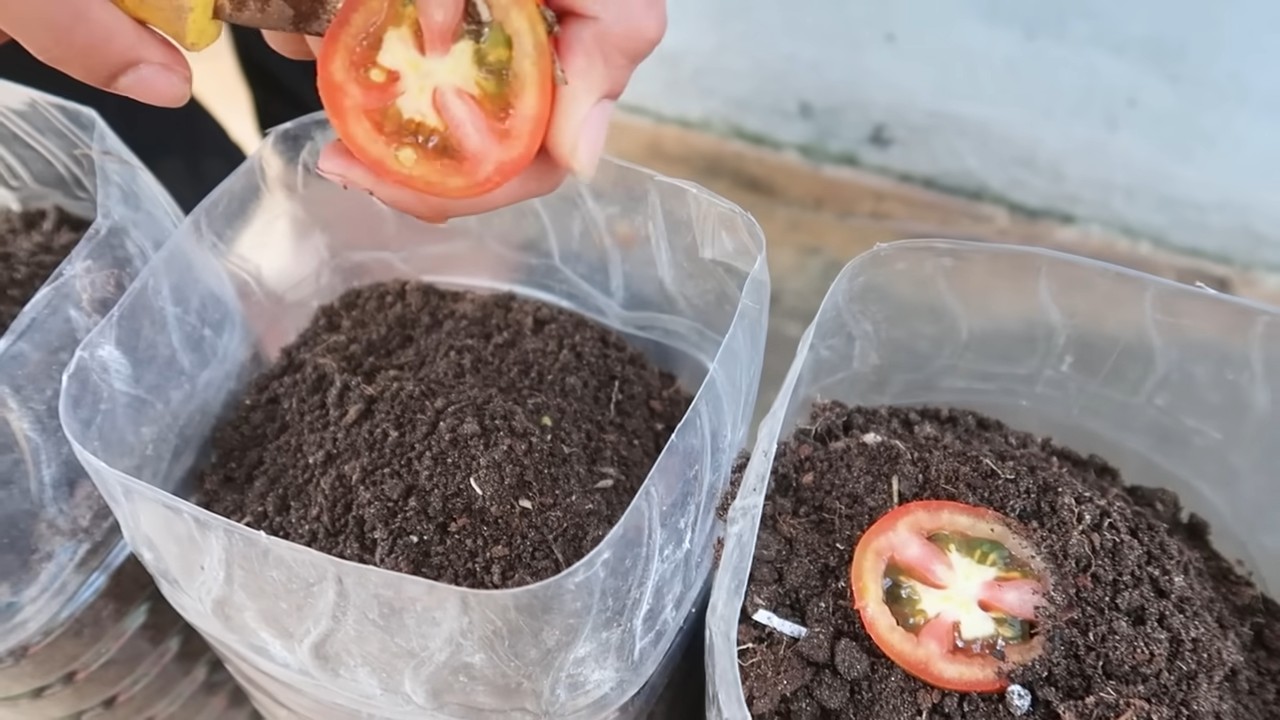
Can I save seeds from my tomato plants to plant next year?
Yes, you can save seeds from your tomato plants, but it’s important to choose open-pollinated or heirloom varieties. Hybrid varieties will not produce true-to-type seeds. To save seeds, allow the tomatoes to fully ripen on the vine. Scoop out the seeds and pulp and place them in a jar with a little water. Let the mixture ferment for a few days, stirring occasionally. This will help remove the gelatinous coating around the seeds. Rinse the seeds thoroughly and spread them out on a paper towel to dry completely. Store the dried seeds in an airtight container in a cool, dark place.

Leave a Comment