
Tire Planter for Butternut Squash: Transform old tires into thriving gardens! Have you ever looked at a pile of discarded tires and thought, “There has to be a better use for these?” Well, you’re in luck! I’m here to show you how to turn those rubber relics into fantastic planters, perfect for growing delicious butternut squash and other vining vegetables.
Upcycling isn’t just a modern trend; repurposing materials has roots in many cultures throughout history. Think of the ancient Romans using broken pottery for drainage in their gardens, or the resourceful communities who have always found ways to make the most of what they have. Today, we’re taking that spirit of ingenuity and applying it to a common waste product: tires.
Why a tire planter for butternut squash, you ask? Because it’s a game-changer! Butternut squash needs space to sprawl, and a tire planter provides a contained, warm environment that encourages healthy growth. Plus, it’s an incredibly budget-friendly and eco-conscious way to garden. Let’s be honest, gardening can be expensive, and finding creative ways to save money while reducing waste is a win-win. This DIY project is perfect for anyone looking to add a touch of rustic charm to their garden while enjoying a bountiful harvest of homegrown butternut squash. So, grab those old tires, and let’s get planting!
DIY Tire Planter for a Bountiful Butternut Squash Harvest
Hey there, fellow gardening enthusiasts! I’m super excited to share a fun and resourceful DIY project with you: creating a tire planter perfect for growing butternut squash (or any other vining plant, really!). Not only is this a great way to recycle old tires, but it also provides a warm, well-draining environment that butternut squash absolutely loves. Let’s get started!
Materials You’ll Need:
* Old tire (or tires, if you want to stack them!)
* Utility knife or jigsaw
* Gloves (essential for handling tires)
* Safety glasses (also essential!)
* Drill with drill bits (for drainage)
* Heavy-duty landscape fabric or burlap
* Staple gun (optional, but helpful for securing fabric)
* Potting mix (lots of it!)
* Butternut squash seedlings or seeds
* Optional: Paint and primer (for decorating the tire)
* Optional: Rocks or gravel (for drainage layer)
Choosing Your Tire and Location:
Before we dive in, let’s talk tire selection. Any size tire will work, but larger tires will give your butternut squash more room to spread its roots. Make sure the tire is relatively clean – you can hose it down if needed. Also, consider the location. Butternut squash needs at least 6-8 hours of sunlight per day, so choose a sunny spot in your yard. Once filled with soil, the tire will be heavy, so pick a permanent location.
Preparing the Tire:
This is where we get our hands a little dirty (or rather, rubbery!).
1. Cleaning the Tire: Give your tire a good scrub with soap and water to remove any dirt, grime, or debris. This will also help the paint adhere better if you decide to decorate it later. Let it dry completely before moving on.
2. Cutting the Tire (Optional): This step is optional, but it can make your planter look more aesthetically pleasing. You can cut off one sidewall of the tire to create a deeper planting area or cut decorative shapes into the tire.
* Using a Utility Knife: This method requires some elbow grease. Score the tire repeatedly along the line you want to cut. Then, carefully work the knife deeper until you cut all the way through. Be extremely cautious, as the knife can slip.
* Using a Jigsaw: This is a faster and easier method, especially for thicker tires. Use a blade designed for cutting rubber or metal. Follow your marked line carefully, and wear safety glasses to protect your eyes from flying debris.
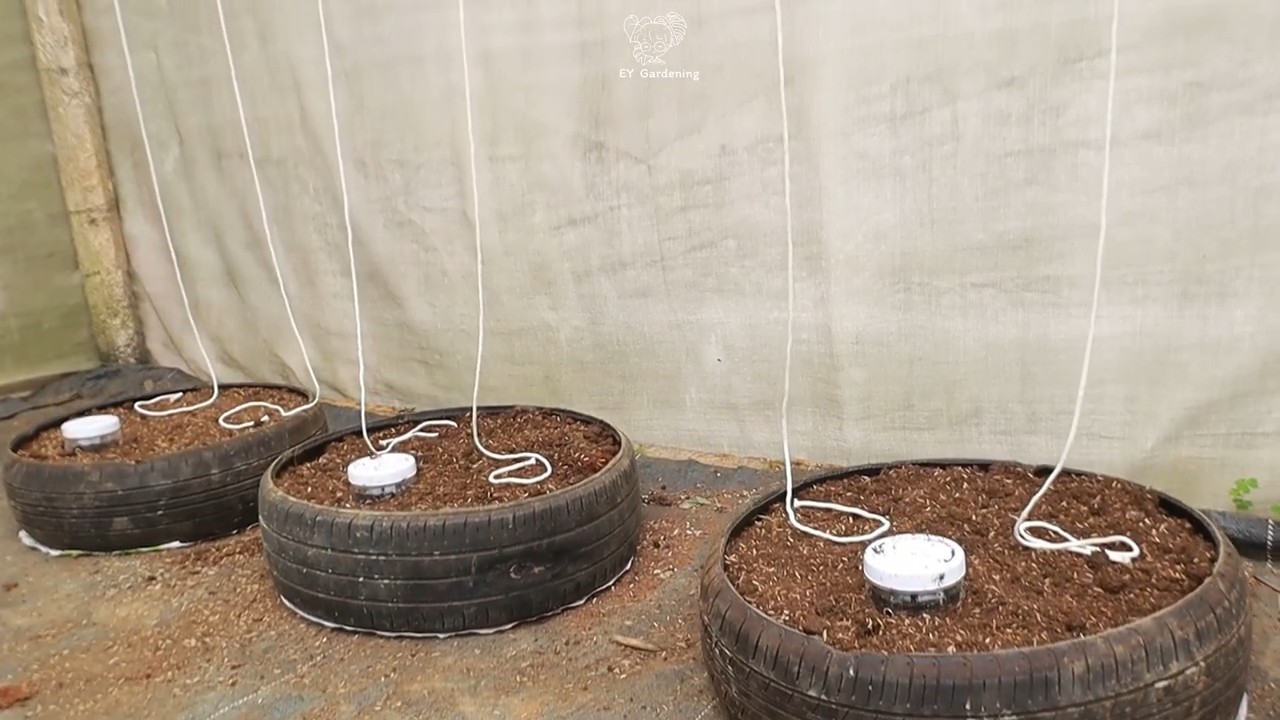
3. Drilling Drainage Holes: This is crucial for preventing waterlogging, which can rot your butternut squash roots. Use a drill with a large drill bit (at least 1/2 inch) to create several drainage holes in the bottom of the tire. Space them evenly around the tire. I usually aim for about 6-8 holes.
4. Painting the Tire (Optional): If you want to add some personality to your planter, now’s the time to paint it!
* Priming: Apply a coat of primer specifically designed for rubber or plastic. This will help the paint adhere better and prevent it from peeling. Let the primer dry completely according to the manufacturer’s instructions.
* Painting: Choose a paint color that complements your garden. You can use spray paint or brush-on paint. Apply several thin coats, allowing each coat to dry completely before applying the next. Get creative with designs! You can stencil patterns, paint flowers, or even create a mosaic effect.
Lining the Tire:
This step prevents the soil from washing out through the drainage holes and keeps the tire from leaching any chemicals into the soil.
1. Measuring the Fabric: Measure the inside circumference and depth of the tire. Cut a piece of landscape fabric or burlap that is large enough to line the entire inside of the tire, with some overlap at the top.
2. Lining the Tire: Place the fabric inside the tire, making sure it covers the bottom and sides completely. Fold the excess fabric over the top edge of the tire.
3. Securing the Fabric (Optional): Use a staple gun to secure the fabric to the inside of the tire. This will keep it in place and prevent it from shifting. If you don’t have a staple gun, you can use heavy-duty tape or simply fold the fabric over the edge and let the soil hold it in place.
Filling the Tire with Soil:
Now for the fun part – creating a cozy home for your butternut squash!
1. Adding a Drainage Layer (Optional): If you live in an area with heavy rainfall or poor drainage, consider adding a layer of rocks or gravel to the bottom of the tire before adding the soil. This will further improve drainage and prevent waterlogging. A 2-3 inch layer should be sufficient.
2. Filling with Potting Mix: Fill the tire with high-quality potting mix. Avoid using garden soil, as it can be too heavy and compact for container gardening. Potting mix is lighter, better draining, and contains essential nutrients for plant growth. Fill the tire almost to the top, leaving a few inches of space.
3. Watering the Soil: Water the soil thoroughly to settle it and remove any air pockets. You may need to add more soil after watering, as it will likely compact down.
Planting Your Butternut Squash:
Time to get those butternut squash babies in their new home!
1. Choosing Seedlings or Seeds: You can start butternut squash from seeds or purchase seedlings from a local nursery. Seedlings will give you a head start, but starting from seeds is more economical.
2. Planting Seedlings: Dig a hole in the soil that is large enough to accommodate the root ball of the seedling. Gently remove the seedling from its container and loosen the roots slightly. Place the seedling in the hole and backfill with soil. Water thoroughly.
3. Planting Seeds: Sow seeds directly into the soil, following the instructions on the seed packet. Typically, you’ll plant seeds about 1 inch deep and space them a few inches apart. Water gently.
4. Spacing: If you’re planting multiple butternut squash plants in the same tire, make sure to space them adequately. Butternut squash vines can get quite large, so give them plenty of room to spread out. I usually recommend planting no more than 2-3 plants in a standard-sized tire.
Caring for Your Butternut Squash:
Now that your butternut squash is planted, it’s time to provide it with the care it needs to thrive.
1. Watering: Butternut squash needs consistent watering, especially during hot, dry weather. Water deeply whenever the top inch of soil feels dry to the touch. Avoid overwatering, as this can lead to root rot.
2. Fertilizing: Butternut squash are heavy feeders, so they need regular fertilization. Use a balanced fertilizer or a fertilizer specifically formulated for vegetables. Follow the instructions on the fertilizer package. I like to use a slow-release fertilizer at planting time and then supplement with liquid fertilizer every few weeks.
3. Sunlight: As mentioned earlier, butternut squash needs at least 6-8 hours of sunlight per day. Make sure your tire planter is located in a sunny spot.
4. Support: Butternut squash vines can get quite long and heavy, so they may need some support. You can use a trellis, stakes, or even just let the vines trail along the ground. If you’re letting the vines trail, make sure to provide them with plenty of space.
5. Pest and Disease Control: Keep an eye out for pests and diseases. Common pests of butternut squash include squash bugs, squash vine borers, and aphids. Common diseases include powdery mildew and downy mildew. Treat any problems promptly with appropriate organic or chemical controls.
6. Pollination: Butternut squash requires pollination to produce fruit. If you’re not seeing any fruit develop, you may need to hand-pollinate the flowers. To do this, use a small paintbrush to transfer pollen from the male flowers to the female flowers. Male flowers have a long, thin stem, while female flowers have a small, immature fruit at the base.
Harvesting Your Butternut Squash:
The moment we’ve all been waiting for – harvesting your delicious butternut squash!
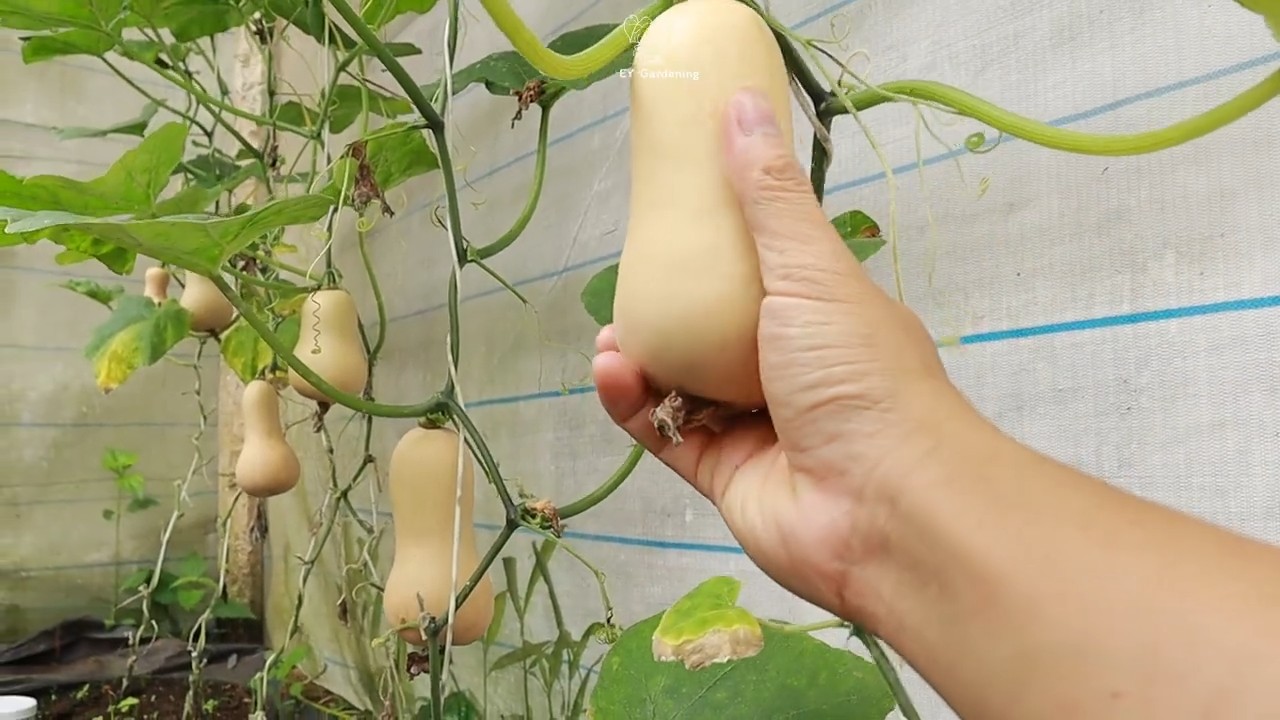
1. When to Harvest: Butternut squash is typically ready to harvest in the fall, about 90-100 days after planting. The squash should be a deep tan color and the skin should be hard. You should not be able to easily pierce the skin with your fingernail.
2. How to Harvest: Use a sharp knife or pruners to cut the squash from the vine, leaving a few inches of stem attached. This will help the squash store longer.
3. Curing: Cure the squash in a warm, dry place for about 1-2 weeks. This will help the skin harden and improve the flavor.
4. Storing
Conclusion
So, there you have it! Transforming an old tire into a thriving butternut squash planter isn’t just about upcycling; it’s about creating a warmer, more productive environment for your squash to flourish. We’ve walked you through the simple steps, highlighting the benefits of this DIY project, from improved soil temperature to enhanced drainage. But why is this particular DIY trick a must-try?
Firstly, the tire acts as a thermal mass, absorbing heat during the day and slowly releasing it at night. This creates a microclimate that’s especially beneficial for butternut squash, which thrives in warmer conditions. This is particularly useful in regions with shorter growing seasons or cooler summers. Secondly, the raised bed created by the tire improves drainage, preventing root rot, a common problem for squash plants. Finally, it’s an incredibly cost-effective and environmentally friendly way to repurpose old tires, keeping them out of landfills and giving them a new lease on life.
But don’t stop there! Feel free to experiment with variations. Consider painting the tire a lighter color to reflect more sunlight in hotter climates, or adding a layer of reflective material inside the tire to further enhance the thermal effect. You could also create a tiered planter by stacking multiple tires, allowing you to grow other companion plants alongside your butternut squash, such as marigolds to deter pests or herbs like basil to enhance flavor. Another exciting variation is to cut the tire in half and create two smaller planters, perfect for smaller gardens or balconies. You can even get creative with the design, cutting out patterns or shapes in the tire sidewall for a more decorative look. Remember to always prioritize safety when cutting or modifying tires, using appropriate tools and protective gear.
We strongly encourage you to give this DIY tire planter for butternut squash a try. It’s a rewarding project that’s both good for your garden and good for the planet. The satisfaction of harvesting your own homegrown butternut squash, knowing you played a part in creating the perfect growing environment, is truly unmatched.
Once you’ve built your tire planter and planted your butternut squash, we’d love to hear about your experience! Share your photos, tips, and any variations you’ve tried in the comments below. Let’s create a community of gardeners who are passionate about upcycling and growing their own food. Your insights could inspire others to embark on this rewarding DIY journey. Don’t forget to tell us about the size of your tire, the type of soil you used, and any challenges you encountered along the way. We’re all here to learn from each other and grow together! So, get your hands dirty, get creative, and get growing! We can’t wait to see your amazing butternut squash tire planters!
FAQ
What type of tire is best for a butternut squash planter?
Ideally, you want a tire that’s in relatively good condition, meaning it doesn’t have any major cracks or damage. The size of the tire will depend on the space you have available and the number of butternut squash plants you plan to grow. A standard car tire is usually sufficient for one or two plants. Larger truck tires can accommodate more plants and provide even better thermal mass. Avoid using tires that are heavily worn or have exposed steel belts, as these can be more difficult to work with and may pose a safety hazard. Also, consider the aesthetic appeal of the tire. Some tires have more interesting tread patterns than others, which can add a unique touch to your planter.
Is it safe to grow food in tires? Are there any chemicals that could leach into the soil?
This is a common concern, and it’s important to address it. While tires do contain chemicals, the risk of significant leaching into the soil is generally considered low, especially with proper precautions. The primary concern is the potential leaching of zinc, which is used in tire manufacturing. However, the amount of zinc that leaches out is typically minimal and unlikely to pose a significant health risk, especially if you take steps to mitigate it.
To minimize any potential leaching, consider lining the inside of the tire with a layer of plastic or landscape fabric. This will create a barrier between the tire and the soil, preventing direct contact. You can also use a high-quality potting mix that’s specifically formulated for vegetable gardening, as these mixes often contain beneficial microbes that can help to break down any potential contaminants. Another option is to avoid planting directly against the tire wall, leaving a few inches of space between the plant roots and the tire. Finally, ensure that you’re using tires that are in relatively good condition and haven’t been exposed to excessive wear and tear, as this can increase the likelihood of leaching.
How do I prepare the tire before planting?
Preparing the tire is crucial for creating a healthy growing environment for your butternut squash. First, thoroughly clean the tire with soap and water to remove any dirt, debris, or oil residue. This will also help to improve the adhesion of any paint or sealant you plan to apply. Next, inspect the tire for any sharp edges or protruding wires that could pose a safety hazard. If you find any, carefully trim them off with a utility knife or wire cutters.
If you plan to paint the tire, now is the time to do it. Use an exterior-grade paint that’s designed to withstand the elements. Lighter colors are generally recommended, as they reflect more sunlight and help to keep the soil cooler in hot climates. Apply several coats of paint, allowing each coat to dry completely before applying the next.
Finally, consider drilling drainage holes in the bottom of the tire to prevent waterlogging. Use a drill with a large drill bit to create several holes evenly spaced around the tire. This will ensure that excess water can drain away freely, preventing root rot and other moisture-related problems.
What kind of soil should I use for my butternut squash tire planter?
The type of soil you use is critical for the success of your butternut squash. Butternut squash plants need well-draining soil that’s rich in organic matter. A good option is to use a mix of equal parts compost, topsoil, and perlite or vermiculite. Compost provides essential nutrients and improves soil structure, while topsoil provides a good base for the plants to grow. Perlite or vermiculite helps to improve drainage and aeration, preventing the soil from becoming compacted.
Avoid using heavy clay soil, as it tends to retain too much water and can suffocate the roots of the plants. If your soil is naturally clay-heavy, amend it with plenty of compost and organic matter to improve its drainage. You can also add a layer of gravel or rocks to the bottom of the tire to further improve drainage.
Before planting, test the soil pH to ensure that it’s within the optimal range for butternut squash, which is between 6.0 and 7.0. If the soil is too acidic, add lime to raise the pH. If it’s too alkaline, add sulfur to lower the pH.
How often should I water my butternut squash plants in a tire planter?
Watering frequency will depend on several factors, including the weather, the type of soil you’re using, and the size of the plants. As a general rule, butternut squash plants need about 1 inch of water per week. However, during hot, dry weather, you may need to water them more frequently.
Check the soil moisture regularly by sticking your finger into the soil about an inch deep. If the soil feels dry to the touch, it’s time to water. Water deeply and thoroughly, ensuring that the water reaches the roots of the plants. Avoid watering the foliage, as this can encourage fungal diseases.
Tire planters tend to dry out more quickly than in-ground gardens, so it’s important to monitor the soil moisture closely. You may also want to consider using a soaker hose or drip irrigation system to provide a consistent and efficient source of water.
How do I fertilize my butternut squash plants in a tire planter?
Butternut squash plants are heavy feeders and require regular fertilization to produce a good crop. Start by incorporating a slow-release fertilizer into the soil at planting time. This will provide a steady supply of nutrients to the plants throughout the growing season.
In addition to the slow-release fertilizer, you can also supplement with liquid fertilizer every two to three weeks. Use a balanced fertilizer that’s specifically formulated for vegetable gardening. Follow the instructions on the fertilizer label carefully, and avoid over-fertilizing, as this can damage the plants.
You can also use organic fertilizers, such as compost tea or fish emulsion. These are gentle and effective ways to provide nutrients to your butternut squash plants.
How do I protect my butternut squash plants from pests and diseases in a tire planter?
Pests and diseases can be a major problem for butternut squash plants, but there are several things you can do to protect them. Start by choosing disease-resistant varieties of butternut squash. These varieties are less susceptible to common diseases, such as powdery mildew and squash vine borers.
Inspect your plants regularly for signs of pests or diseases. If you find any, take action immediately to prevent them from spreading. Hand-picking pests, such as squash bugs and cucumber beetles, can be an effective way to control them. You can also use insecticidal soap or neem oil to control pests.
To prevent diseases, ensure that your plants have good air circulation and are not overcrowded. Water them in the morning so that the foliage has time to dry before nightfall. You can also use a fungicide to prevent or treat fungal diseases.
Finally, consider using companion planting to deter pests
Leave a Comment