
Sweet Potato Grow Bag DIY: Unlock the secrets to bountiful harvests right on your patio! Have you ever dreamt of digging into your own homegrown sweet potatoes, bursting with flavor and freshness? I know I have! But maybe you thought you needed acres of land to make it happen. Well, think again! This DIY guide will show you how to cultivate these delicious tubers in a simple, space-saving grow bag, perfect for even the smallest balconies or backyards.
Sweet potatoes have a rich history, dating back thousands of years in Central and South America. They were a staple food for many ancient civilizations and have since spread across the globe, becoming a beloved ingredient in countless cuisines. Beyond their culinary appeal, sweet potatoes are packed with nutrients, making them a healthy and rewarding addition to your diet.
But why a grow bag? Well, traditional gardening can be intimidating, requiring extensive soil preparation and constant weeding. A sweet potato grow bag DIY project simplifies the process, offering better drainage, temperature control, and easier harvesting. Plus, it’s a fantastic way to recycle old materials and reduce your environmental footprint. In this article, I’ll guide you through each step, from choosing the right materials to nurturing your plants for a successful harvest. Get ready to experience the joy of growing your own sweet potatoes – it’s easier than you think!
DIY Sweet Potato Grow Bag: Bountiful Harvests in Small Spaces!
Hey there, fellow gardening enthusiasts! Are you dreaming of homegrown sweet potatoes but short on space? Well, I’ve got the perfect solution for you: a DIY sweet potato grow bag! This method is fantastic because it’s easy, inexpensive, and allows you to grow a surprising amount of delicious sweet potatoes even on a balcony or patio. Let’s dive in!
What You’ll Need
Before we get started, let’s gather our supplies. This is a pretty straightforward project, so you probably already have some of these items lying around.
* Heavy-duty Woven Polypropylene Bag: This is your grow bag! Look for a bag that’s at least 24 inches in diameter and 24 inches tall. You can often find these at feed stores or garden centers. Burlap sacks can also work, but they might not last as long.
* Potting Mix: A good quality potting mix is crucial. Avoid using garden soil directly, as it can compact and hinder root growth. I recommend a mix that’s well-draining and contains compost or other organic matter.
* Sweet Potato Slips: These are sprouted sweet potatoes, and they’re what you’ll plant. You can buy them online or at your local nursery. You can even grow your own from a sweet potato you bought at the grocery store! (More on that later.)
* Watering Can or Hose: For, well, watering!
* Scissors or Utility Knife: For making drainage holes.
* Optional: Slow-Release Fertilizer: This will give your sweet potatoes an extra boost.
* Optional: Mulch: Helps retain moisture and suppress weeds. Straw or wood chips work great.
Preparing Your Grow Bag
Okay, let’s get our hands dirty! The first step is prepping the grow bag itself.
1. Create Drainage Holes: This is super important! Sweet potatoes need well-drained soil. Using your scissors or utility knife, carefully poke several drainage holes in the bottom of the bag. I usually make about 6-8 holes, spaced evenly.
2. Reinforce the Bag (Optional): If you’re using a thinner bag, you might want to reinforce it. You can do this by lining the inside with a layer of landscape fabric or even another thinner bag with drainage holes. This will help prevent the bag from tearing as it gets heavier.
3. Position Your Bag: Before you fill it with soil, decide where you want your grow bag to live. Once it’s full, it’ll be heavy and difficult to move. Choose a spot that gets at least 6-8 hours of sunlight per day. Sweet potatoes are sun-loving plants!
Planting Your Sweet Potato Slips
Now for the fun part: planting!
1. Fill the Bag Partially: Start by filling the bag about one-third full with your potting mix. Gently pat it down to remove any large air pockets.
2. Add Fertilizer (Optional): If you’re using slow-release fertilizer, now’s the time to add it. Follow the instructions on the fertilizer package for the correct amount. Mix it into the top layer of the potting mix.
3. Plant the Slips: Carefully remove the sweet potato slips from their containers. Gently loosen the roots. Dig a small hole in the potting mix and plant the slip, burying the roots and the bottom part of the stem. Space the slips about 8-12 inches apart. If you’re only planting a few slips, you can plant them in the center of the bag.
4. Fill the Bag with More Soil: Continue filling the bag with potting mix, leaving about 2-3 inches of space at the top. Gently pat down the soil around the slips.
5. Water Thoroughly: Give your newly planted slips a good watering. Water slowly and deeply, until the water drains out of the drainage holes. This will help settle the soil and encourage root growth.
6. Add Mulch (Optional): If you’re using mulch, spread a layer of straw or wood chips around the base of the plants. This will help retain moisture, suppress weeds, and keep the soil cool.
Caring for Your Sweet Potato Plants
Okay, your sweet potato slips are planted! Now it’s time to nurture them and watch them grow.
1. Watering: Sweet potatoes need consistent moisture, especially during hot weather. Water deeply whenever the top inch of soil feels dry to the touch. Avoid overwatering, as this can lead to root rot.
2. Fertilizing: If you didn’t use slow-release fertilizer, you can fertilize your sweet potato plants every few weeks with a balanced liquid fertilizer. Follow the instructions on the fertilizer package.
3. Sunlight: Make sure your sweet potato plants are getting plenty of sunlight. They need at least 6-8 hours of direct sunlight per day.
4. Weeding: Keep the area around your sweet potato plants free of weeds. Weeds can compete with your plants for nutrients and water.
5. Pest Control: Keep an eye out for pests, such as aphids or flea beetles. If you notice any pests, you can treat them with insecticidal soap or neem oil.
6. Hilling (Optional): As your sweet potato vines grow, you can “hill” them by adding more soil around the base of the plants. This encourages more root development and can lead to a larger harvest. Simply add a few inches of potting mix around the base of the plants every few weeks.
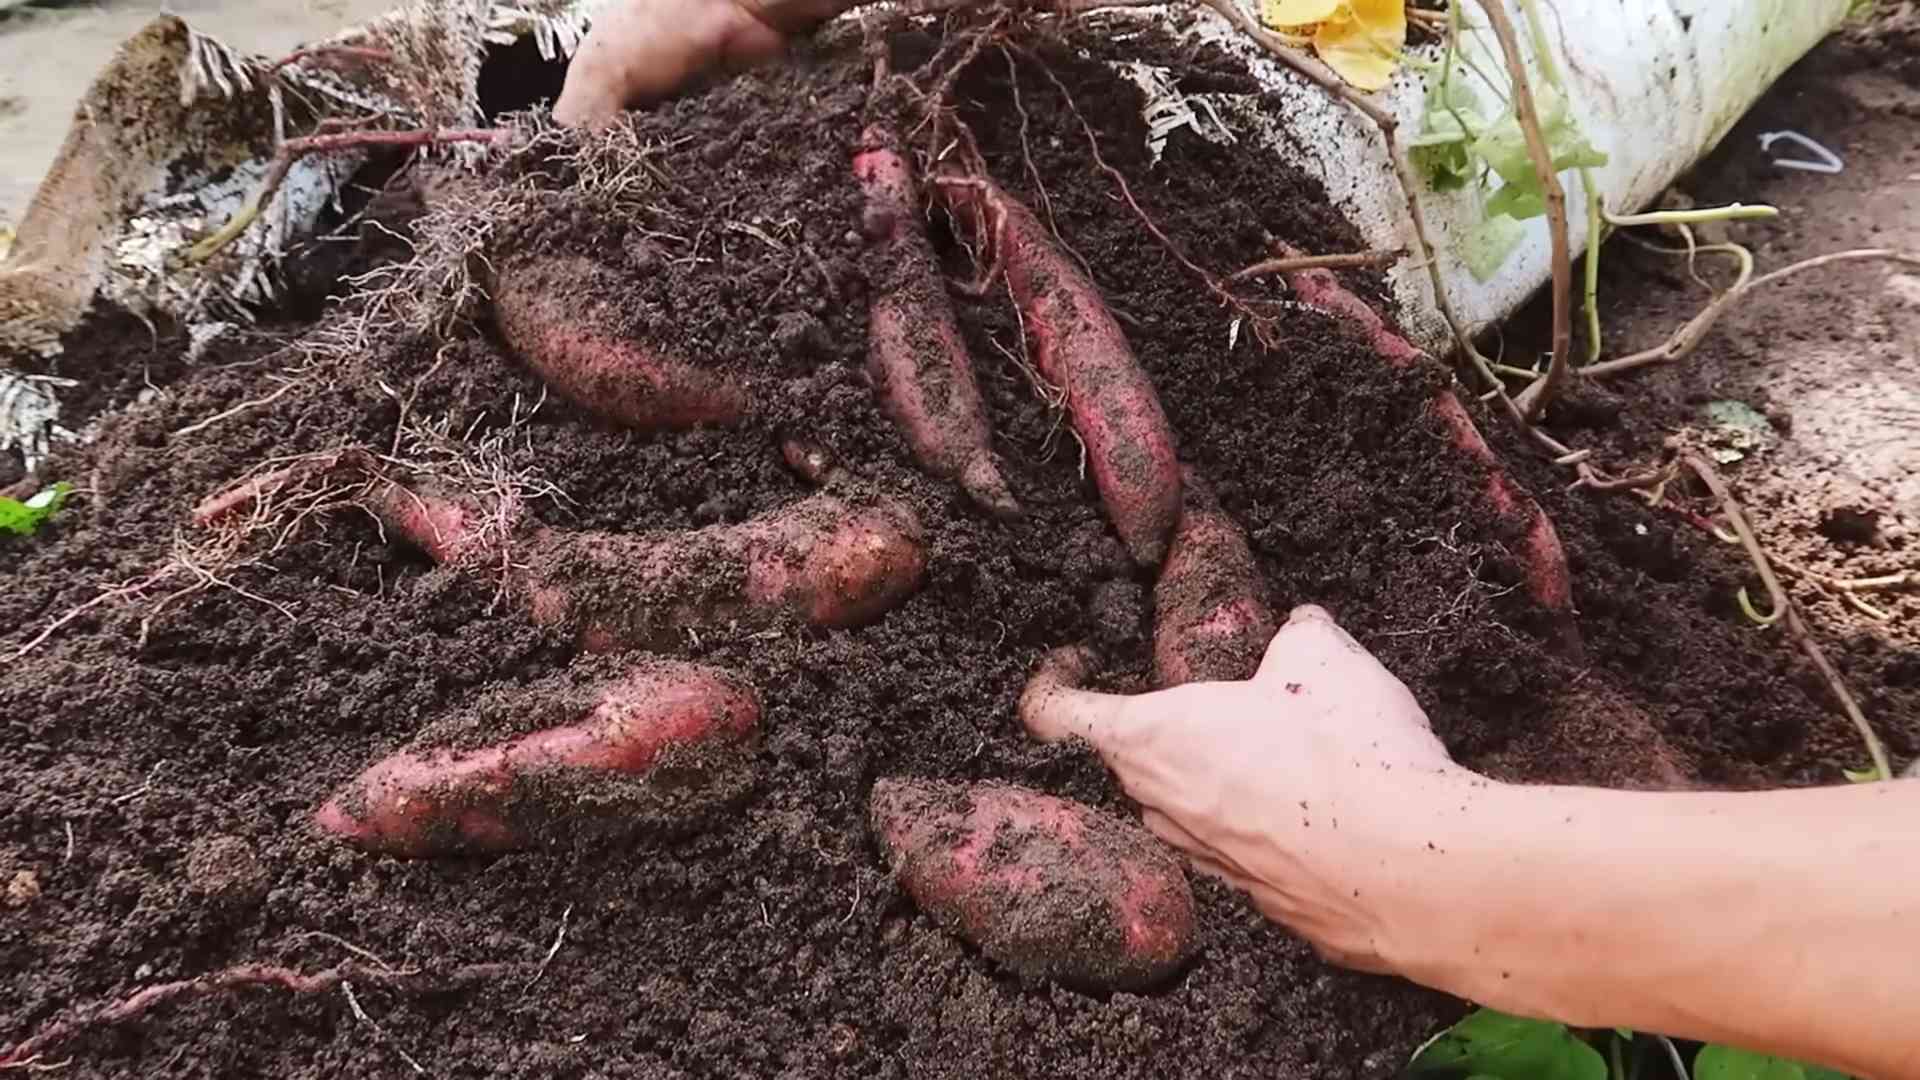
Harvesting Your Sweet Potatoes
The moment we’ve all been waiting for: harvest time!
1. Timing: Sweet potatoes typically take about 90-120 days to mature. You’ll know they’re ready to harvest when the vines start to turn yellow and die back. This usually happens in the fall, before the first frost.
2. Harvesting: The easiest way to harvest sweet potatoes from a grow bag is to simply dump the bag out onto a tarp or other surface. Gently loosen the soil and carefully dig out the sweet potatoes. Be careful not to damage the sweet potatoes as you dig.
3. Curing: After harvesting, sweet potatoes need to be cured. This process helps them develop their sweetness and flavor, and it also helps them store longer. To cure sweet potatoes, place them in a warm, humid place (around 80-85°F and 85-90% humidity) for about 7-10 days. You can use a greenhouse, a shed, or even a spare room with a humidifier.
4. Storing: After curing, store your sweet potatoes in a cool, dry place (around 55-60°F). They should keep for several months.
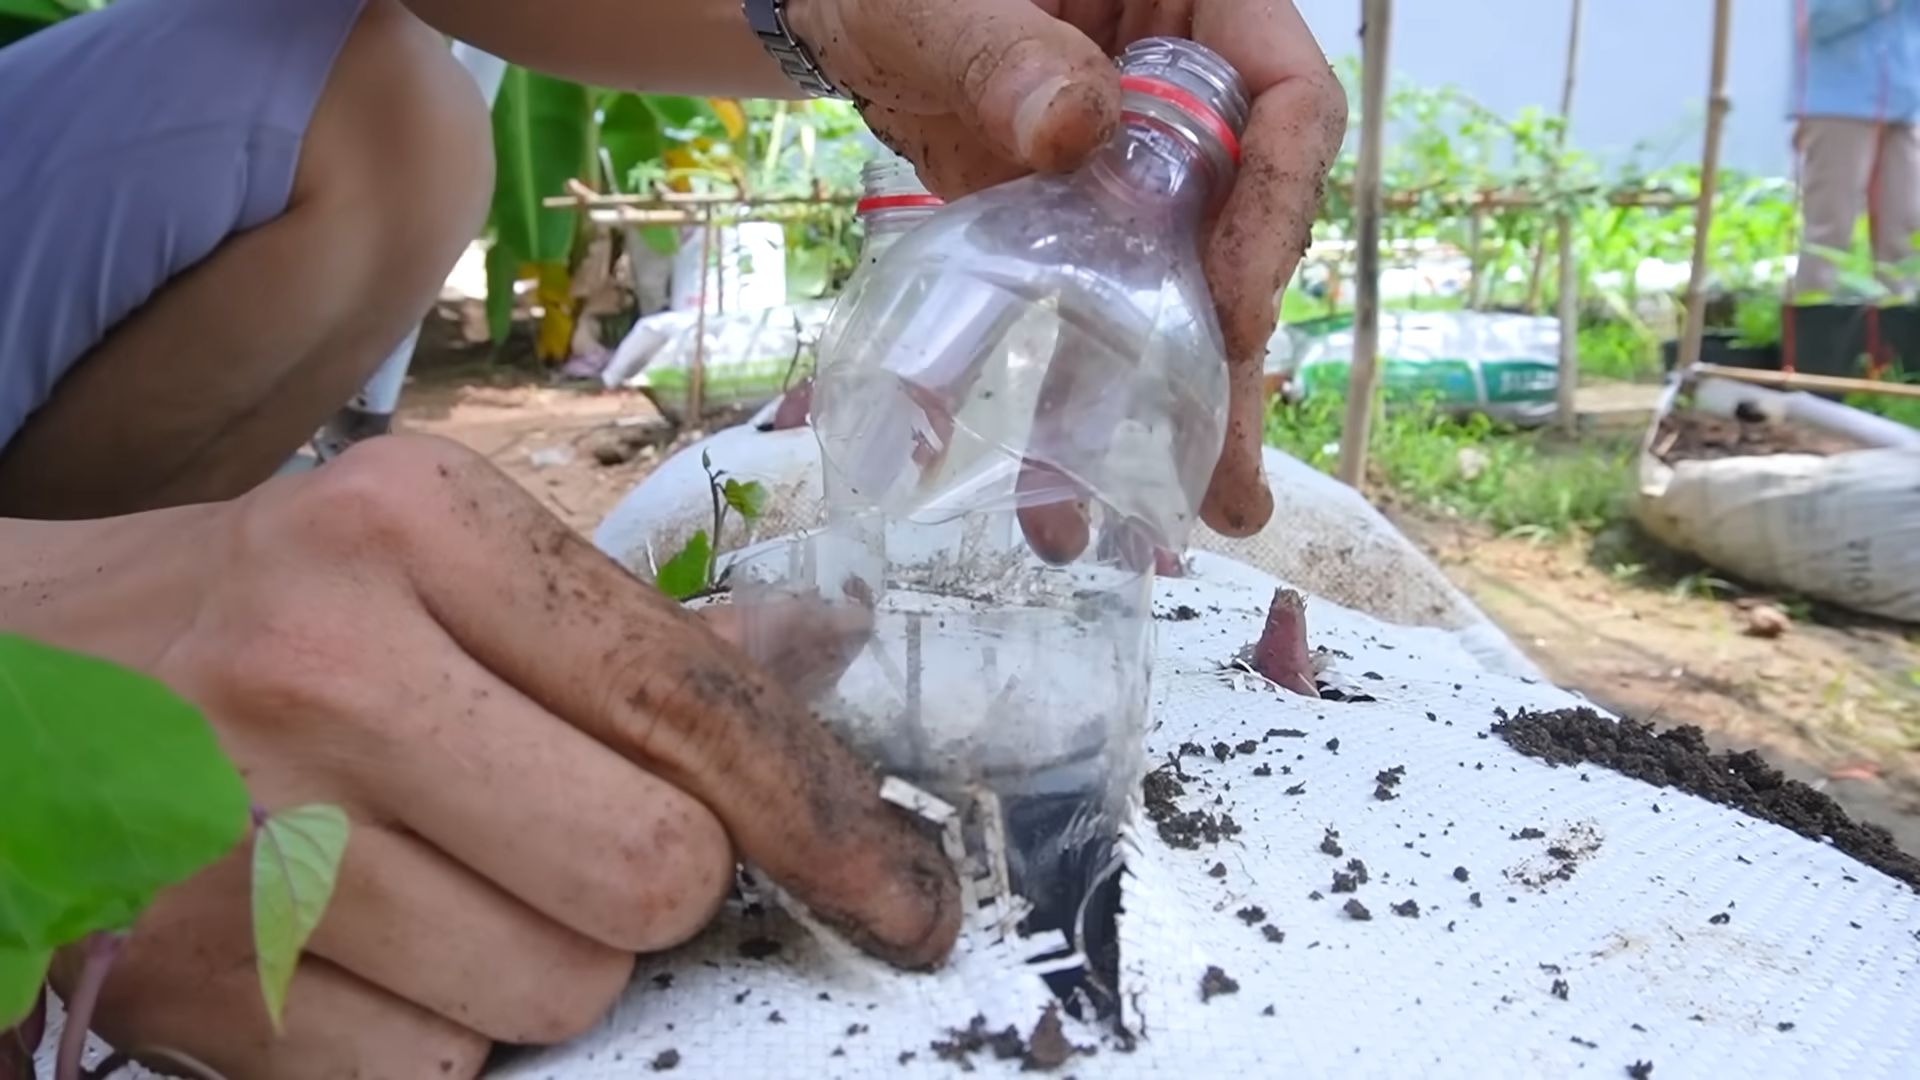
Growing Your Own Sweet Potato Slips
Remember I mentioned growing your own slips? It’s easier than you think!
1. Choose a Sweet Potato: Select a healthy sweet potato from the grocery store or farmer’s market. Look for one that’s firm and free of blemishes.
2. Suspend the Sweet Potato: There are two main methods for sprouting a sweet potato:
* Water Method: Insert toothpicks around the middle of the sweet potato and suspend it over a jar or glass of water, with the bottom half submerged.
* Soil Method: Bury the sweet potato horizontally in a container filled with moist potting mix, leaving the top exposed.
3. Provide Warmth and Light: Place the sweet potato in a warm, sunny location.
4. Wait and Watch: In a few weeks, you should start to see sprouts emerging from the sweet potato. These sprouts will eventually grow into slips.
5. Harvest the Slips: Once the slips are about 6-8 inches long, carefully twist them off the sweet potato.
6. Root the Slips: Place the slips in a jar of water, with the bottom inch or two submerged. In a few days, they should start to develop roots.
7. Plant the Slips: Once the slips have a good root system, they’re ready to plant in your grow bag!
Troubleshooting
Even with the best planning, sometimes things don’t go exactly as expected. Here are a few common problems you might encounter and how to fix them:
* Yellowing Leaves: This could be a sign of overwatering, underwatering, or nutrient deficiency. Check the soil moisture and adjust your watering schedule accordingly. If you suspect a nutrient deficiency, fertilize with a balanced fertilizer.
* Slow Growth: This could be due to lack of sunlight, poor soil, or pests. Make sure your plants are getting enough sunlight and that the soil is well-draining and fertile. Check for pests and treat them accordingly.
* Root Rot: This is caused by overwatering. Make sure your grow bag has good drainage and avoid watering too frequently. If you suspect root rot, you can try
Conclusion
So, there you have it! Transforming a simple bag into a thriving sweet potato haven is not only incredibly rewarding but also surprisingly easy. This Sweet Potato Grow Bag DIY project offers a fantastic way to cultivate your own delicious and nutritious sweet potatoes, even if you’re short on space or gardening experience. Forget those expensive store-bought sweet potatoes – imagine the satisfaction of harvesting your own, knowing exactly where they came from and how they were grown.
But why is this DIY trick a must-try? Firstly, it’s incredibly space-efficient. Grow bags are perfect for balconies, patios, or small gardens, allowing you to maximize your growing potential in limited areas. Secondly, it provides excellent drainage and aeration for your sweet potatoes, promoting healthy root development and preventing waterlogging, a common issue with traditional in-ground gardening. Thirdly, it’s cost-effective. You can often repurpose materials you already have at home, making it a budget-friendly way to expand your gardening endeavors. And finally, it’s incredibly satisfying! There’s nothing quite like nurturing a plant from start to finish and then enjoying the fruits (or in this case, vegetables) of your labor.
Looking to add your own personal touch? Consider these variations:
* **Vertical Sweet Potato Tower:** Stack multiple grow bags on top of each other to create a vertical sweet potato tower. This is a great option for maximizing space and adding visual interest to your garden.
* **Companion Planting:** Plant companion herbs like basil or marigolds around your sweet potato plants to deter pests and attract beneficial insects.
* **Soil Amendments:** Experiment with different soil amendments to find what works best for your sweet potatoes. Compost, worm castings, and aged manure can all improve soil fertility and drainage.
* **Variety is the Spice of Life:** Don’t limit yourself to just one variety of sweet potato! Try growing different types, such as Beauregard, Garnet, or Japanese sweet potatoes, to discover your favorites.
We wholeheartedly encourage you to give this Sweet Potato Grow Bag DIY a try. It’s a fun, educational, and rewarding project that will bring you closer to nature and provide you with a delicious harvest. Once you’ve created your own sweet potato grow bag and started seeing those vibrant vines emerge, we’d love to hear about your experience! Share your photos, tips, and tricks with us in the comments below. Let’s build a community of sweet potato enthusiasts and inspire others to embrace the joy of DIY gardening. Happy growing!
Frequently Asked Questions (FAQ)
What kind of bag should I use for my sweet potato grow bag?
The ideal bag is a durable, breathable fabric bag, such as a burlap sack, a heavy-duty landscape fabric bag, or even a repurposed feed bag. Avoid using plastic bags, as they don’t allow for proper drainage and can lead to root rot. The bag should be at least 18 inches in diameter and 18 inches deep to provide ample space for the sweet potatoes to develop. The larger the bag, the more sweet potatoes you can potentially grow. Consider the weight of the soil when choosing your bag material; it needs to be strong enough to hold the weight without tearing.
What type of soil is best for growing sweet potatoes in a grow bag?
Sweet potatoes thrive in well-draining, sandy loam soil that is rich in organic matter. A good mix would be equal parts of garden soil, compost, and sand or perlite. The compost provides essential nutrients, while the sand or perlite improves drainage. Avoid using heavy clay soil, as it can become waterlogged and hinder root development. You can also purchase a pre-made potting mix specifically formulated for vegetables. Before planting, amend the soil with a slow-release fertilizer to provide a steady supply of nutrients throughout the growing season.
How often should I water my sweet potato grow bag?
Water your sweet potato grow bag regularly, especially during hot and dry weather. The soil should be kept consistently moist, but not waterlogged. Check the soil moisture by sticking your finger about an inch deep into the soil. If it feels dry, it’s time to water. Water deeply, allowing the water to drain out of the bottom of the bag. Avoid overhead watering, as it can lead to fungal diseases. Mulching around the base of the plants can help retain moisture and suppress weeds.
How much sunlight do sweet potatoes need?
Sweet potatoes need at least 6-8 hours of direct sunlight per day to thrive. Choose a location for your grow bag that receives plenty of sunlight throughout the day. If you live in a particularly hot climate, some afternoon shade may be beneficial to prevent the plants from overheating. If you don’t have a sunny location, you can supplement with grow lights.
When is the best time to plant sweet potato slips in a grow bag?
The best time to plant sweet potato slips is in the late spring or early summer, after the last frost has passed and the soil has warmed up to at least 65 degrees Fahrenheit. Sweet potatoes are warm-season crops and are sensitive to frost. You can purchase sweet potato slips from a local nursery or garden center, or you can grow your own from a sweet potato.
How do I know when my sweet potatoes are ready to harvest?
Sweet potatoes are typically ready to harvest about 90-120 days after planting. The leaves will start to turn yellow and the vines will begin to die back. To check if the sweet potatoes are ready, gently dig around the base of the plant and feel for the potatoes. If they are a good size and have a smooth skin, they are ready to harvest. Be careful not to damage the potatoes when digging them up.
How do I cure sweet potatoes after harvesting?
Curing sweet potatoes is essential for improving their flavor and storage life. After harvesting, gently brush off any excess soil and allow the sweet potatoes to dry in a warm, humid place (80-85 degrees Fahrenheit and 85-90% humidity) for about 7-10 days. This allows the skins to harden and any minor cuts or bruises to heal. After curing, store the sweet potatoes in a cool, dry, and well-ventilated place (55-60 degrees Fahrenheit) for several months.
Can I reuse the soil in my sweet potato grow bag?
Yes, you can reuse the soil in your sweet potato grow bag, but it’s important to replenish the nutrients that have been depleted. After harvesting your sweet potatoes, remove any remaining plant debris and amend the soil with compost, aged manure, or a slow-release fertilizer. You may also want to add some fresh potting mix to improve drainage and aeration. Consider rotating your crops each year to prevent the buildup of soilborne diseases.
What are some common pests and diseases that affect sweet potatoes?
Some common pests that affect sweet potatoes include sweet potato weevils, flea beetles, and aphids. Common diseases include fungal diseases like stem rot and black rot. To prevent pests and diseases, choose disease-resistant varieties, practice good sanitation, and avoid overwatering. You can also use organic pest control methods, such as insecticidal soap or neem oil.
Can I grow sweet potatoes in a grow bag indoors?
While it’s possible to grow sweet potatoes in a grow bag indoors, it can be challenging to provide them with the necessary sunlight and warmth. You’ll need to provide supplemental lighting with grow lights and ensure that the temperature is consistently warm. Indoor-grown sweet potatoes may not produce as large of a harvest as those grown outdoors.

Leave a Comment