
Soil-free sprouting at home might sound like something out of a science fiction movie, but trust me, it’s easier than baking a cake! Forget messy soil and complicated setups; we’re diving into a world where fresh, nutritious sprouts are just a few days away, all without getting your hands dirty.
Sprouting, in its essence, is an ancient practice. Cultures around the globe, from ancient China to the Middle East, have long recognized the incredible nutritional power packed into these tiny seedlings. Think of it as unlocking the hidden potential within a seed, transforming it into a powerhouse of vitamins and enzymes.
But why should you bother with soil-free sprouting at home? In today’s fast-paced world, we’re all looking for ways to eat healthier, save money, and connect with our food. Sprouts are a fantastic way to do all three! They’re incredibly nutrient-dense, often cheaper than buying mature vegetables, and growing them yourself gives you a sense of accomplishment and control over what you’re eating. Plus, let’s be honest, who doesn’t love a little DIY project that results in delicious, healthy food? This guide will give you all the tips and tricks you need to get started.

Soil-Free Sprouting: A Beginner’s Guide to Growing Nutritious Sprouts at Home
Hey there, fellow food enthusiasts! I’m so excited to share one of my favorite DIY projects with you: soil-free sprouting! It’s a fantastic way to add fresh, nutrient-packed greens to your diet, and it’s surprisingly easy to do right in your kitchen. Forget about messy soil and complicated gardening – we’re going to sprout like pros without getting our hands dirty!
Why Sprout? The Benefits Are Endless!
Before we dive into the how-to, let’s talk about why sprouting is so awesome. Sprouts are basically baby plants, bursting with vitamins, minerals, and enzymes. They’re incredibly nutritious and can boost your immune system, improve digestion, and even give you more energy. Plus, they’re a super sustainable way to grow your own food!
Here’s a quick rundown of the benefits:
* Nutrient Powerhouse: Sprouts are packed with vitamins, minerals, and enzymes, often in higher concentrations than the mature plant.
* Easy Digestion: The sprouting process breaks down complex starches, making sprouts easier to digest.
* Cost-Effective: A small bag of seeds can yield a huge amount of sprouts, saving you money on groceries.
* Year-Round Availability: You can sprout indoors any time of year, regardless of the weather.
* Sustainable: Sprouting requires minimal resources like water and space.
* Fun and Rewarding: It’s so satisfying to watch your sprouts grow from tiny seeds to edible greens!
Choosing Your Seeds: The Foundation of Success
Not all seeds are created equal when it comes to sprouting. You need to use seeds specifically intended for sprouting, as these are guaranteed to be free from harmful chemicals and treatments. Look for seeds labeled “for sprouting” or “for microgreens.”
Here are some popular and easy-to-sprout options:
* Alfalfa: A classic sprouting choice, alfalfa sprouts have a mild, slightly nutty flavor.
* Broccoli: These sprouts have a slightly spicy, radish-like flavor and are packed with antioxidants.
* Radish: Radish sprouts are peppery and add a zesty kick to salads and sandwiches.
* Mung Beans: These are the sprouts you often see in Asian cuisine, with a mild, slightly sweet flavor.
* Lentils: Lentil sprouts are hearty and filling, with a slightly earthy flavor.
* Fenugreek: These sprouts have a slightly bitter, maple-like flavor and are often used in Indian cuisine.
* Quinoa: A complete protein source, quinoa sprouts are mild and slightly nutty.
Important Note: Avoid sprouting seeds that are intended for planting in the garden, as they may be treated with chemicals that are not safe for consumption. Also, avoid sprouting beans like kidney beans, which are toxic when raw.
What You’ll Need: Gathering Your Supplies
Okay, let’s get down to business! Here’s what you’ll need to start your soil-free sprouting adventure:
* Sprouting Jar: A wide-mouth mason jar works perfectly. I prefer a quart-sized jar, but you can use any size you like.
* Sprouting Lid or Mesh: You’ll need something to cover the jar that allows for drainage and airflow. You can buy a sprouting lid specifically designed for this purpose, or you can use a piece of cheesecloth or nylon mesh secured with a rubber band.
* Sprouting Stand (Optional): A sprouting stand helps to drain the water properly and allows for better airflow. You can buy one or simply prop the jar at an angle in a bowl.
* Sprouting Seeds: Choose your favorite sprouting seeds from the list above.
* Water: Filtered water is best, but tap water is usually fine as long as it’s safe to drink.
* Bowl: For soaking the seeds.
* Clean Towel: For covering the sprouts during certain stages.
Step-by-Step Guide: From Seed to Sprout
Alright, let’s get sprouting! Here’s a detailed, step-by-step guide to help you grow your own delicious sprouts at home:
Phase 1: Soaking the Seeds
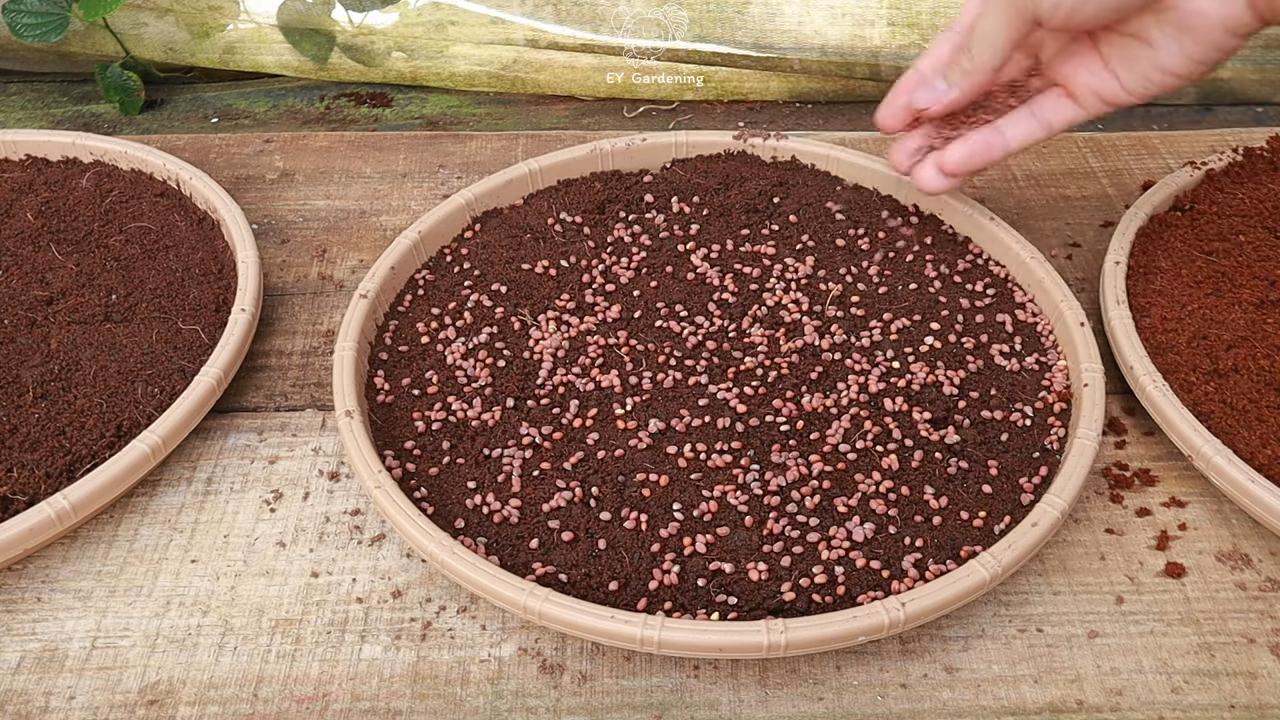
1. Measure Your Seeds: Start with a small amount of seeds. A tablespoon or two is usually enough for a quart-sized jar. Remember, sprouts expand significantly!
2. Rinse the Seeds: Place the seeds in a bowl and rinse them thoroughly with cool water. This removes any debris or dust.
3. Soak the Seeds: Transfer the rinsed seeds to your sprouting jar. Add enough cool water to cover the seeds completely, plus a few extra inches. The seeds will absorb water and expand.
4. Soaking Time: Let the seeds soak for the recommended time. This varies depending on the type of seed:
* Alfalfa: 8-12 hours
* Broccoli: 6-8 hours
* Radish: 6-8 hours
* Mung Beans: 8-12 hours
* Lentils: 8-12 hours
* Fenugreek: 6-8 hours
* Quinoa: 2-4 hours (Quinoa can become bitter if soaked for too long)
5. Drain and Rinse: After the soaking period, drain the water completely using your sprouting lid or mesh. Rinse the seeds thoroughly with fresh, cool water.
Phase 2: Sprouting and Rinsing
1. Position the Jar: Place the jar upside down at an angle in your sprouting stand or a bowl. This allows excess water to drain out and promotes airflow.
2. Rinsing Schedule: Rinse the sprouts 2-3 times per day with fresh, cool water. This is crucial to prevent mold and bacteria growth.
3. Rinsing Technique: To rinse, fill the jar with water, swirl the sprouts around gently, and then drain the water completely.
4. Darkness (Optional): Some sprouts, like alfalfa and broccoli, benefit from being kept in a dark place for the first few days. This encourages them to grow longer and more tender. You can cover the jar with a clean towel or place it in a cupboard.
5. Light Exposure: After a few days, expose the sprouts to indirect sunlight. This will help them develop chlorophyll and turn green. Avoid direct sunlight, as it can overheat the sprouts.
Phase 3: Harvesting and Storing
1. Harvest Time: Your sprouts are ready to harvest when they have developed small leaves and are the desired length. This usually takes 3-7 days, depending on the type of seed and the growing conditions.
2. Final Rinse: Give the sprouts a final rinse before harvesting.
3. Removing Hulls (Optional): Some sprouts, like alfalfa, have hulls (seed coats) that can be removed. To remove hulls, place the sprouts in a large bowl of water and gently agitate them. The hulls will float to the surface and can be skimmed off.
4. Drying: Dry the sprouts thoroughly before storing them. You can use a salad spinner or spread them out on a clean towel and pat them dry.
5. Storage: Store the dried sprouts in an airtight container in the refrigerator. They should last for up to a week.
Troubleshooting: Common Sprouting Problems and Solutions
Even with the best intentions, sometimes things can go wrong. Here are some common sprouting problems and how to fix them:
* Mold Growth: This is usually caused by insufficient rinsing or poor airflow. Make sure to rinse your sprouts 2-3 times per day and ensure that the jar is properly drained. If you see mold, discard the entire batch.
* Slow Growth: This could be due to low temperatures or insufficient light. Try moving the jar to a warmer location or exposing the sprouts to more indirect sunlight.
* Bad Smell: A foul odor indicates that the sprouts are rotting. This is usually caused by overwatering or poor drainage. Discard the batch and start over, making sure to drain the jar thoroughly after each rinse.
* Bitter Taste: Some sprouts, like quinoa, can become bitter if soaked for too long. Reduce the soaking time and make sure to rinse the sprouts thoroughly.
Tips and Tricks for Sprouting Success
Here are a few extra tips to help you become a sprouting master:
* Start Small: Begin with a small amount of seeds until you get the hang of the process.
* Experiment: Try different types of seeds to find your favorites.
* Use Clean Equipment: Wash your sprouting jar and lid thoroughly with soap and water before each use.
* Be Patient: Sprouting takes time, so don’t get discouraged if your first batch isn’t perfect.
* Enjoy the Process: Sprouting is a fun
Conclusion
So, there you have it! Soil-free sprouting at home is not just a trendy kitchen experiment; it’s a game-changer for anyone seeking fresh, nutrient-packed greens without the mess and hassle of traditional gardening. We’ve walked you through the simple steps, highlighting how easy it is to transform humble seeds into vibrant sprouts using nothing more than water, a jar, and a little patience.
Why is this a must-try? Because it’s incredibly convenient. Imagine having a constant supply of fresh sprouts, ready to add a burst of flavor and nutrition to your salads, sandwiches, soups, and smoothies, all grown right on your kitchen counter. No more trips to the grocery store for wilted sprouts that have lost their vitality. No more dealing with soil, pests, or complicated gardening equipment. This method is clean, efficient, and remarkably rewarding.
But the benefits extend beyond convenience. Soil-free sprouting unlocks a world of culinary possibilities. Experiment with different types of seeds to discover your favorite flavor profiles. Try sprouting alfalfa for its mild, nutty taste, or broccoli for its slightly peppery kick. Radish sprouts offer a zesty bite, while mung bean sprouts provide a satisfying crunch. The options are endless!
Consider these variations to personalize your sprouting experience:
* **Sprout Blends:** Combine different types of seeds for a unique flavor and nutrient profile. A mix of alfalfa, clover, and radish sprouts is a popular choice.
* **Sprouting Mediums:** While water is the primary medium, you can experiment with adding a small amount of diluted seaweed extract or other organic fertilizers to the soaking water to boost nutrient content. Be sure to rinse thoroughly afterward.
* **Light Exposure:** While sprouts don’t require direct sunlight, exposing them to indirect light during the final stages of growth can enhance their chlorophyll production, resulting in greener and more flavorful sprouts.
* **Sprout Size:** Harvest your sprouts at different stages of growth to achieve your desired texture and flavor. Some prefer the delicate taste of young sprouts, while others enjoy the more robust flavor of mature sprouts with developed leaves.
Don’t be intimidated by the idea of growing your own food. Soil-free sprouting is one of the easiest and most accessible ways to connect with nature and enjoy the fruits (or rather, sprouts!) of your labor. It’s a fantastic project for families, a great way to introduce children to the wonders of plant growth, and a satisfying hobby for anyone who appreciates fresh, healthy food.
We wholeheartedly encourage you to give this DIY trick a try. Once you experience the joy of harvesting your own homegrown sprouts, you’ll be hooked! And we want to hear all about your experiences. Share your photos, tips, and favorite sprout recipes in the comments below. Let’s create a community of sprout enthusiasts and inspire others to embrace the simplicity and benefits of soil-free sprouting at home. What are you waiting for? Get sprouting!
Frequently Asked Questions (FAQ)
What types of seeds are best for soil-free sprouting?
The best seeds for soil-free sprouting are those specifically labeled for sprouting or microgreens. These seeds have been tested for germination rates and are free from harmful pathogens. Popular choices include alfalfa, broccoli, clover, radish, mung bean, lentil, and sunflower seeds. Avoid using seeds that have been treated with pesticides or fungicides, as these chemicals can be harmful to your health. Always purchase your seeds from a reputable source to ensure quality and safety.
How often should I rinse my sprouts?
Rinsing your sprouts is crucial for preventing mold and bacterial growth. You should rinse them at least twice a day, preferably in the morning and evening. In warmer climates or during humid weather, you may need to rinse them more frequently, up to three or four times a day. Ensure that you drain the sprouts thoroughly after each rinse to prevent them from sitting in stagnant water.
How long does it take for sprouts to grow?
The sprouting time varies depending on the type of seed and the environmental conditions. Generally, most sprouts will be ready to harvest within 3 to 7 days. Alfalfa and clover sprouts typically take 5 to 7 days, while radish and broccoli sprouts may be ready in as little as 3 to 5 days. Mung bean sprouts can be harvested in 2 to 3 days. Keep an eye on your sprouts and harvest them when they reach your desired size and flavor.
How do I prevent mold growth on my sprouts?
Mold growth is a common concern when sprouting, but it can be easily prevented with proper hygiene and ventilation. Ensure that your sprouting jar and equipment are thoroughly cleaned and sanitized before each use. Rinse your sprouts regularly with fresh, clean water and drain them well after each rinse. Provide adequate ventilation by placing your sprouting jar in a well-ventilated area. Avoid overcrowding the jar with too many seeds, as this can restrict airflow and increase the risk of mold growth. If you notice any signs of mold, discard the affected sprouts immediately.
How do I store my harvested sprouts?
Once your sprouts are ready to harvest, rinse them thoroughly and drain them well. Pat them dry with a clean paper towel to remove excess moisture. Store the sprouts in a clean, airtight container in the refrigerator. They should last for up to a week if stored properly. Check the sprouts regularly for any signs of spoilage and discard them if they become slimy or develop an off odor.
Can I sprout seeds that I already have in my pantry?
While you can technically sprout some seeds from your pantry, it’s generally not recommended. Seeds intended for planting are often treated with chemicals to prevent fungal growth, which are not safe for consumption. Additionally, the germination rates of pantry seeds may be lower, and they may not be as fresh or nutritious as seeds specifically intended for sprouting. It’s always best to use seeds that are specifically labeled for sprouting or microgreens to ensure safety and optimal results.
Are there any health benefits to eating sprouts?
Yes! Sprouts are packed with nutrients and offer a wide range of health benefits. They are a rich source of vitamins, minerals, enzymes, and antioxidants. Sprouts are also low in calories and high in fiber, making them a healthy addition to any diet. Eating sprouts can help boost your immune system, improve digestion, and protect against chronic diseases. Different types of sprouts offer different nutritional profiles, so it’s a good idea to incorporate a variety of sprouts into your diet.

Leave a Comment