
Soil-free sprout growing might sound like something out of a sci-fi movie, but trust me, it’s a super accessible and rewarding way to bring fresh, nutritious greens right into your kitchen! Forget messy soil and complicated setups; we’re diving into a world where you can cultivate delicious sprouts with just water, seeds, and a little bit of know-how.
Sprouting, in fact, has a rich history, dating back thousands of years. Ancient cultures, particularly in Asia, recognized the incredible nutritional power packed into these tiny seedlings. They were a vital source of vitamins and minerals, especially during long winters when fresh produce was scarce. Think of it as nature’s original multivitamin!
But why should you be interested in soil-free sprout growing today? Well, in our busy lives, it’s easy to fall short on essential nutrients. Sprouts are a powerhouse of vitamins, minerals, and enzymes, and they’re incredibly easy to digest. Plus, growing them yourself means you know exactly what you’re eating – no pesticides, no hidden ingredients, just pure, fresh goodness. I’m excited to share these simple DIY tricks and hacks that will have you enjoying a constant supply of crunchy, flavorful sprouts in no time. Get ready to ditch the dirt and embrace the clean, efficient world of soil-free sprouting!

Growing Sprouts Without Soil: A Beginner’s Guide
Hey there, fellow sprout enthusiasts! I’m so excited to share my favorite method for growing delicious and nutritious sprouts right in your kitchen, completely soil-free! It’s easier than you think, and the results are incredibly rewarding. Forget about messy soil and potential contamination – this method is clean, simple, and perfect for anyone, even if you don’t have a green thumb.
What You’ll Need
Before we dive in, let’s gather our supplies. The beauty of this method is that you probably already have most of these items at home!
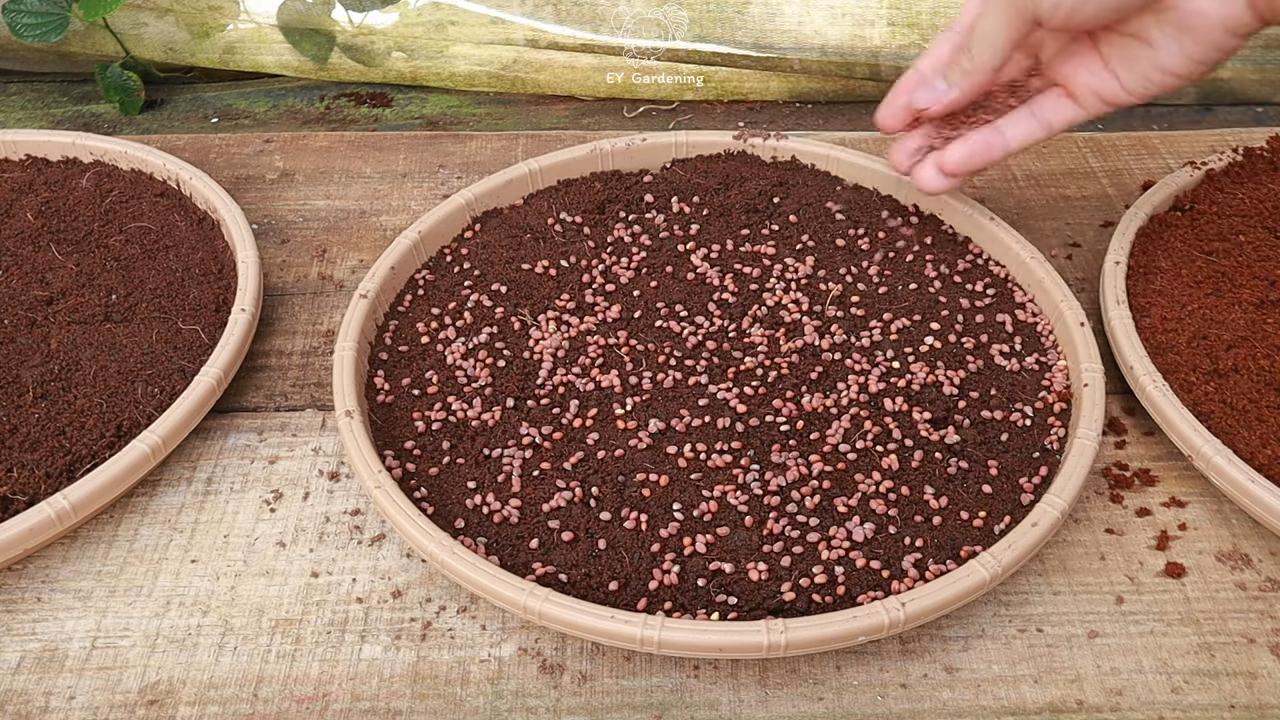
* Sprouting Seeds: This is the most important part! You can use a variety of seeds, such as alfalfa, broccoli, radish, mung beans, lentils, and even quinoa. Make sure you buy seeds specifically labeled for sprouting, as regular seeds may be treated with chemicals.
* Wide-Mouth Mason Jar: A quart-sized jar works perfectly.
* Sprouting Lid or Cheesecloth: You’ll need something to cover the jar and allow for drainage. Sprouting lids are specifically designed for this purpose and are readily available online or at health food stores. Alternatively, you can use a piece of cheesecloth secured with a rubber band.
* Water: Filtered water is best, but tap water is usually fine as long as it’s safe to drink.
* Bowl: To soak the seeds initially.
* Colander or Strainer: For rinsing the sprouts.
* Dark Place: A cupboard or drawer to keep the sprouts in during the initial sprouting phase.
* Patience: Sprouting takes a few days, so be prepared to wait!
Choosing Your Seeds
Choosing the right seeds is crucial for successful sprouting. Here’s what I’ve learned over the years:
* Quality Matters: Always buy seeds specifically labeled for sprouting. These seeds are tested for germination rates and are free from harmful chemicals.
* Start Small: If you’re new to sprouting, start with a small amount of seeds (1-2 tablespoons) to avoid overcrowding the jar.
* Experiment: Try different types of seeds to find your favorites! Alfalfa sprouts are mild and crunchy, while radish sprouts have a peppery kick.
* Storage: Store your sprouting seeds in a cool, dry place to maintain their viability.
The Sprouting Process: Step-by-Step
Okay, let’s get down to the nitty-gritty! Here’s my tried-and-true method for growing sprouts without soil:
1. Soaking the Seeds:
* Place your chosen amount of sprouting seeds in a bowl.
* Cover the seeds with plenty of cool, filtered water. I usually use about 3 times the volume of seeds.
* Let the seeds soak for the recommended time, which varies depending on the type of seed. Generally, smaller seeds like alfalfa need about 4-6 hours, while larger seeds like mung beans need 8-12 hours. Check the seed packet for specific instructions.
* Soaking helps to soften the seed coat and kickstart the germination process.
2. Transferring to the Jar:
* After soaking, drain the seeds thoroughly using a colander or strainer.
* Transfer the soaked seeds to your clean wide-mouth mason jar.
3. Securing the Lid:
* Attach your sprouting lid or secure a piece of cheesecloth over the mouth of the jar with a rubber band. Make sure the cheesecloth is taut enough to prevent seeds from falling out.
4. The First Rinse:
* Add fresh, cool water to the jar through the sprouting lid or cheesecloth.
* Swirl the water around gently to rinse the seeds.
* Drain the water completely. This is important to prevent the seeds from becoming waterlogged and developing mold.
5. The Dark Period:
* Place the jar upside down at an angle in a bowl or rack. This allows excess water to drain out and prevents the seeds from sitting in water.
* Store the jar in a dark, well-ventilated place, such as a cupboard or drawer. Darkness encourages sprouting.
6. Rinsing and Draining (Twice Daily):
* This is the most crucial step! Rinse and drain the sprouts at least twice a day (morning and evening) with fresh, cool water.
* To rinse, add water to the jar, swirl gently, and drain thoroughly.
* Always return the jar to its upside-down position in the dark place after rinsing.
* Rinsing removes metabolic waste products and keeps the sprouts hydrated, preventing them from drying out and molding.
7. The Light Exposure (Day 3 or 4):
* After a few days (usually around day 3 or 4), you’ll start to see tiny sprouts emerging from the seeds.
* At this point, move the jar to a location with indirect sunlight. Sunlight helps the sprouts develop chlorophyll, which gives them their green color and enhances their nutritional value.
* Continue rinsing and draining twice daily.
8. Harvesting Your Sprouts:
* Your sprouts are ready to harvest when they have reached your desired length and have developed a good green color. This usually takes about 5-7 days, depending on the type of seed and the growing conditions.
* To harvest, give the sprouts one final rinse and drain them thoroughly.
9. Storing Your Sprouts:
* Store your harvested sprouts in a clean, airtight container in the refrigerator.
* They should stay fresh for up to a week.
* Before using, give them a quick rinse.
Troubleshooting Common Sprouting Problems
Even with the best intentions, sometimes things can go wrong. Here are some common problems I’ve encountered and how I’ve solved them:
* Mold: Mold is usually caused by poor drainage or insufficient rinsing. If you see mold, discard the entire batch of sprouts. To prevent mold, make sure you’re rinsing and draining the sprouts thoroughly at least twice a day. Also, ensure good air circulation around the jar.
* Rotting Seeds: Rotting seeds can be caused by overwatering or using seeds that are not specifically for sprouting. Make sure you’re using sprouting seeds and that you’re not letting the seeds sit in water.
* Slow Growth: Slow growth can be caused by low temperatures or insufficient light. If your sprouts are growing slowly, try moving them to a warmer location or exposing them to more indirect sunlight.
* Unpleasant Odor: An unpleasant odor can indicate bacterial growth. This is usually caused by poor hygiene or contaminated water. Make sure you’re using clean water and that your jar and sprouting lid are thoroughly cleaned before each use.
Tips for Success
Here are a few extra tips that I’ve found helpful over the years:
* Cleanliness is Key: Always use clean jars, lids, and utensils to prevent contamination.
* Don’t Overcrowd: Use the right amount of seeds for the size of your jar. Overcrowding can lead to poor air circulation and increased risk of mold.
* Experiment with Flavors: Once you’re comfortable with the basic sprouting process, try adding different flavors to your sprouts. For example, you can add a pinch of sea salt or a few drops of lemon juice to the rinsing water.
* Use Your Sprouts Creatively: Sprouts are a versatile ingredient that can be used in a variety of dishes. Add them to salads, sandwiches, soups, stir-fries, or even smoothies!
Different Types of Sprouts and Their Benefits
Let’s explore some popular sprout varieties and their unique health benefits:
* Alfalfa Sprouts: These are mild and crunchy, packed with vitamins A, C, E, and K, as well as minerals like calcium, iron, and potassium. They’re known for their anti-inflammatory properties and potential to lower cholesterol.
* Broccoli Sprouts: These sprouts are a powerhouse of sulforaphane, a potent antioxidant with anti-cancer properties. They also contain vitamins A, C, and K, as well as fiber.
* Radish Sprouts: These sprouts have a peppery flavor and are rich in vitamins A, B, C, and E, as well as minerals like iron, calcium, and potassium. They’re known for their detoxifying properties and ability to boost the immune system.
* Mung Bean Sprouts: These sprouts are a staple in Asian cuisine and are a good source of protein, fiber, and vitamins C and K. They’re known for their digestive benefits and ability to lower blood pressure.
* Lentil Sprouts: These sprouts are a great source of protein, fiber, and iron. They’re also rich in folate and other essential nutrients. They’re known for their ability to improve energy levels and support healthy
Conclusion
So, there you have it! Embracing the world of soil free sprout growing is not just a fun experiment; it’s a game-changer for anyone looking to enjoy fresh, nutrient-packed greens right from their own kitchen. We’ve walked through the simple steps, highlighting how easy and accessible this method is, even for those without a green thumb or ample garden space.
Why is this a must-try? Because it’s about more than just sprouts. It’s about reclaiming control over your food source, reducing your environmental footprint, and experiencing the pure joy of watching life spring forth from tiny seeds. Imagine the satisfaction of adding a handful of vibrant, homegrown sprouts to your salad, sandwich, or smoothie, knowing exactly where they came from and what went into their growth – absolutely nothing but water, air, and a little bit of your attention.
Beyond the basic method we’ve outlined, there’s a whole universe of sprout variations waiting to be explored. Experiment with different types of seeds – radish, broccoli, alfalfa, mung beans, lentils, and even sunflower seeds each offer a unique flavor and nutritional profile. Consider using different sprouting containers, from mason jars with mesh lids to multi-tiered sprouting trays for larger yields. You can even play around with the sprouting environment, adjusting the temperature and light exposure to see how it affects the growth rate and flavor of your sprouts.
For a spicy kick, try adding a pinch of chili flakes to your sprouting water. For a more subtle flavor, consider using filtered water or even adding a drop or two of lemon juice. The possibilities are truly endless!
But the real magic of soil free sprout growing lies in its simplicity and sustainability. No more trips to the grocery store for wilted, overpriced sprouts. No more worrying about harmful pesticides or herbicides. Just pure, unadulterated goodness, grown with your own two hands.
We wholeheartedly encourage you to give this DIY trick a try. It’s an incredibly rewarding experience that will not only enhance your diet but also connect you to the natural world in a profound way. Don’t be afraid to experiment, to make mistakes, and to learn from your experiences.
And most importantly, we want to hear from you! Share your sprouting adventures with us. Tell us about your favorite seeds, your innovative sprouting techniques, and the delicious ways you’re incorporating your homegrown sprouts into your meals. Let’s build a community of sprout enthusiasts, sharing our knowledge and inspiring each other to grow more of our own food. Post pictures of your sprouts on social media using #SoilFreeSprouts and tag us! We can’t wait to see what you create. Happy sprouting!
Frequently Asked Questions (FAQ)
What types of seeds are best for soil free sprouting?
The beauty of soil free sprout growing is that you can sprout a wide variety of seeds! Some of the most popular and readily available options include:
* **Alfalfa:** Known for its mild, slightly sweet flavor and high nutrient content.
* **Broccoli:** Offers a slightly peppery taste and is packed with antioxidants.
* **Radish:** Provides a spicy, pungent flavor that adds a kick to salads and sandwiches.
* **Mung Beans:** A staple in Asian cuisine, these sprouts are crunchy and refreshing.
* **Lentils:** A great source of protein and fiber, lentil sprouts have a mild, earthy flavor.
* **Sunflower Seeds:** These sprouts have a nutty flavor and are rich in vitamins and minerals.
* **Clover:** Mild and slightly sweet, clover sprouts are a good source of vitamins.
* **Mustard Seeds:** These sprouts offer a strong, pungent flavor similar to mustard greens.
It’s important to use seeds specifically intended for sprouting, as these are typically tested for pathogens and are more likely to germinate successfully. Avoid using seeds that are treated with fungicides or other chemicals.
How long does it take for sprouts to grow?
The sprouting time varies depending on the type of seed and the environmental conditions, but generally, you can expect to harvest your sprouts within 3 to 7 days. Some seeds, like radish and broccoli, sprout relatively quickly, while others, like sunflower seeds, may take a bit longer.
Keep in mind that temperature plays a crucial role in the sprouting process. Warmer temperatures (around 70-75°F or 21-24°C) will generally speed up germination, while cooler temperatures will slow it down.
How often should I rinse my sprouts?
Rinsing your sprouts is essential for preventing mold and bacteria growth. Aim to rinse them at least twice a day, ideally in the morning and evening. Use cool, clean water and make sure to drain the sprouts thoroughly after each rinse.
If you live in a particularly humid environment, you may need to rinse your sprouts more frequently. Conversely, if you live in a dry climate, you may be able to get away with rinsing them just once a day. The key is to observe your sprouts closely and adjust your rinsing schedule accordingly.
How do I prevent mold from growing on my sprouts?
Mold growth is a common concern when sprouting, but it can be easily prevented with proper hygiene and ventilation. Here are a few tips:
* **Use clean sprouting containers:** Wash your sprouting jars or trays thoroughly with soap and water before each use.
* **Rinse your sprouts regularly:** As mentioned above, rinsing your sprouts at least twice a day is crucial for preventing mold growth.
* **Ensure good ventilation:** Make sure your sprouts have access to fresh air. Avoid placing them in enclosed spaces or areas with poor air circulation.
* **Don’t overcrowd your sprouts:** Spreading the seeds out evenly in your sprouting container will allow for better air circulation and prevent moisture from building up.
* **Use high-quality seeds:** Using seeds specifically intended for sprouting will reduce the risk of contamination.
If you do notice mold growing on your sprouts, discard them immediately. It’s better to be safe than sorry.
How do I store my sprouts after harvesting?
Once your sprouts have reached your desired length, it’s time to harvest them. To store them properly, rinse them thoroughly and drain them well. Then, place them in a clean container lined with a paper towel. The paper towel will help absorb any excess moisture and keep the sprouts fresh.
Store the container in the refrigerator for up to a week. Be sure to check the sprouts regularly and discard any that show signs of spoilage.
Can I grow sprouts in direct sunlight?
While sprouts need light to grow, direct sunlight can actually be harmful. It can cause them to overheat and dry out, which can inhibit their growth and even kill them.
Instead, opt for indirect sunlight or a well-lit area. A windowsill that receives morning sun is often a good choice. You can also use artificial light, such as a fluorescent grow light, to supplement natural light.
Are there any seeds I should avoid sprouting?
While most seeds are safe to sprout, there are a few exceptions. Avoid sprouting seeds from the nightshade family, such as tomatoes, potatoes, and eggplants, as these can contain toxic compounds.
Also, avoid sprouting seeds that are treated with fungicides or other chemicals. These chemicals can be harmful to your health.
What are the nutritional benefits of eating sprouts?
Sprouts are nutritional powerhouses, packed with vitamins, minerals, enzymes, and antioxidants. They are a great source of protein, fiber, and essential nutrients.
The sprouting process actually increases the bioavailability of many nutrients, making them easier for your body to absorb. Sprouts are also low in calories and fat, making them a healthy addition to any diet.
Can I use tap water for sprouting?
While tap water is generally safe to use for sprouting, it’s best to use filtered water if possible. Tap water can contain chlorine and other chemicals that can inhibit germination and affect the flavor of your sprouts.
If you do use tap water, let it sit out for a few hours before using it to allow the chlorine to evaporate.
What if my sprouts don’t germinate?
If your sprouts aren’t germinating, there could be several reasons why. Here are a few things to check:
* **Seed quality:** Make sure you’re using high-quality seeds that are specifically intended for sprouting.
* **Water quality:** Use filtered water or let tap water sit out for a few hours before using it.
* **Temperature:** Ensure the temperature is within the optimal range for germination (around 70-75°F or 21-24°C).
* **Moisture:** Make sure the seeds are kept consistently moist but not waterlogged.
* **Light:** Provide indirect sunlight or a well-lit area.
If you’ve checked all of these factors and your sprouts still aren’t germinating, try using a different batch of seeds.
Leave a Comment