
Soil Free Coriander Growing: Imagine fresh, fragrant coriander always at your fingertips, ready to elevate your culinary creations. What if I told you that you could achieve this without even getting your hands dirty? That’s right, we’re diving into the wonderful world of soil-free coriander growing, a surprisingly simple and rewarding DIY project that will transform your kitchen into a miniature herb garden!
Coriander, also known as cilantro, has a rich history, dating back thousands of years. Ancient Egyptians used it for medicinal purposes, and it’s been a staple in Asian and Latin American cuisines for centuries. But you don’t need to be an ancient civilization or a master chef to enjoy its vibrant flavor.
Let’s face it, traditional gardening can be intimidating. Soil quality, pests, and watering schedules can quickly turn a budding gardener into a frustrated one. That’s where this DIY trick comes in. Soil Free Coriander Growing eliminates many of these common challenges, making it accessible to everyone, regardless of their gardening experience or space constraints. Plus, it’s incredibly satisfying to nurture a plant from seed to harvest using such a simple method. So, ditch the dirt and let’s get started on this exciting journey to fresh, homegrown coriander!
Growing Coriander Without Soil: A DIY Hydroponic Adventure!
Hey there, fellow plant enthusiasts! Ever dreamt of having fresh coriander (cilantro) readily available, without the mess of soil? Well, you’ve come to the right place! I’m going to walk you through a super fun and surprisingly easy DIY hydroponic setup to grow coriander right in your kitchen. Get ready for a burst of fresh flavor!
What You’ll Need: The Supply List
Before we dive in, let’s gather our supplies. Don’t worry, you probably have a lot of this stuff lying around already!
* **Coriander Seeds:** Obviously! Make sure they’re fresh and viable.
* **A Container:** A plastic storage bin, a bucket, or even a large, opaque plastic container will work. The darker the container, the better, as it prevents algae growth. I’m using a repurposed plastic storage bin.
* **Net Pots:** These are small, slotted pots that will hold your coriander seedlings. You can find them online or at most garden centers. The size depends on your container, but 2-3 inch net pots are generally a good size.
* **Growing Medium:** Instead of soil, we’ll use an inert growing medium like coco coir, perlite, or rockwool cubes. I personally love using coco coir because it’s sustainable and holds moisture well.
* **Nutrient Solution:** This is crucial! Hydroponics relies on providing plants with all the necessary nutrients through the water. You can buy pre-mixed hydroponic nutrient solutions specifically formulated for leafy greens. Look for a balanced formula.
* **Air Pump and Air Stone:** These will oxygenate the nutrient solution, which is essential for healthy root growth. A small aquarium air pump will do the trick.
* **Airline Tubing:** To connect the air pump to the air stone.
* **pH Meter or pH Test Strips:** Maintaining the correct pH of the nutrient solution is vital. Coriander prefers a slightly acidic pH of around 6.0 to 6.5.
* **Measuring Cups and Spoons:** For accurately mixing the nutrient solution.
* **Drill (Optional):** If your container doesn’t have pre-made holes for the net pots, you’ll need a drill and a hole saw attachment to create them.
* **Scissors or a Knife:** For cutting the airline tubing and potentially adjusting the growing medium.
* **Water:** Filtered or dechlorinated tap water is best.
* **Grow Lights (Optional but Recommended):** If you don’t have a sunny windowsill, grow lights will provide the necessary light for your coriander to thrive. LED grow lights are energy-efficient and work great.
Step-by-Step Guide: From Seed to Sprout
Okay, let’s get our hands dirty (well, not really, since there’s no soil!). Here’s how to set up your soil-free coriander garden:
1. **Prepare the Container:**
* First, clean your container thoroughly with soap and water to remove any dirt or debris. Rinse it well.
* If your container doesn’t have holes for the net pots, now’s the time to drill them. Space the holes evenly across the lid or top of the container, making sure they’re the right size to snugly hold the net pots. I usually aim for about 4-6 inches between each pot.
2. **Soak the Coco Coir (if using):**
* If you’re using coco coir, it’s important to rehydrate it before using it. Place the coco coir brick or compressed block in a bucket and add water according to the package instructions. It will expand significantly.
* Once fully hydrated, rinse the coco coir thoroughly to remove any excess salts. This is important for optimal plant growth.
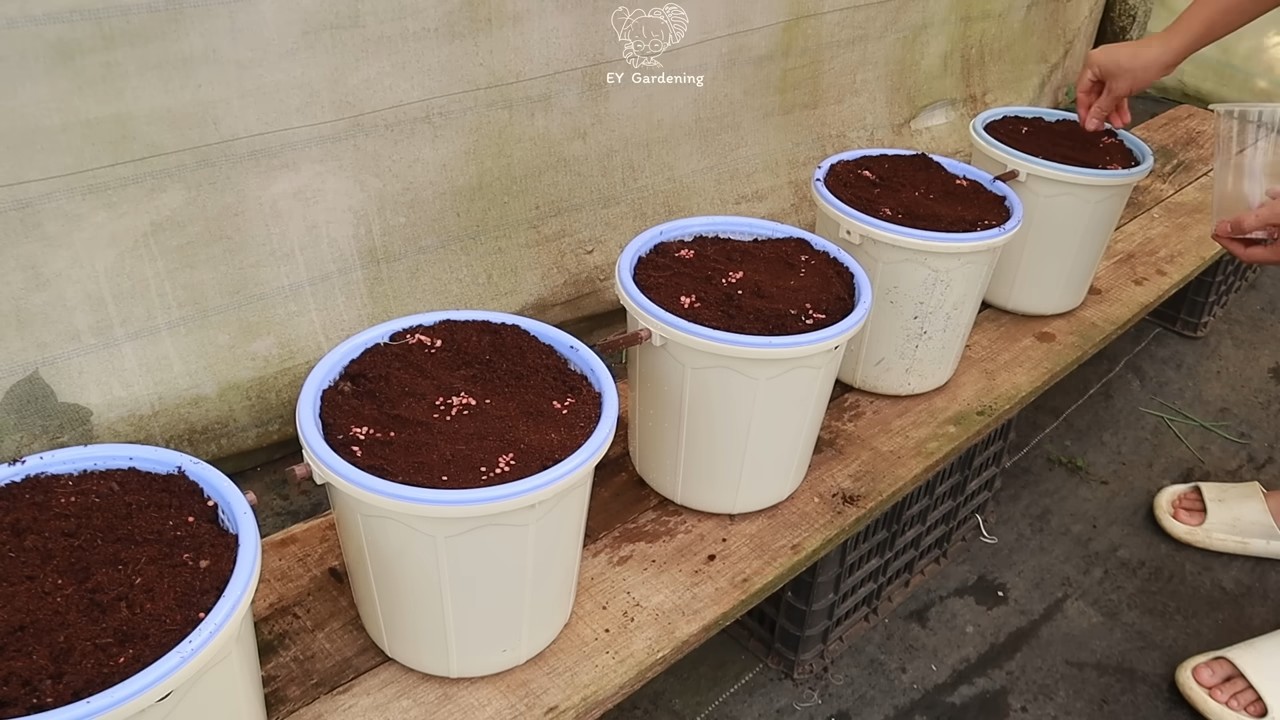
3. **Prepare the Net Pots:**
* Fill each net pot with your chosen growing medium (coco coir, perlite, or rockwool). Don’t pack it too tightly, as you want good airflow around the roots.
* Moisten the growing medium in each net pot with water.
4. **Sow the Coriander Seeds:**
* Sprinkle 3-5 coriander seeds on top of the growing medium in each net pot.
* Gently press the seeds into the medium, but don’t bury them too deep. A light covering is sufficient.
* Mist the surface of the growing medium with water to keep it moist.
5. **Set Up the Hydroponic System:**
* Place the net pots into the holes in the container lid.
* Fill the container with water, leaving about an inch or two of space at the top. You want the bottom of the net pots to be just touching the water. This will allow the growing medium to wick up moisture to the seeds.
* Add the hydroponic nutrient solution to the water according to the package instructions. Be precise with your measurements! Too much or too little can harm your plants.
* Use your pH meter or test strips to check the pH of the nutrient solution. Adjust it to between 6.0 and 6.5 using pH up or pH down solutions if necessary.
* Place the air stone at the bottom of the container.
* Connect the air stone to the air pump using the airline tubing.
* Plug in the air pump. You should see bubbles rising from the air stone, indicating that the nutrient solution is being oxygenated.
6. **Provide Light:**
* Place your hydroponic system in a location that receives at least 6 hours of direct sunlight per day.
* If you don’t have enough natural light, use grow lights. Position the grow lights about 6-12 inches above the net pots.
7. **Maintain the System:**
* Check the water level in the container regularly and add more water as needed to keep the bottom of the net pots moist.
* Monitor the pH of the nutrient solution and adjust it as necessary.
* Change the nutrient solution every 1-2 weeks to prevent nutrient buildup and maintain optimal plant health.
* Keep an eye out for any signs of pests or diseases. Address any problems promptly.
Troubleshooting Tips and Tricks
Even with the best planning, sometimes things don’t go exactly as expected. Here are a few common issues you might encounter and how to fix them:
* **Seeds Not Germinating:** Make sure your seeds are fresh and viable. Also, ensure the growing medium is consistently moist but not waterlogged. Temperature can also play a role; coriander prefers cooler temperatures for germination.
* **Yellowing Leaves:** This could indicate a nutrient deficiency. Double-check your nutrient solution and make sure you’re using the correct concentration. It could also be a pH issue, preventing the plants from absorbing nutrients properly.
* **Slow Growth:** Insufficient light is a common culprit. Make sure your plants are getting enough sunlight or that your grow lights are providing adequate illumination.
* **Algae Growth:** Algae can compete with your plants for nutrients and oxygen. Use an opaque container to block out light and prevent algae growth. You can also add a small amount of hydrogen peroxide to the nutrient solution to kill algae.
* **Root Rot:** This is caused by a lack of oxygen in the nutrient solution. Make sure your air pump and air stone are working properly and providing adequate aeration.
Harvesting Your Soil-Free Coriander
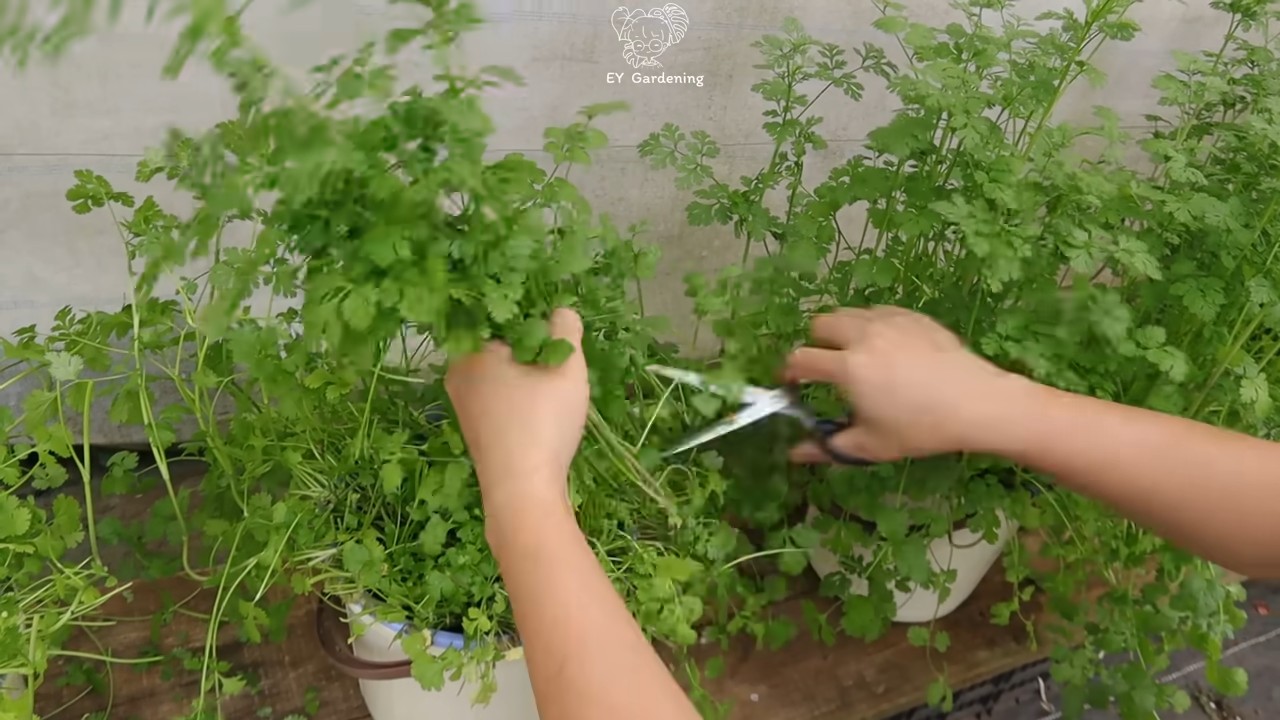
The best part! You can start harvesting your coriander leaves once the plants are about 4-6 inches tall. Simply snip off the leaves you need with scissors. Avoid cutting off more than one-third of the plant at a time to allow it to continue growing. With proper care, your hydroponic coriander garden will provide you with a continuous supply of fresh herbs for weeks or even months!
Growing coriander hydroponically is a rewarding and sustainable way to enjoy fresh herbs year-round. It’s also a great way to learn about plant science and experiment with different growing techniques. So, give it a try and let me know how it goes! Happy growing!
Conclusion
So, there you have it! Growing coriander without soil might sound like something out of a science fiction novel, but it’s surprisingly simple, incredibly rewarding, and a fantastic way to ensure you always have fresh herbs on hand. This DIY trick isn’t just about convenience; it’s about unlocking a new level of control over your food source, minimizing waste, and experiencing the pure joy of nurturing life with minimal resources.
Why is this a must-try? Because it bypasses many of the common pitfalls of traditional gardening. No more battling soil-borne pests, no more worrying about drainage issues, and no more back-breaking weeding. Plus, it’s a space-saver, perfect for apartment dwellers or anyone with limited outdoor space. Imagine the satisfaction of snipping fresh, vibrant coriander leaves right from your kitchen counter, adding a burst of flavor to your favorite dishes.
But the beauty of this method lies in its adaptability. Feel free to experiment with different containers. While a simple glass jar works wonders, you could also use repurposed plastic containers, ensuring they are thoroughly cleaned, of course. Consider using different types of water – filtered water, rainwater, or even water from your aquarium (a natural source of nutrients!) can all be tested to see what yields the best results.
For those seeking a more advanced setup, you could explore incorporating a small air pump and air stone to oxygenate the water, potentially boosting growth rates. You can also experiment with adding diluted hydroponic nutrients to the water, but start with very small amounts to avoid burning the delicate roots. Remember, observation is key. Pay close attention to your coriander plants, noting their color, growth rate, and overall health. Adjust your watering schedule and nutrient levels accordingly.
Don’t be afraid to get creative! Try growing other herbs using this soil-free method. Mint, basil, and parsley are all excellent candidates. You might even discover new and exciting ways to cultivate your favorite greens.
This method of **soil free coriander growing** is not just a trend; it’s a sustainable and efficient way to bring fresh herbs into your life. It’s a testament to the power of innovation and the endless possibilities of urban gardening.
We wholeheartedly encourage you to give this DIY trick a try. It’s a fun, educational, and ultimately delicious experience. And most importantly, we want to hear about your journey! Share your successes, your challenges, and your unique variations in the comments below. Let’s build a community of soil-free coriander growers and learn from each other. What kind of container did you use? Did you add any nutrients? What dishes did you enhance with your homegrown coriander? Your insights could inspire others to embark on their own soil-free adventures. So, grab your coriander seeds, your chosen container, and get ready to experience the magic of soil-free gardening! Happy growing!
Frequently Asked Questions (FAQ)
1. What kind of coriander seeds should I use for soil-free growing?
You can use any type of coriander seeds you would normally use for traditional soil gardening. Look for seeds that are specifically labeled for culinary use, as these are typically the most flavorful. Organic seeds are always a good choice to avoid any unwanted chemicals. Make sure the seeds are fresh for optimal germination rates. Older seeds may still sprout, but the germination rate might be lower. You can test the viability of your seeds by placing a few on a damp paper towel, covering them, and checking for sprouting after a few days. If a good percentage of the seeds sprout, you’re good to go!
2. How often should I change the water in my soil-free coriander setup?
The frequency of water changes depends on several factors, including the size of your container, the temperature of your environment, and the amount of light your coriander plants are receiving. As a general rule, you should change the water every 2-3 days. This helps to prevent the buildup of algae and bacteria, which can harm your plants. If you notice the water becoming cloudy or discolored, change it immediately. When changing the water, be gentle with the roots to avoid damaging them. Use room-temperature water to avoid shocking the plants.
3. What kind of lighting is best for soil-free coriander growing?
Coriander needs adequate light to thrive. If you’re growing your coriander indoors, a sunny windowsill is a great option, especially one that faces south or west. However, if you don’t have access to a sunny windowsill, you can use artificial grow lights. LED grow lights are a popular choice because they are energy-efficient and provide a full spectrum of light that plants need for photosynthesis. Position the grow lights about 6-12 inches above your coriander plants and keep them on for 12-16 hours per day. Monitor your plants closely and adjust the lighting as needed. If the leaves start to turn yellow or brown, it could be a sign that they are getting too much light.
4. Can I add nutrients to the water to help my coriander grow faster?
Yes, you can add diluted hydroponic nutrients to the water to boost the growth of your coriander plants. However, it’s crucial to use a balanced nutrient solution specifically formulated for leafy greens. Start with a very diluted solution, about one-quarter of the recommended strength, and gradually increase the concentration as needed. Over-fertilizing can damage the roots and stunt growth. Look for nutrient solutions that contain essential macronutrients like nitrogen, phosphorus, and potassium, as well as micronutrients like iron, manganese, and zinc. Monitor your plants closely for any signs of nutrient deficiencies, such as yellowing leaves or stunted growth.
5. How long does it take for coriander to grow using this soil-free method?
The time it takes for coriander to grow using the soil-free method depends on several factors, including the variety of coriander, the temperature, the amount of light, and the nutrient levels. Generally, you can expect to see sprouts within 7-14 days. From there, it will take another 3-4 weeks for the plants to reach a harvestable size. Keep in mind that coriander is a relatively fast-growing herb, so you should be able to enjoy fresh coriander within a month or two of planting the seeds.
6. What if my coriander plants start to turn yellow or brown?
Yellowing or browning leaves can be a sign of several issues, including overwatering, underwatering, nutrient deficiencies, or too much light. First, check the water level and make sure the roots are not sitting in stagnant water. If the water is cloudy or discolored, change it immediately. Next, assess the lighting situation. If the plants are getting too much direct sunlight, move them to a shadier location. If they are not getting enough light, consider using artificial grow lights. Finally, consider adding a diluted nutrient solution to the water to address any potential nutrient deficiencies. If the problem persists, try transplanting the coriander plants to a new container with fresh water.
7. Can I grow coriander from cuttings using this soil-free method?
While it’s possible to propagate some herbs from cuttings using hydroponic methods, coriander is generally best grown from seed. Coriander cuttings tend to rot easily in water, making it difficult to establish a healthy root system. For best results, stick with seeds when growing coriander using the soil-free method.
8. How do I harvest my soil-free coriander?
Harvesting your soil-free coriander is easy! Simply snip off the leaves as needed, using scissors or your fingers. Start by harvesting the outer leaves first, allowing the inner leaves to continue growing. Avoid cutting off more than one-third of the plant at a time, as this can stress the plant and slow down growth. Regular harvesting will encourage the plant to produce more leaves, ensuring a continuous supply of fresh coriander.
9. Can I use tap water for soil-free coriander growing?
While tap water can be used, it’s best to let it sit out for 24 hours to allow chlorine and other chemicals to evaporate. Filtered water or rainwater is an even better option, as it is free of these chemicals. If your tap water is very hard (high in mineral content), it may be necessary to use a water softener or distilled water to prevent mineral buildup in the container.
10. My coriander bolted (started flowering) quickly. How can I prevent this?
Bolting, or premature flowering, is often triggered by stress, such as high temperatures or lack of water. To prevent bolting, keep your coriander plants in a cool, well-ventilated location. Ensure they receive adequate water and nutrients. Avoid letting the plants dry out completely. You can also try growing bolt-resistant varieties of coriander. Once the plant starts to bolt, the leaves will become bitter, so it’s best to harvest them before this happens.

Leave a Comment