
Rooftop corn growing simple? Absolutely! Imagine stepping onto your rooftop garden and harvesting fresh, juicy corn – a taste of summer right in the heart of the city. It might sound like a rural fantasy, but with a few clever tricks and a little DIY spirit, you can transform your urban space into a thriving cornfield.
Corn, a staple crop with roots stretching back thousands of years in Mesoamerica, has nourished civilizations and played a vital role in countless cultures. From ancient rituals to modern-day cuisine, corn holds a special place in our history. Now, you can bring that history and abundance to your own home, even without a sprawling backyard.
Why should you try rooftop corn growing simple? Well, beyond the sheer novelty and satisfaction of growing your own food, it’s a fantastic way to connect with nature, reduce your carbon footprint, and enjoy the unparalleled flavor of homegrown produce. Plus, let’s be honest, who wouldn’t want to impress their friends and neighbors with a rooftop corn harvest? This DIY guide will walk you through everything you need to know, from choosing the right varieties to providing the perfect growing conditions, ensuring you can enjoy sweet corn on the cob straight from your own urban oasis. Let’s get growing!
Rooftop Corn Cultivation: Your Simple Guide for a Bountiful Harvest
Hey folks! Have you ever thought about growing your own vegetables but don’t have a garden? No problem! I’m going to show you how you can grow corn on your roof. Yes, you heard right! Corn on the roof! It’s easier than you think and not only provides you with fresh corn but also a great feeling of self-sufficiency. Let’s get started!
What you need: The Materials List
Before we begin, we need a few things. Don’t worry, most of them are easy to get:
- Large planters or containers: Think of large mortar tubs or something similar. Corn needs space for its roots.
- High-quality potting soil: Good soil is the be-all and end-all for a bountiful harvest.
- Corn kernels: Organic seeds are best, so you know what you’re getting.
- Fertilizer: A slow-release fertilizer or organic fertilizer is ideal.
- Watering can or hose: For watering, of course!
- Support material (optional): Bamboo stakes or similar, in case the corn gets too tall and topples over.
- Shovel or spade: For filling the containers with soil.
- Gloves: To keep your hands clean.
- Sunglasses and sunscreen: Because we’re working on the roof!
The Preparation: The Key to Success
Before we start planting, we need to make a few preparations. This is important so that the corn grows well later.
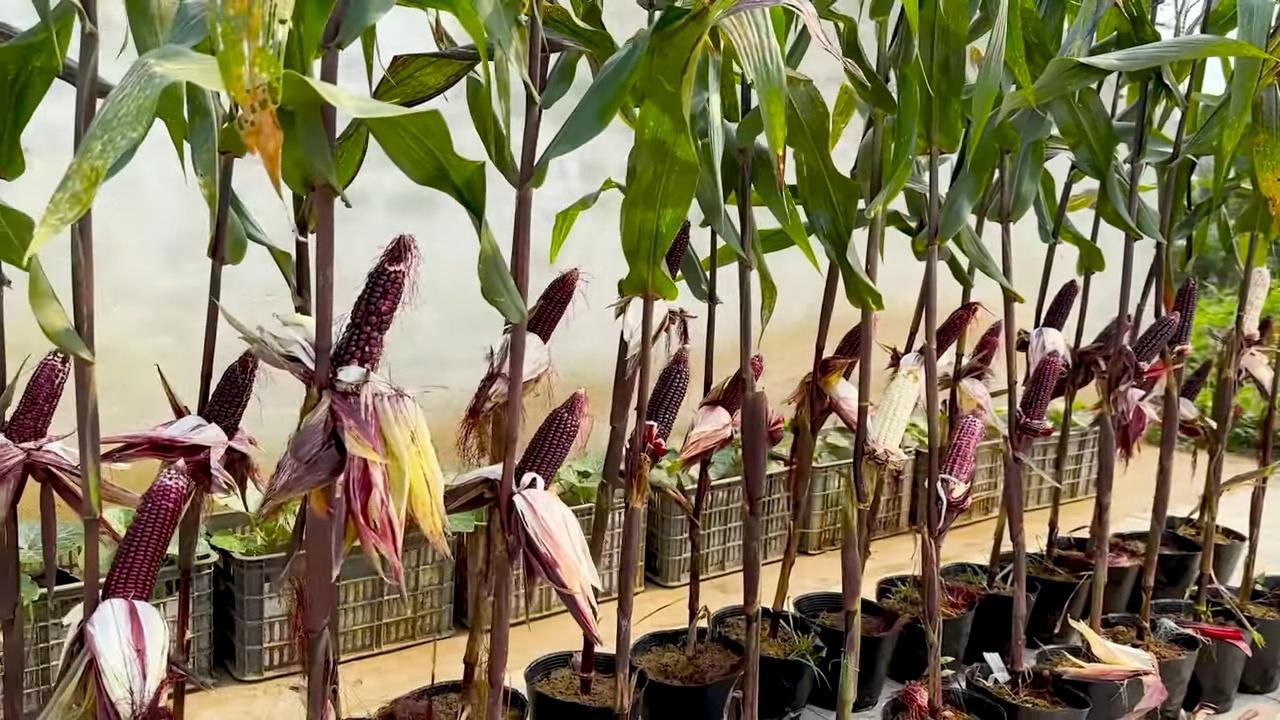
- Choose the right containers: Select containers with a volume of at least 50 liters per plant. Corn has deep roots and needs space. Make sure the containers have drainage holes so that excess water can run off.
- Prepare the soil: Fill the containers with high-quality potting soil. It’s best to mix in some compost or organic fertilizer to enrich the soil with nutrients.
- Choose the location: Corn needs a lot of sun! Choose a location on your roof that gets at least 6-8 hours of sun per day. Also, make sure the location is sheltered from the wind, as tall corn can easily topple over.
- Safety first: Make sure your roof terrace is stable enough to support the weight of the containers. When in doubt, ask a professional.
Sowing: The Start of the Corn Season
Now it’s time to get down to business! We’re sowing the corn kernels.
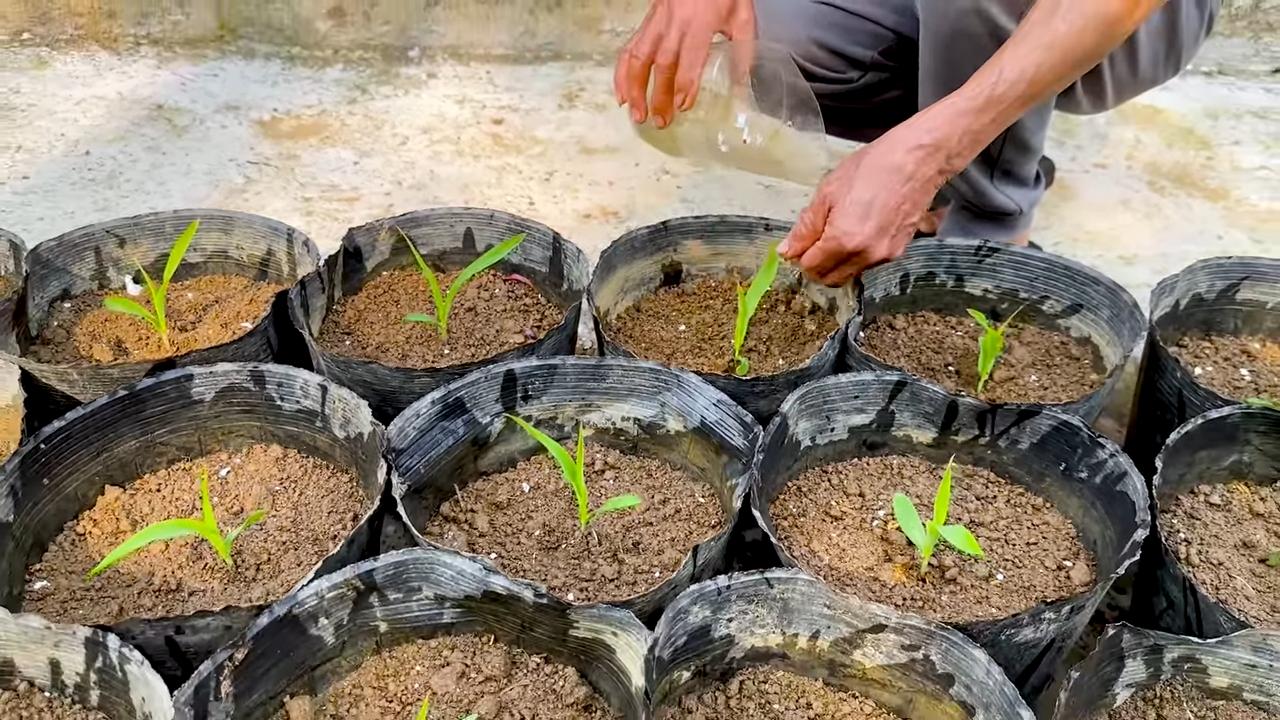
- Prepare the kernels: Soak the corn kernels in lukewarm water for about 12-24 hours before sowing. This speeds up germination.
- Sow the kernels: Make small holes in the soil, about 2-3 cm deep. Place 2-3 corn kernels in each hole. This increases the probability that at least one kernel will germinate.
- Close the holes: Cover the kernels with soil and press them down lightly.
- Water: Water the soil gently so that it is moist but not wet.
The Care: So the Corn Thrives Magnificently
After sowing, it’s important to take good care of the corn. Here are a few tips:
- Watering: Corn needs regular water, especially during the growth phase. It’s best to water the plants in the morning so the leaves can dry during the day. Avoid waterlogging, as this can lead to root rot.
- Fertilizing: Fertilize the corn regularly with a slow-release fertilizer or organic fertilizer. Make sure the fertilizer contains enough nitrogen, phosphorus, and potassium.
- Removing weeds: Regularly remove weeds from the containers so the corn doesn’t have to compete for nutrients.
- Combating pests: Watch out for pests like aphids or corn borers. If necessary, you can use natural pesticides.
- Supporting: If the corn gets too tall and threatens to topple over, you can support it with bamboo stakes or similar.
The Harvest: The Reward for Your Labor
After about 80-100 days, the time has finally come: the corn cobs are ripe and can be harvested.
- Recognizing ripeness: The corn cobs are ripe when the silks are brown and dry. The cobs should feel plump and give slightly when pressed.
- Harvesting the cobs: Carefully break the corn cobs off the stalk. Twist them slightly to loosen them more easily.
- Preparing the cobs: You can cook, grill, or roast the corn cobs immediately. They taste best when they are fresh.
Additional Tips for Rooftop Corn Cultivation
Here are a few more tips that can help you achieve a successful corn harvest on your roof:
- Choose the right corn variety: There are different corn varieties that are suitable for growing in containers. Ask at a specialty store which varieties are best suited for your region.
- Plant several plants together: Corn is a wind-pollinator. To ensure good pollination, you should plant several plants together in one container.
- Pay attention to the wind direction: If your roof is exposed to strong winds, you should plant the corn in a sheltered location or provide it with a windbreak.
- Use drip irrigation: Drip irrigation is an efficient way to supply the corn with water. It saves water and prevents the leaves from getting wet.
- Compost your plant residues: After the harvest, you can compost the plant residues and use them as fertilizer again next year.
Common Problems and Solutions
Problems can also arise with rooftop corn cultivation. Here are a few common problems and their solutions:
- Poor germination: If the corn kernels do not germinate, there can be various reasons. The kernels may have been too old, the soil too dry or too cold. Make sure to use fresh seeds, keep the soil moist, and sow the kernels at a temperature of at least 15 degrees Celsius.
- Yellow leaves: Yellow leaves can be a sign of nutrient deficiency. Fertilize the corn with a fertilizer that contains sufficient nitrogen.
- Aphids: Aphids can infest the corn and suck the sap from its leaves. Combat the aphids with natural pesticides like nettle tea or ladybugs.
- Corn borer: The corn borer is a pest that burrows into the corn cobs and destroys them. You can combat the corn borer with pheromone traps or biological insecticides.
- Toppling over: If the corn gets too tall and threatens to topple over, you can support it with bamboo stakes or similar.
Conclusion: Your Own Corn from the Roof
So, that’s it! With this guide, you can easily grow your own corn on the roof. It’s a great feeling to harvest your own fruits and know where they come from. Try it out and let me know how it goes! Good luck and a bountiful harvest! And remember: patience and care are the keys to success. Until next time!
Conclusion
So, there you have it! Growing corn on your rooftop might sound like a whimsical dream, but with a little planning and effort, it can become a delicious reality. This DIY rooftop corn growing method isn’t just about fresh corn on the cob; it’s about embracing sustainable practices, maximizing your urban space, and connecting with the food you eat in a profound way. Forget those bland, store-bought ears – imagine biting into sweet, juicy corn that you nurtured from seed to table, all within the confines of your own home.
This method is a must-try for several reasons. First, it’s incredibly rewarding. Witnessing the entire life cycle of a plant, from tiny sprout to towering stalk laden with ears, is an experience that fosters a deep appreciation for nature. Second, it’s a fantastic way to utilize otherwise unused space. Rooftops are often overlooked, but they offer ample sunlight and room for a thriving garden. Third, you’re in complete control of the growing process. No pesticides, no herbicides – just pure, organic goodness.
But the benefits extend beyond personal satisfaction. By growing your own corn, you’re reducing your carbon footprint by minimizing transportation needs. You’re also contributing to a more sustainable food system, one that prioritizes local production and reduces reliance on large-scale agriculture. Plus, let’s be honest, bragging rights are definitely a perk!
Don’t be afraid to experiment with different varieties of corn. While sweet corn is a popular choice, consider trying heirloom varieties for unique flavors and colors. Dent corn, also known as field corn, can be grown for animal feed or ground into cornmeal. Popcorn varieties are another fun option, perfect for movie nights. You can also explore companion planting. Beans, squash, and corn are a classic combination, known as the “Three Sisters,” where each plant benefits the others. The beans provide nitrogen to the soil, the squash shades the ground and suppresses weeds, and the corn provides a natural trellis for the beans to climb.
Consider adding a drip irrigation system to your rooftop corn garden to conserve water and ensure consistent moisture. Mulching around the base of the plants with straw or wood chips can also help retain moisture and suppress weeds. And don’t forget to protect your precious corn from pests. Companion planting with herbs like basil or marigolds can deter unwanted visitors.
We encourage you to take the plunge and try this DIY rooftop corn growing method. It’s a fun, educational, and ultimately delicious experience. We are confident that you will be amazed at the results.
Once you’ve harvested your first crop, we’d love to hear about your experience! Share your photos, tips, and challenges in the comments below. Let’s build a community of rooftop corn growers and inspire others to embrace sustainable urban gardening. Your success story could be the inspiration someone else needs to start their own rooftop garden. So, grab your seeds, prepare your containers, and get ready to enjoy the sweet taste of homegrown corn!
Frequently Asked Questions (FAQ)
1. What kind of containers should I use for rooftop corn growing?
The ideal containers for growing corn on a rooftop are large, sturdy, and well-draining. Corn plants have extensive root systems, so you’ll need containers that are at least 12-18 inches deep and wide. Consider using large plastic tubs, half-barrels, or even custom-built raised beds. Ensure that the containers have drainage holes to prevent waterlogging, which can lead to root rot. Lightweight materials are preferable to minimize the weight load on your roof. You can also line the containers with landscape fabric to prevent soil from escaping through the drainage holes. Remember to factor in the weight of the soil and water when choosing your containers, as a fully loaded container can be quite heavy.
2. What type of soil is best for growing corn on a rooftop?
Corn thrives in well-draining, fertile soil that is rich in organic matter. A good potting mix specifically designed for vegetables is a great option. You can also create your own mix by combining equal parts of compost, peat moss (or coconut coir), and perlite or vermiculite. Compost provides essential nutrients, peat moss or coconut coir helps retain moisture, and perlite or vermiculite improves drainage. Avoid using garden soil, as it can be too heavy and compacted for container gardening. Before planting, amend the soil with a slow-release fertilizer to provide a steady supply of nutrients throughout the growing season. Regularly monitor the soil pH and adjust as needed to maintain a slightly acidic to neutral range (6.0-7.0).
3. How much sunlight does corn need to grow on a rooftop?
Corn requires at least 6-8 hours of direct sunlight per day to thrive. Choose a location on your rooftop that receives ample sunlight throughout the day. If your rooftop is partially shaded, try to position your containers in the sunniest spot. You can also use reflective materials, such as white paint or aluminum foil, to bounce sunlight onto the plants. Insufficient sunlight can lead to stunted growth, reduced yields, and poor-quality corn. Monitor your plants closely and adjust their position as needed to ensure they are receiving enough sunlight.
4. How often should I water my rooftop corn plants?
Corn plants need consistent moisture, especially during hot weather. Water deeply and regularly, ensuring that the soil is evenly moist but not waterlogged. The frequency of watering will depend on the weather conditions, the size of your containers, and the type of soil you are using. Check the soil moisture level regularly by sticking your finger into the soil. If the top inch feels dry, it’s time to water. Avoid watering the foliage, as this can promote fungal diseases. A drip irrigation system can be a great way to provide consistent moisture to your plants while conserving water.
5. How do I pollinate corn plants on a rooftop?
Corn is wind-pollinated, meaning that the pollen from the tassels (male flowers) needs to reach the silks (female flowers) on the ears. On a rooftop, where there may be limited wind, you may need to assist with pollination. You can do this by gently shaking the corn stalks to release pollen or by manually collecting pollen from the tassels and dusting it onto the silks. Repeat this process every day for several days to ensure that all the silks are pollinated. Proper pollination is essential for developing full, well-filled ears of corn.
6. What are some common pests and diseases that affect corn, and how can I prevent them?
Common pests that can affect corn include corn earworms, aphids, and spider mites. Diseases include corn smut and fungal leaf spots. To prevent pests and diseases, practice good garden hygiene by removing weeds and debris from around your plants. Companion planting with herbs like basil or marigolds can deter pests. Regularly inspect your plants for signs of pests or diseases and take action promptly. You can use organic insecticides or fungicides to control infestations. Crop rotation can also help prevent soilborne diseases.
7. How do I know when my corn is ready to harvest?
The best way to determine if your corn is ready to harvest is to check the silks. When the silks turn brown and dry, it’s a good indication that the corn is ready. You can also peel back a portion of the husk and puncture a kernel with your fingernail. If the liquid that comes out is milky, the corn is ready to harvest. If the liquid is clear, the corn needs more time to mature. If the liquid is doughy, the corn is overripe. Harvest the corn by twisting and pulling the ear downward from the stalk.
8. Can I grow different varieties of corn together on my rooftop?
While it’s possible to grow different varieties of corn together, it’s important to be aware of cross-pollination. If you grow different varieties of sweet corn together, they may cross-pollinate, resulting in corn that doesn’t taste as sweet. To avoid cross-pollination, you can either grow only one variety of corn or separate the varieties by a significant distance (at least 200 feet). You can also stagger the planting times so that the different varieties don’t tassel and silk at the same time.
9. Is rooftop corn growing safe for my roof?
Before embarking on a rooftop corn growing project, it’s essential to assess the structural integrity of your roof. Consult with a structural engineer or building professional to ensure that your roof can handle the added weight of the containers, soil, and water. Distribute the weight evenly across the roof to avoid concentrating the load in one area. Use lightweight containers and soil mixes to minimize the weight. Regularly inspect your roof for any signs of damage or leaks.
10. What are some creative ways to use my homegrown rooftop corn?
Beyond the classic corn on the cob, there are countless ways to enjoy your homegrown rooftop corn. You can grill it, roast it, or boil it. You can also cut the kernels off the cob and use them in salads, soups, stews, and salsas. Cornmeal can be made from dried corn and used in cornbread, muffins, and polenta. Corn husks can be used to wrap tamales or to add flavor to soups and stews. And don’t forget about popcorn! Growing your own popcorn is a fun and rewarding experience.

Leave a Comment