
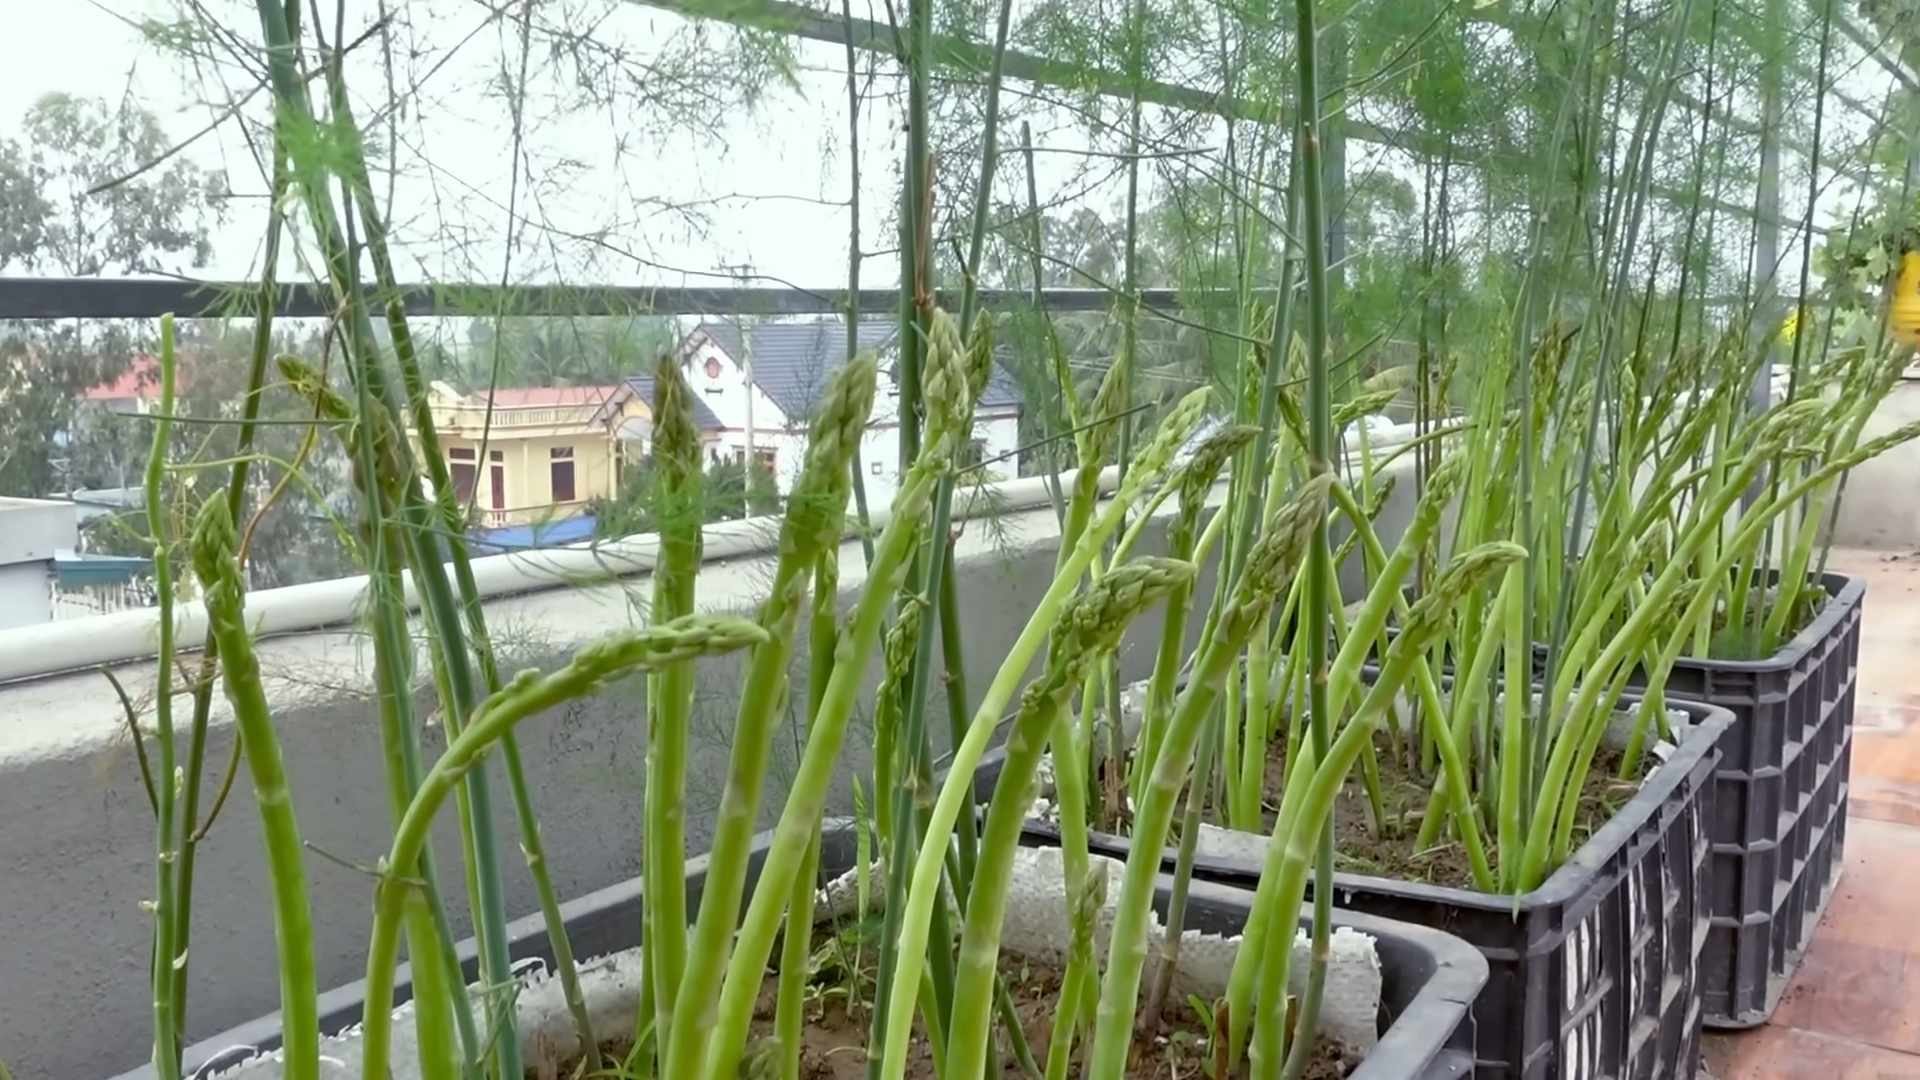
Rooftop Asparagus Growing Routine: Imagine stepping onto your rooftop garden, not just to enjoy the view, but to harvest fresh, delicious asparagus spears you’ve grown yourself! Sounds like a dream, right? Well, it doesn’t have to be! For centuries, asparagus has been prized for its delicate flavor and nutritional benefits, even gracing the tables of Roman emperors. But you don’t need an empire to enjoy this springtime delicacy.
In this article, I’m going to share my tried-and-true DIY tricks and hacks for creating a thriving rooftop asparagus growing routine. Whether you’re a seasoned gardener or a complete beginner, I’ll guide you through every step, from choosing the right container and soil to nurturing your plants for years of bountiful harvests.
Why is this DIY project so important? Because fresh, homegrown asparagus tastes infinitely better than anything you can buy at the store. Plus, knowing exactly where your food comes from and how it’s grown is incredibly rewarding. So, ditch the store-bought veggies and let’s transform your rooftop into an edible oasis! Get ready to learn the secrets to a successful rooftop asparagus growing routine and enjoy the satisfaction of harvesting your own delicious spears.
Rooftop Asparagus Growing: A Beginner’s Guide
Hey there, fellow gardening enthusiasts! Ever dreamed of harvesting your own fresh asparagus spears right from your rooftop? Well, dream no more! I’m here to guide you through the process of creating your very own rooftop asparagus patch. It might seem daunting, but trust me, with a little planning and effort, you can enjoy delicious, homegrown asparagus for years to come.
Choosing the Right Location and Container
Before we dive into the nitty-gritty, let’s talk about location and container selection. Asparagus needs plenty of sunlight and a well-draining container.
* Sunlight is Key: Asparagus thrives in full sun, meaning at least 6-8 hours of direct sunlight per day. Observe your rooftop throughout the day to identify the sunniest spot.
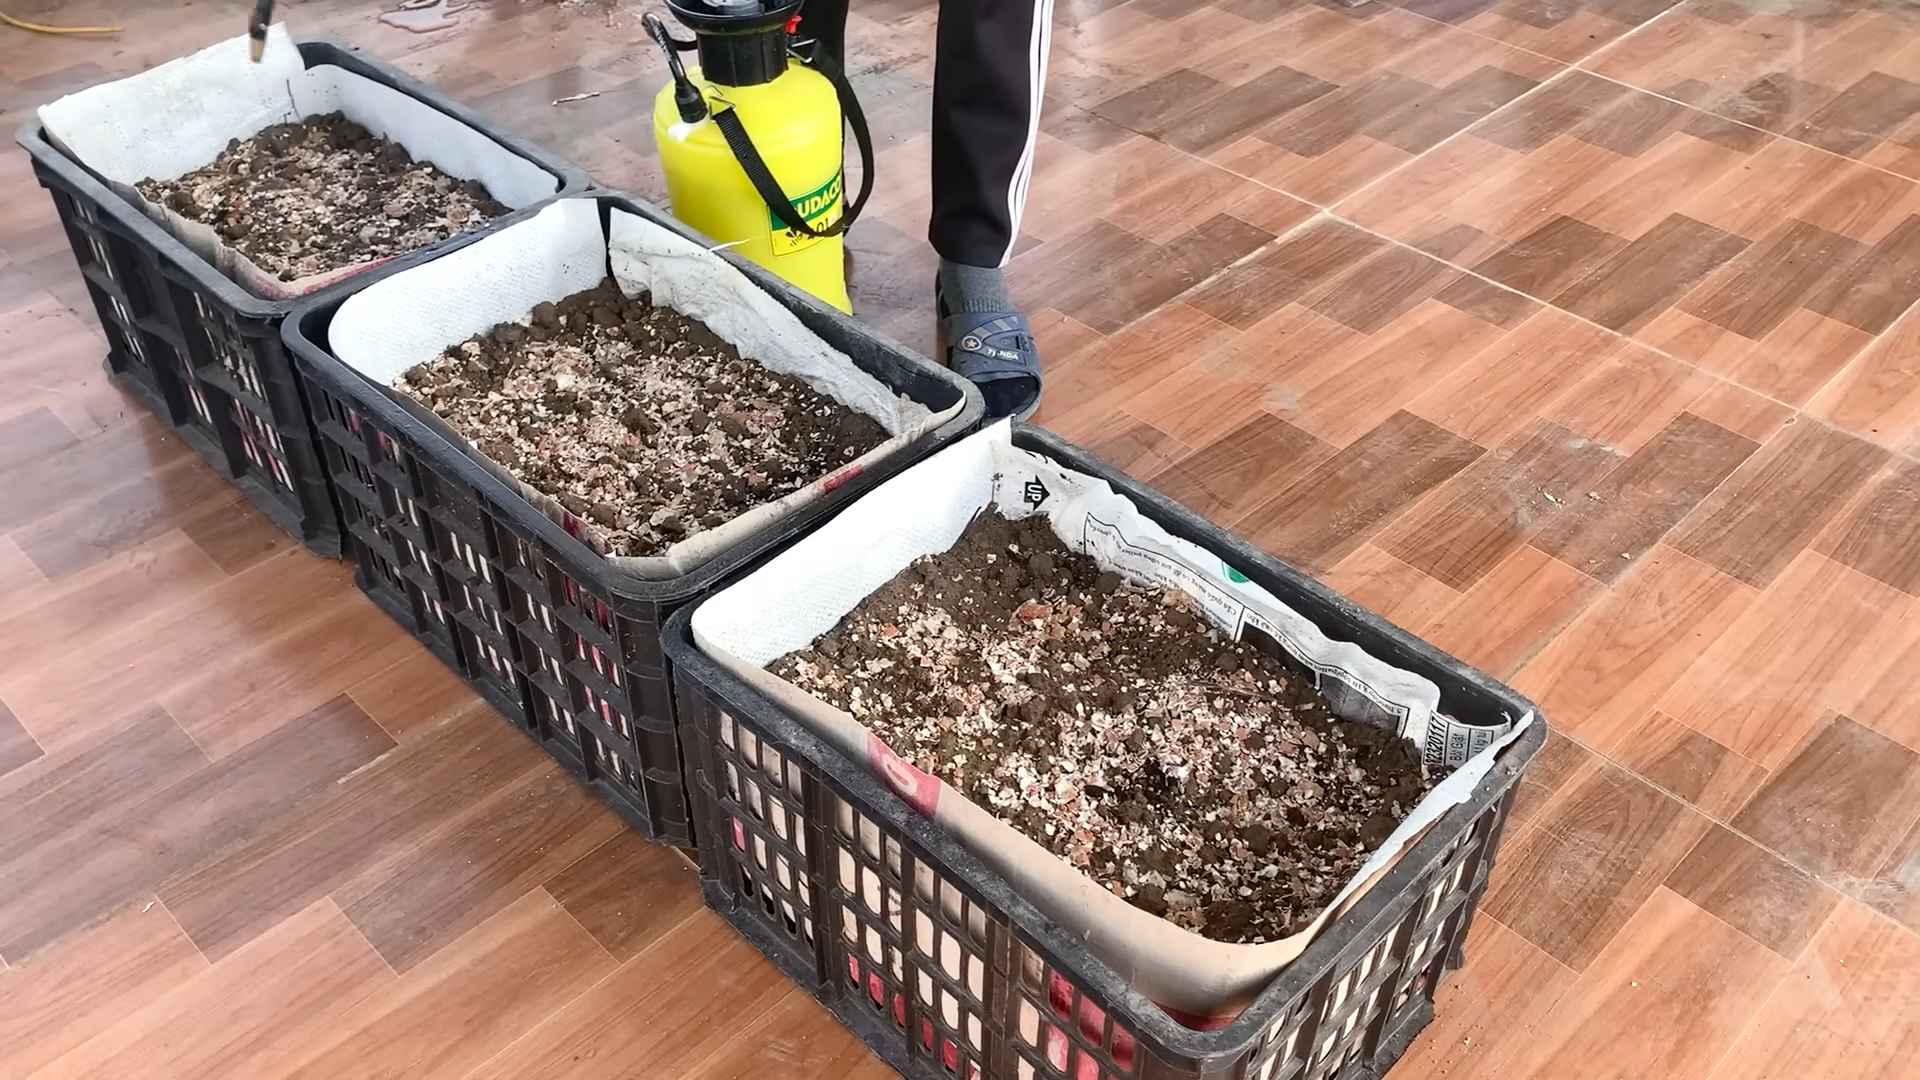
* Container Size Matters: Asparagus roots grow deep, so you’ll need a large container. I recommend a container that’s at least 2 feet deep and 2 feet wide. This will give the roots plenty of room to spread out.
* Drainage is Crucial: Asparagus hates soggy roots. Make sure your container has adequate drainage holes. If not, drill some extra ones.
* Material Considerations: You can use plastic, wood, or even metal containers. Just make sure they’re sturdy enough to hold the weight of the soil and plants. I personally prefer using large, durable plastic containers because they’re lightweight and easy to move.
* Rooftop Weight Limits: This is super important! Before you even think about filling a giant container with soil, check your building’s weight limits for the rooftop. You don’t want to cause any structural damage. Consult with a building professional if you’re unsure.
Preparing the Soil
Asparagus needs well-draining, nutrient-rich soil. Here’s my go-to soil mix:
* Base Mix: Start with a good quality potting mix. This will provide a good foundation for your asparagus.
* Compost Power: Add plenty of compost. Compost provides essential nutrients and improves drainage. I usually add about 1/3 compost to the potting mix.
* Perlite or Vermiculite: These help improve drainage and aeration. Add about 1/4 perlite or vermiculite to the mix.
* Slow-Release Fertilizer: Incorporate a slow-release fertilizer into the soil mix. This will provide a steady supply of nutrients to your asparagus plants. Follow the instructions on the fertilizer package.
* pH Level: Asparagus prefers a slightly acidic to neutral soil pH (around 6.5-7.0). You can test your soil pH with a soil testing kit and amend it if necessary.
Planting Asparagus Crowns
Now for the fun part – planting the asparagus crowns!
1. Choose Your Crowns: Purchase asparagus crowns from a reputable nursery. Look for healthy, one-year-old crowns. They should have plump, firm roots.
2. Soak the Crowns: Before planting, soak the crowns in water for about an hour. This will rehydrate them and give them a good start.
3. Dig a Trench: In your prepared container, dig a trench that’s about 6 inches deep and 12 inches wide.
4. Create Mounds: Space the crowns about 12 inches apart in the trench. Create small mounds of soil in the bottom of the trench for each crown.
5. Position the Crowns: Place each crown on top of a mound, spreading the roots out around it.
6. Cover the Crowns: Gently cover the crowns with about 2 inches of soil.
7. Water Thoroughly: Water the newly planted crowns thoroughly.
Watering and Fertilizing
Proper watering and fertilizing are essential for healthy asparagus growth.
* Watering: Water deeply whenever the top inch of soil feels dry. Avoid overwatering, as this can lead to root rot.
* Fertilizing: Fertilize your asparagus plants regularly throughout the growing season. Use a balanced fertilizer or a fertilizer specifically formulated for vegetables. Follow the instructions on the fertilizer package. I like to use a liquid fertilizer every few weeks.
* Mulching: Apply a layer of mulch around the base of the plants. This will help retain moisture, suppress weeds, and regulate soil temperature. I use straw or shredded bark.
Weeding and Pest Control
Keep your asparagus patch weed-free and protect it from pests.
* Weeding: Regularly remove any weeds that pop up in your container. Weeds compete with asparagus for nutrients and water.
* Pest Control: Keep an eye out for common asparagus pests, such as asparagus beetles and aphids. If you spot any pests, treat them with an appropriate insecticide or organic pest control method. I prefer using insecticidal soap for aphids.
* Disease Prevention: Ensure good air circulation around your plants to prevent fungal diseases. Avoid overhead watering, which can promote fungal growth.
The Waiting Game: Patience is Key!
Asparagus takes time to mature. Don’t expect to harvest any spears in the first year.
* First Year: Let the plants grow and establish themselves. Resist the urge to harvest any spears.
* Second Year: You can harvest a few spears in the second year, but don’t overdo it.
* Third Year and Beyond: In the third year and beyond, you can harvest asparagus spears for 6-8 weeks each spring.
Harvesting Asparagus Spears
Finally, the moment you’ve been waiting for – harvesting your own rooftop asparagus!
1. Harvest Time: Harvest asparagus spears when they are about 6-8 inches tall and the tips are still tightly closed.
2. Cutting Technique: Use a sharp knife to cut the spears at ground level.
3. Harvesting Period: Harvest spears regularly throughout the harvesting period. This will encourage the plants to produce more spears.
4. Stop Harvesting: Stop harvesting when the spears become thin and spindly. This indicates that the plants need to rest.
5. Post-Harvest Care: After the harvesting period, let the plants grow and fern out. This will allow them to store energy for the next year’s growth.
Winterizing Your Asparagus Patch
Prepare your asparagus patch for the winter months.
* Cut Back Ferns: In late fall or early winter, after the ferns have turned brown, cut them back to ground level.
* Mulch Heavily: Apply a thick layer of mulch around the base of the plants. This will protect the roots from freezing temperatures.
* Water Sparingly: Water sparingly during the winter months.
Troubleshooting Common Problems
Even with the best care, you might encounter some problems. Here are a few common issues and how to address them:
* Yellowing Foliage: This could be a sign of nutrient deficiency, overwatering, or disease. Check your soil pH and nutrient levels, and adjust your watering accordingly.
* Thin Spears: This could be a sign of over-harvesting or nutrient deficiency. Reduce the harvesting period and fertilize your plants regularly.
* Asparagus Beetles: These pests can damage the foliage and spears. Treat them with an appropriate insecticide or organic pest control method.
* Root Rot: This is caused by overwatering. Ensure good drainage and avoid overwatering.
Enjoying Your Rooftop Asparagus
Growing asparagus on your rooftop is a rewarding experience. Not only will you enjoy fresh, delicious asparagus, but you’ll also have the satisfaction of knowing that you grew it yourself. So, get started today and enjoy the fruits (or rather, vegetables) of your labor! Remember to be patient, persistent, and enjoy the process. Happy gardening!
Conclusion
So, there you have it! Transforming your rooftop into a thriving asparagus patch is not only achievable but incredibly rewarding. We’ve walked you through the entire process, from selecting the right crowns to establishing a sustainable watering and feeding routine. But why should you embark on this rooftop asparagus adventure?
Simply put, the taste of freshly harvested, homegrown asparagus is unparalleled. Forget the bland, often woody stalks you find in the grocery store. Rooftop-grown asparagus offers a sweetness and tenderness that will redefine your perception of this springtime delicacy. Imagine stepping out onto your roof, snipping a handful of spears, and incorporating them into your dinner within minutes. The freshness is unmatched, and the satisfaction of nurturing your own food source is deeply fulfilling.
Beyond the superior flavor, growing your own asparagus is an environmentally conscious choice. You’re reducing your carbon footprint by eliminating transportation and packaging, and you have complete control over the growing process, ensuring no harmful pesticides or herbicides are used. Plus, asparagus is a perennial crop, meaning once established, your rooftop garden will provide you with years of delicious harvests.
But the benefits don’t stop there. Rooftop gardening, in general, offers numerous advantages, including improved air quality, reduced urban heat island effect, and increased property value. And let’s not forget the sheer joy of connecting with nature in an urban environment. Tending to your asparagus patch can be a therapeutic and meditative experience, providing a welcome escape from the hustle and bustle of city life.
Ready to take your rooftop asparagus growing to the next level? Consider these variations:
* Vertical Asparagus Growing: If space is limited, explore vertical growing methods using trellises or repurposed pallets. This allows you to maximize your yield in a smaller footprint.
* Companion Planting: Enhance your asparagus patch by incorporating companion plants like tomatoes, basil, and parsley. These plants can deter pests, improve soil health, and attract beneficial insects.
* Different Asparagus Varieties: Experiment with different asparagus varieties to discover your favorite flavor profiles. ‘Jersey Knight’ is a popular choice for its high yield and disease resistance, while ‘Purple Passion’ offers a unique color and sweeter taste.
* Extending the Season: Use cold frames or row covers to extend your asparagus harvesting season. This will allow you to enjoy fresh asparagus for a longer period.
We understand that embarking on a new gardening project can be daunting, but we encourage you to take the leap and experience the joys of rooftop asparagus growing firsthand. The rewards are well worth the effort.
So, grab your gardening gloves, gather your supplies, and get ready to transform your rooftop into an asparagus oasis. We’re confident that you’ll be amazed by the results.
Now, we want to hear from you! Have you tried growing asparagus on your rooftop? What challenges did you face, and what successes did you achieve? Share your experiences, tips, and photos in the comments below. Let’s create a community of rooftop asparagus enthusiasts and inspire others to embrace this rewarding and sustainable practice. Your insights could be invaluable to fellow gardeners. Happy growing!
Frequently Asked Questions (FAQ)
What kind of soil is best for rooftop asparagus growing?
Asparagus thrives in well-drained, sandy loam soil that is rich in organic matter. The ideal pH level is between 6.5 and 7.5. Before planting, amend your soil with compost, aged manure, or other organic materials to improve drainage, fertility, and water retention. Avoid heavy clay soils, as they can become waterlogged and lead to root rot. If you’re using raised beds or containers, choose a high-quality potting mix specifically formulated for vegetables. Consider adding perlite or vermiculite to further enhance drainage. Regular soil testing is recommended to monitor pH levels and nutrient deficiencies.
How much sunlight does rooftop asparagus need?
Asparagus requires at least 6-8 hours of direct sunlight per day to thrive. Choose a rooftop location that receives ample sunlight throughout the growing season. If your rooftop is partially shaded, try to position your asparagus patch to maximize sun exposure. Southern-facing rooftops typically receive the most sunlight. Insufficient sunlight can result in weak, spindly growth and reduced yields. Monitor your asparagus plants closely and adjust their location if necessary to ensure they receive adequate sunlight.
How often should I water my rooftop asparagus?
Water your asparagus regularly, especially during dry periods. Aim to keep the soil consistently moist but not waterlogged. Water deeply and thoroughly, allowing the water to penetrate the root zone. Avoid frequent, shallow watering, as this can encourage shallow root growth. The frequency of watering will depend on factors such as weather conditions, soil type, and container size. Check the soil moisture regularly by inserting your finger into the soil. If the top inch feels dry, it’s time to water. Consider using a soaker hose or drip irrigation system to deliver water directly to the roots and minimize water waste.
When is the best time to harvest rooftop asparagus?
The harvesting season typically begins in the spring, about two to three years after planting. Harvest spears when they are 6-8 inches tall and about as thick as your finger. Use a sharp knife to cut the spears at or slightly below the soil surface. Avoid cutting too close to the crown, as this can damage the plant. Harvest spears every day or two during the peak season. As the season progresses, the spears will become thinner and less tender. Stop harvesting when the spears become significantly smaller or when the plant begins to fern out. Allow the ferns to grow and mature throughout the summer to replenish the plant’s energy reserves for the following year.
How do I fertilize my rooftop asparagus?
Asparagus is a heavy feeder and requires regular fertilization to maintain healthy growth and high yields. Apply a balanced fertilizer (e.g., 10-10-10) in the spring, just before the spears emerge. Side-dress the plants with compost or aged manure throughout the growing season to provide additional nutrients. Avoid over-fertilizing, as this can lead to excessive foliage growth at the expense of spear production. Monitor your plants closely for signs of nutrient deficiencies, such as yellowing leaves or stunted growth. Adjust your fertilization schedule accordingly. Consider using a slow-release fertilizer to provide a steady supply of nutrients over a longer period.
How do I protect my rooftop asparagus from pests and diseases?
Asparagus is generally resistant to pests and diseases, but certain problems can occur. Common pests include asparagus beetles, aphids, and spider mites. Inspect your plants regularly for signs of infestation and take action promptly. Handpick beetles and larvae, or use insecticidal soap or neem oil to control infestations. Diseases such as rust and crown rot can also affect asparagus. Ensure good air circulation around your plants to prevent fungal diseases. Avoid overwatering and improve drainage to prevent crown rot. Remove and destroy any infected plant material to prevent the spread of disease. Consider using organic fungicides if necessary.
Can I grow asparagus in containers on my rooftop?
Yes, asparagus can be successfully grown in containers on a rooftop, but it requires careful planning and attention. Choose large, deep containers (at least 12 inches deep and wide) to accommodate the extensive root system. Use a high-quality potting mix that is well-draining and rich in organic matter. Water and fertilize regularly, as container-grown plants tend to dry out and deplete nutrients more quickly than those grown in the ground. Provide adequate support for the ferns as they grow. Consider using a trellis or stake to prevent them from falling over. Overwinter your container-grown asparagus in a sheltered location to protect it from extreme cold.
How long does it take for rooftop asparagus to produce a harvest?
It typically takes two to three years for asparagus to produce a significant harvest after planting crowns. During the first year, allow the plants to establish themselves and develop a strong root system. Harvest only a few spears during the second year, and gradually increase the harvest in subsequent years. Patience is key when growing asparagus. The wait is well worth it, as you’ll be rewarded with years of delicious, homegrown asparagus.
What do I do with the asparagus ferns in the fall?
In the fall, after the first frost, the asparagus ferns will turn yellow and brown. Cut the ferns back to the ground level and remove them from the garden. This will help to prevent the spread of disease and pests. Apply a layer of mulch (e.g., straw, leaves, or compost) over the crowns to protect them from winter cold. The mulch will also help to suppress weeds and retain moisture in the soil. In the spring, remove the mulch as the new spears begin to emerge.
Is rooftop asparagus growing worth the effort?
Absolutely! While it requires some initial investment and patience, rooftop asparagus growing is a rewarding and sustainable practice. The taste of freshly harvested, homegrown asparagus is far superior to store-bought varieties. You’ll also have the satisfaction of knowing that you’re growing your own food in an environmentally conscious way. Plus, rooftop gardening offers numerous benefits, including improved air quality, reduced urban heat island effect, and increased property value. So, if you have a sunny rooftop and a passion for gardening, give rooftop asparagus growing a try. You won’t be disappointed!


Leave a Comment