
Growing garlic indoors might sound like a challenge reserved for seasoned gardeners, but trust me, it’s a surprisingly simple and rewarding DIY project that anyone can tackle! Forget those bland, store-bought cloves – imagine the satisfaction of snipping fresh, pungent garlic greens right from your windowsill to add a burst of flavor to your favorite dishes.
For centuries, garlic has been revered not only for its culinary uses but also for its medicinal properties. From ancient Egypt, where it fueled the pyramid builders, to traditional Chinese medicine, garlic has been a staple in various cultures. Now, you can bring this historical powerhouse right into your home!
Why should you try growing garlic indoors? Well, for starters, it’s a fantastic way to have fresh garlic greens readily available, especially during the colder months when outdoor gardening is limited. Plus, it’s incredibly space-efficient, making it perfect for apartment dwellers or anyone with limited outdoor space. I’ve found that growing garlic indoors is also a great way to recycle those sprouting garlic cloves you might otherwise toss in the trash. It’s a win-win: you reduce waste, enjoy fresh herbs, and add a touch of green to your living space. So, let’s dive into some easy DIY tricks and hacks to get you started on your indoor garlic-growing adventure!
Growing Garlic Indoors: A Comprehensive DIY Guide
Okay, garlic lovers, let’s get down to business! Who says you need a sprawling garden to enjoy the pungent, delicious flavor of homegrown garlic? Not me! I’m going to walk you through everything you need to know to successfully grow garlic indoors, right in your own home. Get ready for fresh garlic scapes and bulbs, all year round!
Choosing Your Garlic
First things first, you need garlic! But not just any garlic will do. Here’s what to consider:
* Softneck vs. Hardneck: This is crucial. Softneck varieties are generally better suited for warmer climates and tend to store longer. Hardneck varieties are more cold-hardy and produce a flower stalk called a scape. For indoor growing, I recommend starting with a softneck variety like ‘California Early’ or ‘Silverskin’ because they are more adaptable to indoor conditions and less demanding in terms of cold stratification (more on that later).
* Source Matters: Don’t just grab a bulb from the grocery store! While it *might* work, grocery store garlic is often treated to prevent sprouting. Your best bet is to source your garlic from a local farmer’s market, a reputable online seed supplier, or a garden center. Look for organic garlic to avoid any unwanted chemicals.
* Healthy Bulbs: Inspect the bulbs carefully. Choose firm, plump bulbs with no signs of mold, rot, or damage. The cloves should be tightly packed and not loose.
Preparing Your Garlic for Planting
Before we get our hands dirty, we need to prep the garlic. This step is important for successful sprouting.
1. Separate the Cloves: Gently separate the cloves from the bulb. Be careful not to damage the papery skin surrounding each clove. Leave the skin intact, as it protects the clove and helps retain moisture.
2. Choose the Best Cloves: Select the largest, healthiest-looking cloves for planting. Smaller cloves may still sprout, but they’ll likely produce smaller bulbs.
3. Optional: Cold Stratification (For Hardneck Varieties): If you’re determined to grow a hardneck variety indoors, you’ll need to mimic the cold winter conditions they require. Place the separated cloves in a paper bag and store them in the refrigerator (not the freezer!) for 4-8 weeks. This process, called cold stratification, helps break dormancy and encourages sprouting. Softneck varieties generally don’t need this step, but it won’t hurt them either.
Planting Your Garlic
Now for the fun part! Let’s get those cloves in the soil.
1. Choose the Right Container: Garlic needs room to grow, so select a pot that’s at least 6-8 inches deep and wide for each clove. A wider pot is better than a deeper one, as garlic roots tend to spread out rather than down. Make sure the pot has drainage holes!
2. Select a Good Potting Mix: Use a well-draining potting mix. Avoid using garden soil, as it can compact and hinder drainage. A mix of potting soil, perlite, and vermiculite is ideal.
3. Fill the Pot: Fill the pot with the potting mix, leaving about an inch of space at the top.
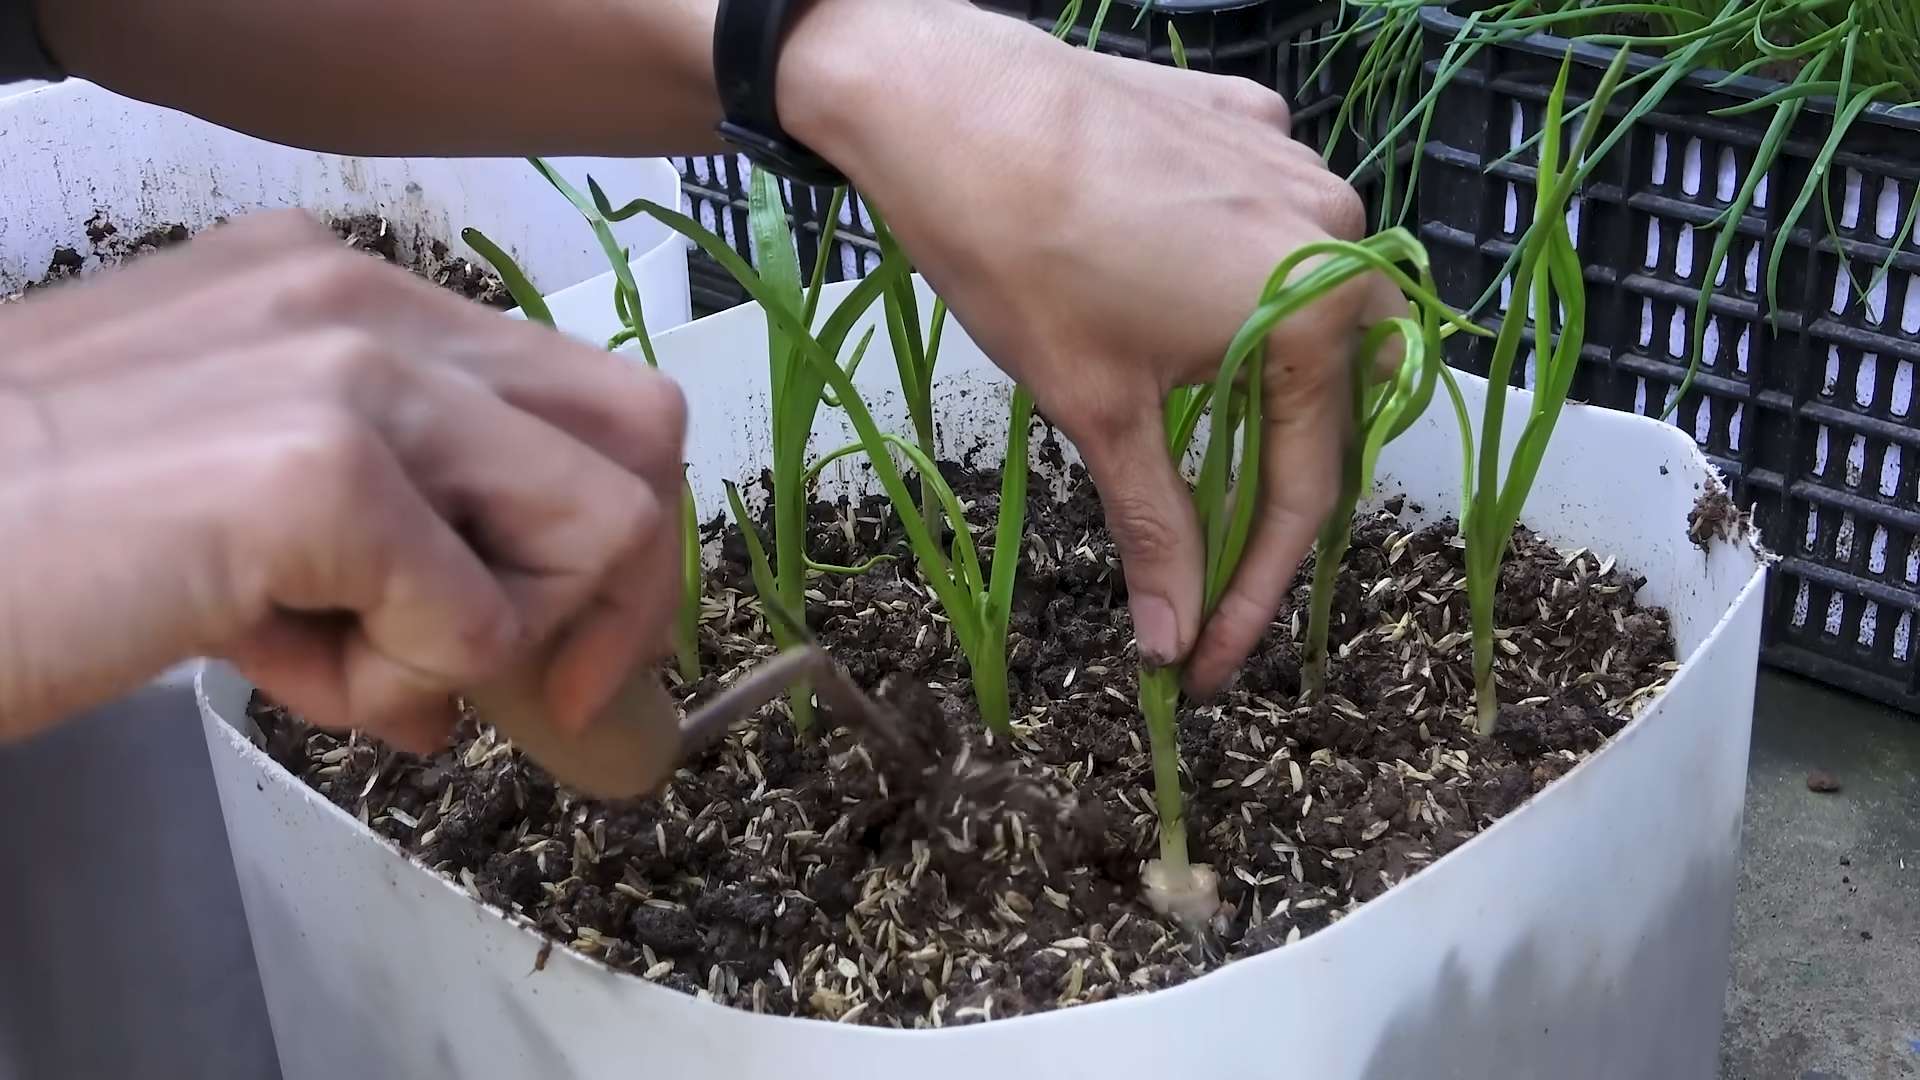
4. Plant the Cloves: Plant the cloves pointy-side up, about 2 inches deep and 4-6 inches apart. The pointy end is where the sprout will emerge.
5. Water Thoroughly: Water the soil thoroughly after planting, until water drains out of the drainage holes. This helps settle the soil and encourages root growth.
Caring for Your Indoor Garlic
Garlic is relatively low-maintenance, but it does need some TLC to thrive indoors.
1. Light: Garlic needs plenty of sunlight, at least 6-8 hours per day. Place your pot in a sunny windowsill or under a grow light. If you’re using a grow light, position it about 6-12 inches above the plants. Rotate the pot regularly to ensure even growth.
2. Watering: Water the garlic regularly, but don’t overwater. Allow the top inch of soil to dry out between waterings. Overwatering can lead to root rot. Check the soil moisture by sticking your finger into the soil. If it feels dry, it’s time to water.
3. Fertilizing: Garlic is a heavy feeder, so it needs regular fertilization. Start fertilizing about 2-3 weeks after planting, once the sprouts have emerged. Use a balanced liquid fertilizer, diluted to half strength, every 2-3 weeks.
4. Temperature: Garlic prefers cooler temperatures, around 60-70°F (15-21°C). Avoid placing your pot near a heat source, such as a radiator.
5. Pest Control: Keep an eye out for pests, such as aphids and spider mites. If you notice any pests, treat them with insecticidal soap or neem oil.
6. Removing Scapes (For Hardneck Varieties): If you’re growing a hardneck variety, you’ll notice a flower stalk, called a scape, emerging from the plant. Remove the scape as soon as it starts to curl. This will encourage the plant to put more energy into bulb development. Scapes are also delicious! You can use them in stir-fries, pesto, or as a garnish.
Harvesting Your Garlic
The moment we’ve all been waiting for! Harvesting your homegrown garlic.
1. Harvesting Garlic Scapes (For Hardneck Varieties): As mentioned earlier, harvest the scapes when they start to curl. Simply snip them off with scissors or pruning shears.
2. Harvesting Garlic Bulbs: The timing of garlic bulb harvest depends on the variety and growing conditions. Generally, garlic is ready to harvest when the lower leaves start to turn yellow and brown. This usually happens about 8-9 months after planting.
3. Gently Dig Up the Bulbs: Carefully dig up the bulbs with a trowel or garden fork. Be careful not to damage the bulbs.
4. Curing the Garlic: Curing is essential for long-term storage. Gently brush off any excess soil from the bulbs. Tie the garlic plants together in bundles of 4-6 bulbs and hang them in a cool, dry, well-ventilated place for 2-3 weeks. The garlic is cured when the necks are dry and the outer skins are papery.
5. Storing Your Garlic: Once the garlic is cured, you can store it in a cool, dry, dark place. Braiding the garlic is a traditional way to store it, but you can also store it in a mesh bag or a basket. Properly cured and stored garlic can last for several months.
Troubleshooting
Even with the best care, you might encounter some challenges. Here are a few common problems and how to address them:
* Yellowing Leaves: This could be a sign of overwatering, underwatering, nutrient deficiency, or pest infestation. Check the soil moisture and adjust your watering accordingly. Fertilize regularly and inspect the plants for pests.
* Slow Growth: This could be due to insufficient light, poor soil, or cold temperatures. Make sure your garlic is getting enough sunlight and that the soil is well-draining. Provide supplemental heat if necessary.
* Small Bulbs: This could be caused by insufficient fertilization, overcrowding, or harvesting too early. Fertilize regularly, thin out the plants if necessary, and wait until the lower leaves start to turn yellow before harvesting.
* Root Rot: This is usually caused by overwatering. Make sure your pot has drainage holes and allow the soil to dry out between waterings.
Enjoying Your Homegrown Garlic
Now that you’ve successfully grown and harvested your own garlic, it’s time to enjoy the fruits (or rather, bulbs!) of your labor. Use it in all your favorite recipes, from garlic bread to pasta sauce to roasted vegetables. The flavor of homegrown garlic is so much more intense and delicious than store-bought garlic.
And there you have it! Growing garlic indoors is a rewarding and relatively easy project that anyone can do. With a little patience and care, you can enjoy fresh, flavorful garlic all year round. Happy growing!
Conclusion
So, there you have it! Growing garlic indoors is not only possible, but it’s also surprisingly rewarding. Forget those last-minute grocery store runs when you’re missing that crucial clove; with this simple DIY trick, you can have fresh, flavorful garlic greens right at your fingertips. We’ve walked you through the process, from selecting the right cloves to providing the optimal environment for growth.
But why is this a must-try? Beyond the convenience, consider the sheer satisfaction of nurturing something from a single clove to a vibrant, edible plant. It’s a small connection to nature, a little burst of green in your home, and a constant source of fresh flavor. Plus, it’s incredibly sustainable – reducing your reliance on commercially grown garlic and minimizing your environmental footprint.
This method is particularly beneficial for those living in apartments or areas with limited outdoor space. You don’t need a garden; a sunny windowsill is all it takes. And even if you have a sprawling garden, indoor garlic cultivation allows you to extend the growing season and enjoy fresh garlic greens year-round.
Don’t be afraid to experiment! Try different varieties of garlic to see which ones thrive best in your indoor environment. Some varieties, like softneck garlic, are known for producing more abundant greens. You can also play around with different containers and potting mixes to find what works best for you. Consider using a self-watering pot to simplify the watering process, especially if you tend to forget.
Another fun variation is to focus solely on growing garlic greens, rather than trying to produce full bulbs indoors. Garlic greens have a milder, more delicate flavor than the cloves themselves, making them perfect for salads, stir-fries, and as a garnish. Simply harvest the greens as needed, and the plant will continue to produce more.
Growing garlic indoors is more than just a gardening project; it’s a way to bring a little bit of the garden into your home, enhance your culinary creations, and connect with the natural world. It’s a simple, satisfying, and sustainable way to enjoy fresh garlic greens whenever you want.
We wholeheartedly encourage you to give this DIY trick a try. It’s easier than you might think, and the rewards are well worth the effort. Once you’ve experienced the joy of harvesting your own fresh garlic greens, you’ll wonder why you didn’t start sooner.
And most importantly, we want to hear about your experience! Share your photos, tips, and stories with us in the comments below. Let us know what worked for you, what challenges you faced, and any creative variations you tried. Your feedback will not only help other readers but also contribute to our collective knowledge of indoor garlic cultivation. Let’s grow together!
Frequently Asked Questions (FAQ)
What kind of garlic should I use for growing indoors?
The best type of garlic to use for growing indoors is softneck garlic. Softneck varieties tend to produce more greens and are generally more adaptable to indoor conditions. However, you can also try growing hardneck garlic, although it may not produce as many greens. Experiment to see what works best for you! Look for organic garlic at your local farmers market or grocery store to avoid any potential chemical treatments.
How much sunlight does indoor garlic need?
Garlic needs at least 6-8 hours of direct sunlight per day to thrive. Place your garlic plants in a sunny windowsill, preferably one that faces south or west. If you don’t have enough natural light, you can supplement with a grow light. Position the grow light a few inches above the plants and keep it on for 12-14 hours per day.
What kind of soil should I use?
Use a well-draining potting mix that is rich in organic matter. A mix of equal parts potting soil, compost, and perlite or vermiculite is ideal. Avoid using garden soil, as it can be too heavy and may contain pests or diseases. Good drainage is crucial to prevent the garlic cloves from rotting.
How often should I water my indoor garlic?
Water your garlic plants when the top inch of soil feels dry to the touch. Avoid overwatering, as this can lead to root rot. Water thoroughly until the water drains out of the bottom of the pot. Reduce watering during the dormant period (if you are trying to grow bulbs).
How long does it take to grow garlic indoors?
You can start harvesting garlic greens in as little as 2-3 weeks. If you’re trying to grow full bulbs, it will take several months, typically 6-8 months. However, growing full bulbs indoors can be challenging, so many people focus on growing garlic greens instead.
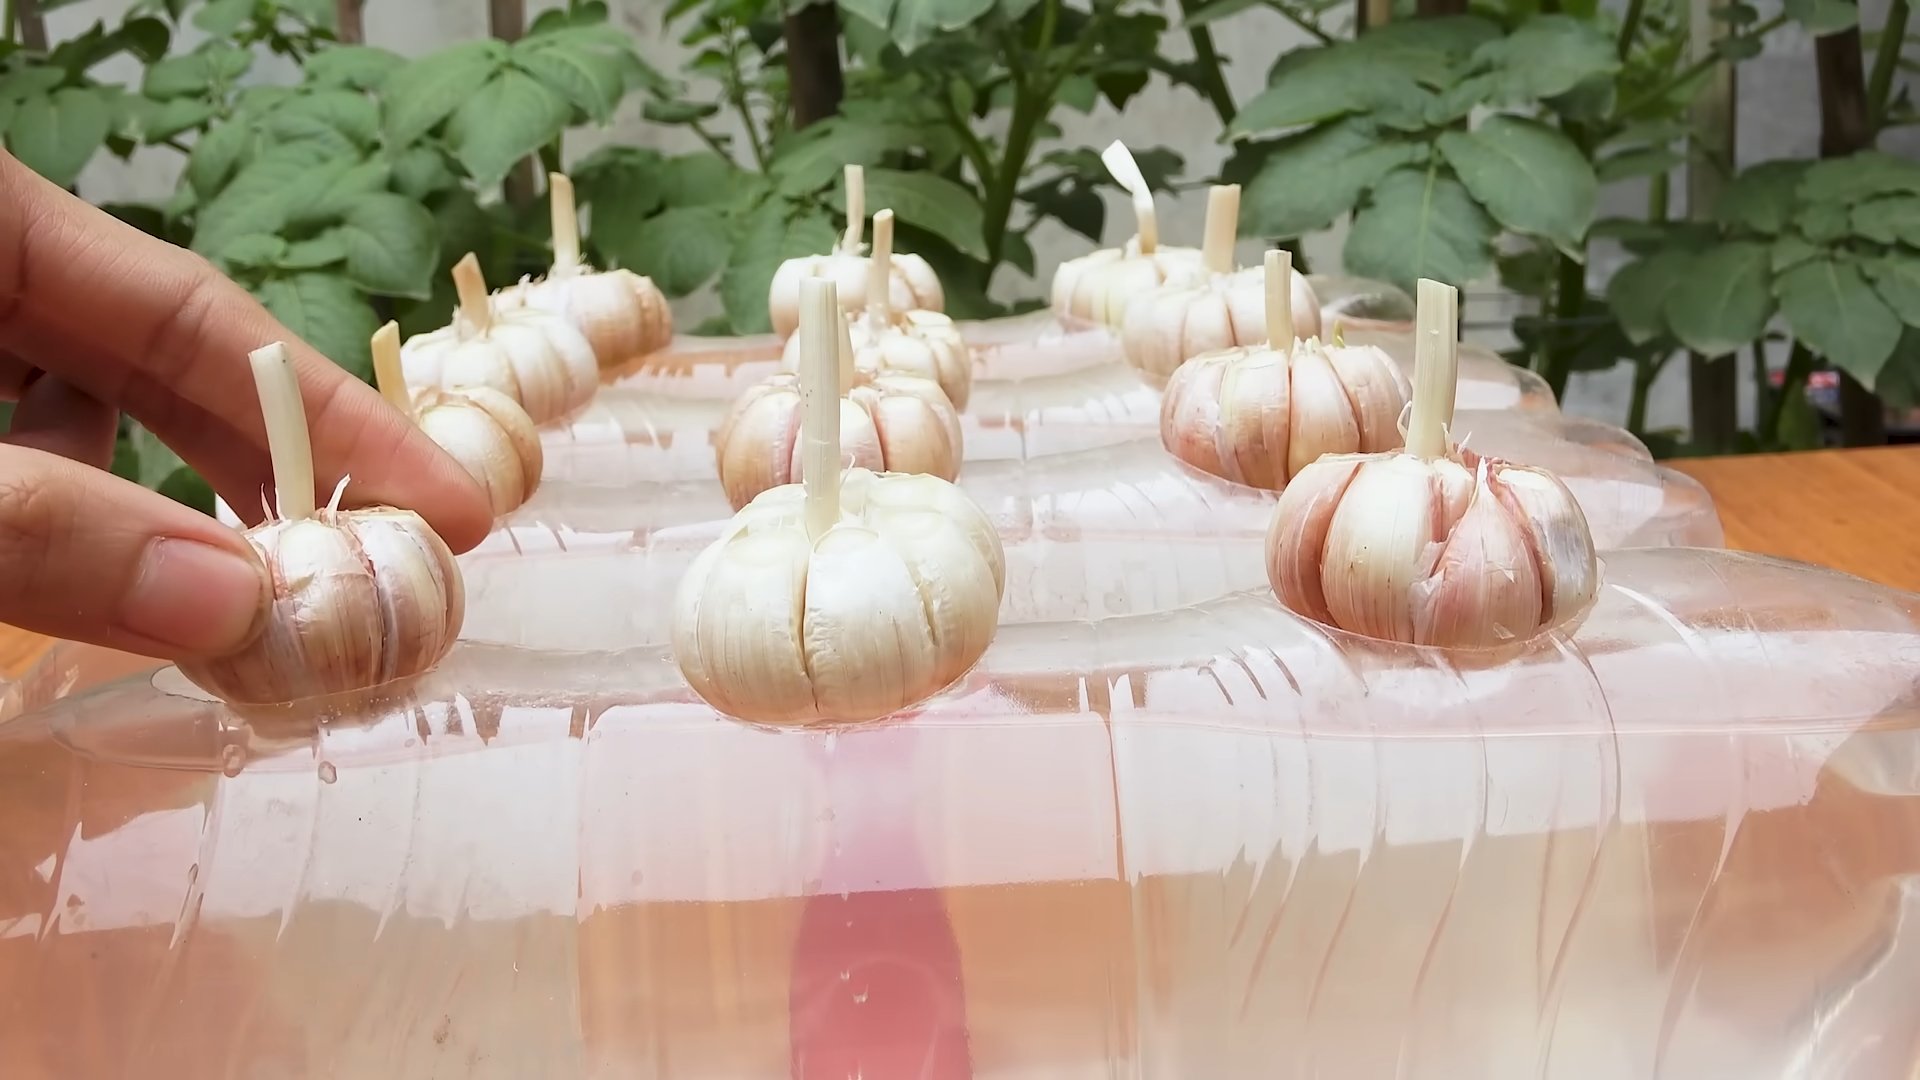
Can I grow garlic indoors in water only?
Yes, you can sprout garlic cloves in water. Place the cloves in a shallow dish of water, with the pointed end facing up. Keep the bottom of the cloves submerged in water, but don’t let the entire clove be submerged. The cloves will sprout roots and greens in a few days. However, for long-term growth and to harvest substantial greens, it’s best to transplant the sprouted cloves into soil.
How do I harvest garlic greens?
To harvest garlic greens, simply snip off the leaves with scissors, leaving about an inch or two of the plant intact. The plant will continue to produce more greens. Harvest the outer leaves first, as they are the oldest. You can harvest garlic greens multiple times throughout the growing season.
What can I do with garlic greens?
Garlic greens have a mild, garlicky flavor and can be used in a variety of dishes. Add them to salads, stir-fries, soups, and omelets. Use them as a garnish for pasta dishes or grilled meats. You can also chop them up and mix them into dips or sauces.
Are there any pests or diseases that affect indoor garlic?
Indoor garlic is generally less susceptible to pests and diseases than outdoor garlic. However, you may encounter aphids, spider mites, or fungus gnats. Inspect your plants regularly and treat any infestations promptly. You can use insecticidal soap or neem oil to control pests. Ensure good air circulation to prevent fungal diseases.
Can I regrow garlic from store-bought cloves?
Yes, you can regrow garlic from store-bought cloves, but it’s best to use organic garlic to avoid any potential chemical treatments. Also, some store-bought garlic may have been treated to prevent sprouting. If you’re having trouble getting store-bought garlic to sprout, try using garlic from a local farmers market or garden center.
What if my garlic cloves don’t sprout?
If your garlic cloves don’t sprout, there could be several reasons. The cloves may be old or damaged, they may have been treated to prevent sprouting, or the growing conditions may not be optimal. Try using fresh, organic garlic cloves and ensure that they are planted in well-draining soil and receive adequate sunlight and water. You can also try soaking the cloves in water for a few hours before planting to help them sprout.
How do I know when to harvest the garlic bulb (if I’m trying to grow one indoors)?
Growing a full garlic bulb indoors is challenging, but if you’re attempting it, look for the following signs of maturity: the lower leaves will start to turn yellow and brown, and the stem will begin to soften. Stop watering a week or two before harvest. Gently dig up the bulb and allow it to cure in a cool, dry place for a few weeks before storing. However, be aware that indoor-grown bulbs may be smaller than those grown outdoors.

Leave a Comment