
Purple Sweet Pepper Growing can seem like a daunting task, but trust me, with a few clever tricks and a little DIY spirit, you can be harvesting vibrant, delicious peppers right from your own backyard! Have you ever dreamed of adding a splash of color and a burst of flavor to your meals with homegrown purple sweet peppers? Well, stop dreaming and start doing! This article is packed with easy-to-follow tips and hacks that will transform your gardening game.
The history of peppers is fascinating, dating back thousands of years in South America. While the vibrant purple variety might be a more modern development, the joy of cultivating your own food connects us to a long line of gardeners who have nurtured the earth. Growing your own food, especially something as unique as purple sweet peppers, is incredibly rewarding.
Why do you need these DIY tricks? Because let’s face it, gardening can be tricky! From pest control to soil preparation, there’s a lot to learn. But don’t worry, I’m here to guide you. These hacks will save you time, money, and frustration, ensuring a bountiful harvest of beautiful purple sweet pepper growing. Plus, imagine the bragging rights when you serve up a dish featuring peppers you grew yourself! Let’s get started and unlock the secrets to successful purple sweet pepper cultivation!
Growing Vibrant Purple Sweet Peppers: A DIY Guide
Hey there, fellow gardening enthusiasts! I’m so excited to share my experience and guide you through growing your own gorgeous purple sweet peppers. These beauties aren’t just visually stunning; they’re also incredibly delicious and packed with nutrients. Trust me, the satisfaction of harvesting your own vibrant purple peppers is unmatched! Let’s dive in!
Choosing the Right Variety
Before we get our hands dirty, it’s crucial to pick the right purple sweet pepper variety. There are a few popular options, each with its own unique characteristics:
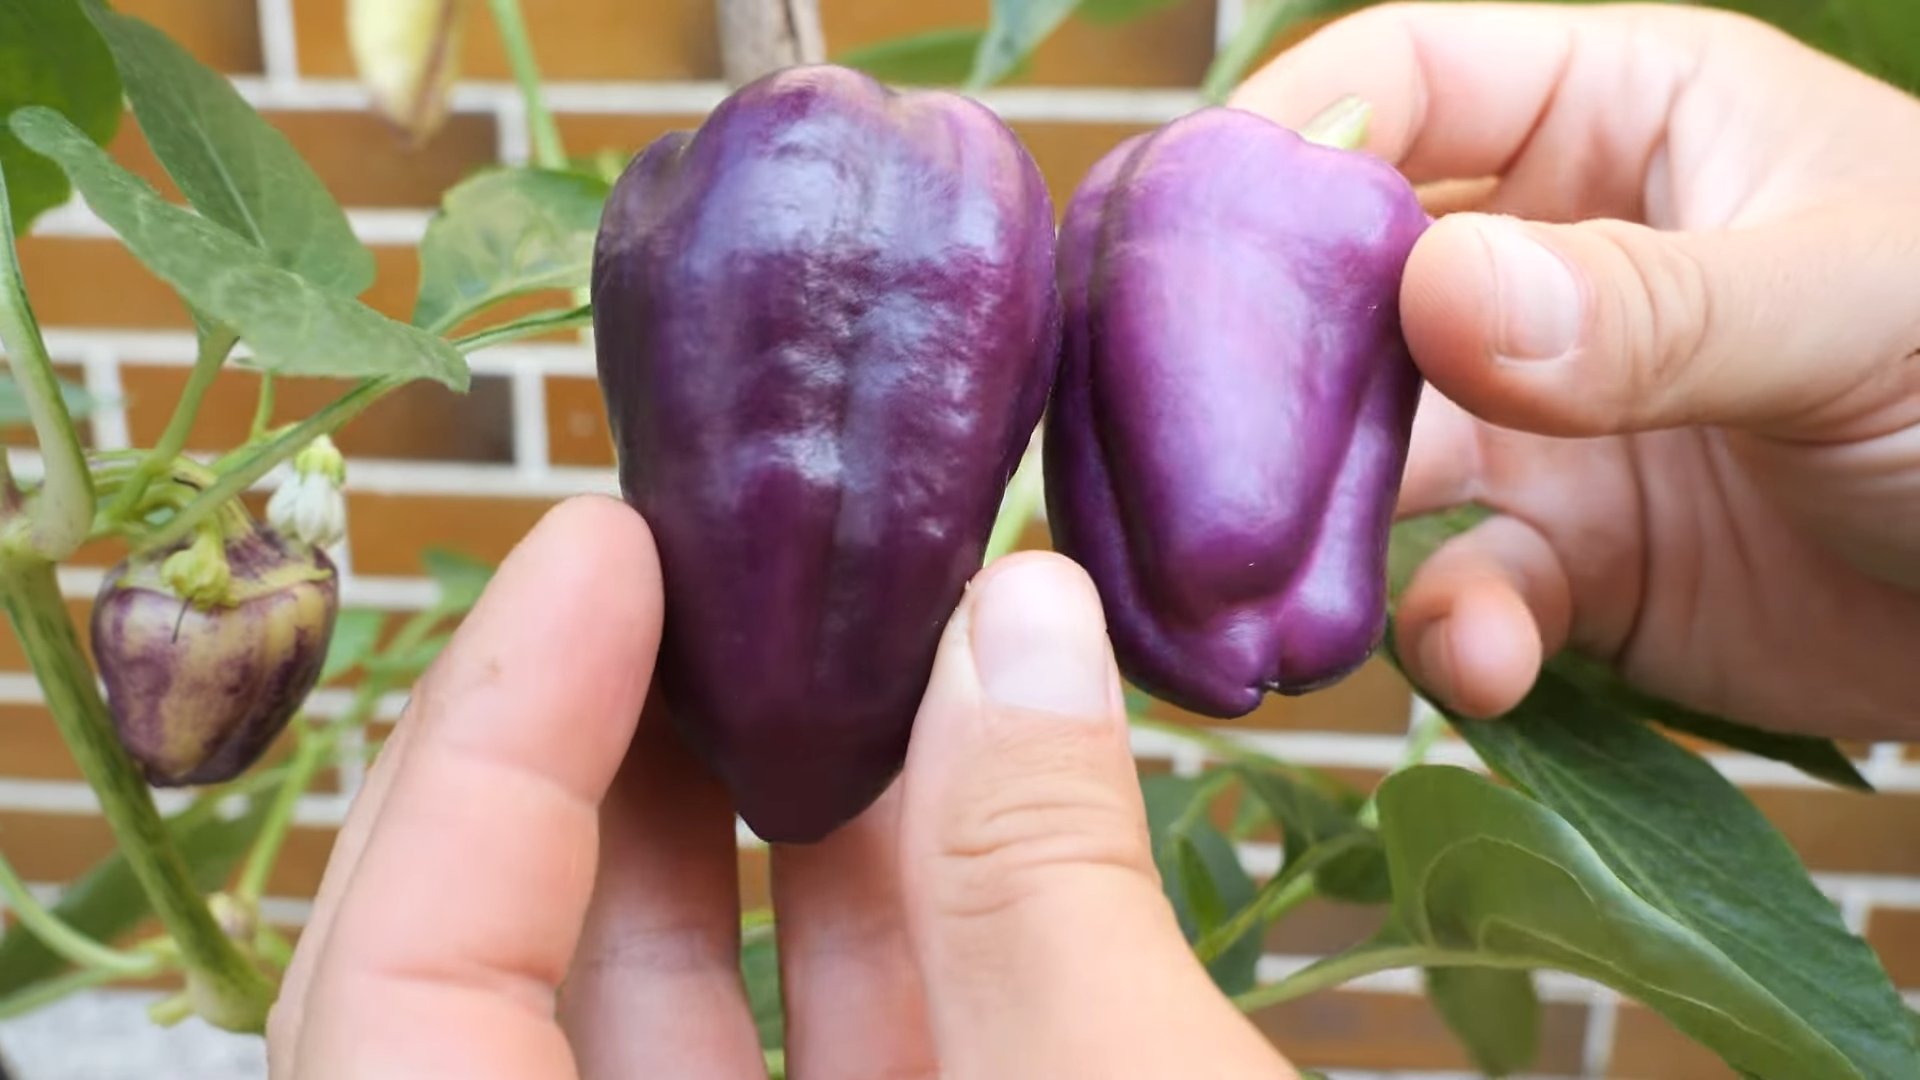
* ‘Purple Beauty’: This is a classic choice, known for its reliability and good yields. The peppers are blocky and turn a deep, rich purple when mature.
* ‘Violetta’: This Italian heirloom variety produces elongated, slightly pointed peppers with a beautiful violet hue. They have a slightly sweeter flavor than ‘Purple Beauty’.
* ‘Sweet Purple’: As the name suggests, this variety is exceptionally sweet and mild. The peppers are smaller and more bell-shaped.
* ‘Islander’: This variety is known for its early maturity and resistance to common pepper diseases. The peppers are a vibrant purple and have a slightly spicy kick.
I personally love growing ‘Purple Beauty’ because of its consistent performance and stunning color. But feel free to experiment and find the variety that best suits your taste and growing conditions!
Starting Your Seeds (or Buying Seedlings)
You have two main options for starting your purple sweet pepper journey: starting from seeds or buying seedlings. Starting from seeds gives you more control over the process and allows you to choose from a wider variety of cultivars. Buying seedlings is a quicker and easier option, especially if you’re short on time or space.
Starting from Seeds:
This is my preferred method because I love watching the tiny seeds sprout and grow into healthy plants.
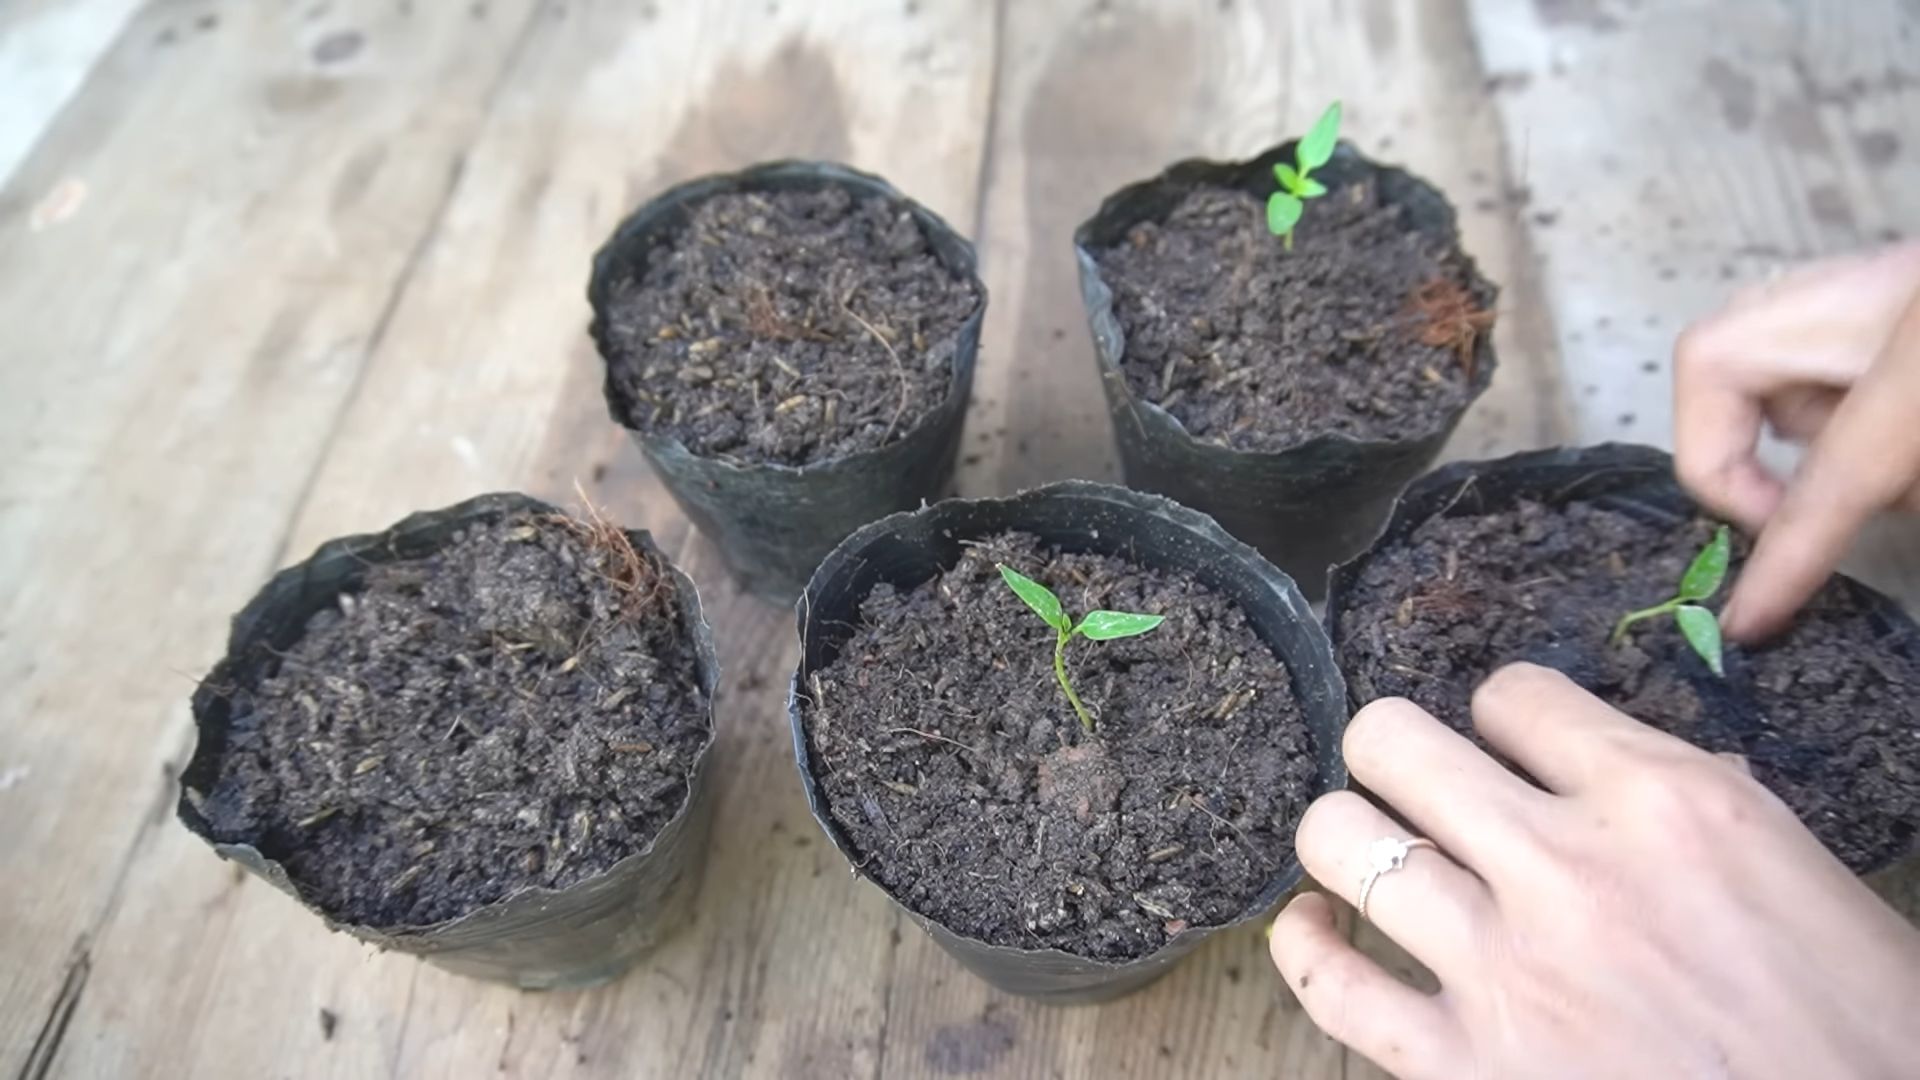
1. Timing is Key: Start your seeds indoors about 6-8 weeks before the last expected frost in your area. This will give them a head start and ensure they’re ready to be transplanted outdoors when the weather warms up.
2. Gather Your Supplies: You’ll need seed starting trays or small pots, seed starting mix (a light and airy soil blend), a spray bottle, and a heat mat (optional, but highly recommended).
3. Sow the Seeds: Fill your seed starting trays or pots with seed starting mix. Moisten the mix thoroughly with a spray bottle. Sow the seeds about ¼ inch deep and gently cover them with more mix.
4. Provide Warmth and Light: Place the trays or pots on a heat mat to maintain a soil temperature of around 75-85°F (24-29°C). This will significantly improve germination rates. Cover the trays with a humidity dome or plastic wrap to create a humid environment. Place the trays under grow lights or in a sunny window.
5. Keep the Soil Moist: Check the soil moisture daily and water gently with a spray bottle when the top inch feels dry. Avoid overwatering, as this can lead to damping off, a fungal disease that can kill seedlings.
6. Harden Off the Seedlings: Once the seedlings have developed a few sets of true leaves (the leaves that look like miniature pepper leaves), it’s time to harden them off. This process gradually acclimates the seedlings to outdoor conditions. Start by placing them outdoors in a sheltered location for an hour or two each day, gradually increasing the amount of time they spend outside over the course of a week or two.
Buying Seedlings:
If you’re opting for seedlings, make sure to choose healthy-looking plants with sturdy stems and vibrant green leaves. Avoid plants that are leggy, yellowed, or have any signs of pests or diseases.
Preparing the Garden Bed
Purple sweet peppers thrive in well-drained soil that is rich in organic matter. Before transplanting your seedlings, it’s essential to prepare the garden bed properly.
1. Choose a Sunny Location: Peppers need at least 6-8 hours of direct sunlight per day to produce abundant fruit. Select a location in your garden that receives plenty of sunshine.
2. Amend the Soil: Amend the soil with compost, well-rotted manure, or other organic matter to improve drainage, fertility, and water retention. I like to add a generous amount of compost to my pepper beds.
3. Check the Soil pH: Peppers prefer a slightly acidic soil pH of around 6.0-6.8. You can test your soil pH with a soil testing kit and amend it accordingly. If your soil is too alkaline, you can add sulfur to lower the pH. If it’s too acidic, you can add lime to raise the pH.
4. Create Raised Beds (Optional): Raised beds can improve drainage and warm up the soil more quickly in the spring. This is especially beneficial in areas with heavy clay soil.
Transplanting Your Seedlings
Once the danger of frost has passed and the soil has warmed up, it’s time to transplant your purple sweet pepper seedlings into the garden.
1. Choose a Cloudy Day: Transplanting on a cloudy day will help reduce transplant shock.
2. Dig Holes: Dig holes that are slightly larger than the root balls of your seedlings. Space the holes about 18-24 inches apart.
3. Gently Remove Seedlings: Gently remove the seedlings from their pots or trays, being careful not to damage the roots.
4. Plant the Seedlings: Place the seedlings in the holes and backfill with soil. Gently firm the soil around the base of the plants.
5. Water Thoroughly: Water the seedlings thoroughly after transplanting.
6. Mulch: Apply a layer of mulch around the plants to help retain moisture, suppress weeds, and regulate soil temperature. I like to use straw or shredded leaves as mulch.
Caring for Your Purple Sweet Pepper Plants
Proper care is essential for ensuring a bountiful harvest of purple sweet peppers.
1. Watering: Water your pepper plants regularly, especially during hot, dry weather. Aim to keep the soil consistently moist but not waterlogged. Water deeply at the base of the plants to avoid wetting the foliage, which can increase the risk of fungal diseases.
2. Fertilizing: Fertilize your pepper plants every 2-3 weeks with a balanced fertilizer or a fertilizer specifically formulated for peppers and tomatoes. Follow the instructions on the fertilizer label. I like to use a liquid fertilizer diluted in water.
3. Pruning: Pruning can help improve air circulation and encourage fruit production. Remove any suckers (small shoots that grow from the base of the plant) and any yellowed or diseased leaves.
4. Staking or Caging: As your pepper plants grow, they may need staking or caging to support the weight of the fruit. This is especially important for taller varieties.
5. Pest and Disease Control: Keep an eye out for common pepper pests such as aphids, flea beetles, and pepper hornworms. You can control these pests with insecticidal soap, neem oil, or by handpicking them off the plants. Prevent fungal diseases by providing good air circulation, avoiding overhead watering, and applying a fungicide if necessary.
Harvesting Your Purple Sweet Peppers
The moment you’ve been waiting for! Harvesting your beautiful purple sweet peppers.
1. Timing is Everything: Purple sweet peppers are typically ready to harvest about 60-80 days after transplanting, depending on the variety. The peppers will turn a deep, rich purple color when they are fully ripe.
2. Gently Harvest: Use pruning shears or a sharp knife to cut the peppers from the plant, leaving a short stem attached.
3. Enjoy Your Harvest: Enjoy your fresh purple sweet peppers in salads, stir-fries, roasted dishes, or simply eat them raw as a healthy snack.
Troubleshooting
Even with the best care, you may encounter some challenges while growing purple sweet peppers. Here are some common problems and how to address them:
* Blossom End Rot: This is a condition caused by calcium deficiency, resulting in dark, sunken spots on the bottom of the peppers. To prevent blossom end rot, ensure your soil is rich in calcium and water your plants consistently. You can also add calcium to the soil by incorporating bone meal or crushed eggshells.
* Sunscald: This occurs when peppers are exposed to excessive sunlight, causing white or tan patches on the fruit. To prevent sunscald, provide some shade for your plants during the hottest part of the day.
* Pest Infestations: As mentioned earlier, keep an eye out for common pepper pests and take action promptly to control them.
* Fungal Diseases: Prevent fungal diseases by providing good air circulation, avoiding overhead watering, and applying a fungicide if necessary.
Saving Seeds (Optional)
If you want to save seeds from your purple sweet peppers to grow them again next year, follow these steps:
1. Choose the Best Peppers: Select the healthiest and most flavorful peppers to save seeds from.
Conclusion
So, there you have it! Growing your own purple sweet peppers is not only achievable, but it’s also incredibly rewarding. From the vibrant color that adds a unique aesthetic to your garden to the delicious, subtly sweet flavor that elevates your culinary creations, these peppers are a true garden gem. We’ve walked you through the essential steps, from selecting the right seeds and nurturing seedlings to providing optimal growing conditions and harvesting your bountiful crop.
Why is this DIY trick a must-try? Because it empowers you to take control of your food source, ensuring you have access to fresh, healthy, and uniquely colored produce. Store-bought peppers simply can’t compare to the satisfaction of harvesting your own, knowing exactly where they came from and how they were grown. Plus, the deep purple hue of these peppers makes them a conversation starter and a stunning addition to any dish.
But don’t stop there! Experiment with different varieties of purple sweet peppers. Some are more compact, perfect for container gardening, while others offer a slightly spicier kick. Consider companion planting to enhance growth and deter pests. Basil, carrots, and onions are all excellent choices for planting alongside your purple sweet peppers.
And speaking of variations, think beyond the garden! Once you’ve harvested your peppers, explore the endless culinary possibilities. Roast them for a smoky sweetness, stuff them with flavorful fillings, pickle them for a tangy treat, or simply slice them raw for a vibrant addition to salads and snacks. The possibilities are truly endless.
We wholeheartedly encourage you to embark on this purple sweet pepper growing adventure. It’s a journey filled with learning, growth, and ultimately, delicious rewards. Don’t be afraid to get your hands dirty, experiment with different techniques, and most importantly, have fun!
Once you’ve successfully grown your own purple sweet peppers, we’d love to hear about your experience! Share your tips, tricks, and photos in the comments below. Let’s create a community of purple pepper enthusiasts and inspire others to discover the joy of growing their own food. Your insights could be invaluable to fellow gardeners, and together, we can cultivate a world filled with vibrant, homegrown goodness. So, get planting, get growing, and get ready to enjoy the sweet taste of success!
Frequently Asked Questions (FAQ)
What are the best conditions for growing purple sweet peppers?
Purple sweet peppers thrive in warm weather and require plenty of sunlight, ideally 6-8 hours per day. The optimal temperature range for growth is between 70-85°F (21-29°C). They also need well-draining soil that is rich in organic matter. Amend your soil with compost or aged manure before planting to provide essential nutrients. Consistent watering is crucial, especially during hot weather, but avoid overwatering, which can lead to root rot.
How long does it take to grow purple sweet peppers from seed?
Growing purple sweet peppers from seed typically takes around 70-80 days from planting to harvest. You’ll need to start the seeds indoors 6-8 weeks before the last expected frost. Once the seedlings have developed several sets of true leaves and the weather has warmed up, you can transplant them outdoors. Be patient, as pepper plants can be slow to start, but once they get going, they’ll reward you with a bountiful harvest.
What are some common pests and diseases that affect purple sweet peppers?
Common pests that can affect purple sweet peppers include aphids, spider mites, and pepper weevils. Regularly inspect your plants for signs of infestation and take action promptly. You can use insecticidal soap or neem oil to control these pests. Diseases such as blossom-end rot, fungal leaf spot, and verticillium wilt can also affect pepper plants. Ensure good air circulation around your plants, avoid overhead watering, and use disease-resistant varieties to minimize the risk of these problems.
How often should I water my purple sweet pepper plants?
Water your purple sweet pepper plants deeply and regularly, especially during hot and dry weather. The soil should be consistently moist but not waterlogged. A good rule of thumb is to water when the top inch of soil feels dry to the touch. Mulching around the base of the plants can help retain moisture and suppress weeds. Consider using a soaker hose or drip irrigation system to deliver water directly to the roots, minimizing water waste and reducing the risk of fungal diseases.
When is the best time to harvest purple sweet peppers?
Purple sweet peppers are typically ready to harvest when they have reached their full size and have developed a deep, vibrant purple color. The peppers should feel firm to the touch. Use pruning shears or a sharp knife to cut the peppers from the plant, leaving a small stem attached. Harvesting regularly will encourage the plant to produce more peppers. Remember that even if some peppers turn green before fully ripening to purple, they are still edible, though the flavor will be less sweet.
Can I grow purple sweet peppers in containers?
Yes, purple sweet peppers can be successfully grown in containers. Choose a container that is at least 12 inches in diameter and has good drainage holes. Use a high-quality potting mix that is well-draining and rich in organic matter. Place the container in a sunny location that receives at least 6-8 hours of sunlight per day. Water regularly and fertilize every 2-3 weeks with a balanced fertilizer. Container-grown peppers may require more frequent watering and fertilization than those grown in the ground.
What are some good companion plants for purple sweet peppers?
Several plants can benefit purple sweet peppers when planted nearby. Basil is a classic companion plant that repels pests and improves the flavor of peppers. Carrots attract beneficial insects that prey on aphids and other pests. Onions and garlic deter pests and can help prevent fungal diseases. Marigolds are also effective at repelling nematodes and other soil pests. Avoid planting peppers near fennel or brassicas (such as cabbage and broccoli), as they can inhibit pepper growth.
How can I prevent blossom-end rot in my purple sweet peppers?
Blossom-end rot is a common problem in peppers, caused by a calcium deficiency. To prevent it, ensure your soil has adequate calcium levels. You can amend your soil with lime or bone meal before planting. Maintain consistent watering to help the plants absorb calcium from the soil. Avoid over-fertilizing with nitrogen, as this can interfere with calcium uptake. If you notice blossom-end rot developing, you can apply a calcium chloride spray to the affected plants.
How do I save seeds from my purple sweet peppers?
Saving seeds from your purple sweet peppers is a great way to ensure you have a supply for future growing seasons. Choose peppers that are fully ripe and healthy. Cut the peppers open and remove the seeds. Spread the seeds out on a paper towel and allow them to dry completely for several days. Once the seeds are dry, store them in an airtight container in a cool, dark, and dry place. Properly stored seeds can remain viable for several years. Note that if you grew hybrid varieties, the seeds may not produce plants that are true to type.
What are some creative ways to use purple sweet peppers in cooking?
Purple sweet peppers are incredibly versatile in the kitchen. They can be roasted, grilled, sautéed, stuffed, pickled, or eaten raw. Their vibrant color makes them a beautiful addition to salads, stir-fries, and vegetable platters. Try roasting them with other vegetables like onions, zucchini, and eggplant for a flavorful side dish. Stuff them with rice, ground meat, or quinoa for a hearty and satisfying meal. Pickle them for a tangy condiment that adds a pop of color and flavor to sandwiches and salads. The possibilities are endless!
Leave a Comment