
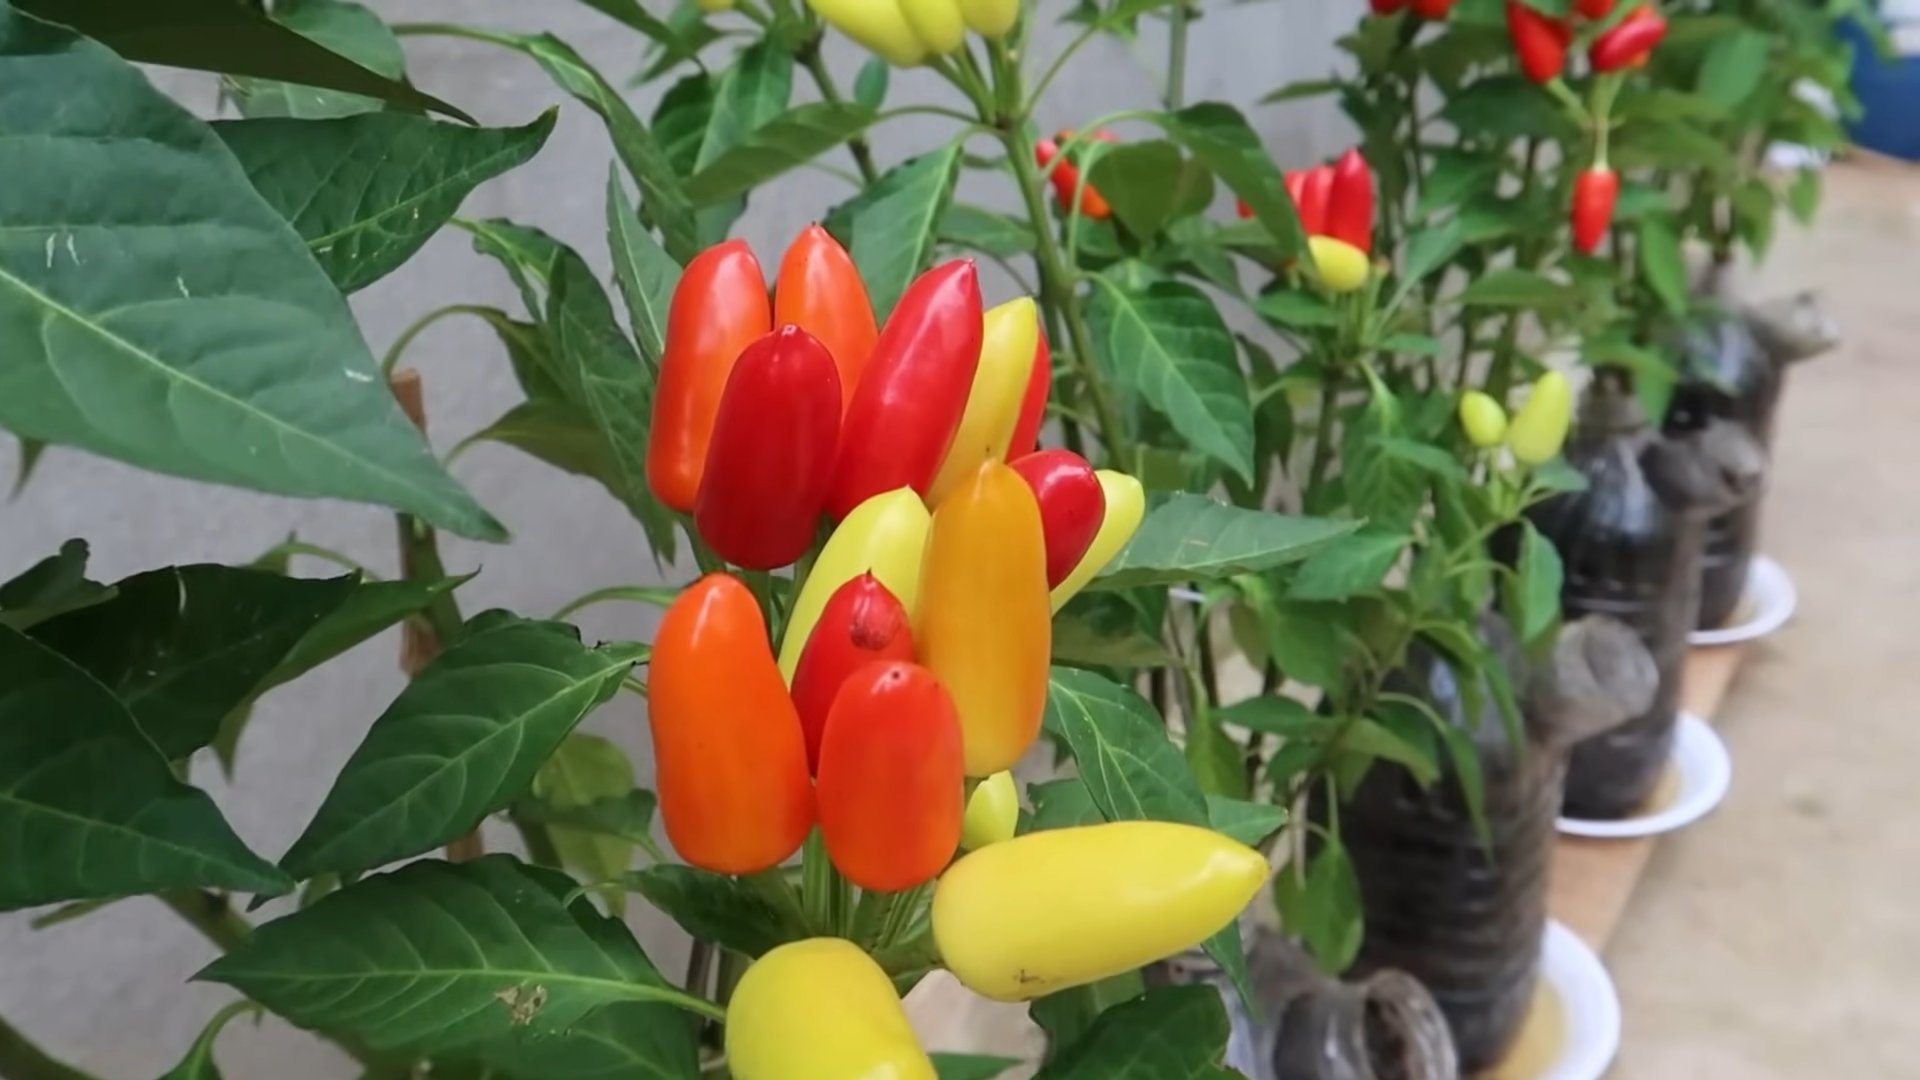
Plastic bottle pepper gardening: who knew that turning trash into treasure could be so rewarding, and so delicious? I’m so excited to share some amazing DIY tricks that will transform your humble plastic bottles into thriving pepper plants! Forget expensive gardening supplies and complicated setups. We’re diving headfirst into a world of upcycled gardening, where resourcefulness meets green thumbs.
Growing peppers has a rich history, dating back thousands of years in South America. From the fiery chilies used in ancient Aztec cuisine to the sweet bell peppers enjoyed worldwide today, these vibrant fruits have always held a special place in our culinary traditions. But you don’t need acres of land to participate in this legacy. With a few simple plastic bottles, you can cultivate your own pepper paradise, even in the smallest of spaces.
Why should you embrace plastic bottle pepper gardening? Well, for starters, it’s incredibly budget-friendly and eco-conscious. We all have those empty plastic bottles piling up, and this is the perfect way to give them a new life while reducing waste. Plus, it’s a fantastic way to control the growing environment, protect your peppers from pests, and enjoy fresh, homegrown produce right at your fingertips. Ready to get started? Let’s unlock the secrets to successful pepper growing, one plastic bottle at a time!
DIY Self-Watering Pepper Planter from a Plastic Bottle
Hey there, fellow gardening enthusiasts! Are you ready to grow some delicious peppers but short on space or time? I’ve got the perfect solution for you: a self-watering pepper planter made from a recycled plastic bottle! This project is super easy, budget-friendly, and a fantastic way to give those plastic bottles a new life. Plus, it’s a great way to ensure your pepper plants get consistent moisture, even when you’re away. Let’s get started!
Materials You’ll Need
Before we dive in, let’s gather our supplies. You probably have most of these lying around already!
* A large plastic bottle (2-liter soda bottle or a similar size works great)
* A sharp knife or scissors
* Potting soil (specifically for vegetables)
* A pepper seedling (your favorite variety!)
* Cotton rope or strips of fabric (for the wicking system)
* Water
* Optional: Spray paint (to decorate your planter)
* Optional: Small pebbles or gravel
Tools You’ll Need
* Scissors or Utility Knife
* Measuring Tape or Ruler
* Marker or Pen
Preparing the Bottle
Okay, first things first, we need to prep our plastic bottle. This is where the magic begins!
1. Clean the Bottle: Make sure your plastic bottle is clean and dry. Remove any labels and sticky residue. A good wash with soap and water will do the trick.
2. Cut the Bottle: This is a crucial step. Using your sharp knife or scissors, carefully cut the bottle in half. You want to cut it horizontally, about one-third of the way down from the top. The top part (with the bottle cap) will be inverted and placed inside the bottom part.
3. Prepare the Top Section: Take the top section of the bottle (the part with the cap). If you want to paint the bottle, now is the time to do it! Let the paint dry completely before moving on.
4. Drill a Hole in the Cap (Optional): Some people prefer to drill a small hole in the bottle cap to allow for better airflow. This is optional, but it can help prevent the soil from becoming waterlogged. If you choose to do this, use a small drill bit and be careful not to crack the cap.
Creating the Wicking System
The wicking system is what makes this planter self-watering. It draws water from the reservoir in the bottom section up to the soil in the top section.
1. Prepare the Wick: Cut a length of cotton rope or fabric strips. The length should be long enough to reach from the bottom of the top section of the bottle to the bottom of the bottom section, with a little extra to spare. I usually aim for about 12-18 inches.
2. Thread the Wick: Thread the rope or fabric strips through the neck of the bottle (where the cap screws on). Make sure a good portion of the wick hangs down into what will be the water reservoir. The rest of the wick should be spread out inside the top portion of the bottle.
Assembling the Planter
Now, let’s put everything together!
1. Add Soil to the Top Section: Fill the top section of the bottle with potting soil, leaving about an inch of space at the top. Gently pack the soil down. Make sure the wick is buried within the soil, but also has enough length to reach the bottom water reservoir.
2. Plant Your Pepper Seedling: Carefully remove your pepper seedling from its container and gently loosen the roots. Dig a small hole in the center of the soil in the top section and plant the seedling. Backfill with soil and gently pat it down.
3. Add Water to the Bottom Section: Fill the bottom section of the bottle with water. This will be your water reservoir.
4. Invert and Place: Carefully invert the top section of the bottle (with the soil and pepper seedling) and place it inside the bottom section, making sure the wick is submerged in the water.
5. Add Pebbles (Optional): If you want to improve drainage and prevent the soil from becoming too soggy, you can add a layer of small pebbles or gravel to the bottom of the top section before adding the soil. This will create a buffer between the soil and the wick.
Caring for Your Self-Watering Pepper Plant
Now that your self-watering pepper planter is assembled, here are a few tips to keep your plant happy and healthy:
* Watering: Check the water level in the bottom section regularly. Refill as needed. The frequency will depend on the weather and the size of your plant.
* Sunlight: Place your planter in a sunny location that receives at least 6-8 hours of direct sunlight per day.
* Fertilizing: Feed your pepper plant with a balanced liquid fertilizer every 2-3 weeks during the growing season. Follow the instructions on the fertilizer label.
* Pruning: Prune your pepper plant regularly to encourage bushier growth and more fruit production. Remove any dead or yellowing leaves.
* Pest Control: Keep an eye out for pests like aphids, whiteflies, and spider mites. Treat any infestations promptly with insecticidal soap or neem oil.
* Support: As your pepper plant grows, it may need support to prevent the branches from breaking under the weight of the fruit. You can use stakes or a small tomato cage.
Troubleshooting
Sometimes things don’t go exactly as planned. Here are a few common issues you might encounter and how to fix them:
* Soil is too dry: If the soil in the top section is dry, even though there’s water in the bottom section, the wick might not be working properly. Make sure the wick is making good contact with both the soil and the water. You might need to adjust the length or thickness of the wick.
* Soil is too wet: If the soil is constantly soggy, even when the water level in the bottom section is low, you might have too much wick. Try using a thinner wick or drilling a small hole in the bottle cap to improve drainage.
* Plant is wilting: Wilting can be caused by a number of factors, including lack of water, too much sun, or pests. Check the soil moisture, adjust the plant’s location, and inspect for pests.
* Plant is not producing fruit: Lack of fruit production can be caused by insufficient sunlight, lack of pollination, or nutrient deficiencies. Make sure your plant is getting enough sunlight, consider hand-pollinating the flowers, and fertilize regularly.
Alternative Wicking Materials
If you don’t have cotton rope or fabric strips, don’t worry! There are other materials you can use for the wicking system:
* Felt strips: Felt is a great alternative to cotton. It’s absorbent and durable.
* Old t-shirts: Cut up an old cotton t-shirt into strips.
* Microfiber cloths: Microfiber cloths are very absorbent and work well as wicks.
* Shoelaces: Cotton shoelaces can also be used.
Decorating Your Planter
While the functionality of this planter is awesome, why not make it look good too? Here are some ideas for decorating your plastic bottle planter:
* Spray paint: Use spray paint to give your planter a fresh new look. Choose colors that complement your garden or home decor.
* Acrylic paint: Use acrylic paint to create intricate designs or patterns on your planter.
* Decoupage: Decoupage is a fun way to decorate your planter with paper cutouts.
* Mosaic tiles: Glue small mosaic tiles onto your planter for a colorful and textured look.
* Twine or rope: Wrap twine or rope around the planter for a rustic look.
Why This Works
The beauty of this self-watering system lies in its simplicity. The wick acts as a bridge, drawing water from the reservoir in the bottom section up to the soil in the top section. This provides a consistent supply of moisture to the pepper plant’s roots, preventing them from drying out. The plastic bottle also helps to retain moisture, reducing the need for frequent watering.
Benefits of Self-Watering Planters
* Conserves water: Self-watering planters reduce water waste by delivering water directly to the plant’s roots.
* Reduces watering frequency: You don’t have to water as often, which is great for busy gardeners or those who travel frequently.
* Prevents overwatering: The wicking system helps to regulate the amount of water the plant receives, preventing overwatering and root rot.
* Promotes healthy growth: Consistent moisture levels promote healthy root development and plant growth.
* Recycles plastic bottles: This project is a great way to reuse plastic bottles and reduce waste.
Growing Other Vegetables
While this guide focuses on growing peppers, you can use this same method to grow
Conclusion
So, there you have it! Transforming a simple plastic bottle into a thriving pepper garden is not just a fun project; it’s a sustainable, space-saving, and incredibly rewarding way to grow your own fresh produce. We’ve walked you through the steps, highlighting the ease and efficiency of this DIY method. But why is this particular trick a must-try?
Firstly, it’s about accessibility. Whether you live in an apartment with a tiny balcony, a suburban home with limited garden space, or simply want to extend your growing season, the plastic bottle pepper garden offers a solution. It democratizes gardening, making it possible for anyone, anywhere, to enjoy the taste of homegrown peppers.
Secondly, it’s about sustainability. Reusing plastic bottles reduces waste and gives these materials a new lease on life. You’re not just growing peppers; you’re contributing to a more environmentally conscious lifestyle. Plus, by growing your own food, you’re reducing your carbon footprint associated with transportation and packaging.
Thirdly, it’s about control. You have complete control over the growing environment, from the soil composition to the watering schedule. This allows you to tailor the conditions to the specific needs of your pepper plants, resulting in healthier, more flavorful peppers.
But the beauty of this DIY project lies in its adaptability. Feel free to experiment with different types of plastic bottles. Larger bottles can accommodate larger pepper varieties, while smaller bottles are perfect for compact spaces. You can also explore different soil mixes to find what works best for your local climate and pepper type. Consider adding organic fertilizers or compost to boost growth and flavor.
For those looking to take their plastic bottle pepper garden to the next level, consider creating a vertical garden by hanging multiple bottles from a wall or fence. This not only maximizes space but also adds a visually appealing element to your outdoor area. You can also experiment with different pepper varieties, from sweet bell peppers to fiery habaneros, to create a diverse and flavorful harvest.
Don’t be afraid to get creative with your watering system. You can create a self-watering system by adding a wick to the bottom of the bottle that draws water from a reservoir. This is especially useful if you’re prone to forgetting to water your plants or if you’re going away on vacation.
The possibilities are endless! The key is to have fun and experiment. This is your chance to unleash your inner gardener and create a unique and thriving pepper garden that reflects your personal style and preferences.
We are confident that you’ll find this DIY plastic bottle pepper gardening trick to be a game-changer. It’s simple, effective, and incredibly satisfying. So, grab a plastic bottle, some soil, and your favorite pepper seeds, and get started today!
We can’t wait to hear about your experiences. Share your photos, tips, and tricks with us in the comments below. Let’s create a community of plastic bottle pepper gardeners and inspire others to embrace sustainable and rewarding gardening practices. Happy growing!
FAQ
What types of peppers are best suited for growing in plastic bottles?
Almost any pepper variety can be grown in plastic bottles, but smaller to medium-sized varieties tend to thrive best. Bell peppers, jalapeños, chili peppers, and even some smaller habanero varieties are all excellent choices. Consider the size of the bottle when selecting your pepper variety. Larger bottles can accommodate larger plants, while smaller bottles are better suited for compact varieties. Also, consider your local climate and choose pepper varieties that are well-suited to your growing conditions.
How often should I water my plastic bottle pepper plants?
Watering frequency depends on several factors, including the size of the bottle, the type of soil, the climate, and the stage of growth of the pepper plant. Generally, you should water your plants when the top inch of soil feels dry to the touch. Avoid overwatering, as this can lead to root rot. In hot, dry weather, you may need to water your plants daily, while in cooler, wetter weather, you may only need to water them every few days. A good rule of thumb is to check the soil moisture regularly and water accordingly. Consider using a moisture meter to get a more accurate reading of the soil moisture level.
What kind of soil should I use for my plastic bottle pepper garden?
A well-draining potting mix is essential for growing healthy pepper plants in plastic bottles. Avoid using garden soil, as it can be too heavy and compact, leading to poor drainage and root rot. A good potting mix should be lightweight, airy, and rich in organic matter. You can also amend your potting mix with perlite or vermiculite to improve drainage and aeration. Consider adding compost or other organic fertilizers to provide your plants with the nutrients they need to thrive.
How much sunlight do my plastic bottle pepper plants need?
Pepper plants need at least 6-8 hours of direct sunlight per day to thrive. Choose a location for your plastic bottle pepper garden that receives plenty of sunlight. If you live in a hot climate, you may need to provide some afternoon shade to protect your plants from scorching. If you don’t have access to enough sunlight, you can supplement with grow lights.
How do I fertilize my plastic bottle pepper plants?
Pepper plants are heavy feeders and require regular fertilization to produce a bountiful harvest. You can use a balanced liquid fertilizer or a slow-release granular fertilizer. Follow the instructions on the fertilizer package carefully. Avoid over-fertilizing, as this can damage your plants. You can also amend your soil with compost or other organic fertilizers to provide your plants with a steady supply of nutrients. Consider using a fertilizer specifically formulated for peppers and tomatoes, as these fertilizers are typically high in phosphorus, which is essential for fruit production.
How do I prevent pests and diseases in my plastic bottle pepper garden?
Regularly inspect your plants for signs of pests and diseases. Common pests that affect pepper plants include aphids, whiteflies, and spider mites. You can control these pests with insecticidal soap or neem oil. Common diseases that affect pepper plants include powdery mildew and blossom end rot. You can prevent these diseases by providing good air circulation, avoiding overwatering, and ensuring that your plants have adequate calcium. Consider using organic pest control methods whenever possible to protect the environment and your health.
Can I grow peppers indoors in plastic bottles?
Yes, you can grow peppers indoors in plastic bottles, but you will need to provide them with adequate light and warmth. Place your plants near a sunny window or use grow lights to supplement the natural light. Maintain a consistent temperature of around 70-80 degrees Fahrenheit. Be sure to water your plants regularly and fertilize them as needed. Indoor pepper plants may require more attention than outdoor plants, but they can still produce a bountiful harvest.
How do I transplant my pepper seedlings into plastic bottles?
When your pepper seedlings are about 4-6 inches tall, they are ready to be transplanted into plastic bottles. Carefully remove the seedlings from their original containers and gently loosen the roots. Dig a hole in the potting mix in the plastic bottle and place the seedling in the hole. Gently firm the soil around the seedling and water thoroughly. Be sure to handle the seedlings with care to avoid damaging the roots.
What are some variations I can try with my plastic bottle pepper garden?
There are many variations you can try with your plastic bottle pepper garden. You can create a vertical garden by hanging multiple bottles from a wall or fence. You can also experiment with different types of plastic bottles, such as soda bottles, water bottles, or milk jugs. You can also try growing other vegetables or herbs in plastic bottles, such as tomatoes, lettuce, or basil. The possibilities are endless!
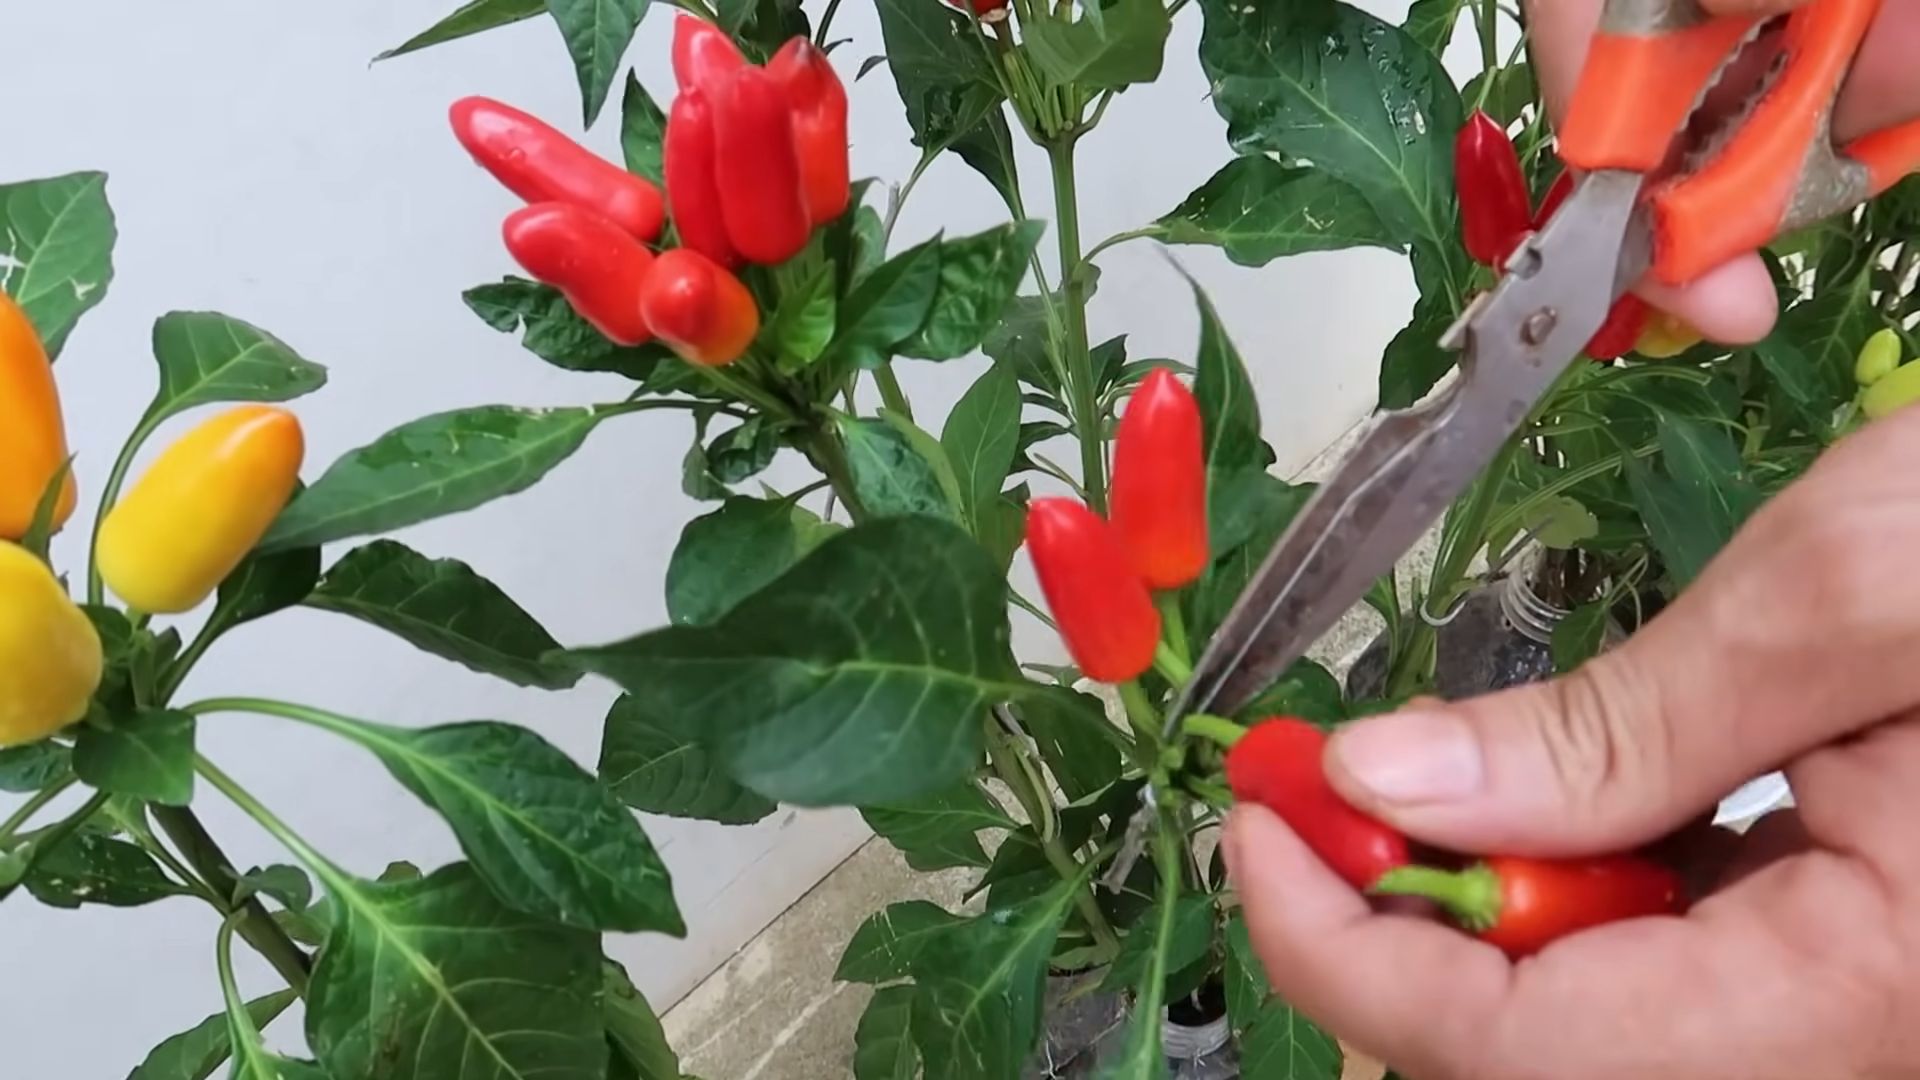
How do I know when my peppers are ready to harvest?
Peppers are typically ready to harvest when they have reached their mature size and color. The exact time will vary depending on the pepper variety. Bell peppers are typically harvested when they are green, red, yellow, or orange. Jalapeños are typically harvested when they are green or red. Chili peppers are typically harvested when they are red or orange. Gently twist the pepper from the plant or use a pair of scissors to cut the stem.

Leave a Comment