
Planting potatoes doesn’t have to be a daunting task! Have you ever dreamed of harvesting your own homegrown potatoes, bursting with flavor and freshness, right from your backyard? Imagine the satisfaction of serving a meal made with ingredients you nurtured from seed to table. This simple DIY guide will unlock the secrets to successful potato planting, even if you’re a complete beginner.
Potatoes have a rich history, dating back thousands of years to the Andes Mountains in South America, where they were a staple food for the Inca civilization. Over time, they spread across the globe, becoming a vital part of cuisines worldwide. But beyond their historical significance, potatoes are incredibly versatile and nutritious, making them a fantastic addition to any home garden.
Why should you learn this planting potatoes simple idea? Well, store-bought potatoes often lack the vibrant taste of freshly grown ones. Plus, growing your own allows you to control the entire process, ensuring they’re free from harmful chemicals and pesticides. This DIY trick will save you money, provide you with healthier food, and connect you with nature in a rewarding way. Let’s get started and transform your garden into a potato paradise!
Growing Potatoes: A Simple DIY Guide for Beginners
Hello dear garden friends! I am thrilled to show you today how easy it is to grow potatoes yourself. It’s a truly rewarding project, and the result—freshly harvested potatoes from your own garden—is simply unbeatable! Don’t worry, it’s much easier than you might think. Let’s get started!
What you need:
- Seed potatoes: These are special potatoes bred for cultivation. You can get them at garden centers or online. Choose varieties that you like and are suitable for your climate.
- A sunny location: Potatoes love the sun! Choose a spot in your garden that gets at least 6 hours of sun per day.
- Well-draining soil: Potatoes do not like standing water. The soil should be loose and well-draining.
- Compost or other organic fertilizer: To enrich the soil and provide the potatoes with nutrients.
- A shovel or a spade: For digging the planting holes.
- A watering can or a hose: For watering the potatoes.
- Mulch (optional): Straw, hay, or grass clippings to keep the soil moist and suppress weeds.
- A large container (optional): If you don’t have a garden, you can also grow potatoes in pots or bags.
Preparing the Seed Potatoes:
- Chitting (optional, but recommended): About 4-6 weeks before the planned planting date, you can “chit” the seed potatoes. Place them in a bright, cool place (approx. 10-15°C / 50-59°F). You will see them develop small, green shoots. This gives the potatoes a head start.
- Cutting (optional): You can cut large seed potatoes into pieces, ensuring each piece has at least one or two “eyes” (shoots). Let the cut surfaces dry for a few days before planting to prevent rot. You can leave small seed potatoes whole.
Planting: Step by Step
- Prepare the soil: Dig over the soil at the planting site and remove stones and weeds. Work in plenty of compost or other organic fertilizer to enrich the soil. I personally love mixing in well-rotted manure, it gives an extra boost!
- Dig the planting holes: Dig holes that are about 15-20 cm (6-8 inches) deep. The distance between the holes should be about 30-40 cm (12-16 inches), and the distance between the rows about 70-80 cm (28-31 inches).
- Plant the seed potatoes: Place one seed potato in each hole with the shoots facing up. Cover the potatoes with soil and press it down lightly.
- Watering: Water the planting area thoroughly so that the soil is moist.
- Mulching (optional): Cover the planting area with a layer of mulch to keep the soil moist and suppress weeds.
Care: How Your Potatoes Will Thrive
- Watering: Potatoes need regular water, especially during flowering and tuber formation. Make sure the soil is always moist, but not wet.
- Hilling up: When the potato plants are about 20-30 cm (8-12 inches) high, you should “hill them up.” This means you pile soil up around the stems so that only the top leaves are showing. This promotes tuber formation and protects the potatoes from sunlight, which turns them green. Repeat the hilling every few weeks until the plants are about 50-60 cm (20-24 inches) high. I always do this with a small shovel, it’s very easy!
- Fertilizing (optional): If you wish, you can fertilize the potatoes additionally during the growing phase. Use an organic fertilizer or a special potato fertilizer.
- Weed control: Keep the planting area free of weeds by weeding regularly. Weeds compete with the potatoes for nutrients and water.
- Protection from pests and diseases: Watch out for pests like potato beetles or aphids. If necessary, you can use biological pesticides. Potato diseases such as late blight can also occur. Watch for the symptoms and take action if necessary.
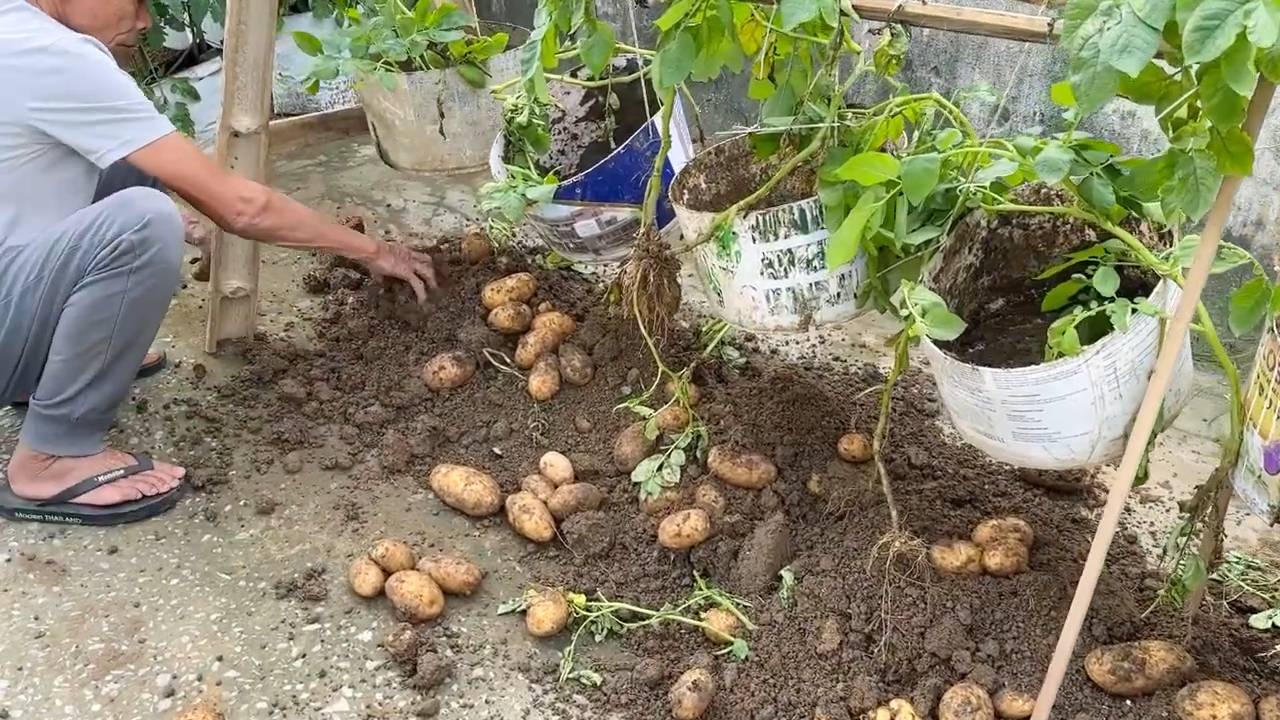
The Harvest: The Reward for Your Effort
- The right time: The potatoes are ready to harvest when the leaves of the plants turn yellow and die back. This is usually about 3-4 months after planting.
- The harvest: Carefully dig up the potatoes with a digging fork or a spade. Be careful not to damage the potatoes.
- Storage: Let the potatoes air dry for a few hours after harvesting. Then store them in a cool, dark, and dry place. This way, they will last for several months.
Growing Potatoes in a Pot: An Alternative for Balcony and Terrace
No garden? No problem! Potatoes can also be grown wonderfully in pots or bags.
- The right container: Choose a large container with a diameter of at least 30 cm (12 inches) and a height of at least 40 cm (16 inches). Make sure the container has drainage holes so that water can run off.
- The soil: Use a high-quality, well-draining potting mix.
- Planting: Fill the container with about 15 cm (6 inches) of soil. Place a seed potato on the soil and cover it with another 10 cm (4 inches) of soil.
- Care: Water the potatoes regularly and fertilize them if necessary. As the plants grow, keep adding more soil until the container is full. This promotes tuber formation.
- The harvest: The potatoes are ready for harvest when the leaves of the plants turn yellow and die back. Tip out the container and collect the potatoes.
Common Problems and Solutions:
- Green potatoes: Potatoes exposed to sunlight turn green and contain solanine, a toxic alkaloid. Green potatoes should not be eaten. To avoid green potatoes, hill up the plants regularly and store the potatoes in the dark.
- Late blight: This fungal disease can infect potato plants and destroy the harvest. Watch for the symptoms (brown spots on the leaves) and take action if necessary (e.g., fungicides).
- Potato beetles: These pests eat the leaves of the potato plants. Collect the beetles and larvae by hand or use biological pesticides.
Variety Recommendations:
There are countless potato varieties, each with its own advantages. Here are a few recommendations for beginners:
- Linda: A waxy variety with good flavor.
- Annabelle: A very early, waxy variety.
- Laura: A primarily waxy variety with red skin.
- Bamberger Hörnchen (Bamberger Crescent): An old, waxy variety with a nutty taste.
- Blauer Schwede (Blue Swede): a starchy variety with blue skin and blue flesh.

Conclusion
So, there you have it! Planting potatoes doesn’t have to be a daunting task reserved for seasoned gardeners. This simple, DIY trick unlocks a world of possibilities, allowing you to cultivate your own delicious, homegrown potatoes, regardless of your experience level or the size of your garden. We’ve shown you how to maximize your yield with minimal effort, transforming a humble spud into a bountiful harvest.
But why is this method a must-try? Because it’s efficient, space-saving, and incredibly rewarding. Imagine the satisfaction of digging into the earth and unearthing your own freshly grown potatoes, bursting with flavor and nutrients. Store-bought potatoes simply can’t compare! Beyond the taste, you’ll also gain a deeper connection to your food and a greater appreciation for the natural world.
This method is also incredibly adaptable. Feel free to experiment with different potato varieties to discover your favorites. Russets, Yukon Golds, red potatoes – the choice is yours! You can also adjust the size of your container to suit your needs. A smaller container is perfect for a patio garden, while a larger container can accommodate a more ambitious harvest.
Consider adding companion plants to your potato container to further enhance your growing experience. Marigolds can help deter pests, while basil can improve the flavor of your potatoes. The possibilities are endless!
Don’t be afraid to get your hands dirty and embrace the joy of growing your own food. This DIY potato planting trick is a gateway to a more sustainable and fulfilling lifestyle. It’s a chance to connect with nature, learn new skills, and enjoy the fruits (or rather, vegetables) of your labor.
We are confident that once you try this method, you’ll be hooked. The ease, efficiency, and delicious results speak for themselves. So, grab some seed potatoes, gather your supplies, and get ready to embark on a rewarding gardening adventure.
We encourage you to try this DIY potato planting trick and share your experiences with us! Let us know what varieties you planted, what challenges you faced, and what successes you celebrated. Share your photos and tips in the comments below. We can’t wait to hear your stories and learn from your experiences. Together, we can create a community of passionate gardeners who are dedicated to growing their own food and living a more sustainable lifestyle. Happy planting!
Frequently Asked Questions (FAQ)
What kind of container should I use for planting potatoes?
The ideal container for planting potatoes should be large enough to accommodate the growing root system and allow for hilling. A container that is at least 20 inches in diameter and 20 inches deep is generally recommended. You can use a variety of materials, such as plastic pots, wooden crates, or even repurposed containers like old tires or trash cans (make sure they are food-grade if using recycled materials). The most important thing is to ensure that the container has drainage holes to prevent waterlogging, which can lead to root rot. Fabric pots are also a great option as they allow for excellent drainage and aeration.
How often should I water my potato plants?
Watering frequency depends on several factors, including the weather, the type of container you’re using, and the stage of growth. Generally, you should water your potato plants when the top inch of soil feels dry to the touch. During hot, dry weather, you may need to water daily, while during cooler, wetter periods, you may only need to water every few days. Avoid overwatering, as this can lead to root rot. When watering, water deeply, ensuring that the entire root zone is moistened. A good rule of thumb is to water until you see water draining from the drainage holes.
What kind of soil should I use for planting potatoes?
Potatoes prefer well-draining, slightly acidic soil with a pH between 6.0 and 6.8. A good potting mix specifically formulated for vegetables is a great option. You can also create your own soil mix by combining equal parts of compost, peat moss (or coconut coir), and perlite or vermiculite. Compost provides essential nutrients, peat moss (or coconut coir) helps retain moisture, and perlite or vermiculite improves drainage. Avoid using heavy clay soil, as it can become waterlogged and hinder root growth.
How do I know when my potatoes are ready to harvest?
The timing of your potato harvest depends on the variety you’re growing and the desired size of the potatoes. For “new potatoes,” which are small and tender, you can begin harvesting about 7-8 weeks after planting, when the plants begin to flower. To harvest new potatoes, carefully dig around the base of the plant and remove a few potatoes, leaving the rest to continue growing. For mature potatoes, wait until the foliage begins to yellow and die back, typically about 10-12 weeks after planting. At this point, the potato skins will be thicker and more resistant to damage. To harvest mature potatoes, carefully dig up the entire plant, being careful not to damage the potatoes with your shovel or fork.
What are some common pests and diseases that affect potato plants, and how can I prevent them?
Common pests that affect potato plants include aphids, potato beetles, and flea beetles. Diseases include early blight, late blight, and potato scab. To prevent these problems, start with disease-free seed potatoes and practice good sanitation. Remove any diseased foliage promptly and avoid overhead watering, which can promote fungal diseases. Companion planting with marigolds can help deter pests. You can also use organic insecticides and fungicides if necessary, following the instructions carefully. Crop rotation is also an important preventative measure. Avoid planting potatoes in the same location year after year, as this can allow pests and diseases to build up in the soil.
Can I grow potatoes in a container indoors?
While it’s possible to grow potatoes in a container indoors, it can be challenging to provide the necessary conditions for optimal growth. Potatoes need at least 6-8 hours of direct sunlight per day, which can be difficult to achieve indoors. You’ll also need a large container and a well-draining potting mix. If you decide to try growing potatoes indoors, choose a sunny location and supplement with grow lights if necessary. Be sure to monitor the plants closely for pests and diseases.
What are some different varieties of potatoes that I can grow in a container?
Many different varieties of potatoes can be grown in containers. Some popular choices include:
* **Yukon Gold:** A versatile potato with a buttery flavor and smooth texture.
* **Red Norland:** A red-skinned potato with a creamy texture and slightly sweet flavor.
* **Russet Burbank:** A classic baking potato with a fluffy texture.
* **Fingerling Potatoes:** Small, elongated potatoes with a firm texture and nutty flavor.
* **Purple Potatoes:** Add a pop of color to your plate with these antioxidant-rich potatoes.
Choose a variety that suits your taste preferences and growing conditions.
How do I store my harvested potatoes?
To store your harvested potatoes properly, cure them first by allowing them to dry in a cool, dark, and well-ventilated place for about a week. This will help to toughen the skins and prevent rot. After curing, store the potatoes in a cool, dark, and dry place with good ventilation. The ideal storage temperature is between 40 and 50 degrees Fahrenheit. Avoid storing potatoes near apples or onions, as these fruits and vegetables release ethylene gas, which can cause potatoes to sprout. Properly stored potatoes can last for several months.
Leave a Comment