
Pink Radish Pot Growing: Ever dreamed of plucking vibrant, peppery radishes straight from your own patio? I know I have! There’s something incredibly satisfying about nurturing your own food, and it’s easier than you might think, even without a sprawling garden. For centuries, container gardening has allowed people to cultivate their own little Edens, from the hanging gardens of Babylon to the humble window boxes of today. It’s a testament to our innate desire to connect with nature and provide for ourselves.
But let’s be honest, sometimes gardening feels intimidating. That’s where this DIY guide comes in! I’m going to show you a simple, effective, and oh-so-rewarding trick for pink radish pot growing that will have you harvesting delicious radishes in just a few weeks. Forget complicated setups and expensive equipment. This method is perfect for beginners, apartment dwellers, or anyone looking to add a splash of color and flavor to their lives.
Why do you need this trick? Because store-bought radishes simply can’t compare to the fresh, crisp taste of homegrown ones. Plus, knowing exactly where your food comes from and how it was grown gives you peace of mind. So, grab your pots, some soil, and radish seeds, and let’s get growing! I promise, you’ll be amazed at how easy and fun it is to cultivate your own little radish patch.
Grow Radishes in a Pot: A Beginner’s Guide to a Bountiful Harvest
Hey there, fellow gardening enthusiasts! Ever thought about growing your own radishes? They’re super easy, quick to mature, and add a delightful peppery crunch to salads and snacks. Plus, you don’t need a huge garden to enjoy them. I’m going to walk you through how to grow radishes in a pot, right on your balcony, patio, or even a sunny windowsill!
Choosing the Right Pot and Soil
First things first, let’s talk about the essentials: the pot and the soil. These are crucial for a successful radish-growing adventure.
* Pot Size: Radishes don’t need a super deep pot, but they do need some space to grow. I recommend a pot that’s at least 6 inches deep and 6 inches wide. A wider pot is better if you plan on planting multiple radishes. Think about a rectangular planter box if you want a good row of them.
* Drainage: This is non-negotiable! Make sure your pot has drainage holes. Radishes hate sitting in soggy soil, which can lead to rot. If your pot doesn’t have drainage, you can drill some holes yourself.
* Soil: Radishes thrive in loose, well-draining soil. Heavy clay soil will stunt their growth and make them taste bitter. I always use a good quality potting mix specifically designed for vegetables. You can also amend regular potting mix with compost or perlite to improve drainage and fertility. Avoid using garden soil directly in your pots, as it can compact and not drain well.
Planting Your Radish Seeds
Now for the fun part: planting the seeds! This is where the magic begins.
1. Prepare the Soil: Fill your pot with the potting mix, leaving about an inch of space at the top. Gently pat the soil down to remove any large air pockets.
2. Sow the Seeds: Radish seeds are small, so you don’t need to plant them too deep. I usually sow them about ½ inch deep and about an inch apart. If you’re planting multiple rows, space the rows about 2 inches apart.
3. Cover the Seeds: Lightly cover the seeds with soil.
4. Water Gently: Water the soil gently until it’s evenly moist. Avoid overwatering, which can wash away the seeds. A spray bottle or watering can with a gentle rose head works best.
5. Label Your Pot: It’s always a good idea to label your pot with the date you planted the seeds and the variety of radish you’re growing. This will help you keep track of when to expect your harvest.
Caring for Your Radishes
Radishes are relatively low-maintenance, but they do need a little TLC to thrive.
* Sunlight: Radishes need at least 6 hours of sunlight per day. If you don’t have a sunny spot, you can supplement with a grow light.
* Watering: Keep the soil consistently moist, but not soggy. Water when the top inch of soil feels dry to the touch. Overwatering can lead to root rot, while underwatering can cause the radishes to become tough and bitter.
* Thinning: Once the seedlings emerge (usually within a few days), you’ll need to thin them out. This means removing some of the seedlings to give the remaining ones enough space to grow. I usually thin them to about 2 inches apart. Don’t be afraid to pull out the weaker-looking seedlings.
* Fertilizing: Radishes don’t need a lot of fertilizer, but a light feeding every few weeks can help them grow. I like to use a balanced liquid fertilizer diluted to half strength. Avoid over-fertilizing, which can cause the radishes to become leggy and have excessive foliage.
* Weed Control: Keep an eye out for weeds and remove them promptly. Weeds can compete with the radishes for nutrients and water.
Harvesting Your Radishes
This is the moment you’ve been waiting for! Radishes are one of the fastest-growing vegetables, so you won’t have to wait long to enjoy your harvest.
1. Check for Maturity: Radishes are typically ready to harvest in about 3-4 weeks, depending on the variety. You can check for maturity by gently brushing away the soil around the top of the radish to see how big it is.
2. Harvesting: To harvest, gently pull the radish from the soil. If the soil is dry, you may need to loosen it first.
3. Enjoy Your Harvest: Wash the radishes thoroughly and enjoy them fresh. They’re delicious in salads, sandwiches, or as a crunchy snack. You can also roast them or pickle them for a longer shelf life.
Troubleshooting
Even with the best care, you might encounter a few problems along the way. Here are some common issues and how to deal with them:
* Bolting: Bolting is when the radish plant starts to flower prematurely. This can happen if the weather is too hot or if the plants are stressed. To prevent bolting, try to plant your radishes in the spring or fall when the weather is cooler. You can also provide shade during the hottest part of the day.
* Root Rot: Root rot is caused by overwatering. To prevent root rot, make sure your pot has good drainage and avoid overwatering. If you suspect root rot, you can try to salvage the plants by transplanting them into fresh soil and reducing watering.
* Pests: Radishes can be susceptible to pests such as flea beetles and aphids. You can control these pests with insecticidal soap or neem oil.
* Bitter Taste: Radishes can taste bitter if they’re grown in hot weather or if they’re not watered enough. To prevent a bitter taste, try to plant your radishes in the spring or fall and keep the soil consistently moist.
Choosing Radish Varieties
There are tons of radish varieties to choose from, each with its own unique flavor and appearance. Here are a few of my favorites:
* Cherry Belle: This is a classic red radish that’s known for its mild flavor and crisp texture.
* French Breakfast: This radish has an elongated shape and a mild, slightly sweet flavor.
* Easter Egg: This variety produces radishes in a variety of colors, including red, pink, purple, and white.
* Black Spanish: This radish has a black skin and a pungent, spicy flavor.
* Watermelon Radish: This radish has a green skin and a bright pink interior. It has a mild, slightly sweet flavor.
Succession Planting for a Continuous Harvest
Want to enjoy fresh radishes all season long? Try succession planting! This involves planting a new batch of seeds every few weeks. This way, you’ll have a continuous supply of radishes to harvest. I usually plant a new batch of seeds every 2-3 weeks.
Extra Tips for Radish Growing Success
Here are a few extra tips to help you grow the best radishes ever:
* Rotate Your Crops: Don’t plant radishes in the same spot year after year. Rotating your crops can help prevent soilborne diseases and pests.
* Companion Planting: Radishes are great companion plants for carrots, lettuce, and spinach. They can help deter pests and improve soil health.
* Use a Seed Starting Tray: If you want to get a head start on the growing season, you can start your radish seeds indoors in a seed starting tray.
* Have Fun! Gardening should be enjoyable. Don’t be afraid to experiment and try new things.
Growing Radishes Indoors
While radishes thrive outdoors, you can absolutely grow them indoors with a few adjustments.
1. Light is Key: Indoor radishes need a lot of light. A south-facing window is ideal, but you’ll likely need to supplement with a grow light. I recommend a full-spectrum LED grow light for at least 12-14 hours a day.
2. Temperature Control: Radishes prefer cooler temperatures, ideally between 60-70°F (15-21°C). Avoid placing your pot near a heat source like a radiator.
3. Air Circulation: Good air circulation is important to prevent fungal diseases. A small fan can help.
4. Pollination (Not Really): Radishes are self-pollinating, so you don’t need to worry about hand-pollinating them indoors.
5. Monitor for Pests: Indoor plants are still susceptible to pests, so keep an eye out for aphids, spider mites, and other common houseplant pests.
Saving Radish Seeds (For Next Year!)
If you want to save seeds from your radishes for next year, here’s how:
1. Let a Few Radishes Bolt: Allow a few of your radish plants to bolt (flower). This is necessary for
Conclusion
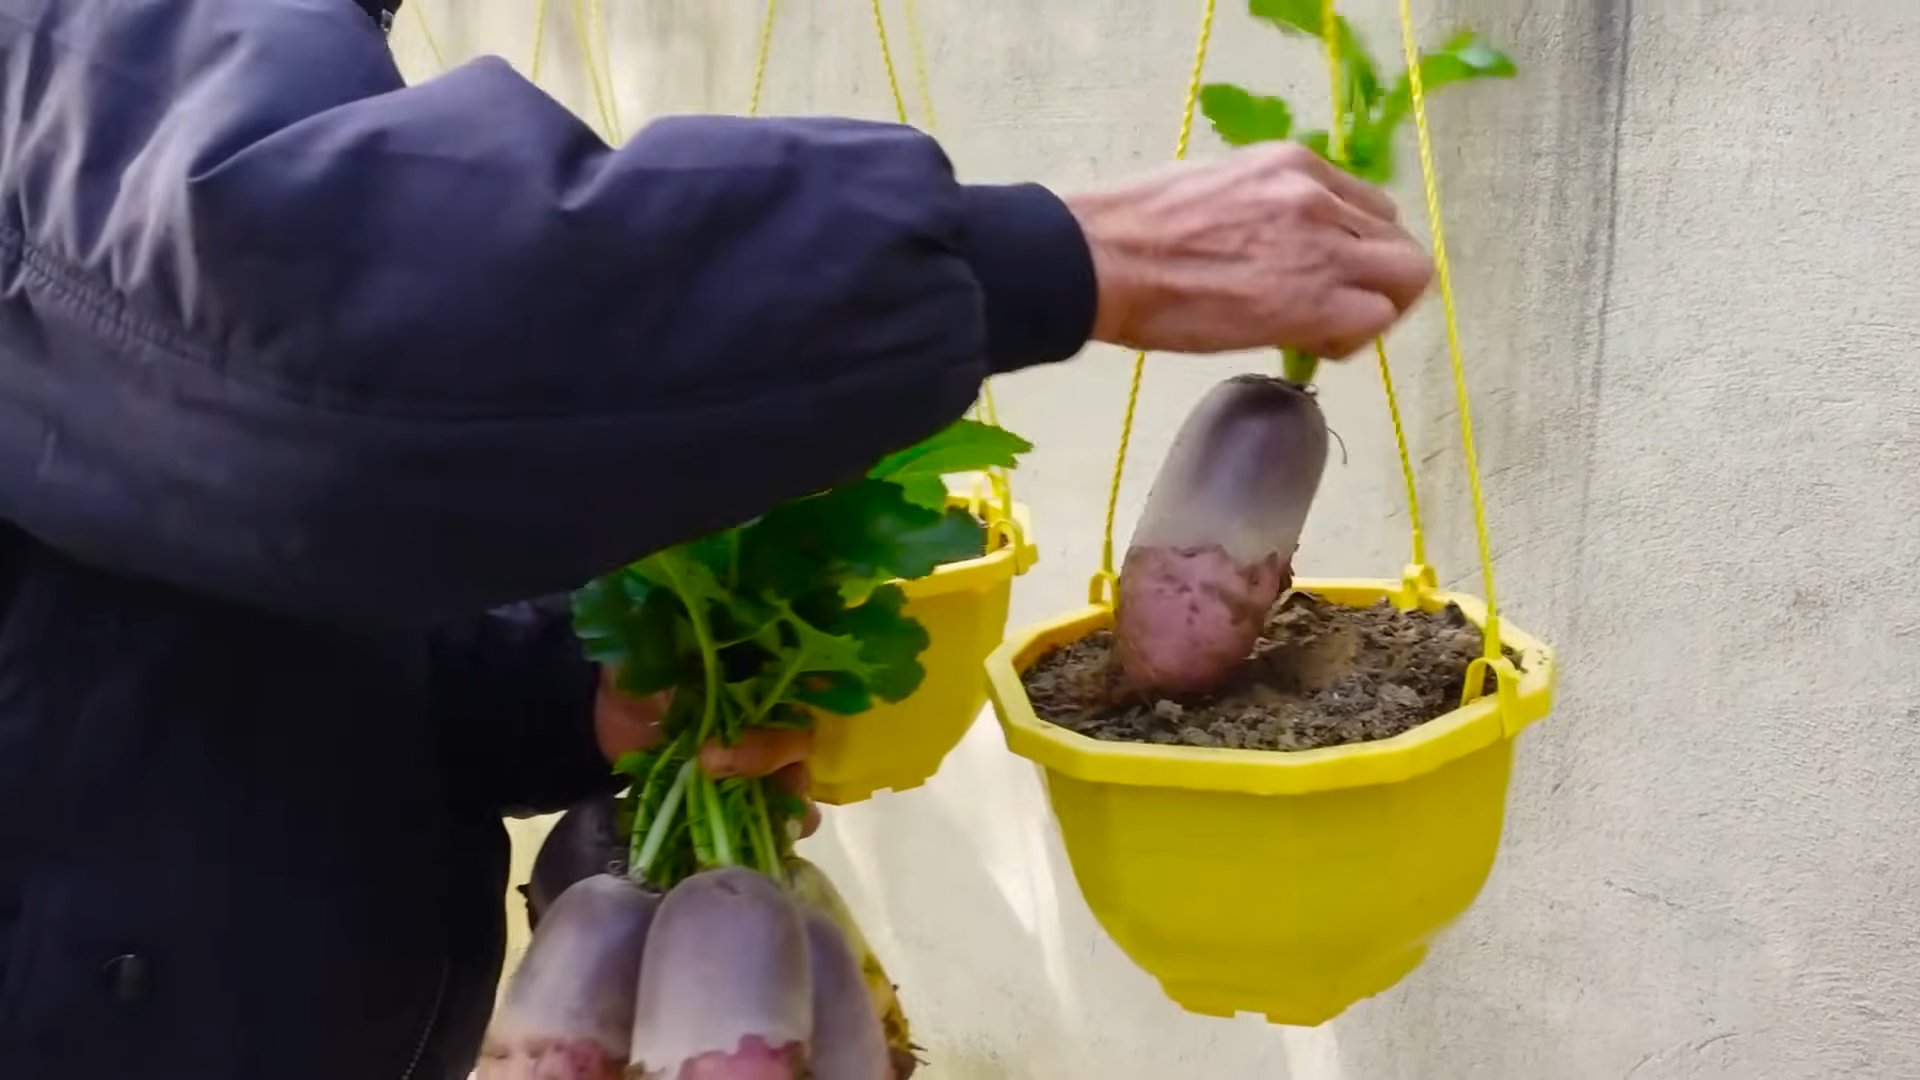
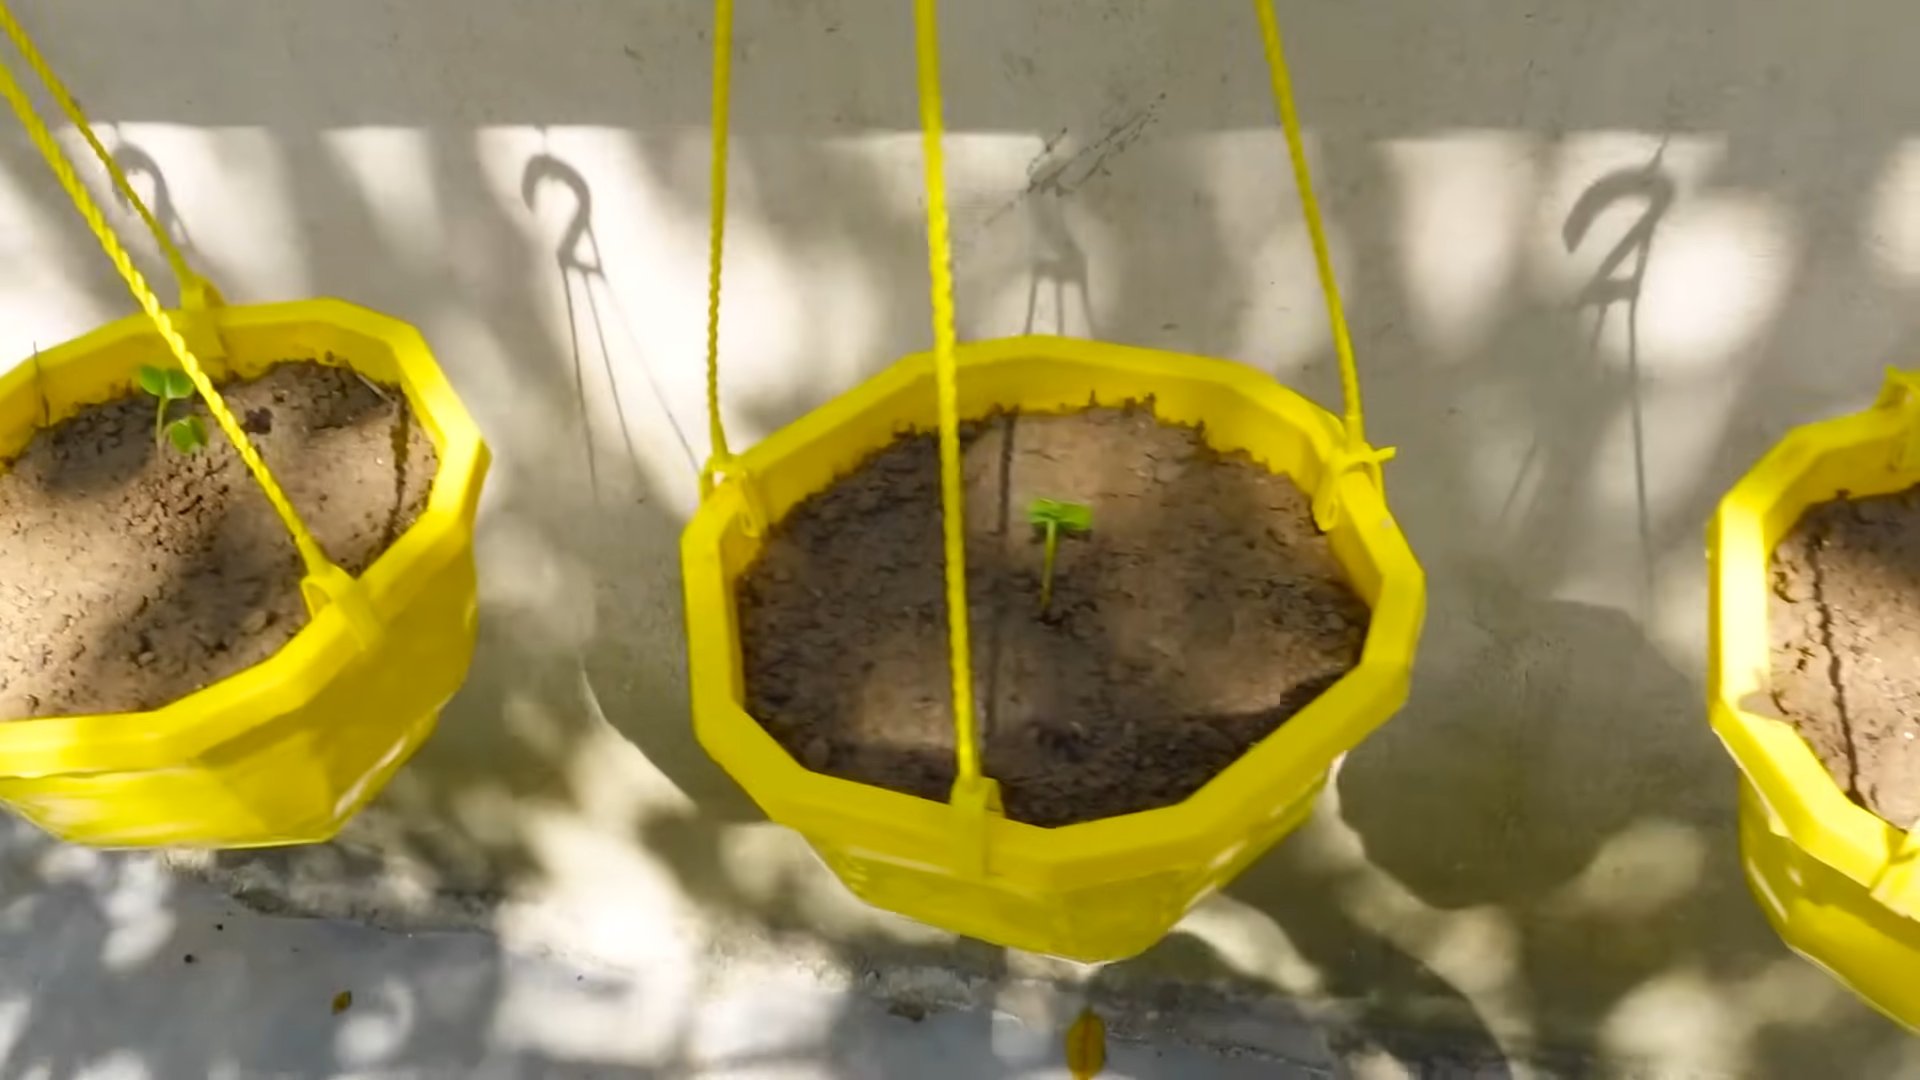
So, there you have it! Transforming a humble pink radish into a miniature, self-contained garden is not only surprisingly simple, but also incredibly rewarding. This DIY pink radish pot growing trick offers a unique and sustainable way to cultivate small plants, adding a touch of whimsy and natural beauty to your home. Forget those generic plastic pots – this method allows you to repurpose food waste, reduce your environmental footprint, and create a conversation starter all in one go.
Why is this a must-try? Because it’s more than just a gardening project; it’s an experiment in resourcefulness and a celebration of nature’s ingenuity. It’s a fantastic way to introduce children to the wonders of plant life, teaching them about decomposition, growth, and the importance of sustainable practices. Plus, let’s be honest, the sheer novelty of growing something in a radish is undeniably cool!
Looking for variations? Absolutely! Consider using different types of radishes – while pink radishes offer a vibrant color contrast, daikon radishes, with their larger size, could accommodate slightly bigger seedlings or a cluster of smaller herbs. You can also experiment with different types of seeds. While we’ve focused on microgreens and small herbs, you could try starting flower seeds or even succulents, ensuring you choose varieties that thrive in small spaces and require minimal watering. For a decorative touch, try painting the radish pot with non-toxic paints or embellishing it with natural materials like twine or small pebbles. Remember to adjust the watering schedule based on the plant you choose and the humidity levels in your environment.
Don’t be afraid to get creative and personalize your radish pot! The possibilities are endless.
We wholeheartedly encourage you to give this DIY pink radish pot growing trick a try. It’s a fun, educational, and eco-friendly project that will bring a touch of green to your life. Once you’ve created your own miniature garden, we’d love to see your results! Share your photos and experiences with us on social media using #RadishPotGarden. Let’s inspire others to embrace sustainable gardening and discover the hidden potential in everyday items. We can’t wait to see what you grow!
Frequently Asked Questions (FAQ)
What kind of radish works best for this project?
While pink radishes are visually appealing and commonly available, you can experiment with other varieties. Daikon radishes, being larger, can accommodate more soil and potentially larger plants. Red radishes are also a good option. The key is to choose a radish that is firm and relatively large enough to hold a decent amount of soil. Avoid radishes that are soft, cracked, or show signs of decay, as they won’t hold up well as a pot.
How long will the radish pot last?
The lifespan of your radish pot depends on several factors, including the type of radish, the humidity levels, and how well you maintain it. Generally, you can expect it to last for a few weeks to a couple of months. As the radish decomposes, it will actually provide nutrients to the plant growing inside. However, it’s important to monitor the radish for signs of excessive decay or mold growth. If it starts to break down too quickly, you can transfer the plant to a more permanent pot.
What kind of soil should I use?
For best results, use a well-draining potting mix specifically formulated for seedlings or herbs. Avoid using garden soil, as it can be too dense and may contain pests or diseases. A mix of peat moss, perlite, and vermiculite is a good option. You can also add a small amount of compost to provide extra nutrients. Ensure the soil is moist but not waterlogged before planting.
How often should I water the radish pot?
Watering frequency depends on the type of plant you’re growing and the environmental conditions. Generally, you should water when the top inch of soil feels dry to the touch. Avoid overwatering, as this can lead to root rot. Use a spray bottle or a gentle watering can to avoid disturbing the seedlings. Remember that the radish itself will retain some moisture, so you may need to water less frequently than you would with a traditional pot.
What kind of plants can I grow in a radish pot?
The best plants for radish pots are those that are small, shallow-rooted, and don’t require a lot of space. Microgreens, herbs like basil, thyme, and oregano, and small succulents are all excellent choices. You can also try starting flower seeds, such as pansies or violas, but be prepared to transplant them to a larger pot once they outgrow the radish. Avoid planting large, deep-rooted plants, as they will quickly become root-bound and won’t thrive in the limited space.
How do I prevent the radish from rotting too quickly?
To prolong the life of your radish pot, avoid overwatering and ensure good air circulation. Place the pot in a well-ventilated area and avoid direct sunlight, which can cause the radish to dry out and crack. You can also try coating the inside of the radish with a thin layer of beeswax or a non-toxic sealant to help prevent moisture from seeping into the radish flesh. Regularly check the radish for signs of decay and remove any dead leaves or debris.
Can I use fertilizer on my radish pot plants?
Yes, you can use a diluted liquid fertilizer to provide extra nutrients to your plants. Choose a fertilizer that is specifically formulated for seedlings or herbs and follow the instructions on the label. Avoid over-fertilizing, as this can damage the plants. A general rule of thumb is to fertilize every two to four weeks, depending on the plant’s needs.
What if mold starts growing on the radish?
Mold growth is a common issue with organic materials, especially in humid environments. If you notice mold growing on the radish, try wiping it away with a damp cloth. You can also spray the radish with a diluted solution of water and vinegar (1 part vinegar to 10 parts water). Ensure good air circulation to prevent further mold growth. If the mold persists or becomes excessive, it’s best to transplant the plant to a new pot.
Is this project safe for children?
Yes, this project is generally safe for children, but adult supervision is recommended, especially when using sharp tools to carve out the radish. Ensure that children wash their hands thoroughly after handling the radish and soil. Use non-toxic paints and sealants if you choose to decorate the radish pot.
Where should I place my radish pot?
Place your radish pot in a location that receives bright, indirect sunlight. Avoid direct sunlight, which can scorch the plants and cause the radish to dry out. A windowsill, a patio, or a balcony are all good options. Ensure the location has good air circulation to prevent mold growth.

Leave a Comment