
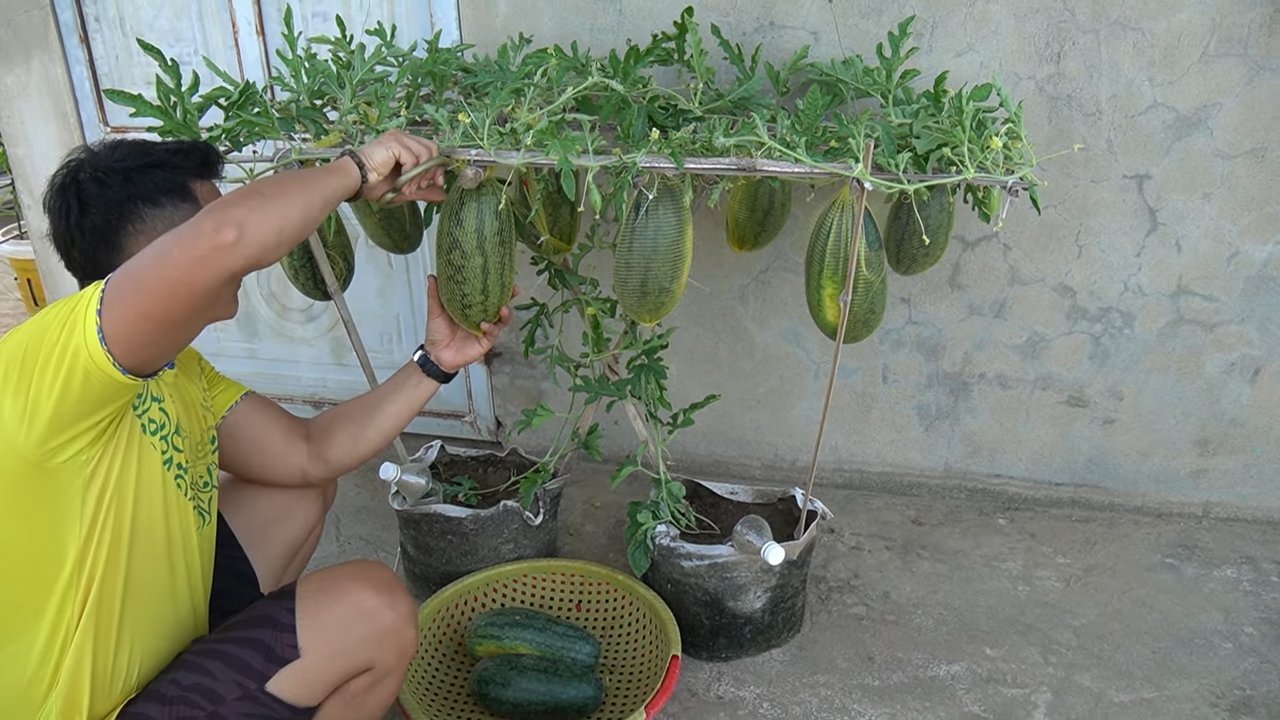
One-Pot Watermelon Growing: Imagine sinking your teeth into a juicy, homegrown watermelon, bursting with sweetness, all thanks to your own green thumb! Sounds idyllic, right? But the thought of sprawling vines taking over your entire garden can be a bit daunting. That’s where the magic of one-pot watermelon growing comes in!
For centuries, watermelons have been a symbol of summer, abundance, and shared joy. From ancient Egypt, where they were depicted in hieroglyphics, to the vibrant markets of modern-day Asia, this refreshing fruit has held a special place in our hearts and cultures. But traditionally, growing watermelons meant dedicating a significant amount of space.
Let’s face it, not everyone has acres of land to dedicate to a watermelon patch. Apartment dwellers, balcony gardeners, and even those with limited backyard space often feel like they have to miss out on the joy of growing their own. But fear not! This DIY guide is here to show you that you can enjoy the taste of summer, no matter how small your growing area. We’ll walk you through the simple steps of one-pot watermelon growing, proving that you don’t need a sprawling farm to harvest your own delicious watermelons. I’m excited to share these simple tricks with you!
One-Pot Watermelon Growing: A Sweet Summer Project!
Hey there, fellow gardening enthusiasts! Ever dreamt of biting into a juicy, homegrown watermelon but thought you didn’t have the space? Well, I’m here to tell you that you absolutely can grow watermelons, even if you’re short on yard space! This guide will walk you through the surprisingly simple process of growing a watermelon in a single pot. Get ready for some sweet success!
What You’ll Need: The Essentials
Before we dive in, let’s gather our supplies. This is crucial for a smooth and successful watermelon-growing journey. Trust me, having everything ready beforehand will save you a lot of time and frustration.
* A Large Pot: This is the most important part! You’ll need a pot that’s at least 24 inches in diameter and 24 inches deep. Watermelons have extensive root systems, and they need plenty of room to grow. A larger pot is always better than a smaller one. Think big!
* High-Quality Potting Mix: Don’t skimp on the potting mix! Watermelons are heavy feeders and need nutrient-rich soil. Look for a mix that’s specifically formulated for vegetables or one that contains plenty of compost and organic matter. Avoid using garden soil, as it can compact in a pot and hinder drainage.
* Watermelon Seeds: Choose a bush or dwarf variety of watermelon. These varieties are specifically bred to be more compact and suitable for container gardening. Some popular choices include ‘Bush Sugar Baby,’ ‘Sugar Pot,’ and ‘Golden Midget.’ You can find these seeds at most garden centers or online.
* Slow-Release Fertilizer: Watermelons are heavy feeders, so a slow-release fertilizer will provide them with a steady supply of nutrients throughout the growing season. Look for a fertilizer that’s high in phosphorus and potassium, which are essential for fruit development.
* Water-Soluble Fertilizer: In addition to the slow-release fertilizer, you’ll also want to have some water-soluble fertilizer on hand. This will allow you to give your watermelon plant an extra boost of nutrients when it needs it most, such as during flowering and fruit development.
* Trellis or Support: Even bush varieties can get quite large, and the weight of the watermelon can cause the vines to break. A trellis or other support system will help to keep the plant upright and prevent damage. You can use a tomato cage, a small trellis, or even just some sturdy stakes.
* Watering Can or Hose: Watermelons need consistent moisture, especially during hot weather. Make sure you have a watering can or hose that you can use to water your plant regularly.
* Mulch: Mulch helps to retain moisture in the soil, suppress weeds, and regulate soil temperature. You can use organic mulch, such as straw, wood chips, or shredded leaves.
* Gardening Gloves: Protect your hands from dirt and thorns with a pair of gardening gloves.
* Hand Trowel: A hand trowel will be helpful for planting the seeds and transplanting seedlings.
Step-by-Step Planting Guide
Now that we have all our supplies, let’s get planting! This is the fun part where we bring our watermelon dreams to life.
1. Prepare the Pot: Start by filling your large pot with the high-quality potting mix. Leave about 2-3 inches of space at the top of the pot. This will make watering easier and prevent the soil from spilling out.
2. Add Slow-Release Fertilizer: Mix the slow-release fertilizer into the top few inches of the potting mix, following the instructions on the fertilizer package. This will provide your watermelon plant with a steady supply of nutrients throughout the growing season.
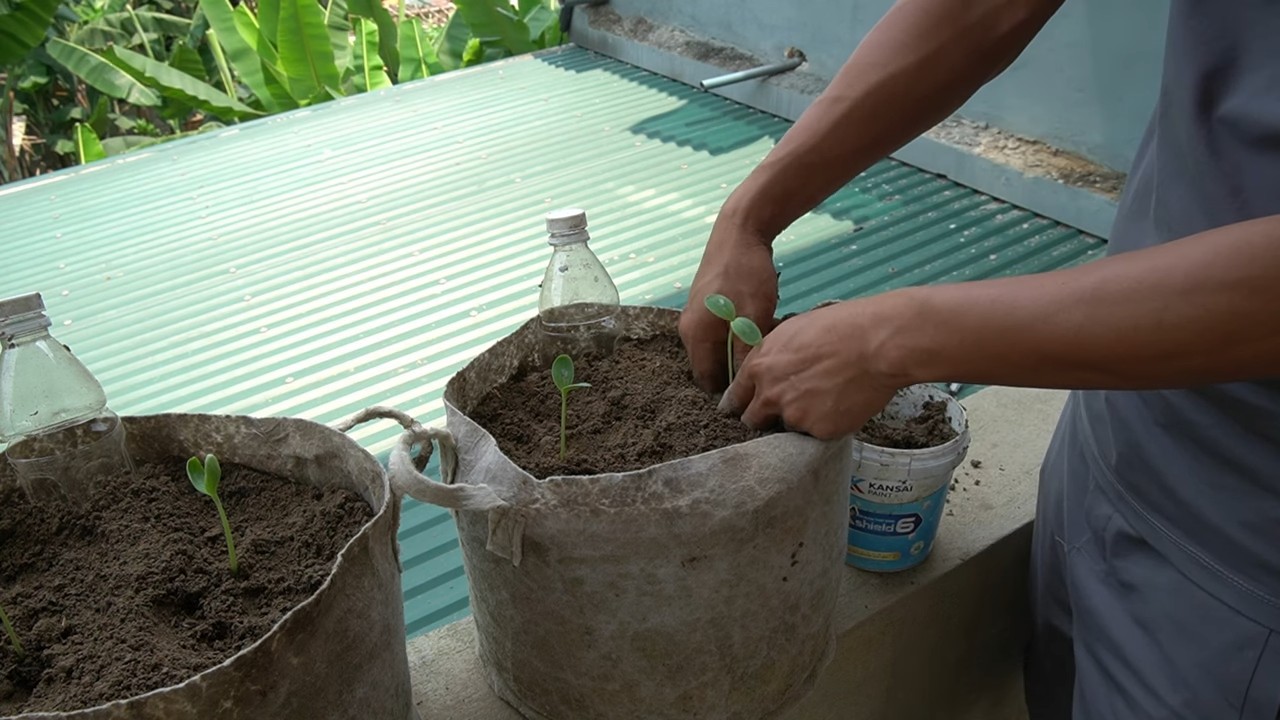
3. Plant the Seeds: Sow 3-4 watermelon seeds about 1 inch deep in the center of the pot. Space the seeds a few inches apart. Cover the seeds with potting mix and gently water the soil.
4. Water Thoroughly: Water the pot thoroughly until water drains out of the bottom. This will help to settle the soil and ensure that the seeds have enough moisture to germinate.
5. Choose a Sunny Location: Place the pot in a location that receives at least 6-8 hours of direct sunlight per day. Watermelons need plenty of sunlight to thrive. A south-facing location is ideal.
6. Keep the Soil Moist: Keep the soil consistently moist, but not waterlogged. Water when the top inch of soil feels dry to the touch. Avoid overwatering, as this can lead to root rot.
7. Thin Seedlings (If Necessary): Once the seedlings emerge, thin them to the strongest one or two plants. This will give the remaining plants more room to grow and prevent overcrowding. Use scissors to cut the unwanted seedlings at the soil line, rather than pulling them out, which could disturb the roots of the remaining plants.
Nurturing Your Watermelon Plant: Care and Maintenance
Growing a watermelon is more than just planting seeds; it’s about providing the right care and attention throughout its life cycle. Here’s how to keep your watermelon plant happy and healthy.
1. Watering: Watermelons need consistent moisture, especially during hot weather. Water deeply and regularly, aiming for about 1-2 inches of water per week. Check the soil moisture regularly and adjust your watering schedule accordingly. Avoid watering the foliage, as this can promote fungal diseases. Water at the base of the plant instead.
2. Fertilizing: In addition to the slow-release fertilizer, you’ll also want to fertilize your watermelon plant with a water-soluble fertilizer every 2-3 weeks. Follow the instructions on the fertilizer package. Use a fertilizer that’s high in phosphorus and potassium, which are essential for fruit development.
3. Providing Support: As the watermelon vine grows, it will need support to prevent it from breaking under the weight of the fruit. Install a trellis or other support system early on, before the vine gets too large. Train the vine to grow up the trellis by gently tying it to the support with soft twine or plant ties.
4. Pollination: Watermelons require pollination to produce fruit. If you’re growing your watermelon plant indoors or in an area with limited bee activity, you may need to hand-pollinate the flowers. To hand-pollinate, use a small paintbrush to transfer pollen from the male flowers to the female flowers. Male flowers have a long, thin stem, while female flowers have a small, immature watermelon at the base.
5. Pruning: Pruning can help to improve air circulation and promote fruit development. Remove any dead or yellowing leaves, as well as any suckers (small shoots that grow from the base of the plant). You can also prune the tips of the vines to encourage branching and more fruit production.
6. Mulching: Apply a layer of mulch around the base of the plant to help retain moisture, suppress weeds, and regulate soil temperature. Use organic mulch, such as straw, wood chips, or shredded leaves.
7. Pest and Disease Control: Keep an eye out for pests and diseases, such as aphids, squash bugs, and powdery mildew. If you notice any problems, take action immediately to prevent them from spreading. You can use organic pest control methods, such as insecticidal soap or neem oil, to control pests. For diseases, you can use a fungicide or remove the affected leaves.
Harvesting Your Watermelon: The Sweet Reward
After all your hard work, the moment you’ve been waiting for has finally arrived: harvesting your homegrown watermelon! Knowing when to harvest a watermelon can be tricky, but here are a few signs to look for:
1. The Tendril: The tendril closest to the watermelon stem will turn brown and dry. This is a reliable indicator that the watermelon is ripe.
2. The Ground Spot: The spot where the watermelon rests on the ground (the ground spot) will turn from white to yellow or cream-colored.
3. The Sound: When you thump the watermelon, it should sound hollow and deep. A ripe watermelon will have a resonant sound, while an unripe watermelon will sound dull and flat.
4. The Feel: The watermelon skin will become slightly dull and waxy. It will also be more difficult to pierce with your fingernail.
Once you’ve determined that your watermelon is ripe, use a sharp knife to cut it from the vine, leaving a few inches of stem attached. Congratulations, you’ve successfully grown a watermelon in a pot! Now it’s time to enjoy the sweet, juicy fruits of your labor. Slice it up, share it with friends and family, and savor the taste of summer.
Troubleshooting: Common Issues and Solutions
Even with the best care, you might encounter some challenges along the way. Here are some common issues and how to address them:
* Yellowing Leaves: This could be a sign of overwatering, underwatering, nutrient deficiency, or disease. Check the soil moisture, fertilize the plant, and inspect for pests or diseases.
* Lack of Fruit: This
Conclusion
So, there you have it! Growing watermelons in a pot might seem unconventional, but with the right approach, it’s a surprisingly rewarding experience, especially if you’re short on space or simply want to try something new. This one-pot watermelon growing method opens up the possibility of enjoying homegrown, juicy watermelons even if you only have a balcony, patio, or small yard.
Why is this DIY trick a must-try? Because it democratizes watermelon cultivation! No longer is this delicious summer fruit limited to those with sprawling gardens. It’s about accessibility, sustainability, and the sheer joy of nurturing something from seed to table. Imagine the satisfaction of biting into a sweet, refreshing watermelon that you grew yourself, right in your own little container garden. Plus, it’s a fantastic conversation starter!
But the benefits extend beyond just the delicious fruit. Container gardening, in general, is known to be therapeutic. The act of tending to your plants, observing their growth, and providing them with the care they need can be incredibly calming and stress-relieving. And let’s not forget the educational aspect – especially if you have children. Growing watermelons in a pot is a hands-on lesson in botany, patience, and the wonders of nature.
Looking for variations? Absolutely! Consider experimenting with different watermelon varieties. Bush varieties, specifically bred for smaller spaces, are ideal for container growing. Sugar Baby, Bush Sugar Baby, and Golden Midget are all excellent choices. You can also try different soil mixes to see what works best in your climate. Some gardeners swear by adding extra compost or aged manure to boost nutrient levels. Another variation is to explore different trellising methods. While a simple stake might suffice for smaller plants, a more elaborate trellis can provide better support and airflow, leading to healthier, more productive vines. You could even get creative and build your own DIY trellis using bamboo poles or repurposed materials.
Don’t be afraid to get your hands dirty and experiment! Remember to monitor your watermelon plants closely for any signs of pests or diseases. Early detection is key to preventing problems from escalating. And most importantly, be patient. Growing watermelons takes time and effort, but the reward is well worth it.
We wholeheartedly encourage you to give this one-pot watermelon growing method a try. It’s a fun, educational, and ultimately delicious project that anyone can undertake. Once you’ve harvested your first homegrown watermelon, we’d love to hear about your experience! Share your photos, tips, and stories with us in the comments below. Let’s build a community of container watermelon growers and inspire others to embrace the joy of homegrown goodness. Happy growing!
Frequently Asked Questions (FAQ)
What is the best size pot for growing watermelons?
The ideal pot size for growing watermelons is at least 20 gallons, but bigger is generally better. A 25-30 gallon pot will provide ample space for the roots to develop and support the growth of the vine. Make sure the pot has drainage holes to prevent waterlogging, which can lead to root rot. Using a fabric pot can also be beneficial as it allows for better aeration and drainage.
What type of soil should I use for growing watermelons in a pot?
Watermelons need well-draining, nutrient-rich soil. A good mix would be equal parts of potting soil, compost, and perlite or vermiculite. The potting soil provides a base, the compost adds essential nutrients, and the perlite or vermiculite improves drainage and aeration. Avoid using garden soil, as it can be too heavy and compact in a container. You can also add a slow-release fertilizer to the soil mix to provide a steady supply of nutrients throughout the growing season.
How often should I water my watermelon plant in a pot?
Watermelons are thirsty plants, especially when they are actively growing and producing fruit. Water deeply whenever the top inch of soil feels dry to the touch. This might mean watering daily, especially during hot, dry weather. Be careful not to overwater, as this can lead to root rot. Check the drainage holes to ensure that excess water is draining properly. A good rule of thumb is to water until you see water draining from the bottom of the pot.
How much sunlight does a watermelon plant need?
Watermelons need at least 6-8 hours of direct sunlight per day to thrive. Choose a sunny location for your potted watermelon plant, such as a south-facing balcony or patio. If you live in a particularly hot climate, you might need to provide some afternoon shade to prevent the plant from getting scorched.
How do I pollinate my watermelon flowers?
Watermelons have separate male and female flowers. The female flowers have a small, immature watermelon at the base. If you’re not seeing any watermelons developing, it could be due to poor pollination. You can hand-pollinate the flowers by using a small paintbrush to transfer pollen from the male flowers to the female flowers. Do this in the morning, when the flowers are open. Alternatively, you can attract pollinators to your garden by planting flowers that attract bees and other beneficial insects.
When should I fertilize my watermelon plant?
Start fertilizing your watermelon plant about two weeks after transplanting it into the pot. Use a balanced fertilizer, such as a 10-10-10 or a fertilizer specifically formulated for fruiting plants. Fertilize every 2-3 weeks throughout the growing season, following the instructions on the fertilizer package. You can also supplement with compost tea or liquid seaweed extract to provide additional nutrients.
How do I know when my watermelon is ripe?
There are several ways to tell when a watermelon is ripe. One method is to look at the tendril closest to the fruit. When the tendril turns brown and dries up, the watermelon is usually ripe. Another method is to check the underside of the watermelon where it rests on the soil. This spot, called the ground spot, should turn from white to a creamy yellow color. You can also thump the watermelon. A ripe watermelon will sound hollow when thumped.
Can I grow multiple watermelon plants in one pot?
While it’s technically possible to grow multiple watermelon plants in a very large pot, it’s generally not recommended. Watermelon plants need a lot of space to grow and develop, and overcrowding can lead to stunted growth and reduced fruit production. It’s best to stick to one watermelon plant per pot to ensure that it has enough space, nutrients, and sunlight to thrive.
What are some common pests and diseases that affect watermelon plants?
Some common pests that affect watermelon plants include aphids, squash bugs, and vine borers. Aphids can be controlled with insecticidal soap or neem oil. Squash bugs can be handpicked or trapped under boards. Vine borers can be difficult to control, but you can try injecting Bacillus thuringiensis (Bt) into the stems. Common diseases that affect watermelon plants include powdery mildew and fusarium wilt. Powdery mildew can be treated with fungicides. Fusarium wilt is a soilborne disease that can be prevented by using disease-resistant varieties and practicing crop rotation.
How do I trellis my watermelon plant in a pot?
Trellising your watermelon plant can help to save space and improve air circulation. There are several ways to trellis a watermelon plant in a pot. You can use a simple stake or tomato cage to support the main stem. For larger vines, you can build a more elaborate trellis using bamboo poles or repurposed materials. Make sure the trellis is strong enough to support the weight of the watermelon fruit. You can also use slings made from fabric or netting to support the fruit as it grows.
Leave a Comment