
Mushroom Bottle Farming Guide: Unlock the secrets to growing delicious, fresh mushrooms right in your own home! Have you ever dreamed of harvesting your own gourmet mushrooms without the hassle of a sprawling garden? I’m here to tell you it’s absolutely possible, and surprisingly easy, with this simple and rewarding DIY project.
For centuries, mushroom cultivation has been revered in various cultures, from ancient Chinese medicinal practices to European culinary traditions. The ability to cultivate these fungi offered a sustainable food source and a connection to the natural world. Now, you can tap into that rich history with a modern twist: bottle farming!
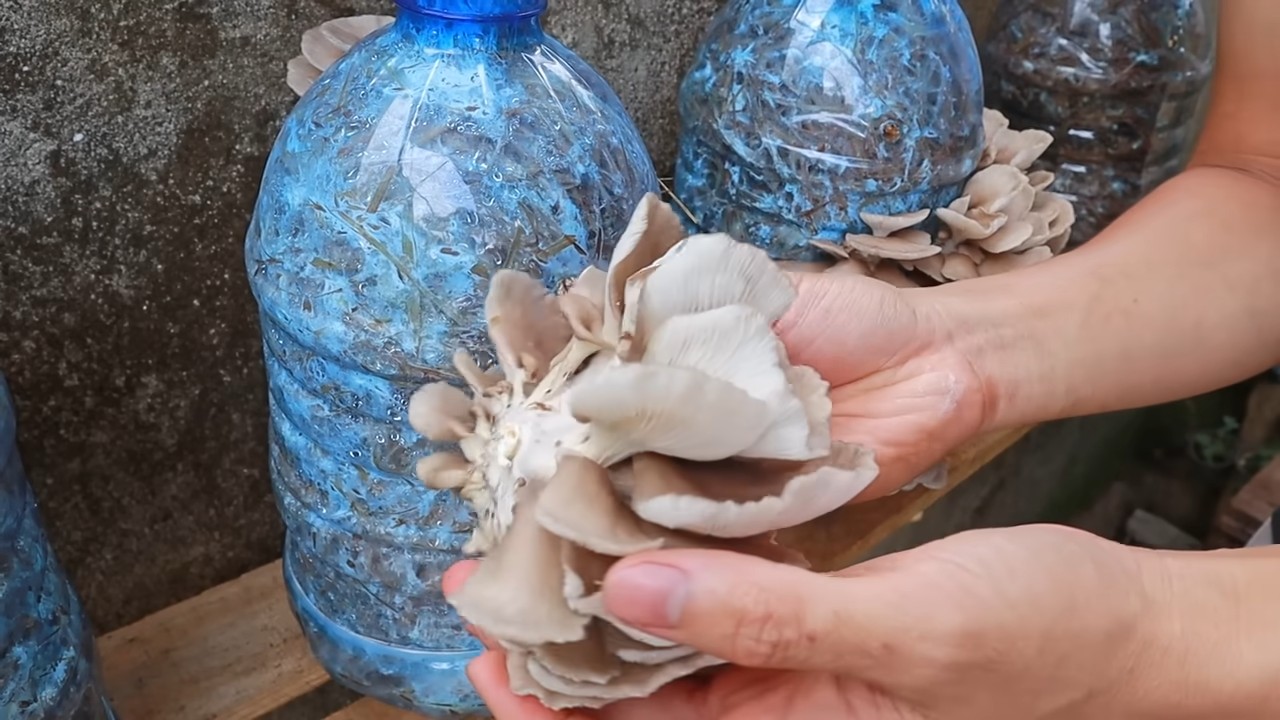
Why should you try this DIY mushroom bottle farming guide? Well, imagine the satisfaction of snipping off plump oyster mushrooms for your stir-fry, or adding earthy shiitakes to your homemade soup, all grown with your own two hands. Not only is it incredibly rewarding, but it’s also a fantastic way to recycle those empty bottles and reduce your carbon footprint. Plus, with the rising cost of groceries, growing your own food is becoming increasingly important. This mushroom bottle farming guide provides a cost-effective and space-saving solution for anyone looking to enjoy fresh, homegrown mushrooms, regardless of their gardening experience. Let’s get started and transform those bottles into a thriving mushroom farm!
Mushroom Cultivation in a Bottle Garden: Your DIY Guide for Home
Hello dear mushroom friends! Have you ever wondered how you can grow your own delicious mushrooms at home without taking up much space? Then you’ve come to the right place! In this article, I’ll show you how to create a mushroom bottle garden – a simple, cost-effective, and incredibly rewarding way to harvest fresh mushrooms right in your kitchen. Don’t worry, it’s easier than you think!
What you need for your mushroom bottle garden
Before we get started, let’s make sure you have everything you need on hand. Here is a list of the materials and tools you will need:
- A glass bottle: A large wine bottle, a mason jar, or a similar container with a wide opening is ideal. The larger the bottle, the more space your mushrooms will have to cover the bottle opening during the incubation phase.
- Rubber band: To secure the foil.
- Gloves: To avoid contamination.
- Optional: A thermometer to keep an eye on the temperature.
Step-by-Step Guide: How to Build Your Mushroom Bottle Garden
Now that we have everything, we can start building our mushroom bottle garden. Follow these steps carefully to achieve the best results:
1. Preparing the Substrate
The substrate is the foundation for the growth of your mushrooms. Good preparation is crucial for success.
- Pasteurize the substrate: The goal is to kill unwanted microorganisms without destroying the beneficial ones.
- **Straw grow.
- Mushroom spawn: This is the heart of our project! You can buy mushroom spawn online or at garden centers. Oyster mushrooms (Pleurotus ostreatus) are a good choice for beginners as they are relatively easy to grow.
- Substrate: The substrate is the food source for your mushrooms. Straw, coffee grounds, sawdust, or a mixture of these work great. Make sure the substrate is clean and free of mold.
- Hydrogen peroxide (3%): To sterilize the substrate and kill unwanted microorganisms.
- Spray bottle: To moisten the substrate.
- Aluminum foil or plastic wrap: To cover the bottle opening during the incubation phase.
- Rubber band: To secure the foil.
- Gloves: To avoid contamination.
- Optional: A thermometer to keep an eye on the temperature.
Step-by-Step Guide: How to build your mushroom bottle garden
Now that we have everything, we can start building our mushroom bottle garden. Follow these steps carefully to achieve the best results:
1. Preparing the Substrate
The substrate is the foundation for the growth of your mushrooms. Good preparation is crucial for success.
:** Cut the straw into small pieces (approx. 2-5 cm). Put it in a large pot and cover it with boiling water. Let it soak for 1-2 hours. Drain the water and let the straw cool until you can touch it.
* Coffee grounds: Fresh coffee grounds are already pasteurized. You can use them directly or heat them briefly in the microwave to ensure they are clean.
* Sawdust: Put the sawdust in a pot and cover it with water. Boil it for 30-60 minutes to pasteurize it. Drain the water and let the sawdust cool.
2. Add hydrogen peroxide: Lightly spray the pasteurized substrate with 3% hydrogen peroxide to kill additional germs.
3. Check moisture: The substrate should be moist, but not wet. Squeeze a handful of substrate. Only a few drops of water should come out.
2. The Inoculation: Bringing Mushroom Spawn into the Substrate
Now comes the exciting part: We bring the mushroom spawn into the substrate!
- Wash hands and put on gloves: Hygiene is very important here to avoid contamination.
- Prepare the bottle: Make sure the bottle is clean and dry.
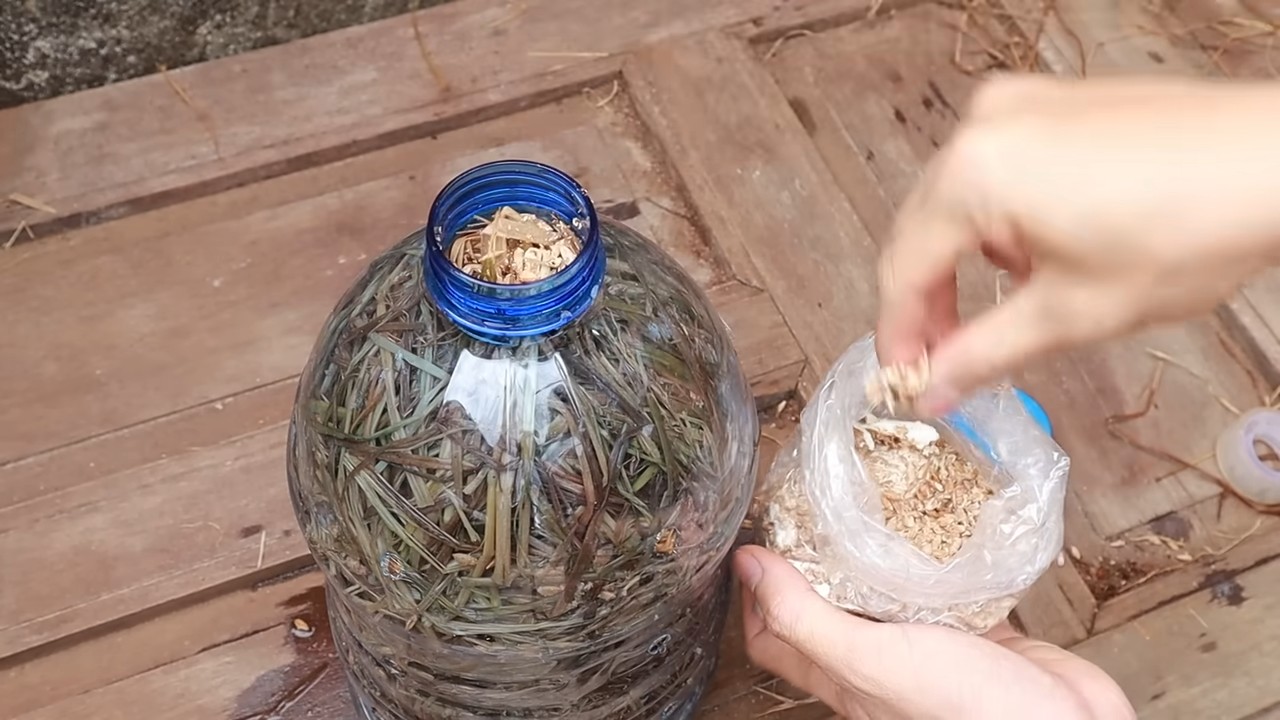
- Mix substrate and mushroom spawn: Put a layer of substrate in the bottle (approx. 5-7 cm). Then sprinkle a layer of mushroom spawn over it. Repeat this process until the bottle is almost full. The top layer should be substrate.
4.1. Pasteurize the substrate: The goal is to kill unwanted microorganisms without destroying the beneficial ones.- Straw: Cut the straw into small pieces (approx. 2-5 cm). Put it in a large pot and pour boiling water over it. Let it soak for 1-2 hours. Drain the water and let the Press the substrate lightly: Press the substrate lightly to ensure the mushroom spawn has good contact with the substrate.
- Cover the bottle opening: Cover the bottle opening with aluminum foil or plastic wrap and secure it with a rubber band. Poke a few small holes in the foil to ensure ventilation.
3. The Incubation: Waiting for Mycelium Growth
Incubation is the phase in which the mycelium (the fungal network) grows through the substrate.
- ** straw cool until you can touch it.
- Coffee grounds: Fresh coffee grounds are already pasteurized. You can use them directly or heat them briefly in the microwave to ensure they are clean.
- Sawdust: Put the sawdust in a pot and cover it with water. Boil it for 30-60 minutes to pasteurize it. Drain the water and let the sawdust cool.
- Add hydrogen peroxide: Lightly spray the pastePlace the bottle:** Place the bottle in a dark, warm place (approx. 20-24°C). Avoid direct sunlight.
- Be patient: Mycelium growth can take a few weeks. Checkurized substrate with 3% hydrogen peroxide to kill additional germs.
- Check moisture: The substrate should be moist the bottle regularly. You should see white, fluffy threads (the mycelium) spreading in the substrate.
- **, but not wet. Squeeze a handful of substrate. Only a few drops of water should come out.
###Check for contamination:** Watch for signs of contamination, such as green, black, or orange spots. If you notice contamination, dispose 2. Inoculation: Bringing mushroom spawn into the substrate
Now comes the exciting part: We are bringing the mushroom spawn of the bottle immediately to prevent it from spreading.
4. The Fruiting: Harvesting Mushrooms
When the mycel into the substrate!
- Wash hands and put on gloves: Hygiene is very important here to avoid contamination.
2ium has completely colonized the substrate, it’s time for fruiting – the formation of the mushrooms. - . Prepare the bottle: Make sure the bottle is clean and dry.
- Mix substrate andMove the bottle to a brighter place:** Move the bottle to a brighter place, but avoid direct sunlight. A windowsill or a shelf mushroom spawn:** Put a layer of substrate in the bottle (approx. 5-7 cm). Then sprinkle a layer of mushroom near a window is ideal.
- Increase humidity: Spray the substrate regularly with water to increase humidity. You spawn over it. Repeat this process until the bottle is almost full. The top layer should be substrate.
- can also put a plastic bag over the bottle to retain moisture. Make sure the bag does not rest directly on the substratePress the substrate lightly: Press the substrate lightly to ensure that the mushroom spawn has good contact with the substrate.
and that there is enough air circulation. - Ensure ventilation: Remove the foil and ventilate the bottle regularly5. Cover the bottle opening: Cover the bottle opening with aluminum foil or plastic wrap and secure it with a rubber to prevent mold.
- Observe the mushrooms: After a few days, you should see small mushrooms (primordia) band. Poke a few small holes in the foil to ensure ventilation.
3. Incubation: Waiting for mycel growing out of the substrate.
- Harvest the mushrooms: Harvest the mushrooms when they have reached their fullium growth
Incubation is the phase in which the mycelium (the mushroom network) grows through the substrate.
size, but before they release spores. Cut the mushrooms at the stem with a sharp knife or scissors.
5. Second1. Place the bottle: Place the bottle in a dark, warm place (approx. 20-24° Harvest and Beyond
After the first harvest, you can often get more harvests.
- **Moisten the substrate:**C). Avoid direct sunlight.
- Be patient: Mycelium growth can take several weeks. Check Moisten the substrate again by spraying it with water.
- Repeat the fruiting process: Place the bottle in a the bottle regularly. You should see white, fluffy threads (the mycelium) spreading through the substrate.
- brighter place again and ensure high humidity.
- Less yield: Subsequent harvests are often smaller than the first. Check for contamination: Watch for signs of contamination, such as green, black, or orange spots. If you notice
- Replace the substrate: After a few harvests, the substrate is exhausted. You can then compost it contamination, dispose of the bottle immediately to prevent it from spreading.
4. Fruiting: Harvesting mushrooms
When and use a new substrate.
Common Problems and Solutions
Problems can also occur when growing mushrooms. Here are some common problems the mycelium has completely colonized the substrate, it is time for fruiting – the formation of the mushrooms.
- and how you can solve them:
- No mycelium growth:
- Cause: TemperatureMove the bottle to a brighter place: Move the bottle to a brighter place, but avoid direct sunlight. A windowsill or a is too low, substrate is too dry, contamination.
- Solution: Place the bottle in a warmer place shelf near a window is ideal.
- Increase humidity: Spray the substrate regularly with water to increase humidity. You, moisten the substrate, and watch for signs of contamination.
- Contamination:
- Cause: Unwanted microorganisms have spread in the substrate.
- Solution: Dispose of the bottle immediately and that there is enough air circulation, can also put a plastic bag over the bottle to retain moisture. Make sure the bag does not rest directly on the substrate
Conclusion
So, there you have it! Transforming discarded bottles into thriving mushroom farms is not just a clever upcycling project; it’s a gateway to fresh, delicious, and sustainable food right in your own home. We’ve walked you through the process, from preparing your substrate to harvesting your bounty, and hopefully, demystified the art of indoor mushroom cultivation.
Why is this DIY mushroom bottle farming trick a must-try? Because it’s accessible, affordable, and incredibly rewarding. You’re reducing waste, learning a new skill, and gaining access to a gourmet ingredient that’s often expensive to buy in stores. Plus, there’s something deeply satisfying about nurturing life from seemingly nothing. Imagine the pride you’ll feel serving up a dish featuring mushrooms you grew yourself!
But the beauty of this method lies in its adaptability. Feel free to experiment with different mushroom varieties. While we’ve focused on oyster mushrooms due to their ease of cultivation, you can explore other species like shiitake or lion’s mane, keeping in mind their specific environmental needs. Consider adjusting the substrate mix to suit the particular mushroom you’re growing. Some mushrooms thrive on supplemented sawdust, while others prefer straw or coffee grounds.
Don’t be afraid to get creative with your bottle setup too. Try grouping multiple bottles together to create a larger, more visually appealing farm. Experiment with different lighting conditions to see how they affect mushroom growth. You can even add a small fan to improve air circulation and prevent mold growth.
This isn’t just about growing mushrooms; it’s about connecting with nature, embracing sustainability, and empowering yourself to produce your own food. It’s about understanding the fascinating life cycle of fungi and appreciating the role they play in our ecosystem.
We wholeheartedly encourage you to give this DIY mushroom bottle farming a try. It’s a fun, educational, and ultimately delicious project that will bring a touch of the natural world into your home. And most importantly, we want to hear about your experiences! Share your successes, your challenges, and your creative adaptations in the comments below. Let’s build a community of mushroom enthusiasts and learn from each other. Show us your bottle farms, tell us about your favorite mushroom recipes, and inspire others to embark on this rewarding journey. Let’s cultivate a world where fresh, sustainable food is accessible to everyone, one mushroom bottle at a time. This method of **mushroom bottle farming** is a great way to start your journey into the world of mycology.
Frequently Asked Questions (FAQ)
What types of bottles are best for mushroom bottle farming?
The ideal bottles are clear plastic bottles, such as those used for water, soda, or juice. Clear bottles allow light to penetrate, which is important for mushroom development. Avoid using colored or opaque bottles, as they will restrict light and hinder growth. Make sure the bottles are thoroughly cleaned and sanitized before use to prevent contamination. Glass bottles can also be used, but they are more fragile and require more caution when drilling holes.
What is the best substrate for growing mushrooms in bottles?
Oyster mushrooms, which are commonly grown in bottle farms, thrive on a variety of substrates. A popular and readily available option is pasteurized straw. You can also use supplemented sawdust, coffee grounds, or a mixture of these materials. The key is to ensure the substrate is properly pasteurized to kill off any competing organisms. Pasteurization can be achieved by soaking the substrate in hot water (around 160-180°F) for an hour or two. Allow the substrate to cool completely before inoculating it with mushroom spawn.
How do I pasteurize the substrate properly?
Pasteurization is crucial to eliminate competing molds and bacteria that can hinder mushroom growth. For straw, chop it into small pieces and soak it in a large container filled with hot water (around 160-180°F) for 1-2 hours. You can use a thermometer to monitor the water temperature. For sawdust or coffee grounds, you can use a similar method, but be careful not to over-saturate the substrate. After pasteurization, drain the substrate thoroughly and allow it to cool completely before inoculating it with mushroom spawn.
How much mushroom spawn do I need per bottle?
A general guideline is to use about 5-10% spawn by weight of the substrate. For example, if you have 1 kilogram of substrate, you would use 50-100 grams of spawn. Distribute the spawn evenly throughout the substrate as you layer it into the bottle. This ensures that the mycelium can colonize the substrate efficiently.
How long does it take for mushrooms to grow in a bottle farm?
The time it takes for mushrooms to grow depends on several factors, including the mushroom species, the substrate, the temperature, and the humidity. Generally, oyster mushrooms will start to pin (form small mushroom buds) within 1-2 weeks after the substrate is fully colonized by the mycelium. It then takes another 3-5 days for the mushrooms to mature and be ready for harvest.
What are the ideal environmental conditions for mushroom bottle farming?
Oyster mushrooms prefer a temperature range of 60-75°F (15-24°C) and high humidity (80-90%). Maintain humidity by misting the bottles regularly with water. Good air circulation is also important to prevent mold growth. Place the bottles in a location with indirect sunlight or artificial light. Avoid direct sunlight, as it can overheat the bottles and dry out the substrate.
How do I harvest the mushrooms?
Harvest the mushrooms when the caps are fully developed but before they start to drop spores. Gently twist or cut the mushrooms off the bottle, being careful not to damage the substrate. After harvesting, the substrate may produce another flush of mushrooms. Continue to mist the bottles and maintain the ideal environmental conditions to encourage further growth.
What if I see mold growing in my mushroom bottle farm?
Mold contamination is a common problem in mushroom cultivation. If you see mold, try to remove the affected area immediately. You can use a clean knife or spoon to scrape off the mold. Improve air circulation and reduce humidity to prevent further mold growth. If the mold is widespread, it may be necessary to discard the entire bottle to prevent contamination of other bottles.
Can I reuse the substrate after harvesting mushrooms?
After harvesting several flushes of mushrooms, the substrate will eventually become depleted of nutrients. At this point, you can compost the spent substrate and use it as a soil amendment in your garden. The spent substrate is rich in organic matter and beneficial microbes, making it an excellent addition to your compost pile.
Where can I buy mushroom spawn?
Mushroom spawn can be purchased from a variety of sources, including online retailers, garden centers, and specialty mushroom suppliers. Look for reputable suppliers that offer high-quality spawn of the mushroom species you want to grow. Make sure the spawn is fresh and free from contamination. Liquid culture is also a great way to start your mushroom journey.
Leave a Comment