
Citric Acid Cleaning Hacks: Unlock the sparkling potential of your home with this all-natural powerhouse! Are you tired of harsh chemicals and their lingering odors? Do you dream of a cleaner, brighter space without breaking the bank? Well, you’re in luck! I’m about to share some incredible DIY cleaning secrets using a simple, readily available ingredient: citric acid.
Citric acid, derived from citrus fruits like lemons and limes, has been used for centuries, not just in cooking but also for its amazing cleaning properties. Think back to your grandmother’s cleaning rituals – chances are, she knew a thing or two about the power of lemon juice! This natural acid acts as a fantastic disinfectant, deodorizer, and stain remover, making it a versatile tool in your cleaning arsenal.
In today’s world, where we’re increasingly conscious of the environment and the impact of chemicals on our health, finding effective and eco-friendly cleaning solutions is more important than ever. That’s where these citric acid cleaning hacks come in. I’ll show you how to tackle everything from stubborn hard water stains to grimy appliances, all while keeping your home safe and smelling fresh. Get ready to ditch the harsh chemicals and embrace the natural cleaning power of citric acid – your home (and your nose) will thank you!
Growing Chili Peppers on Your Balcony: A Spicy DIY Guide
Hey there, fellow spice enthusiasts! Ever dreamt of adding a fiery kick to your meals with homegrown chili peppers, right from your own balcony? Well, dream no more! I’m going to walk you through everything you need to know to cultivate a thriving chili pepper garden, even if you’re short on space. Get ready to turn your balcony into a mini-spice farm!
Choosing the Right Chili Pepper Variety
First things first, let’s talk chili peppers. Not all peppers are created equal, and some are definitely better suited for balcony life than others. Consider these factors when making your selection:
* Size: Compact varieties are your best bet. Think about how much space you realistically have. Dwarf or bush-type chili plants are ideal for containers.
* Climate: Choose varieties that thrive in your local climate. Some peppers love the heat, while others prefer cooler conditions. Do a little research to find peppers that will flourish in your area.
* Spice Level: From mild to scorching hot, chili peppers come in a wide range of heat levels. Pick peppers that match your taste preferences. Jalapeños, serranos, and Thai chilies are popular choices for beginners.
* Days to Maturity: This refers to the time it takes for the plant to produce mature peppers after transplanting. Shorter maturity times mean you’ll be harvesting sooner!
Some great options for balcony chili growing include:
* Jalapeño: A classic, versatile pepper with a moderate heat level.
* Serrano: A bit hotter than jalapeños, perfect for adding a kick to salsas and sauces.
* Thai Chili: Small but mighty, these peppers pack a serious punch.
* Cayenne: A popular choice for making chili powder and hot sauce.
* Habanero: For the truly adventurous, these peppers are intensely hot. (Handle with care!)
* ‘Patio Fire’ Hybrid: Bred specifically for container growing, this variety produces a good yield of medium-hot peppers.
Gathering Your Supplies
Okay, now that we’ve chosen our chili pepper varieties, let’s gather the necessary supplies. Here’s what you’ll need:
* Chili Pepper Seeds or Seedlings: You can start from seeds or buy established seedlings from a local nursery. Seedlings will give you a head start.
* Containers: Choose pots that are at least 12 inches in diameter and depth. Make sure they have drainage holes to prevent waterlogging. Terracotta or plastic pots work well.
* Potting Mix: Use a high-quality potting mix that’s well-draining and contains nutrients. Avoid using garden soil, as it can compact and hinder drainage.
* Fertilizer: A balanced fertilizer (e.g., 10-10-10) or a fertilizer specifically formulated for tomatoes and peppers will provide the necessary nutrients for healthy growth and abundant pepper production.
* Watering Can or Hose: For watering your plants.
* Gardening Gloves: To protect your hands.
* Trowel: For transplanting seedlings.
* Plant Markers: To label your chili pepper varieties.
* Optional:
* Plant Support: Some chili pepper varieties may need support as they grow taller and produce heavy peppers. Stakes or small trellises can help.
* Pest Control: Insecticidal soap or neem oil can be used to control common pests like aphids and spider mites.
* Mulch: Organic mulch, such as straw or wood chips, can help retain moisture and suppress weeds.
Planting Your Chili Peppers
Alright, let’s get our hands dirty! Here’s how to plant your chili peppers:
Starting from Seeds (Optional)
1. Start Seeds Indoors (6-8 weeks before the last frost): Fill seed trays or small pots with seed-starting mix. Sow seeds about ¼ inch deep.
2. Keep Soil Moist: Water gently and keep the soil consistently moist, but not waterlogged.
3. Provide Warmth and Light: Place the seed trays in a warm location (around 70-80°F) and provide plenty of light. A sunny windowsill or a grow light will work.
4. Transplant Seedlings: Once the seedlings have developed a few sets of true leaves, they’re ready to be transplanted into larger pots.
Transplanting Seedlings
1. Prepare the Containers: Fill your chosen containers with potting mix, leaving about an inch of space at the top.
2. Remove Seedlings from Nursery Pots: Gently remove the seedlings from their nursery pots. If the roots are tightly bound, gently loosen them with your fingers.
3. Plant the Seedlings: Dig a hole in the potting mix that’s large enough to accommodate the root ball. Place the seedling in the hole and backfill with potting mix. Gently firm the soil around the base of the plant.
4. Water Thoroughly: Water the newly planted seedlings thoroughly to help them settle in.
5. Label Your Plants: Use plant markers to label each chili pepper variety.
Caring for Your Chili Pepper Plants
Now that your chili peppers are planted, it’s time to provide them with the care they need to thrive.
Sunlight
Chili peppers need at least 6-8 hours of direct sunlight per day. Place your containers in the sunniest spot on your balcony. If your balcony doesn’t get enough sunlight, you may need to supplement with a grow light.
Watering
Water your chili pepper plants regularly, especially during hot, dry weather. Check the soil moisture by sticking your finger into the soil. If the top inch of soil feels dry, it’s time to water. Water deeply, until water drains out of the drainage holes. Avoid overwatering, as this can lead to root rot.
Fertilizing
Feed your chili pepper plants with a balanced fertilizer every 2-3 weeks. Follow the instructions on the fertilizer label. You can also use a fertilizer specifically formulated for tomatoes and peppers.
Pruning
Pruning isn’t essential, but it can help to improve air circulation and encourage bushier growth. Remove any dead or yellowing leaves. You can also pinch off the tips of the branches to encourage branching.
Pest and Disease Control
Keep an eye out for common pests like aphids, spider mites, and whiteflies. If you spot any pests, treat them with insecticidal soap or neem oil. You can also try hand-picking the pests off the plants. To prevent fungal diseases, avoid overwatering and ensure good air circulation.
Supporting the Plants
As your chili pepper plants grow taller and produce heavy peppers, they may need support. Use stakes or small trellises to support the plants and prevent them from falling over.
Harvesting Your Chili Peppers
The moment you’ve been waiting for! Harvesting your chili peppers is the most rewarding part of the process.
1. When to Harvest: The time to harvest depends on the variety of chili pepper and your personal preference. Generally, chili peppers are ready to harvest when they’ve reached their mature color and size.
2. How to Harvest: Use pruning shears or scissors to cut the peppers from the plant. Be careful not to damage the plant.
3. Handling Hot Peppers: If you’re harvesting hot peppers, wear gloves to protect your hands from the capsaicin (the compound that makes chili peppers hot). Avoid touching your eyes or face after handling hot peppers.
4. Storing Your Harvest: Fresh chili peppers can be stored in the refrigerator for up to a week. You can also dry, freeze, or pickle your chili peppers for longer storage.
Troubleshooting Common Problems
Even with the best care, you may encounter some problems while growing chili peppers on your balcony. Here are some common issues and how to address them:
* Yellowing Leaves: This can be caused by overwatering, underwatering, nutrient deficiencies, or pests. Check the soil moisture, fertilize the plants, and inspect for pests.
* Blossom Drop: This is when the flowers fall off the plant without producing peppers. It can be caused by temperature stress, lack of pollination, or nutrient deficiencies. Ensure consistent watering, provide adequate sunlight, and fertilize the plants. Hand-pollinating the flowers with a small brush can also help.
* Pest Infestations: Aphids, spider mites, and whiteflies are common pests of chili pepper plants. Treat them with insecticidal soap or neem oil.
* Fungal Diseases: Overwatering and poor air circulation can lead to fungal diseases. Avoid overwatering, ensure good air circulation, and treat with a fungicide if necessary.
Enjoying Your Homegrown Chili Peppers
Congratulations! You’ve successfully grown chili peppers on your balcony. Now it’s time to enjoy the fruits (or should I say, peppers?) of your labor. Use your homegrown chili peppers
Conclusion
So, there you have it! Citric acid cleaning hacks are not just a trend; they’re a game-changer for anyone seeking a powerful, eco-friendly, and cost-effective way to keep their home sparkling. We’ve explored a range of applications, from banishing hard water stains in your bathroom to reviving your coffee maker and tackling stubborn grime in your kitchen. The versatility of citric acid is truly remarkable, making it an indispensable tool in your cleaning arsenal.
Why is this DIY trick a must-try? Because it offers a compelling alternative to harsh chemical cleaners. You’re not only reducing your exposure to potentially harmful substances but also contributing to a healthier environment. Plus, the satisfaction of creating your own effective cleaning solutions is incredibly rewarding. Think about it: you’re saving money, minimizing waste, and achieving exceptional cleaning results – all with a simple, readily available ingredient.
But the beauty of citric acid cleaning doesn’t stop there. It’s incredibly adaptable. Feel free to experiment with different concentrations to find what works best for your specific needs. For instance, if you’re dealing with particularly stubborn stains, you might want to increase the amount of citric acid in your solution. Conversely, for more delicate surfaces, a milder concentration is advisable.
Here are a few suggestions and variations to get you started:
* **Scent it up:** Add a few drops of your favorite essential oil, like lavender, lemon, or eucalyptus, to your citric acid cleaning solutions for a refreshing aroma. This is especially great for all-purpose cleaners and bathroom sprays.
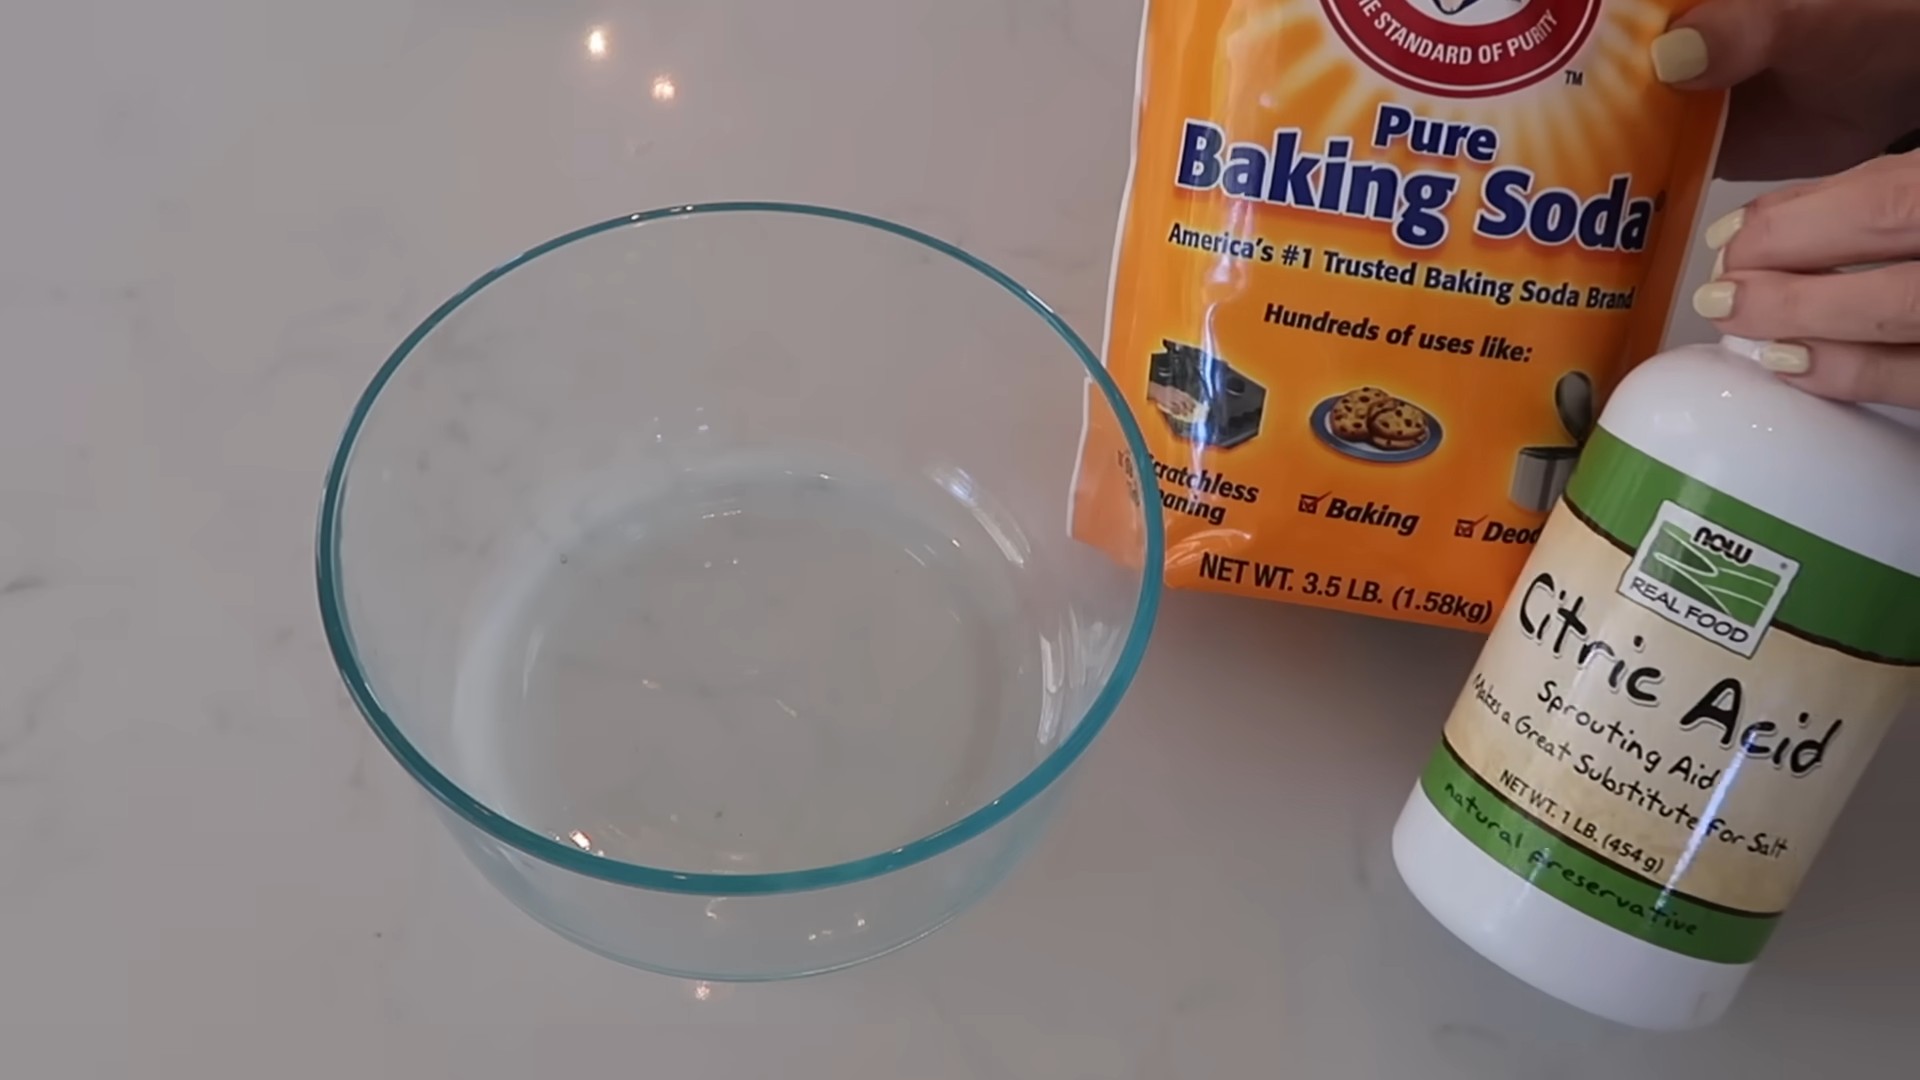
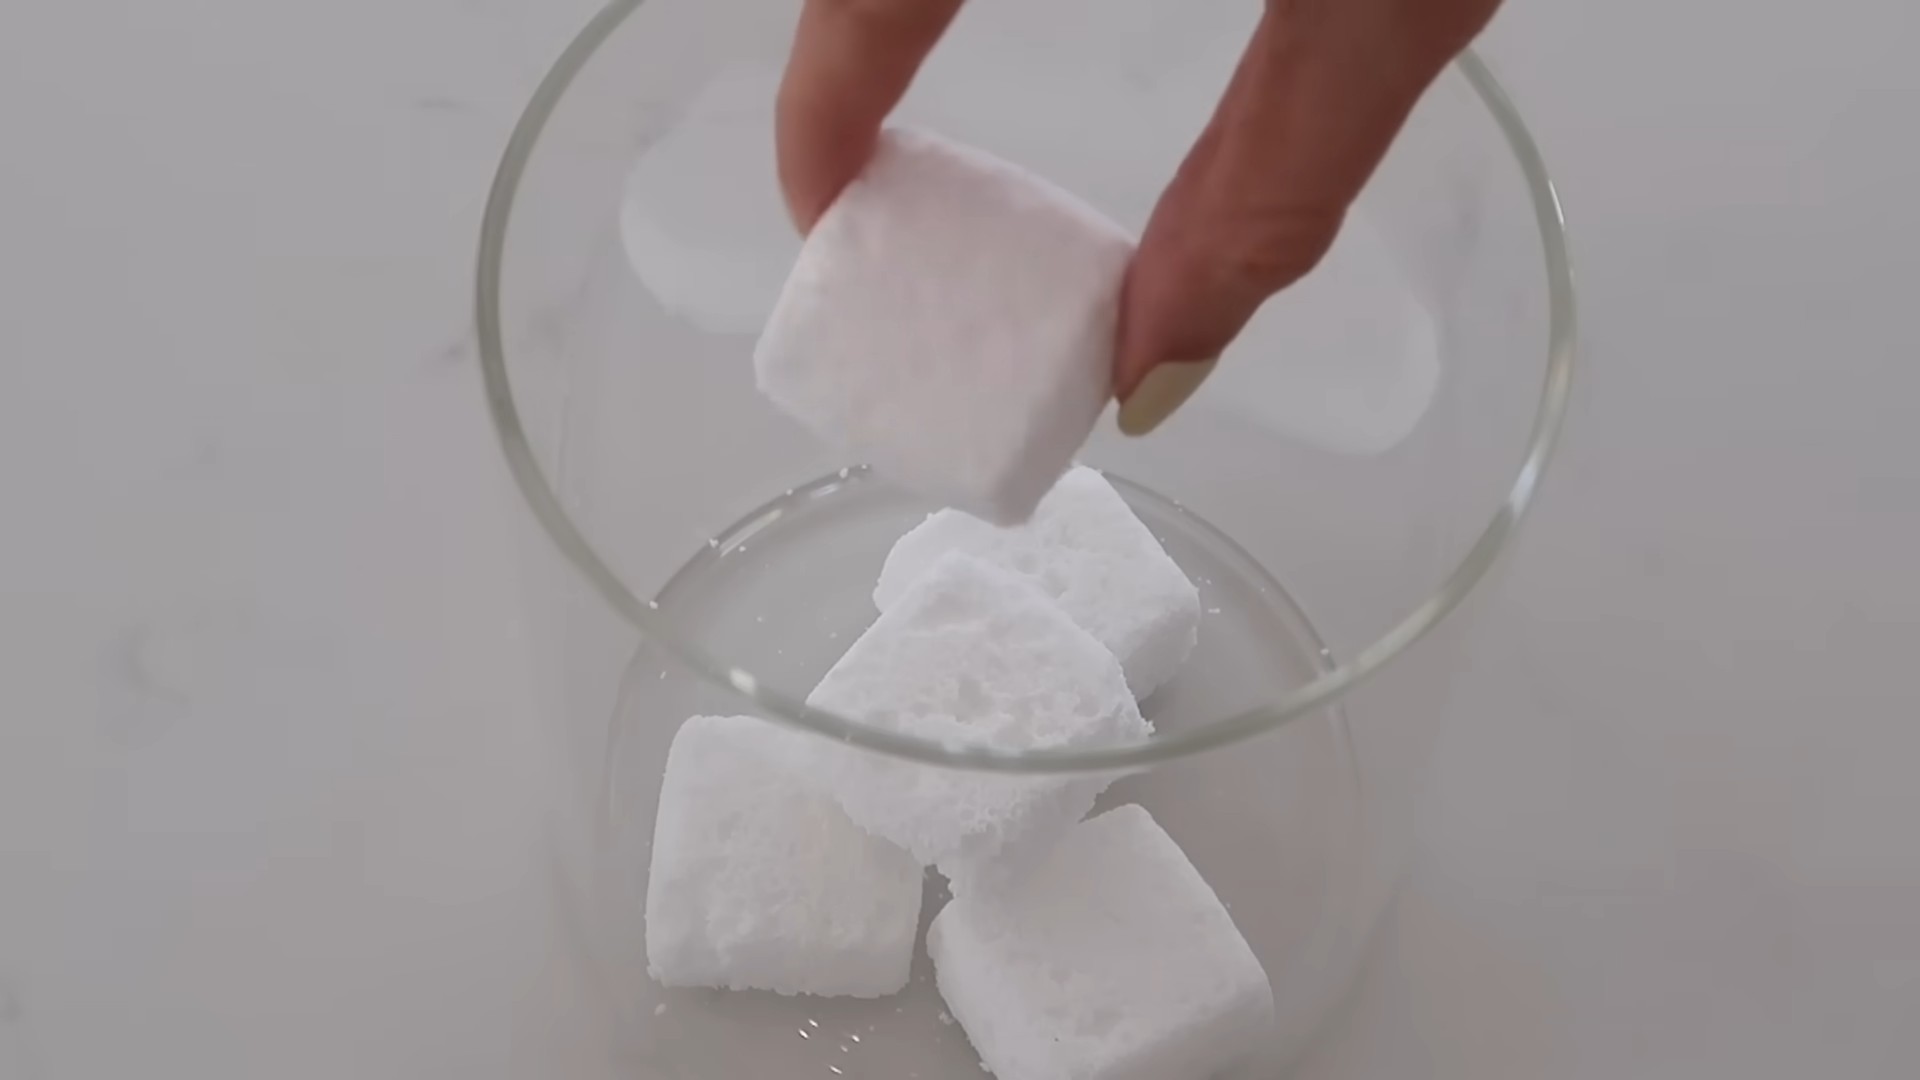
* **Boost its power:** For extra cleaning oomph, combine citric acid with baking soda to create a fizzing paste that’s perfect for scrubbing grout or removing baked-on food. Remember to test this mixture in an inconspicuous area first.
* **Target specific stains:** Create a concentrated paste of citric acid and water to tackle rust stains on clothing or other surfaces. Apply the paste, let it sit for a few minutes, and then scrub gently.
* **Citric acid for laundry:** Add a tablespoon of citric acid to your washing machine along with your regular detergent to help brighten whites and remove mineral buildup. This is particularly beneficial if you have hard water.
Ultimately, the best way to discover the full potential of citric acid cleaning is to try it yourself. We’re confident that you’ll be amazed by the results. So, ditch the harsh chemicals and embrace the power of this natural cleaning agent.
We encourage you to embark on your own citric acid cleaning adventure and share your experiences with us! Let us know what hacks you’ve tried, what variations you’ve discovered, and what amazing results you’ve achieved. Your feedback will not only inspire others but also help us refine and expand our knowledge of this incredible cleaning solution. Share your tips and tricks in the comments below! We can’t wait to hear from you.
Frequently Asked Questions (FAQ)
What exactly is citric acid, and is it safe to use?
Citric acid is a naturally occurring organic acid found in citrus fruits like lemons, limes, and oranges. It’s a weak acid, which makes it effective for cleaning without being overly harsh. Generally, citric acid is considered safe for household use when diluted properly. However, it’s always a good idea to wear gloves when handling cleaning solutions, even natural ones, to protect your skin. Avoid getting citric acid in your eyes, and if you do, rinse thoroughly with water. Keep citric acid and cleaning solutions made with it out of reach of children and pets.
Where can I buy citric acid?
Citric acid is readily available in several places. You can find it in the baking aisle of most grocery stores, often sold as a food preservative or for canning. You can also purchase it online from retailers like Amazon or specialty cleaning supply stores. When buying citric acid, make sure you’re getting the pure form, not a blend with other ingredients. Food grade citric acid is perfectly acceptable for cleaning purposes.
What surfaces should I avoid cleaning with citric acid?
While citric acid is generally safe for many surfaces, there are a few exceptions. Avoid using it on natural stone surfaces like marble, granite, and limestone, as it can etch or damage them. It’s also best to avoid using citric acid on aluminum, as it can cause corrosion. Always test a small, inconspicuous area before applying citric acid to any surface, especially if you’re unsure about its compatibility.
How do I make a basic citric acid cleaning solution?
A basic citric acid cleaning solution is easy to make. Simply dissolve 1-2 tablespoons of citric acid powder in 1 cup of warm water. Stir until the citric acid is completely dissolved. You can then pour the solution into a spray bottle for easy application. Adjust the concentration of citric acid depending on the severity of the cleaning task.
Can I use citric acid to clean my coffee maker?
Yes, citric acid is an excellent descaler for coffee makers. To clean your coffee maker, dissolve 2 tablespoons of citric acid in a full pot of water. Pour the solution into the water reservoir and run a full brewing cycle. Then, run two cycles with plain water to rinse away any remaining citric acid. This will remove mineral buildup and improve the performance of your coffee maker.
How effective is citric acid for removing rust stains?
Citric acid is highly effective for removing rust stains. To treat rust stains, create a paste by mixing citric acid powder with a small amount of water. Apply the paste to the rust stain and let it sit for 30 minutes to an hour. Then, scrub the area with a brush or sponge and rinse thoroughly with water. For stubborn rust stains, you may need to repeat the process.
Is citric acid safe for septic systems?
Yes, citric acid is generally considered safe for septic systems. It’s a natural substance that breaks down easily and doesn’t contain harsh chemicals that can harm the beneficial bacteria in your septic tank. However, as with any cleaning product, it’s best to use citric acid in moderation.
How long does a citric acid cleaning solution last?
A citric acid cleaning solution can last for several weeks when stored properly. Keep it in a sealed container, such as a spray bottle, in a cool, dark place. Over time, the solution may lose some of its potency, so it’s best to make a fresh batch every few weeks for optimal cleaning performance.
Can I mix citric acid with other cleaning agents?
While citric acid is a versatile cleaner, it’s important to be cautious when mixing it with other cleaning agents. Avoid mixing citric acid with bleach, as this can create harmful chlorine gas. It’s generally safe to mix citric acid with baking soda, but be aware that this will create a fizzing reaction. Always test any cleaning mixture in a small, inconspicuous area before applying it to a larger surface.
What are the benefits of using citric acid for cleaning compared to traditional chemical cleaners?
There are several benefits to using citric acid for cleaning compared to traditional chemical cleaners. Citric acid is a natural, biodegradable substance that’s less harmful to the environment. It’s also non-toxic and doesn’t contain harsh chemicals that can irritate your skin or respiratory system. Additionally, citric acid is often more affordable than specialized chemical cleaners. By choosing citric acid, you’re making a more sustainable and healthier choice for your home and the planet.

Leave a Comment