
Malabar Spinach Growing Tips: Ever dreamt of snipping fresh, vibrant greens right from your backyard for a delicious and healthy meal? I know I have! There’s something incredibly satisfying about nurturing your own food, and Malabar spinach makes it surprisingly easy, even if you don’t have a sprawling garden. This climbing vine, also known as Ceylon spinach or vine spinach, isn’t actually a true spinach, but its leaves offer a similar flavor and nutritional punch, packed with vitamins A and C, iron, and calcium.
Historically, Malabar spinach has been cultivated in tropical Asia for centuries, prized for its heat tolerance and ability to thrive in humid climates. It’s a staple in many Asian cuisines, adding a delightful texture and subtle earthy flavor to stir-fries, soups, and salads. But why should *you* consider adding it to your garden? Well, for starters, it’s incredibly low-maintenance. Forget about fussy plants that demand constant attention! Malabar spinach is relatively pest-resistant and can handle a bit of neglect, making it perfect for busy gardeners or beginners. Plus, it’s a beautiful plant, adding vertical interest to your garden with its twining vines and glossy leaves.
In this DIY guide, I’m going to share my top Malabar Spinach Growing Tips and tricks to help you cultivate a thriving crop, no matter your experience level. We’ll cover everything from choosing the right location and preparing the soil to providing support for its climbing habit and harvesting those delicious leaves. Get ready to enjoy fresh, homegrown greens all season long!
Malabarspinat selbst anbauen: Ein umfassender DIY-Leitfaden
Hallo liebe Gartenfreunde! Ich freue mich, euch heute in die Welt des Malabarspinats einzuführen. Dieser Kletterspinat ist nicht nur eine köstliche und nahrhafte Ergänzung für eure Küche, sondern auch ein echter Hingucker im Garten. Er ist relativ einfach anzubauen und bietet eine reiche Ernte über einen langen Zeitraum. Lasst uns gemeinsam in dieses spannende Projekt eintauchen!
Was ist Malabarspinat?
Bevor wir loslegen, kurz zur Info: Malabarspinat (Basella alba oder Basella rubra) ist kein echter Spinat, sondern eine tropische Kletterpflanze. Er ist hitzebeständig und wächst schnell, was ihn zu einer idealen Alternative zu herkömmlichem Spinat in warmen Klimazonen macht. Die Blätter und Stängel sind essbar und haben einen milden, leicht zitronigen Geschmack.
Vorbereitung ist alles: Was ihr braucht
Bevor wir mit dem Anbau beginnen, solltet ihr sicherstellen, dass ihr alles Notwendige zur Hand habt. Hier ist eine Liste der Materialien und Werkzeuge, die ihr benötigt:
* Malabarspinatsamen oder Stecklinge: Samen sind online oder in gut sortierten Gartencentern erhältlich. Stecklinge könnt ihr von einer bestehenden Pflanze nehmen.
* Anzuchttöpfe oder -schalen: Für die Voranzucht der Samen.
* Anzuchterde: Eine leichte, gut durchlässige Erde ist ideal.
* Gartenerde: Für das Auspflanzen ins Beet oder in größere Töpfe.
* Kompost oder organischer Dünger: Um den Boden anzureichern.
* Pflanzgefäße (optional): Wenn ihr den Malabarspinat in Töpfen anbauen möchtet.
* Rankhilfe: Ein Spalier, Zaun oder ähnliches, da der Malabarspinat klettert.
* Gießkanne oder Gartenschlauch: Zum Bewässern.
* Gartenschere: Zum Ernten und Beschneiden.
* Handschuhe: Zum Schutz eurer Hände.
Aussaat und Voranzucht
Die Voranzucht ist besonders in kälteren Regionen empfehlenswert, um den Pflanzen einen Vorsprung zu verschaffen.
1. Samen vorbereiten: Die Samen des Malabarspinats haben eine harte Schale. Um die Keimung zu beschleunigen, könnt ihr sie vor der Aussaat für 24 Stunden in lauwarmem Wasser einweichen.
2. Aussaat in Anzuchttöpfen: Füllt die Anzuchttöpfe mit Anzuchterde. Legt pro Topf 2-3 Samen etwa 1 cm tief in die Erde.
3. Bewässern: Gießt die Erde vorsichtig an, sodass sie feucht, aber nicht nass ist.
4. Standort: Stellt die Anzuchttöpfe an einen warmen, hellen Ort. Eine Temperatur von 20-25°C ist ideal.
5. Feuchtigkeit halten: Um die Luftfeuchtigkeit zu erhöhen, könnt ihr die Töpfe mit einer durchsichtigen Plastikfolie oder einem Mini-Gewächshaus abdecken. Lüftet regelmäßig, um Schimmelbildung zu vermeiden.
6. Keimung: Die Keimung dauert in der Regel 1-3 Wochen. Sobald die Sämlinge groß genug sind, könnt ihr die schwächsten entfernen, sodass nur der stärkste Sämling pro Topf übrig bleibt.
Auspflanzen ins Freie oder in Töpfe
Sobald die Sämlinge kräftig genug sind und keine Frostgefahr mehr besteht (in der Regel ab Mitte Mai), können sie ins Freie oder in größere Töpfe umgepflanzt werden.
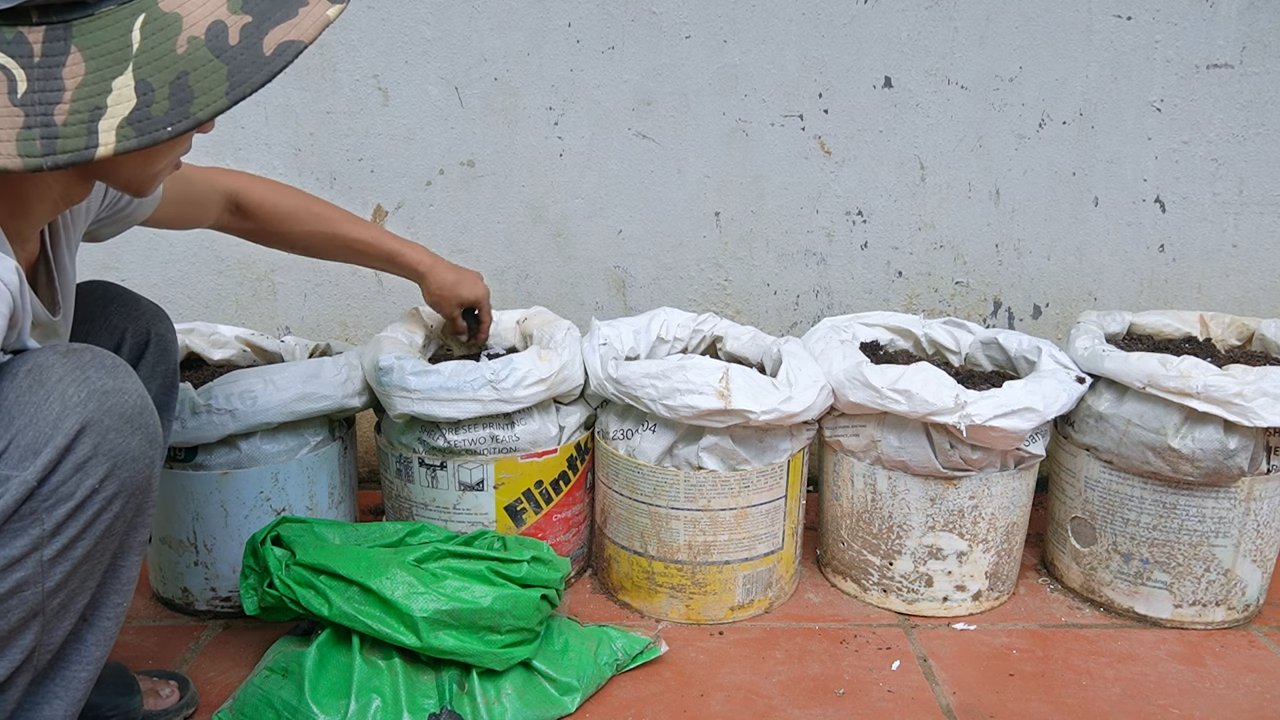
1. Boden vorbereiten: Wählt einen sonnigen Standort mit gut durchlässigem Boden. Lockert den Boden auf und reichert ihn mit Kompost oder organischem Dünger an.
2. Pflanzlöcher graben: Grabt Pflanzlöcher, die etwas größer sind als die Wurzelballen der Sämlinge.
3. Auspflanzen: Setzt die Sämlinge vorsichtig in die Pflanzlöcher und füllt diese mit Erde auf. Achtet darauf, dass die Wurzelballen vollständig bedeckt sind.
4. Abstand: Pflanzt die Sämlinge in einem Abstand von etwa 30-40 cm zueinander, damit sie genügend Platz zum Wachsen haben.
5. Bewässern: Gießt die Pflanzen nach dem Auspflanzen gründlich an.
6. Rankhilfe anbringen: Da der Malabarspinat klettert, benötigt er eine Rankhilfe. Bringt ein Spalier, einen Zaun oder ähnliches in der Nähe der Pflanzen an.
Pflege des Malabarspinats
Die Pflege des Malabarspinats ist relativ einfach, aber es gibt ein paar Dinge, die ihr beachten solltet, um eine reiche Ernte zu erzielen.
1. Bewässerung: Der Malabarspinat benötigt regelmäßige Bewässerung, besonders während trockener Perioden. Achtet darauf, dass der Boden immer leicht feucht ist, aber vermeidet Staunässe.
2. Düngung: Düngt die Pflanzen regelmäßig mit einem organischen Dünger oder Kompost, um sie mit ausreichend Nährstoffen zu versorgen.
3. Beschneidung: Um das Wachstum anzuregen und die Ernte zu erleichtern, könnt ihr die Pflanzen regelmäßig beschneiden. Entfernt dabei alte oder beschädigte Blätter und Stängel.
4. Schutz vor Schädlingen: Der Malabarspinat ist relativ resistent gegen Schädlinge, aber gelegentlich können Blattläuse oder Schnecken auftreten. Kontrolliert die Pflanzen regelmäßig und entfernt Schädlinge bei Bedarf manuell oder mit natürlichen Schädlingsbekämpfungsmitteln.
5. Überwinterung (optional): In kälteren Regionen ist der Malabarspinat nicht winterhart. Ihr könnt ihn entweder als einjährige Pflanze anbauen oder versuchen, ihn im Haus zu überwintern. Dazu müsst ihr die Pflanze vor dem ersten Frost ausgraben und in einen Topf umpflanzen. Stellt den Topf an einen hellen, kühlen Ort und gießt die Pflanze nur sparsam.
Erntezeit!
Die Ernte des Malabarspinats kann etwa 6-8 Wochen nach dem Auspflanzen beginnen.
1. Blätter und Stängel ernten: Erntet die Blätter und Stängel, sobald sie groß genug sind. Ihr könnt entweder einzelne Blätter abzupfen oder ganze Stängel abschneiden.
2. Regelmäßige Ernte: Durch regelmäßige Ernte fördert ihr das Wachstum der Pflanze und sorgt für eine kontinuierliche Ernte.
3. Verwendung: Der Malabarspinat kann wie herkömmlicher Spinat verwendet werden. Er eignet sich für Salate, Suppen, Eintöpfe oder als Beilage. Die Blätter können roh oder gekocht gegessen werden.
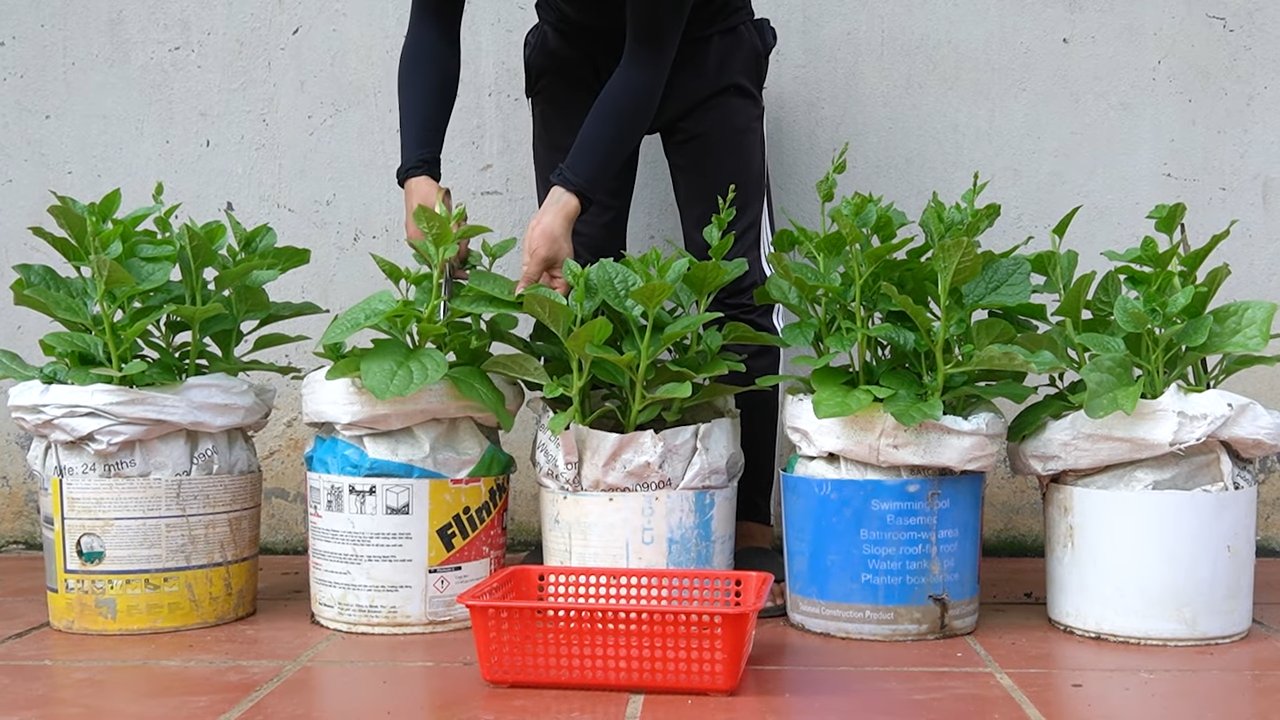
Malabarspinat in Töpfen anbauen
Wenn ihr keinen Garten habt, könnt ihr den Malabarspinat auch problemlos in Töpfen anbauen.
1. Topfgröße: Wählt einen Topf mit einem Durchmesser von mindestens 30 cm.
2. Erde: Verwendet eine hochwertige Gartenerde, die mit Kompost oder organischem Dünger angereichert ist.
3. Standort: Stellt den Topf an einen sonnigen Standort.
4. Rankhilfe: Bringt eine Rankhilfe im Topf an, damit der Malabarspinat klettern kann.
5. Pflege: Die Pflege des Malabarspinats im Topf ist die gleiche wie im Beet. Achtet auf regelmäßige Bewässerung und Düngung.
Häufige Probleme und Lösungen
Auch beim Anbau von Malabarspinat können Probleme auftreten. Hier sind einige häufige Probleme und ihre Lösungen:
* Gelbe Blätter: Gelbe Blätter können ein Zeichen für Nährstoffmangel oder Überwässerung sein. Düngt die Pflanzen regelmäßig und achtet darauf, dass der Boden gut durchlässig ist.
* Blattläuse: Blattläuse können die Blätter des Malabarspinats befallen. Entfernt die Blattläuse manuell oder mit natürlichen Schädlingsbekämpfungsmitteln.
* Schnecken: Schnecken können die Blätter des Malabarspinats anfressen. Sammelt die Schnecken ab oder verwendet Schneckenkorn.
* Langsame Keimung:
Conclusion
So, there you have it! Mastering the art of growing Malabar spinach isn’t just about having a green thumb; it’s about understanding the plant’s needs and providing the right environment for it to thrive. This DIY approach, focusing on [Malabar Spinach Growing Tips], empowers you to take control of your garden and enjoy a bountiful harvest of this nutritious and delicious leafy green.
Why is this DIY trick a must-try? Because it’s more than just a set of instructions; it’s a pathway to self-sufficiency and a deeper connection with nature. By understanding the nuances of soil preparation, sunlight requirements, and watering techniques, you’re not just growing spinach; you’re cultivating a sustainable food source right in your backyard. You’re also avoiding the potential pesticides and herbicides that can be found in commercially grown produce. The satisfaction of harvesting your own fresh, organic Malabar spinach is unparalleled.
But the journey doesn’t end here! Feel free to experiment with different growing mediums. While we’ve highlighted the importance of well-draining soil enriched with organic matter, you might find success with hydroponics or even container gardening using coco coir. Consider companion planting to further enhance your Malabar spinach’s growth. Basil, marigolds, and nasturtiums are known to deter pests and attract beneficial insects.
Another exciting variation is to explore different cultivars of Malabar spinach. While the green-stemmed variety is the most common, you might encounter red-stemmed varieties that offer a slightly different flavor profile and visual appeal. Don’t be afraid to try them all and discover your personal favorite!
Remember, gardening is a continuous learning process. There will be successes and setbacks, but each experience will bring you closer to mastering the art of growing Malabar spinach. The key is to be patient, observant, and adaptable. Pay attention to your plants’ needs, adjust your techniques as necessary, and don’t be discouraged by the occasional challenge.
We wholeheartedly encourage you to embark on this rewarding journey of growing your own Malabar spinach. The benefits are numerous: fresh, nutritious food, a connection with nature, and the satisfaction of creating something beautiful and sustainable.
And most importantly, we want to hear about your experiences! Share your successes, your challenges, and your unique tips and tricks in the comments below. Let’s create a community of Malabar spinach enthusiasts who can learn from each other and inspire others to embrace the joys of gardening. Your insights could be invaluable to someone just starting out, and together, we can unlock the full potential of this amazing plant. So, grab your gardening gloves, prepare your soil, and get ready to experience the magic of growing your own Malabar spinach! Let us know how these [Malabar Spinach Growing Tips] worked for you!
Frequently Asked Questions (FAQ)
What kind of soil is best for growing Malabar spinach?
Malabar spinach thrives in well-draining soil that is rich in organic matter. A slightly acidic to neutral pH (around 6.5 to 7.0) is ideal. Amend your soil with compost, aged manure, or other organic materials to improve its fertility and drainage. If you have heavy clay soil, consider adding sand or perlite to improve drainage. You can also perform a soil test to determine its pH and nutrient levels and amend accordingly.
How much sunlight does Malabar spinach need?
Malabar spinach needs at least 6 hours of direct sunlight per day to thrive. In hotter climates, some afternoon shade can be beneficial to prevent the leaves from scorching. If you’re growing Malabar spinach indoors, provide it with supplemental lighting using grow lights. Position the lights close to the plants and adjust the duration of light exposure based on their growth.
How often should I water my Malabar spinach?
Water your Malabar spinach regularly, especially during hot and dry weather. Keep the soil consistently moist but not waterlogged. Overwatering can lead to root rot, so ensure that your soil has good drainage. Check the soil moisture by sticking your finger about an inch deep into the soil. If it feels dry, it’s time to water. Mulching around the plants can help retain moisture and suppress weeds.
How do I fertilize Malabar spinach?
Malabar spinach is a heavy feeder and benefits from regular fertilization. Use a balanced fertilizer (e.g., 10-10-10) or a fertilizer specifically formulated for leafy greens. Apply the fertilizer according to the package instructions. You can also use organic fertilizers such as compost tea, fish emulsion, or seaweed extract. Avoid over-fertilizing, as this can lead to excessive foliage growth at the expense of flavor.
When can I harvest Malabar spinach?
You can start harvesting Malabar spinach leaves about 6-8 weeks after planting. Harvest the leaves when they are young and tender, as they become tougher and more bitter as they mature. Pinch off the leaves or cut the stems just above a node to encourage new growth. Regular harvesting will promote bushier growth and a continuous supply of leaves.
How do I deal with pests and diseases?
Malabar spinach is generally resistant to pests and diseases, but it can be susceptible to aphids, spider mites, and fungal diseases. Inspect your plants regularly for signs of infestation or disease. If you find pests, try spraying them off with a strong stream of water or using insecticidal soap. For fungal diseases, improve air circulation around the plants and avoid overhead watering. You can also use organic fungicides if necessary.
Can I grow Malabar spinach in containers?
Yes, Malabar spinach can be grown successfully in containers. Choose a container that is at least 12 inches in diameter and has good drainage holes. Use a well-draining potting mix and provide the plants with adequate sunlight and water. Container-grown Malabar spinach may require more frequent watering and fertilization than plants grown in the ground.
Is Malabar spinach a perennial or an annual?
Malabar spinach is a tender perennial that is typically grown as an annual in temperate climates. It can survive mild winters in warmer regions (USDA zones 9-11), but it will die back in colder climates. You can try to overwinter Malabar spinach indoors by bringing it inside before the first frost and providing it with adequate light and water.
How do I save seeds from Malabar spinach?
To save seeds from Malabar spinach, allow some of the plants to flower and produce berries. The berries will turn from green to black when they are ripe. Harvest the berries and remove the seeds from the pulp. Allow the seeds to dry completely before storing them in an airtight container in a cool, dark place.
What are some ways to use Malabar spinach in cooking?
Malabar spinach can be used in a variety of dishes, similar to regular spinach. It can be eaten raw in salads, sautéed, steamed, or added to soups, stews, and stir-fries. It has a slightly mucilaginous texture, which can be reduced by cooking it with acidic ingredients such as lemon juice or vinegar. Malabar spinach is also a good source of vitamins A and C, iron, and calcium.
Leave a Comment