
Growing Garlic at Home can seem daunting, but trust me, it’s one of the most rewarding experiences a home gardener can have! Imagine the satisfaction of harvesting plump, flavorful garlic cloves that you nurtured from tiny bulbs right in your own backyard. For centuries, garlic has been revered not just for its culinary prowess, but also for its medicinal properties. From ancient Egyptian tombs to medieval European gardens, garlic has been a staple crop, believed to ward off everything from vampires to the common cold.
But let’s be honest, store-bought garlic just doesn’t compare to the robust flavor of homegrown. And that’s where this DIY guide comes in! I’m going to share some simple yet effective tricks and hacks that will transform you into a garlic-growing guru, even if you’ve never planted a bulb before.
Why do you need these DIY tricks? Because growing garlic at home doesn’t have to be complicated or expensive. With a few clever techniques, you can maximize your yield, minimize pests, and enjoy a bountiful harvest of this pungent and versatile herb. Plus, who doesn’t love the idea of saving money and reducing their reliance on grocery stores? So, grab your gardening gloves, and let’s get started on this exciting garlic-growing adventure!
Growing Garlic at Home: A DIY Guide for Beginners
Hey there, fellow gardening enthusiasts! I’m so excited to share my experience with growing garlic at home. It’s surprisingly easy, incredibly rewarding, and you get the most flavorful garlic you can imagine. Plus, there’s something deeply satisfying about harvesting something you’ve nurtured from a single clove. Let’s dive in!
Choosing Your Garlic Variety
Before we get our hands dirty, let’s talk garlic types. There are two main categories: hardneck and softneck.
* **Hardneck:** These are generally more cold-hardy and produce a flower stalk called a scape (which is delicious, by the way!). They typically have fewer, larger cloves and a more intense flavor. Hardnecks are better suited for colder climates. Popular varieties include ‘German Extra Hardy,’ ‘Music,’ and ‘Chesnok Red.’
* **Softneck:** These are more adaptable to warmer climates and don’t produce a scape. They have more cloves per bulb, making them great for braiding. Softnecks also tend to store longer than hardnecks. Common varieties include ‘California Early,’ ‘Silverskin,’ and ‘Inchelium Red.’
I personally prefer hardneck varieties because I live in a colder region, and I love the scapes. But feel free to experiment and see what works best for you!
Preparing for Planting
Okay, now for the fun part! Here’s what you’ll need to get started:
* **Garlic Cloves:** Choose large, healthy cloves from a reputable source. Avoid using garlic from the grocery store, as it may have been treated to prevent sprouting.
* **Well-Draining Soil:** Garlic hates soggy feet! Amend your soil with compost or other organic matter to improve drainage.
* **Sunlight:** Garlic needs at least 6 hours of sunlight per day.
* **Fertilizer (Optional):** A balanced fertilizer can give your garlic a boost.
* **Gardening Gloves:** To keep your hands clean and protected.
* **Trowel or Shovel:** For planting.
* **Mulch:** Straw, leaves, or wood chips to help retain moisture and suppress weeds.
Step-by-Step Planting Guide
The best time to plant garlic is in the fall, about 4-6 weeks before the ground freezes. This allows the cloves to establish roots before winter sets in.
1. **Prepare the Soil:** Choose a sunny spot in your garden and loosen the soil to a depth of about 12 inches. Mix in plenty of compost or other organic matter to improve drainage and fertility. I like to add a slow-release fertilizer at this stage as well.
2. **Separate the Cloves:** Gently separate the cloves from the bulb, being careful not to damage them. Leave the papery skin on each clove intact. Only plant the largest, healthiest cloves, as these will produce the biggest bulbs.
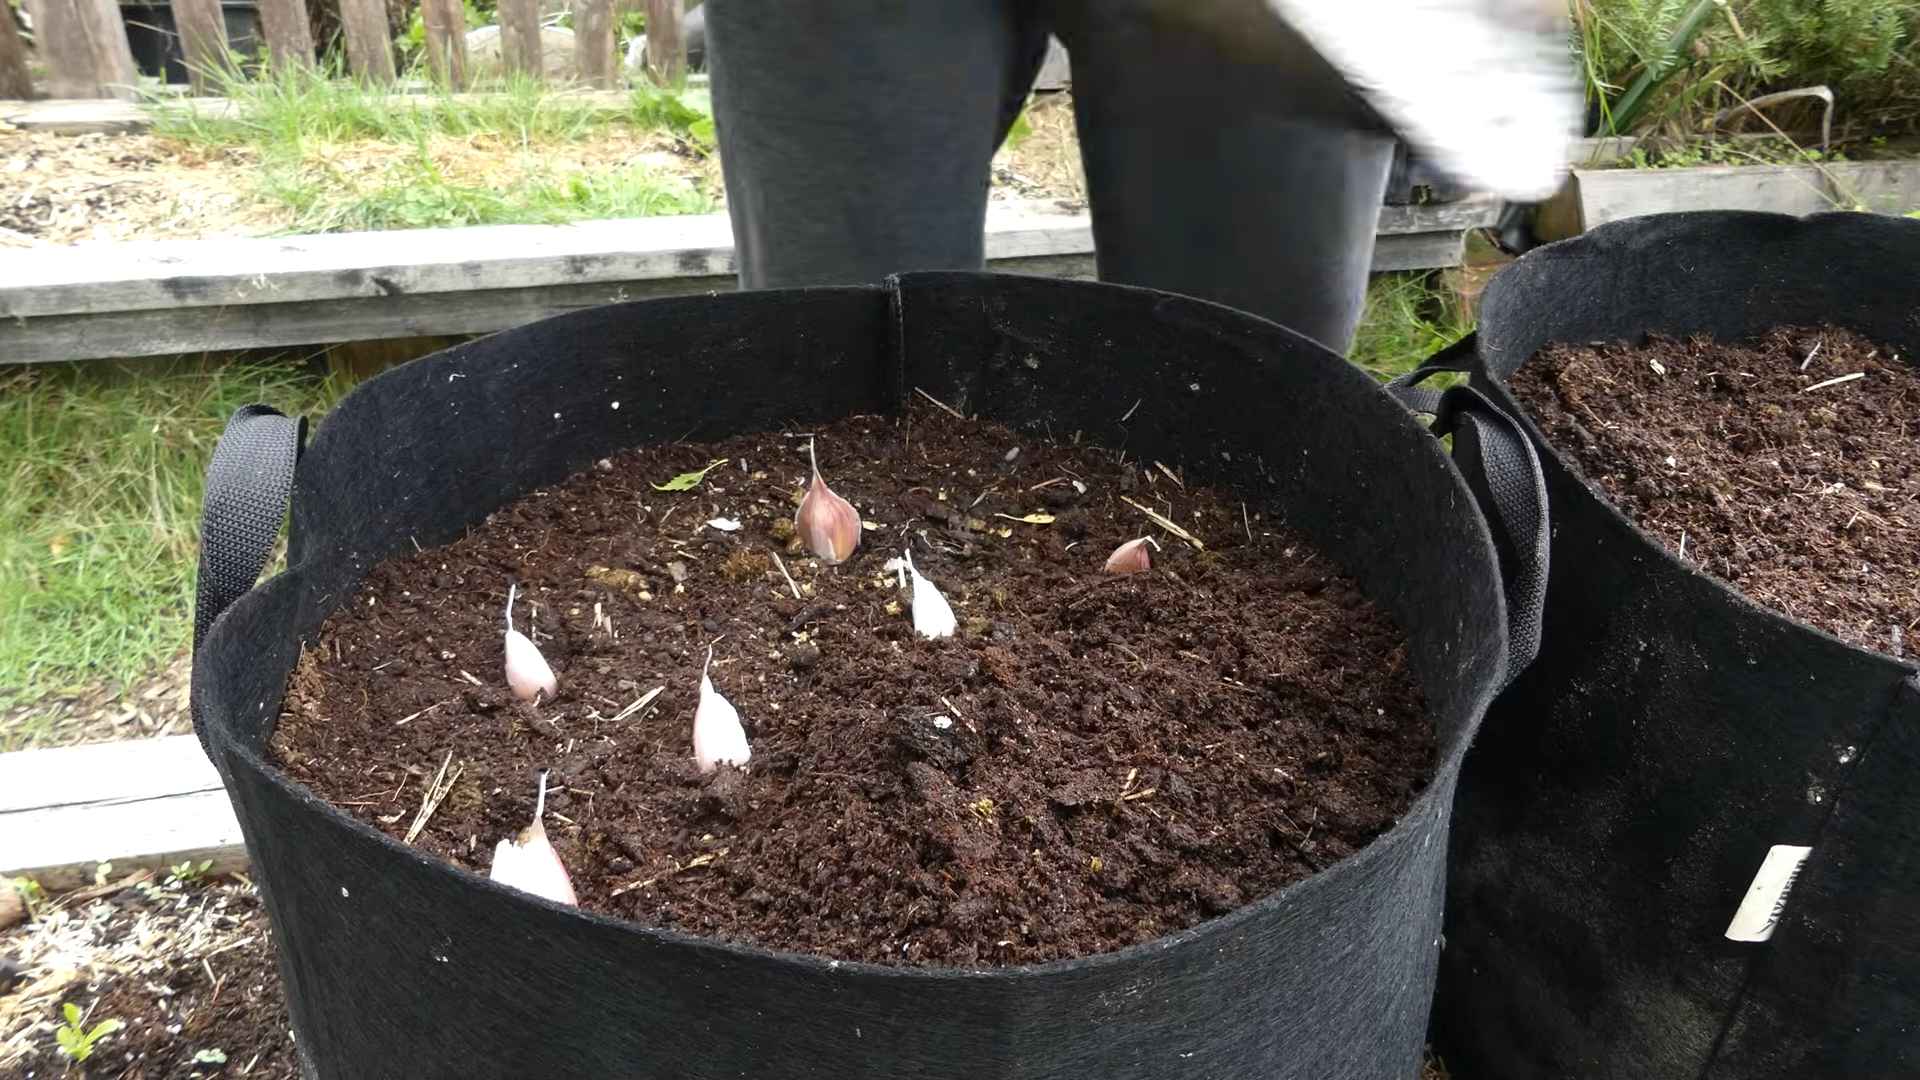
3. **Plant the Cloves:** Plant the cloves pointy-end up, about 2-3 inches deep and 6-8 inches apart. Space rows about 10-12 inches apart. I use a trowel to create small holes for each clove.
4. **Cover with Soil:** Gently cover the cloves with soil and pat it down lightly.
5. **Water Thoroughly:** Water the planting area well to help settle the soil and encourage root growth.
6. **Mulch:** Apply a thick layer of mulch (straw, leaves, or wood chips) over the planting area. This will help retain moisture, suppress weeds, and protect the cloves from extreme temperatures. I usually use about 4-6 inches of straw.
Caring for Your Garlic
Now that your garlic is planted, it’s time to provide it with the care it needs to thrive.
* **Watering:** Garlic needs consistent moisture, especially during the spring when it’s actively growing. Water deeply whenever the soil feels dry to the touch. Avoid overwatering, as this can lead to rot.
* **Weeding:** Keep the planting area free of weeds, as they can compete with the garlic for nutrients and water. Hand-pull weeds carefully to avoid disturbing the garlic roots.
* **Fertilizing:** If you didn’t add fertilizer at planting time, you can side-dress your garlic with a balanced fertilizer in the spring. Follow the instructions on the fertilizer package. I usually use a liquid fertilizer diluted in water.
* **Scape Removal (Hardneck Varieties):** Hardneck garlic produces a flower stalk called a scape. These should be removed as soon as they start to curl, as they divert energy away from bulb development. Don’t throw them away! Scapes are delicious and can be used in pesto, stir-fries, or grilled.
Harvesting Your Garlic
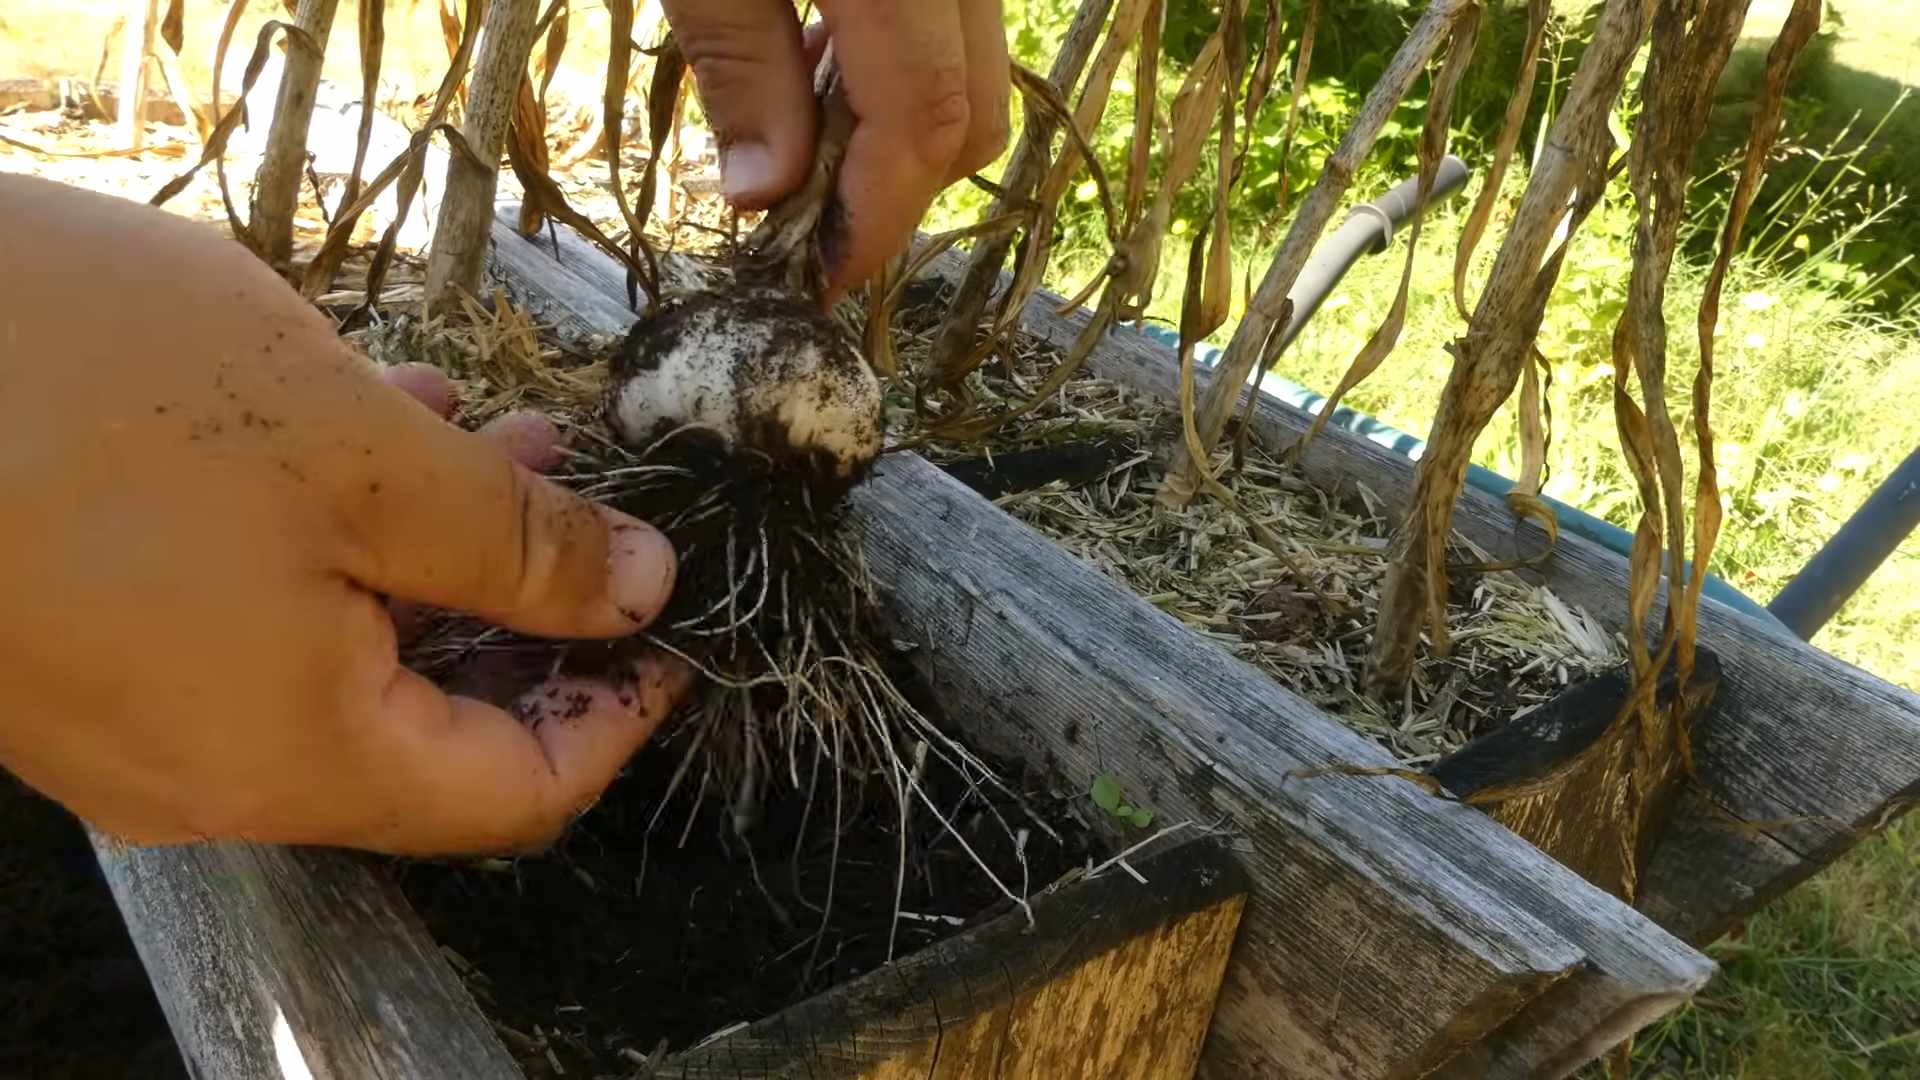
Harvest time is the most exciting part! You’ll know your garlic is ready to harvest when the lower leaves start to turn yellow and brown. This usually happens in mid-summer.
1. **Loosen the Soil:** Use a garden fork or shovel to carefully loosen the soil around the garlic bulbs. Be careful not to damage the bulbs.
2. **Gently Pull:** Gently pull the garlic bulbs from the ground. If the soil is dry, you may need to use a trowel to help lift them.
3. **Brush Off Excess Soil:** Brush off any excess soil from the bulbs, but don’t wash them.
4. **Curing:** The most important step! Cure the garlic in a well-ventilated, dry place for 2-3 weeks. I like to hang them in bunches in my garage. This allows the outer layers to dry and protects the bulbs from rot.
5. **Trimming:** Once the garlic is cured, trim the roots and cut the stalks back to about 1-2 inches above the bulb.
Storing Your Garlic
Proper storage is
Hey there, fellow gardening enthusiasts! I’m so excited to share my experience with growing garlic at home. It’s surprisingly easy, incredibly rewarding, and you get the most flavorful garlic you can imagine. Plus, there’s something deeply satisfying about harvesting something you’ve nurtured from a single clove. Let’s dive in!
Choosing Your Garlic Variety
Before we get our hands dirty, let’s talk garlic types. There are two main categories: hardneck and softneck.
* **Hardneck:** These are generally more cold-hardy and produce a flower stalk called a scape (which is delicious, by the way!). They typically have fewer, larger cloves and a more intense flavor. Hardnecks are better suited for colder climates. Popular varieties include ‘German Extra Hardy,’ ‘Music,’ and ‘Chesnok Red.’
* **Softneck:** These are more adaptable to warmer climates and don’t produce a scape. They have more cloves per bulb, making them great for braiding. Softnecks also tend to store longer than hardnecks. Common varieties include ‘California Early,’ ‘Silverskin,’ and ‘Inchelium Red.’
I personally prefer hardneck varieties because I live in a colder region, and I love the scapes. But feel free to experiment and see what works best for you!
Preparing for Planting
Okay, now for the fun part! Here’s what you’ll need to get started:
* **Garlic Cloves:** Choose large, healthy cloves from a reputable source. Avoid using garlic from the grocery store, as it may have been treated to prevent sprouting.
* **Well-Draining Soil:** Garlic hates soggy feet! Amend your soil with compost or other organic matter to improve drainage.
* **Sunlight:** Garlic needs at least 6 hours of sunlight per day.
* **Fertilizer (Optional):** A balanced fertilizer can give your garlic a boost.
* **Gardening Gloves:** To keep your hands clean and protected.
* **Trowel or Shovel:** For planting.
* **Mulch:** Straw, leaves, or wood chips to help retain moisture and suppress weeds.
Step-by-Step Planting Guide
The best time to plant garlic is in the fall, about 4-6 weeks before the ground freezes. This allows the cloves to establish roots before winter sets in.
1. **Prepare the Soil:** Choose a sunny spot in your garden and loosen the soil to a depth of about 12 inches. Mix in plenty of compost or other organic matter to improve drainage and fertility. I like to add a slow-release fertilizer at this stage as well.
2. **Separate the Cloves:** Gently separate the cloves from the bulb, being careful not to damage them. Leave the papery skin on each clove intact. Only plant the largest, healthiest cloves, as these will produce the biggest bulbs.
3. **Plant the Cloves:** Plant the cloves pointy-end up, about 2-3 inches deep and 6-8 inches apart. Space rows about 10-12 inches apart. I use a trowel to create small holes for each clove.
4. **Cover with Soil:** Gently cover the cloves with soil and pat it down lightly.
5. **Water Thoroughly:** Water the planting area well to help settle the soil and encourage root growth.
6. **Mulch:** Apply a thick layer of mulch (straw, leaves, or wood chips) over the planting area. This will help retain moisture, suppress weeds, and protect the cloves from extreme temperatures. I usually use about 4-6 inches of straw.
Caring for Your Garlic
Now that your garlic is planted, it’s time to provide it with the care it needs to thrive.
* **Watering:** Garlic needs consistent moisture, especially during the spring when it’s actively growing. Water deeply whenever the soil feels dry to the touch. Avoid overwatering, as this can lead to rot.
* **Weeding:** Keep the planting area free of weeds, as they can compete with the garlic for nutrients and water. Hand-pull weeds carefully to avoid disturbing the garlic roots.
* **Fertilizing:** If you didn’t add fertilizer at planting time, you can side-dress your garlic with a balanced fertilizer in the spring. Follow the instructions on the fertilizer package. I usually use a liquid fertilizer diluted in water.
* **Scape Removal (Hardneck Varieties):** Hardneck garlic produces a flower stalk called a scape. These should be removed as soon as they start to curl, as they divert energy away from bulb development. Don’t throw them away! Scapes are delicious and can be used in pesto, stir-fries, or grilled.
Harvesting Your Garlic
Harvest time is the most exciting part! You’ll know your garlic is ready to harvest when the lower leaves start to turn yellow and brown. This usually happens in mid-summer.
1. **Loosen the Soil:** Use a garden fork or shovel to carefully loosen the soil around the garlic bulbs. Be careful not to damage the bulbs.
2. **Gently Pull:** Gently pull the garlic bulbs from the ground. If the soil is dry, you may need to use a trowel to help lift them.
3. **Brush Off Excess Soil:** Brush off any excess soil from the bulbs, but don’t wash them.
4. **Curing:** The most important step! Cure the garlic in a well-ventilated, dry place for 2-3 weeks. I like to hang them in bunches in my garage. This allows the outer layers to dry and protects the bulbs from rot.
5. **Trimming:** Once the garlic is cured, trim the roots and cut the stalks back to about 1-2 inches above the bulb.
Storing Your Garlic
Proper storage is essential to keep your garlic fresh for months.
* **Store in a Cool, Dry Place:** Store your garlic in a cool, dry, and well-ventilated place, such as a pantry or basement. Avoid storing it in the refrigerator, as this can cause it to sprout.
* **Braiding (Softneck Varieties):** Softneck garlic can be braided for easy storage and a beautiful display.
* **Check Regularly:** Check your garlic regularly for signs of spoilage, such as soft spots or mold. Discard any bulbs that are not in good condition.
Troubleshooting
Even with the best care, you might encounter some problems while growing garlic. Here are a few common issues and how to address them:
* **Garlic Rust:** This fungal disease causes orange spots on the leaves. Improve air circulation and avoid overhead watering. You can also use a fungicide if necessary.
* **Onion Maggots:** These pests can damage the roots of garlic. Use row covers to prevent them from laying eggs.
* **Poor Drainage:** Soggy soil can lead to rot. Improve drainage by amending the soil with compost or other organic matter.
Enjoy Your Homegrown Garlic!
Congratulations! You’ve successfully grown your own garlic. Now it’s time to enjoy the fruits (or rather, bulbs) of your labor. Use your homegrown garlic in all your favorite recipes. The flavor is so much better than store-bought garlic, you’ll never go back! I love using mine in pasta sauces, soups, and roasted vegetables.
Growing garlic at home is a rewarding experience that anyone can enjoy. With a little bit of planning and care, you can have a bountiful harvest of delicious, homegrown garlic. Happy gardening!
Conclusion
So, there you have it! Growing garlic at home isn’t just a gardening project; it’s an investment in flavor, freshness, and a deeper connection to your food. Forget those bland, pre-packaged cloves from the supermarket. Imagine the robust, pungent aroma of freshly harvested garlic filling your kitchen, ready to elevate your culinary creations. This simple DIY trick unlocks a world of gastronomic possibilities, and it’s far easier than you might think.
Why is this a must-try? Because the difference between store-bought and homegrown garlic is truly remarkable. The flavor is more intense, the texture is firmer, and you have complete control over the growing process, ensuring your garlic is free from unwanted chemicals and pesticides. Plus, there’s an undeniable satisfaction in nurturing something from a single clove to a bountiful harvest.
But the benefits extend beyond just taste. Growing your own garlic is a sustainable practice, reducing your reliance on commercial agriculture and minimizing your carbon footprint. It’s also a fantastic way to get outdoors, connect with nature, and enjoy the therapeutic benefits of gardening.
Ready to take your garlic game to the next level? Consider these variations:
* Experiment with different varieties: From the mild and creamy ‘California Early’ to the fiery ‘Spanish Roja,’ each garlic variety offers a unique flavor profile. Try planting a few different types to discover your personal favorites.
* Plant in containers: If you’re short on space, don’t let that deter you. Garlic thrives in containers, making it perfect for balconies, patios, or even a sunny windowsill. Just be sure to choose a pot that’s at least 8 inches deep to accommodate the bulb’s growth.
* Garlic Scapes: Don’t forget about the scapes! These curly flower stalks that emerge in the spring are a delicious delicacy. Snip them off to encourage bulb growth and enjoy them in stir-fries, pesto, or grilled as a flavorful side dish.
* Companion Planting: Garlic is a great companion plant! It deters many pests and can help protect other plants in your garden. Try planting it near roses, tomatoes, or carrots.
We’re confident that once you experience the joy of harvesting your own homegrown garlic, you’ll never go back to store-bought again. It’s a rewarding and delicious endeavor that will transform your cooking and connect you to the natural world.
So, grab some garlic cloves, prepare your soil, and get planting! We can’t wait to hear about your experiences. Share your photos, tips, and triumphs in the comments below. Let’s build a community of garlic growers and spread the love for this amazing allium. Happy gardening!
Frequently Asked Questions (FAQ)
Q: When is the best time to plant garlic?
A: The ideal time to plant garlic is in the fall, typically 4-6 weeks before the ground freezes. This allows the cloves to establish roots before winter sets in. In colder climates, this is usually around October or November. In warmer climates, you can plant later, even into December. The key is to give the garlic enough time to develop a strong root system before the cold weather arrives. Spring planting is possible, but the bulbs may not be as large as those planted in the fall.
Q: What kind of soil is best for growing garlic?
A: Garlic prefers well-drained, fertile soil that is rich in organic matter. Amend your soil with compost or well-rotted manure before planting to improve drainage and provide essential nutrients. A slightly acidic to neutral pH (around 6.0 to 7.0) is ideal. Avoid heavy clay soils, as they can retain too much moisture and lead to bulb rot. If you have clay soil, consider planting in raised beds or containers.
Q: How deep and far apart should I plant the garlic cloves?
A: Plant garlic cloves about 2 inches deep, with the pointed end facing up. Space them about 6-8 inches apart in rows that are 12 inches apart. This spacing allows for adequate air circulation and prevents overcrowding, which can lead to disease. If you’re planting in containers, you can space the cloves closer together, but make sure they have enough room to develop.
Q: How much water does garlic need?
A: Garlic needs consistent moisture, especially during the spring when the bulbs are actively growing. Water deeply whenever the top inch of soil feels dry to the touch. Avoid overwatering, as this can lead to bulb rot. During the winter months, reduce watering frequency, especially if you live in an area with heavy rainfall.
Q: How do I know when my garlic is ready to harvest?
A: Garlic is typically ready to harvest in mid-summer, about 8-9 months after planting. The leaves will start to turn yellow and brown, and the stalks may begin to fall over. A good indicator is when about half of the leaves have turned brown. To be sure, you can dig up a test bulb to check its size and maturity. The bulb should be plump and well-formed, with papery skins.
Q: How do I cure garlic after harvesting?
A: Curing garlic is essential for long-term storage. After harvesting, gently brush off any excess soil and lay the bulbs out in a single layer in a well-ventilated, dry, and shaded area. You can also braid the stalks together and hang them to dry. Cure the garlic for about 2-3 weeks, or until the necks are completely dry and the outer skins are papery.
Q: How do I store garlic properly?
A: Store cured garlic in a cool, dry, and dark place with good air circulation. A temperature between 60-70°F (15-21°C) is ideal. Avoid storing garlic in the refrigerator, as this can cause it to sprout. Properly cured and stored garlic can last for several months.
Q: What are garlic scapes and how do I use them?
A: Garlic scapes are the curly flower stalks that emerge from hardneck garlic varieties in the spring. They are a delicious and versatile ingredient with a mild garlic flavor. Snip them off when they are still tender and curly to encourage bulb growth. Use them in stir-fries, pesto, soups, or grilled as a flavorful side dish.
Q: Can I grow garlic from store-bought cloves?
A: Yes, you can grow garlic from store-bought cloves, but it’s important to choose organic garlic to avoid cloves that may have been treated with growth inhibitors. Also, be aware that store-bought garlic may not be adapted to your local climate, so it may not perform as well as garlic specifically grown for your region.
Q: My garlic bulbs are small. What could be the reason?
A: Several factors can contribute to small garlic bulbs. These include:
* Poor soil: Garlic needs fertile soil with plenty of organic matter.
* Insufficient watering: Garlic needs consistent moisture, especially during bulb formation.
* Overcrowding: Garlic cloves need enough space to develop properly.
* Late planting: Fall planting is ideal for optimal bulb size.
* Nutrient deficiencies: Garlic may need additional nutrients, such as phosphorus and potassium.
* Pests or diseases: Pests and diseases can weaken the plants and reduce bulb size.
By addressing these potential issues, you can improve your chances of growing larger, healthier garlic bulbs.
Leave a Comment