
Rooftop Asparagus Growing DIY: Imagine stepping onto your rooftop garden, not just to enjoy the view, but to harvest fresh, tender asparagus spears you’ve grown yourself! Sounds like a dream, right? Well, it doesn’t have to be! For centuries, asparagus has been a prized vegetable, enjoyed by ancient Romans and Greeks for its delicious flavor and purported medicinal properties. Today, you don’t need acres of farmland to cultivate this springtime delicacy.
Many people think growing asparagus is difficult, but I’m here to tell you it’s totally achievable, even in a limited space. This DIY guide will walk you through everything you need to know to successfully grow asparagus on your rooftop. Whether you’re a seasoned gardener or a complete beginner, I’ll share my best tips and tricks to ensure a bountiful harvest.
Why rooftop asparagus growing? Because fresh, homegrown asparagus tastes infinitely better than anything you can buy in the store. Plus, it’s a sustainable way to enjoy this nutritious vegetable, reducing your carbon footprint and connecting you with nature. Let’s get started and transform your rooftop into an asparagus oasis!
Rooftop Asparagus Growing: A DIY Guide to Delicious Spears
Asparagus, that springtime delicacy, isn’t just for fancy restaurants or farmers’ markets anymore! You can actually grow your own, even if you only have a rooftop or balcony. It might seem intimidating, but trust me, with a little planning and effort, you can be harvesting fresh asparagus spears for years to come. This guide will walk you through everything you need to know to create your own rooftop asparagus patch.
Choosing the Right Container and Location
Before we get our hands dirty, let’s talk about the essentials. Asparagus is a perennial, meaning it comes back year after year, so we need to think long-term.
* Container Size: This is crucial! Asparagus roots need room to spread. I recommend a container that’s at least 2 feet deep and 2 feet wide per plant. Larger is always better. Think big troughs, raised beds on legs, or even repurposed livestock watering troughs (with drainage holes, of course!).
* Material: The material of your container isn’t as critical, but consider weight. Soil is heavy, especially when wet, so choose a lightweight material like plastic or fiberglass if weight is a concern for your rooftop. Wood is also a good option, but it will eventually decompose.
* Drainage: Absolutely essential! Asparagus hates soggy roots. Make sure your container has plenty of drainage holes. If not, drill some!
* Sunlight: Asparagus needs at least 6-8 hours of direct sunlight per day. Choose a location on your rooftop that gets plenty of sun. South-facing is usually ideal.
* Wind Protection: Rooftops can be windy. Consider windbreaks if your location is particularly exposed. This could be as simple as a trellis or a strategically placed screen.
* Accessibility: Think about how you’ll water and harvest your asparagus. Make sure you can easily reach your container.
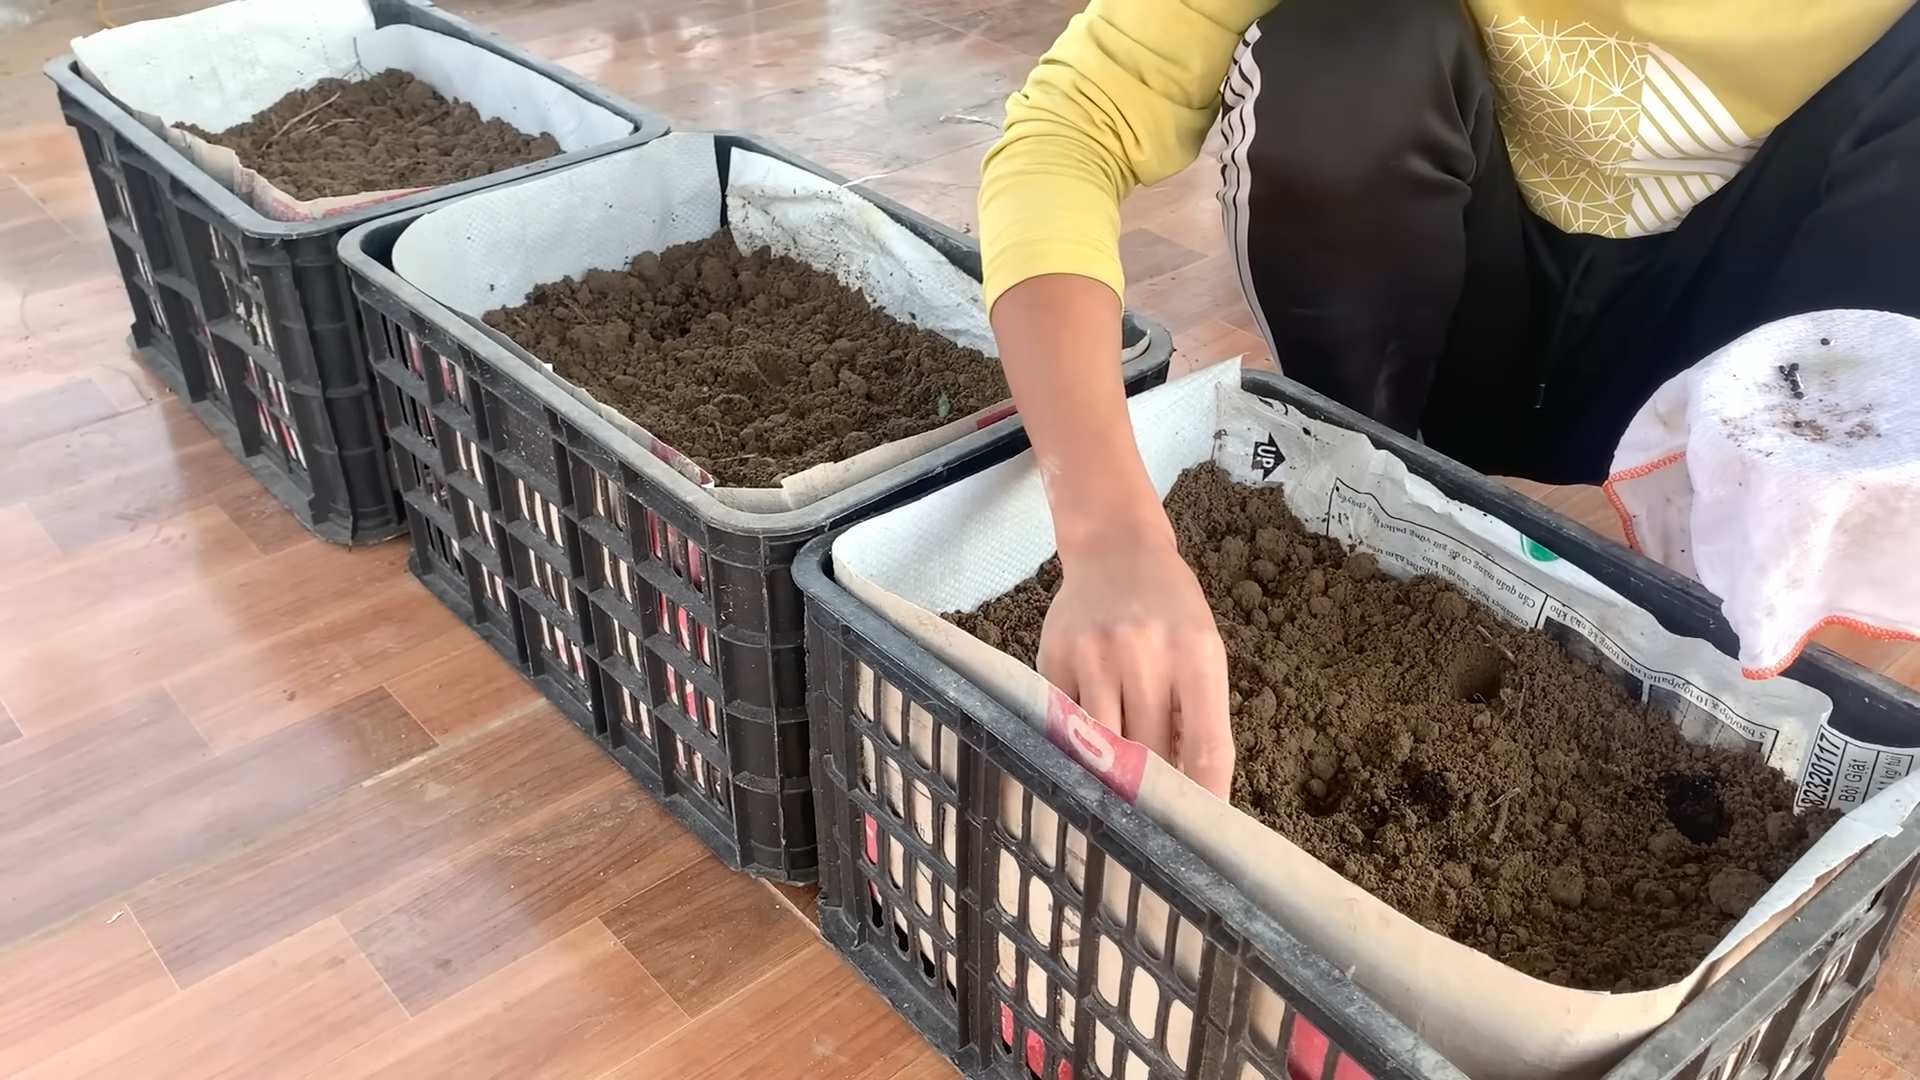
Preparing the Soil: The Asparagus Bed Foundation
Asparagus is a heavy feeder, so the soil needs to be rich and well-draining. This isn’t the time to skimp!
* Soil Mix: I recommend a mix of equal parts:
* High-quality potting mix (avoid mixes with a lot of peat moss, as it can become compacted).
* Compost (well-rotted manure, leaf mold, or kitchen scraps).
* Coarse sand or perlite (for drainage).
* pH Level: Asparagus prefers a slightly acidic to neutral pH (around 6.5-7.0). You can test your soil with a pH testing kit, available at most garden centers. If your soil is too acidic, add lime.
* Fertilizer: Incorporate a slow-release fertilizer into the soil mix. Look for one that’s high in phosphorus, which promotes root growth. Bone meal is a good organic option.
* Filling the Container: Fill your container with the soil mix, leaving a few inches of space at the top.
Planting Asparagus Crowns: The Heart of Your Patch
You’ll be planting asparagus crowns, which are basically one-year-old asparagus plants. You can buy them online or at your local nursery.
* Choosing Crowns: Look for healthy crowns with plump, firm roots. Avoid crowns that are dry or moldy.
* Soaking Crowns: Before planting, soak the crowns in water for about an hour. This will help rehydrate them.
* Digging Trenches: Dig trenches in your prepared soil that are about 6-8 inches deep and 12 inches wide. Space the trenches about 12-18 inches apart.
* Mounding Soil: Create a small mound of soil in the bottom of each trench.
* Placing Crowns: Place the asparagus crowns on top of the mounds, spreading the roots out like a spider.
* Covering Crowns: Gently cover the crowns with about 2 inches of soil.
* Watering: Water thoroughly after planting.
* Gradual Filling: As the asparagus shoots emerge, gradually fill in the trenches with soil until they are level with the rest of the container. This encourages the development of a strong root system.
Caring for Your Asparagus Patch: Nurturing Your Investment
Asparagus requires consistent care, especially in the first few years.
* Watering: Water regularly, especially during dry periods. Asparagus needs consistent moisture, but avoid overwatering, which can lead to root rot. Check the soil moisture by sticking your finger into the soil. If it feels dry an inch or two down, it’s time to water.
* Fertilizing: Fertilize your asparagus patch in the spring and fall with a balanced fertilizer. You can also side-dress with compost throughout the growing season.
* Weeding: Keep your asparagus patch free of weeds. Weeds compete with asparagus for nutrients and water. Hand-pull weeds carefully to avoid damaging the asparagus roots.
* Mulching: Mulch around your asparagus plants with straw, wood chips, or shredded leaves. Mulch helps retain moisture, suppress weeds, and regulate soil temperature.
* Fern Care: As the asparagus grows, it will produce ferns. These ferns are essential for photosynthesis and storing energy for the next year’s growth. Allow the ferns to grow and mature. Do not cut them back until they turn brown in the fall or winter.
* Pest and Disease Control: Asparagus is relatively pest-resistant, but keep an eye out for asparagus beetles. These beetles can damage the ferns and spears. Hand-pick them off or use an insecticidal soap. Rust is a fungal disease that can affect asparagus. Ensure good air circulation and avoid overhead watering to prevent rust. If rust does occur, treat it with a fungicide.
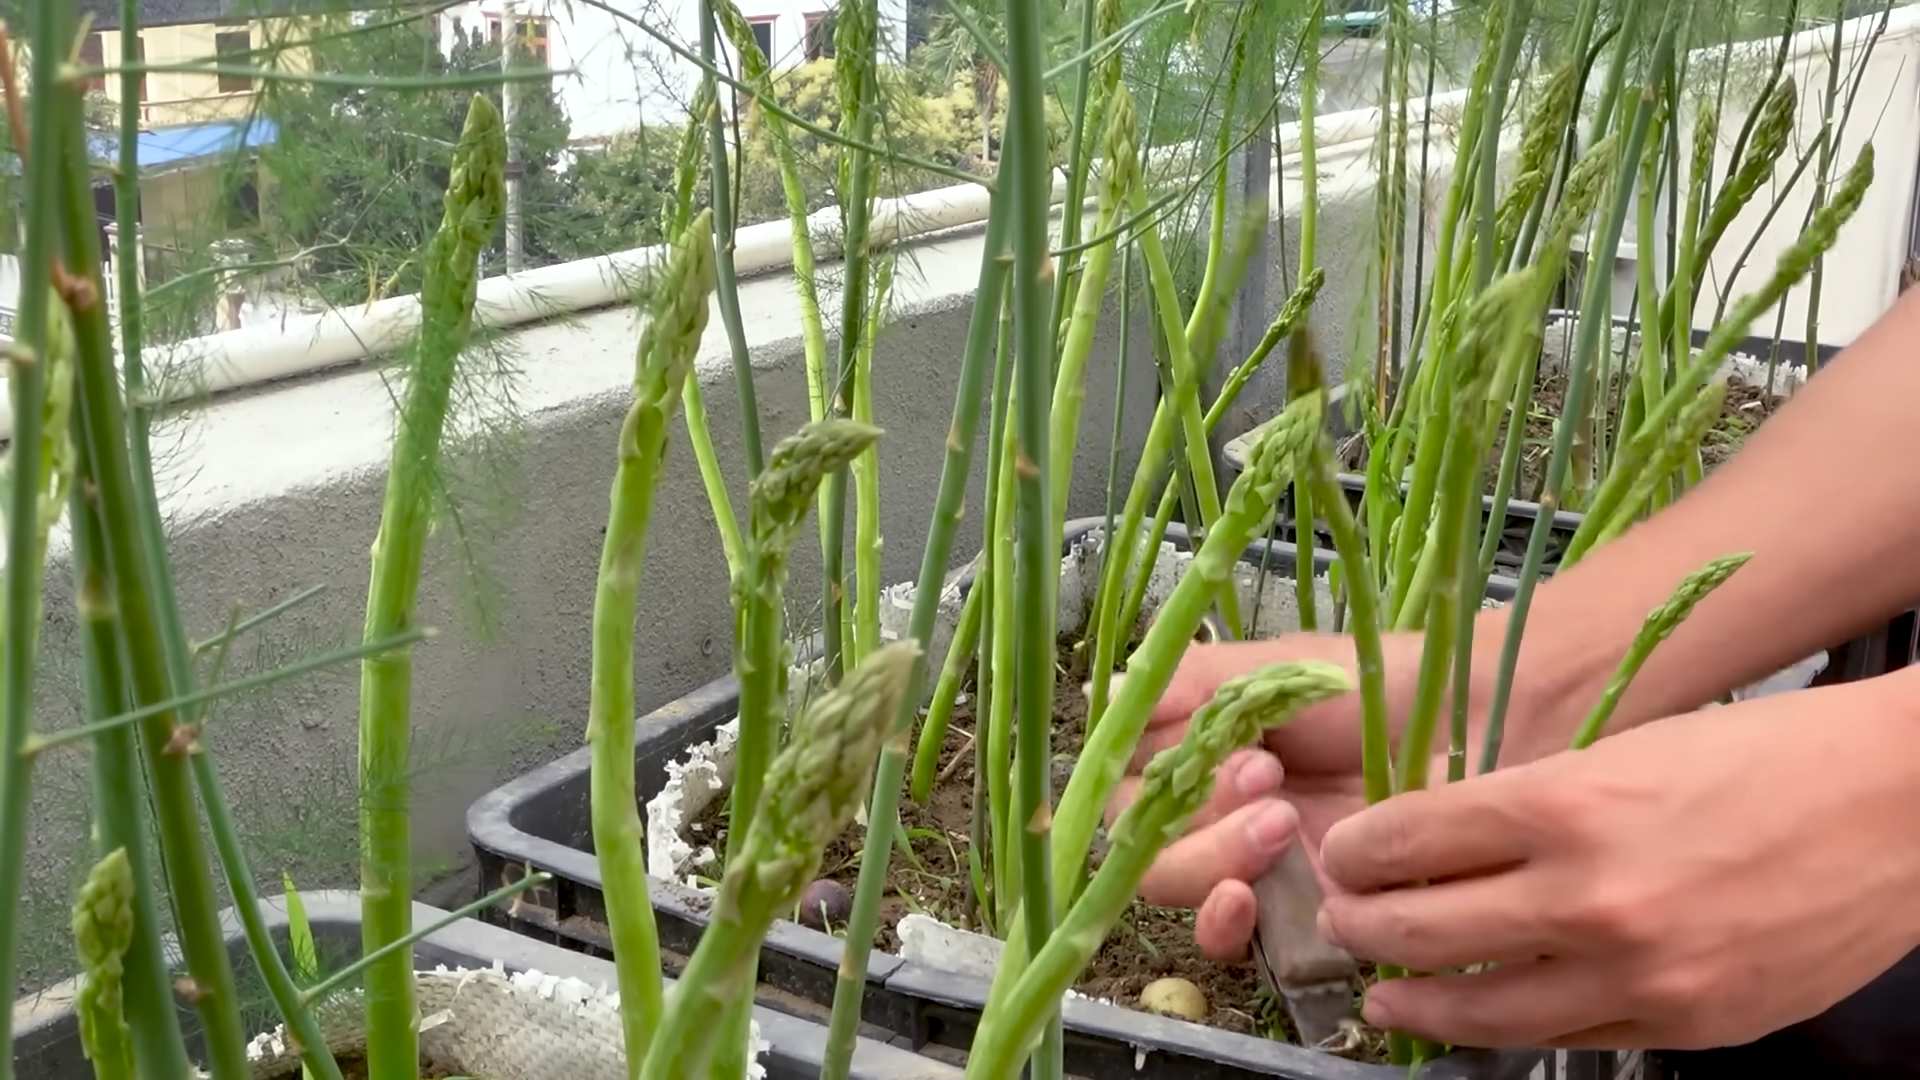
Harvesting Asparagus: The Sweet Reward
Patience is key! You shouldn’t harvest any asparagus spears in the first year. In the second year, you can harvest lightly for a few weeks. In the third year and beyond, you can harvest for a longer period, typically 6-8 weeks.
* Harvesting Time: Harvest asparagus spears when they are about 6-8 inches tall and about as thick as your finger.
* Harvesting Method: Use a sharp knife to cut the spears at ground level. Be careful not to damage the surrounding spears or the crown.
* Harvesting Frequency: Harvest spears every day or two during the peak harvesting season.
* Stopping Harvesting: Stop harvesting when the spears become thin and spindly. This indicates that the plant needs to replenish its energy reserves.
* Post-Harvest Care: After harvesting, continue to care for your asparagus patch as described above.
Overwintering Asparagus: Preparing for the Next Season
Asparagus needs a period of dormancy in the winter to rest and prepare for the next growing season.
* Cutting Back Ferns: In the fall or winter, after the ferns have turned brown, cut them back to ground level.
* Mulching: Apply a thick layer of mulch over the asparagus patch to protect the roots from freezing temperatures.
* Watering: Water sparingly during the winter, only when the soil is very dry.
* Fertilizing: You can apply a light application of fertilizer in the late winter or early spring to give the asparagus a boost.
Troubleshooting: Addressing Common Problems
Even with the best care, you might encounter some problems. Here are a few common issues and how to address them:
* Yellowing Ferns: This could be caused by overwatering, underwatering, nutrient deficiency, or disease. Check the soil moisture, fertilize, and inspect for pests or diseases.
* Thin Spears: This could be caused by over-harvesting, nutrient deficiency, or lack of sunlight. Stop harvesting, fertilize, and ensure the plant is getting enough sunlight.
* Asparagus Beetles: Hand-pick them off or use an insecticidal soap.
* Rust: Ensure good air circulation and avoid overhead watering. Treat with a fungicide if necessary.
Enjoying Your Harvest: From Rooftop to Table
The best part of growing your own asparagus is enjoying the fresh, delicious spears! Asparagus is incredibly versatile and can be cooked in many ways.
* Storage: Store asparagus spears in the refrigerator, wrapped in a damp paper towel.
* Cooking Methods: Asparagus can be steamed, roasted, grilled, sautéed, or even eaten raw.
* Recipes: There are countless asparagus recipes available online and in cookbooks. Some popular options include roasted asparagus with parmesan cheese, asparagus soup, and asparagus frittata.
Growing asparagus on your rooftop might seem like a challenge, but it’s definitely achievable with a little planning and effort. The reward of fresh, homegrown asparagus is well worth it! So, get your hands dirty and start your own rooftop asparagus patch today! You’ll be enjoying delicious spears
Conclusion
So, there you have it! Transforming your rooftop into a thriving asparagus patch is not just a whimsical dream; it’s an achievable reality with this simple, effective DIY trick. We’ve walked you through the process, highlighting the key steps and considerations for successful rooftop asparagus growing. But why should you dedicate your time and effort to this project?
The answer lies in the unparalleled rewards. Imagine stepping onto your rooftop garden, basket in hand, and harvesting fresh, vibrant asparagus spears – bursting with flavor and nutrients – just moments before preparing your meal. No more trips to the grocery store for limp, overpriced asparagus. No more wondering about the origin or freshness of your produce. With rooftop asparagus growing, you have complete control over the entire process, from seed to table.
Beyond the convenience and superior quality, this DIY project offers a unique connection to nature. In our increasingly urbanized world, it’s easy to feel disconnected from the natural rhythms of growth and harvest. Cultivating your own asparagus patch provides a tangible link to the earth, fostering a sense of accomplishment and well-being. Plus, you’ll be contributing to a greener environment by reducing your carbon footprint and supporting local biodiversity.
But the benefits don’t stop there. Rooftop asparagus growing can also be a fantastic conversation starter and a source of pride. Imagine the delight of sharing your homegrown asparagus with friends and family, regaling them with tales of your rooftop garden and the secrets of successful asparagus cultivation.
Variations and Suggestions:
While we’ve focused on the core principles of rooftop asparagus growing, there’s plenty of room for customization and experimentation. Consider these variations to tailor the project to your specific needs and preferences:
* Container Size and Material: Experiment with different container sizes and materials to find what works best for your rooftop environment. Larger containers will provide more space for root growth, while lighter materials like plastic or fiberglass can reduce the overall weight load on your roof.
* Asparagus Varieties: Explore different asparagus varieties to discover your favorite flavor profiles and growth habits. Some popular choices include ‘Jersey Knight,’ ‘Millennium,’ and ‘Purple Passion.’
* Companion Planting: Enhance your asparagus patch by incorporating companion plants that can deter pests, attract beneficial insects, and improve soil health. Some good options include tomatoes, basil, and marigolds.
* Vertical Growing: If space is limited, consider using vertical growing techniques to maximize your asparagus yield. Trellises or stacked planters can provide additional support and create a visually appealing display.
* Automated Watering Systems: To simplify maintenance, consider installing an automated watering system that will deliver consistent moisture to your asparagus plants. This is especially helpful during hot, dry weather.
A Final Word of Encouragement:
Rooftop asparagus growing may seem daunting at first, but with a little planning and effort, it’s a surprisingly rewarding experience. Don’t be afraid to experiment, learn from your mistakes, and adapt your approach as needed. The key is to start small, stay patient, and enjoy the process.
We encourage you to embark on this exciting DIY adventure and discover the joys of homegrown asparagus. And once you’ve harvested your first crop, we’d love to hear about your experience! Share your photos, tips, and stories in the comments section below. Let’s create a community of rooftop asparagus growers and inspire others to embrace the magic of urban gardening. This DIY trick is a game changer.
Frequently Asked Questions (FAQ)
What type of rooftop is suitable for growing asparagus?
Most rooftops can support an asparagus garden, but it’s crucial to assess the weight-bearing capacity of your roof. Consult with a structural engineer or building professional if you have any concerns. Flat or gently sloping roofs are generally easier to work with, but you can adapt the techniques to suit other roof types. Ensure the area receives at least 6-8 hours of direct sunlight per day. Also, consider the accessibility of the rooftop for watering, maintenance, and harvesting. A rooftop with easy access to a water source is ideal.
How much weight will the containers add to my rooftop?
The weight of your containers will depend on their size, material, and the type of soil you use. A large container filled with wet soil can weigh several hundred pounds. To minimize the weight load, choose lightweight containers made of plastic or fiberglass. Use a well-draining potting mix that is lighter than garden soil. Consider distributing the weight evenly across the rooftop by placing containers near load-bearing walls or beams. Regularly monitor the containers for signs of excessive weight, such as sagging or cracking.
What kind of soil should I use for rooftop asparagus growing?
Asparagus thrives in well-draining, fertile soil with a slightly acidic to neutral pH (6.0-7.0). Avoid using heavy clay soil, as it can become waterlogged and suffocate the roots. A good option is to use a high-quality potting mix specifically formulated for container gardening. You can also amend your own soil by mixing equal parts of compost, peat moss, and perlite or vermiculite. Compost provides essential nutrients, peat moss improves water retention, and perlite or vermiculite enhances drainage. Before planting, test the soil pH and adjust it as needed with lime (to raise the pH) or sulfur (to lower the pH).
How often should I water my rooftop asparagus plants?
Water your asparagus plants regularly, especially during hot, dry weather. The soil should be consistently moist but not waterlogged. Check the soil moisture level by inserting your finger into the soil. If the top inch feels dry, it’s time to water. Water deeply and thoroughly, allowing the water to drain out of the bottom of the container. Avoid overhead watering, as it can promote fungal diseases. Consider using a drip irrigation system or soaker hose to deliver water directly to the roots. Reduce watering frequency during the dormant season (fall and winter).
How do I fertilize my rooftop asparagus plants?
Asparagus is a heavy feeder and requires regular fertilization to thrive. Apply a balanced fertilizer (e.g., 10-10-10) in the spring, just as the spears begin to emerge. Follow the instructions on the fertilizer label for application rates. You can also supplement with organic fertilizers, such as compost tea or fish emulsion. Avoid over-fertilizing, as it can burn the roots. In the fall, apply a layer of compost or well-rotted manure around the base of the plants to provide nutrients and protect the roots during the winter.
How long does it take to harvest asparagus from seed?
Growing asparagus from seed requires patience, as it can take up to three years to harvest your first crop. The first year is focused on establishing a strong root system. In the second year, the plants will continue to grow and develop. In the third year, you can begin harvesting a limited number of spears. To speed up the process, consider starting with asparagus crowns (one-year-old plants) instead of seeds. Crowns will typically produce a harvestable crop in the second year.
How do I protect my rooftop asparagus plants from pests and diseases?
Rooftop asparagus plants are generally less susceptible to pests and diseases than those grown in the ground. However, it’s still important to monitor your plants regularly for any signs of trouble. Common pests that may affect asparagus include asparagus beetles, aphids, and spider mites. Control these pests with insecticidal soap or neem oil. Fungal diseases, such as rust and crown rot, can also affect asparagus. Prevent these diseases by providing good air circulation, avoiding overhead watering, and removing any infected foliage.
How do I overwinter my rooftop asparagus plants?
Asparagus is a perennial plant, meaning it will come back year after year. In the fall, the foliage will turn yellow and die back. Cut the foliage down to the ground level and remove any debris from around the base of the plants. Apply a layer of mulch, such as straw or leaves, to protect the roots from freezing temperatures. In colder climates, you may need to move the containers to a sheltered location, such as a garage or shed. Water the plants sparingly during the winter to prevent the soil from drying out completely. In the spring, remove the mulch and fertilize the plants to encourage new growth.
Can I grow other vegetables alongside my asparagus on the rooftop?
Yes, companion planting can be beneficial for rooftop asparagus growing. Some good companion plants for asparagus include tomatoes, basil, parsley, marigolds, and nasturtiums. Tomatoes provide shade and support for asparagus plants, while basil repels asparagus beetles. Marigolds and nasturtiums attract beneficial insects that prey on pests. Avoid planting asparagus near onions, garlic, or potatoes, as they can inhibit asparagus growth.
What if my rooftop doesn’t get enough sunlight?
Asparagus requires at least 6-8 hours of direct sunlight per day to thrive. If your rooftop doesn’t receive enough sunlight, you may need to supplement with artificial lighting. Grow lights can provide the necessary light for asparagus plants to grow and produce spears. Choose full-spectrum LED grow lights that mimic natural sunlight. Position the lights close to the plants and adjust the height as they grow. You may also need to rotate the containers regularly to ensure that all sides of the plants receive adequate light.


Leave a Comment