
Hanging bottle garden celery: sounds intriguing, right? I’m so excited to share this incredibly easy and rewarding DIY project with you! Forget those expensive store-bought celery stalks that often wilt before you even get a chance to use them. Imagine fresh, crisp celery, grown right outside your kitchen window, ready to be snipped and added to your favorite soups, salads, or even enjoyed as a healthy snack with peanut butter.
The concept of vertical gardening, while seemingly modern, actually has roots stretching back centuries. Think of the Hanging Gardens of Babylon, one of the Seven Wonders of the Ancient World! While we might not be building anything quite so grand, the principle remains the same: maximizing space and bringing the beauty of nature closer to home. In many cultures, celery has been valued not only for its culinary uses but also for its medicinal properties, adding another layer of appreciation to this humble vegetable.
But why a hanging bottle garden, specifically for celery? Well, let’s face it, space is a premium for many of us. Whether you live in an apartment with a small balcony or simply want to make the most of your existing garden, this DIY hack is a game-changer. Plus, it’s an incredibly sustainable way to reuse plastic bottles, turning waste into something beautiful and productive. This hanging bottle garden celery project is not only budget-friendly but also a fantastic way to introduce kids to the joys of gardening and the importance of recycling. So, grab your scissors, some empty bottles, and let’s get started on creating your own little vertical celery oasis!
DIY Hanging Bottle Garden for Celery: How to Grow Your Own Vegetables Vertically!
Hey everyone! Do you have as little space in your garden or on your balcony as I do? No problem! Today I’m going to show you how you can conjure up a cool, hanging garden for celery with just a few plastic bottles and a bit of skill. It’s not only space-saving but also a real eye-catcher! And the best part: you’ll always have fresh celery on hand. Let’s get started!
What you need:
- Several plastic bottles (preferably 1.5 or 2 liters)
- A sharp knife or scissors
- A drill or a nail and hammer
- Sturdy string or wire
- Soil (preferably vegetable soil)
- Celery plants (from the supermarket or market)
- Optional: Spray paint (for a custom look)
- Optional: Fleece or jute (to protect the soil)
Preparation is everything: Processing the bottles
Before we start planting, we need to prepare the bottles. This is actually very simple, but please be careful, especially when using a knife!
- Clean the bottles: First, you should clean the plastic bottles thoroughly. Remove all labels and rinse them with warm water and dish soap. Let them dry well. This is important so that no residue affects the plants later.
- Cutting: Now for the exciting part: cutting the bottles. We need two different types of bottles:
- Planters: Cut off the top part of the bottle (the neck). The height you cut off depends on how deep you want to plant the celery. I recommend cutting off about one-third of the bottle.
- Water reservoir: For some bottles, you’ll leave the neck on. These will later serve as water reservoirs. Cut off the bottom of these bottles.
- Drill holes: To allow water to drain well and prevent the plants from sitting in water, we need to drill holes in the bottoms of the planters. Take your drill or a nail and hammer and make a few small holes in the bottom of each bottle. Make sure the holes are not too big, or the soil will fall out.
- Prepare for hanging: Now we need holes to hang the bottles later. Drill or poke two holes opposite each other in the upper rim of each bottle (both planters and water reservoirs). Make sure the holes are strong enough to support the weight of the soil and plants.
- Optional: Painting: If you want to spice up your hanging garden a bit, you can now paint the bottles with spray paint. Let your creativity run wild! However, make sure the paint is food-safe if it comes into contact with the soil. Let the paint dry well before you continue.
The Setup: How bottles become a garden
Now that the bottles are prepared, we can start building the hanging garden. It’s like a little puzzle, but don’t worry, I’ll help you with it!
- Attach the string: Take your string or wire and thread it through the holes in the bottles. Start with the bottom water reservoir. Make a sturdy knot so the bottle hangs securely.
- Attach planters: Continue threading the string through the holes in the planters. Make sure the planters hang above the water reservoirs so that the water can drain well later. Make sturdy knots here too.
- Keep your distance: Leave enough space between the individual bottles so that the plants get enough light and have room to grow. I recommend a distance of about 20-30 cm.
- Optional: Insert fleece or jute: To prevent soil from falling out of the holes in the bottom of the planters, you can place a piece of fleece or jute in the bottom before filling it with soil. This also helps to keep the soil moist.
Planting: Planting and caring for celery
Finally! Now for the best part: the planting. Here you can show off your green thumb.
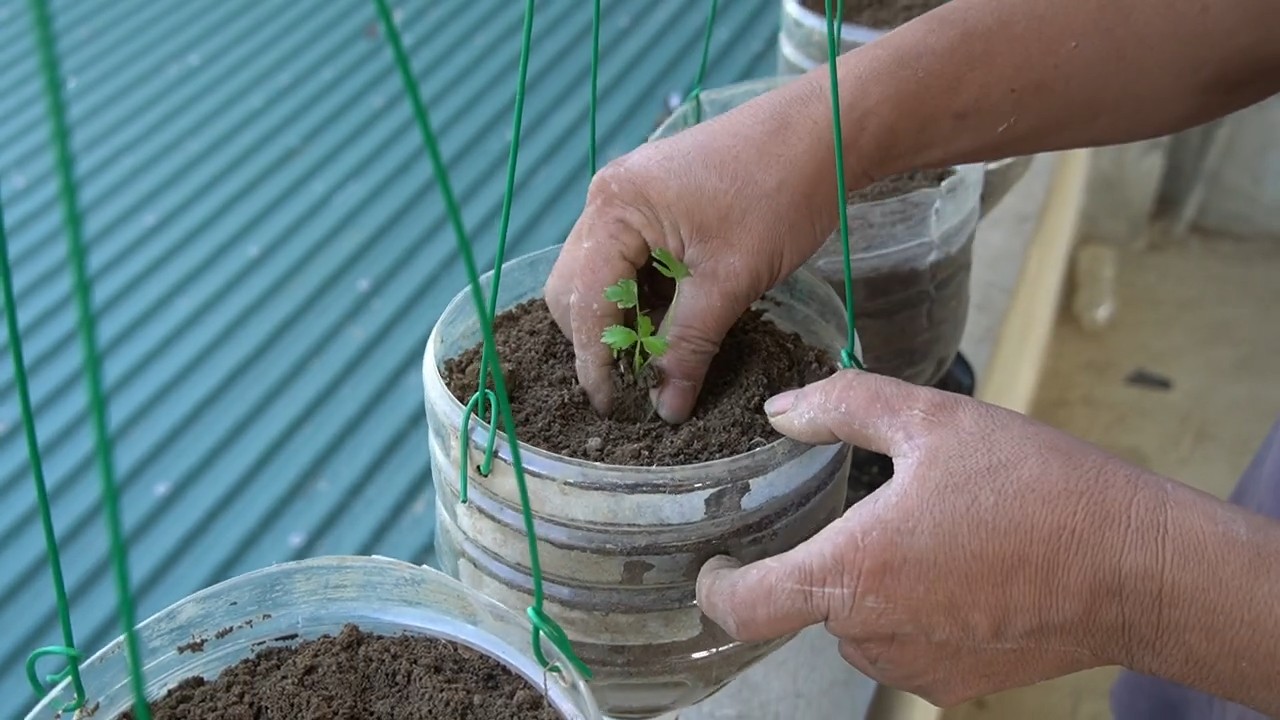
- Fill with soil: Fill the planters with soil. Make sure the soil is loose and airy so that the roots of the celery plants can grow well.
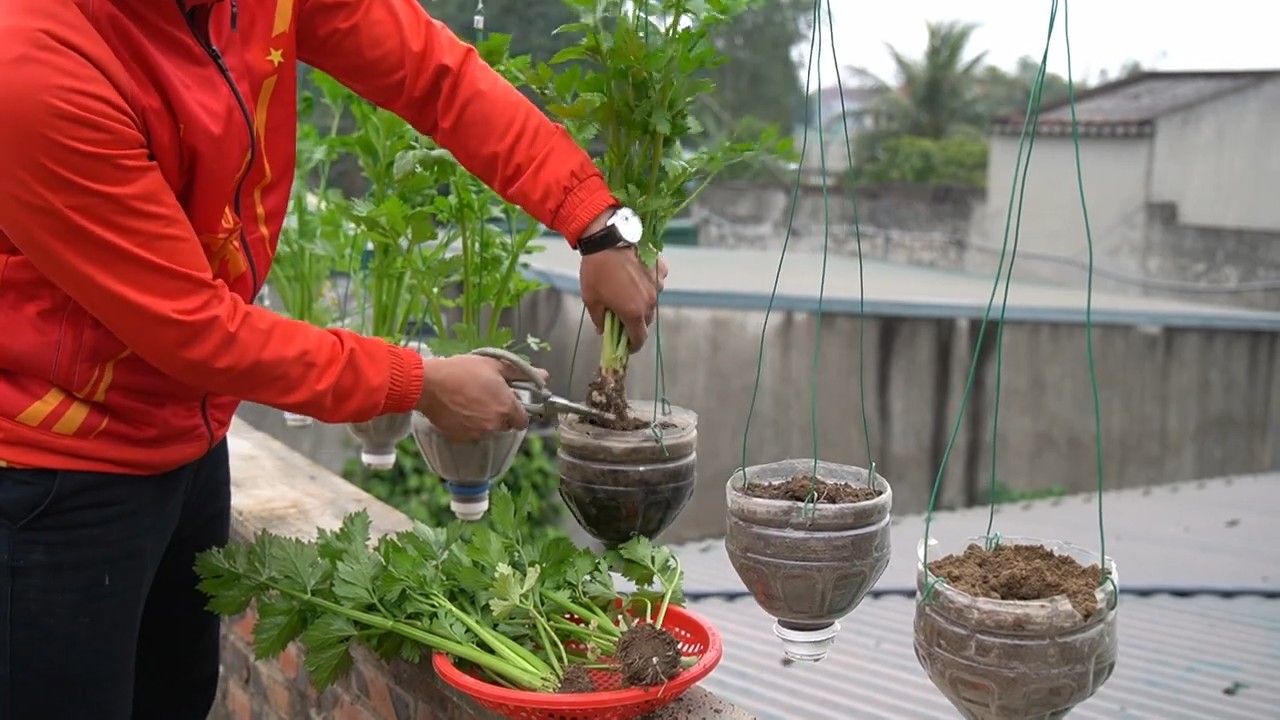
- Plant celery: Take your celery plants and carefully place them in the soil. Make sure the roots are well covered. Press the soil down lightly.
- Water in: Water the celery plants well after planting. This helps them get used to their new location.
- Fill water reservoir: Fill the water reservoirs with water. Make sure the water is not too high, so the plant roots are not sitting in water.
- Hang it up: Find a sunny spot for your hanging garden. Make sure the spot is stable enough to support the weight of the garden. Hang up the garden and enjoy the view!
The Care: How to keep your celery healthy and happy
For your celery to grow and thrive, it naturally needs some care. But don’t worry, it’s not a lot of work!
- Watering: Water your celery regularly. Make sure the soil is always slightly moist. On hot days, you may need to water more often. Check the water reservoirs regularly and refill them if necessary.
- Fertilizing: Fertilize your celery regularly with an organic fertilizer. This will help it grow healthy and strong.
- Sunlight: Celery needs a lot of sun to grow well. Place your hanging garden in a sunny spot where it gets at least 6 hours of sun per day.
- Pests: Watch out for pests like aphids or slugs. If you spot pests, combat them with natural remedies.
- Harvesting: You can harvest your celery as soon as it is big enough. Simply cut off the stalks you need. The celery will continue to grow and produce new stalks.
Additional tips and tricks:
- Different plants: You can grow not only celery in your hanging garden, but also other herbs and vegetables like parsley, chives, or lettuce.
- Vertical gardens: If you have more space, you can also hang several hanging gardens next to each other to create a vertical garden.
- Recycling: Use old plastic bottles to do your part for the environment.
- Creativity: Let your creativity run wild and design your hanging garden just the way you like it.
I hope you enjoyed this guide and now feel like building your own hanging bottle garden for celery. It’s a great project to show off your green thumb and do something for the environment at the same time. Happy gardening!
Conclusion
So, there you have it! Transforming discarded plastic bottles into a thriving vertical garden for your celery is not just a fun project; it’s a sustainable solution that brings fresh, homegrown flavor right to your fingertips. We’ve walked you through the simple steps, highlighting the ease and affordability of this DIY trick. But why is this method a must-try?
Firstly, it’s incredibly space-saving. If you’re living in an apartment, have a small balcony, or simply want to maximize your garden’s yield, a hanging bottle garden is the perfect answer. It allows you to grow upwards, utilizing vertical space that would otherwise go unused. Imagine a wall adorned with lush, green celery stalks, ready to be harvested whenever you need them.
Secondly, it’s an eco-conscious choice. By repurposing plastic bottles, you’re actively reducing waste and contributing to a more sustainable lifestyle. It’s a small act with a big impact, demonstrating that even simple DIY projects can make a difference in protecting our planet. Plus, it’s a fantastic way to teach children about recycling and the importance of environmental responsibility.
Thirdly, growing your own celery guarantees freshness and flavor. Store-bought celery often lacks the vibrant taste and crisp texture of homegrown varieties. With your own hanging bottle garden, you can enjoy celery that’s bursting with flavor, free from pesticides, and harvested at its peak ripeness.
But the possibilities don’t stop there! Feel free to experiment with different variations of this DIY trick. Try using different sizes of plastic bottles to accommodate varying root depths. You could even paint the bottles to add a splash of color to your garden. Consider adding companion plants like herbs or flowers to your hanging garden to attract beneficial insects and enhance the overall aesthetic. You can also try different types of celery, such as Pascal celery or Chinese celery, to discover your favorite flavor profiles.
Another variation is to create a self-watering system by connecting the bottles with tubing. This will help to ensure that your celery plants receive consistent moisture, even when you’re away. You can also add a layer of gravel or pebbles to the bottom of each bottle to improve drainage and prevent waterlogging.
The key to success with this DIY trick is to provide your celery plants with plenty of sunlight, well-draining soil, and regular watering. Be sure to monitor your plants for pests and diseases, and take action promptly if you notice any problems.
We’re confident that you’ll find this hanging bottle garden celery project to be both rewarding and enjoyable. It’s a fantastic way to connect with nature, reduce waste, and enjoy fresh, homegrown produce. So, gather your supplies, follow our instructions, and get ready to create your own vertical celery oasis!
We encourage you to try this DIY trick and share your experience with us. Post photos of your hanging bottle gardens on social media using the hashtag #BottleGardenCelery, and let us know what you think. We’re eager to see your creations and hear your tips and tricks for growing celery in recycled plastic bottles. Happy gardening!
FAQ
Frequently Asked Questions About Growing Celery in a Hanging Bottle Garden
1. What type of plastic bottles are best for this project?
The best type of plastic bottles to use are those that are sturdy and can withstand the weight of the soil and plants. Look for bottles that are made from thicker plastic, such as those used for juice or soda. Avoid using bottles that are too thin or flimsy, as they may collapse under the weight. Clear or translucent bottles are ideal, as they allow you to monitor the moisture level of the soil. Make sure to thoroughly clean the bottles before using them to remove any residue or contaminants.
2. What kind of soil should I use for growing celery in a hanging bottle garden?
Celery thrives in well-draining, nutrient-rich soil. A good potting mix specifically formulated for vegetables is ideal. You can also create your own soil mix by combining equal parts of compost, peat moss, and perlite or vermiculite. Compost provides essential nutrients, peat moss helps retain moisture, and perlite or vermiculite improves drainage. Avoid using garden soil, as it can be too heavy and may not drain well in a container.
3. How much sunlight does celery need when grown in a hanging bottle garden?
Celery needs at least six hours of sunlight per day to thrive. Choose a location for your hanging bottle garden that receives plenty of sunlight, such as a south-facing balcony or patio. If you don’t have access to enough natural sunlight, you can supplement with grow lights. Be sure to rotate the bottles regularly to ensure that all sides of the plants receive adequate sunlight.
4. How often should I water my celery plants in a hanging bottle garden?
Celery needs consistent moisture to grow well. Water your plants regularly, especially during hot, dry weather. Check the soil moisture level daily by sticking your finger into the soil. If the top inch of soil feels dry, it’s time to water. Water thoroughly until the water drains out of the bottom of the bottle. Avoid overwatering, as this can lead to root rot.
5. How do I fertilize my celery plants in a hanging bottle garden?
Celery is a heavy feeder and benefits from regular fertilization. Use a balanced liquid fertilizer, such as a 10-10-10 or 20-20-20, diluted to half strength. Fertilize your plants every two to three weeks during the growing season. You can also add compost tea to the soil to provide additional nutrients.
6. How do I protect my celery plants from pests and diseases in a hanging bottle garden?
Monitor your plants regularly for pests and diseases. Common pests that affect celery include aphids, spider mites, and celery leaf miners. You can control these pests by spraying your plants with insecticidal soap or neem oil. Common diseases that affect celery include early blight and late blight. You can prevent these diseases by providing good air circulation and avoiding overhead watering. If you notice any signs of disease, remove the affected leaves and spray your plants with a fungicide.
7. How long does it take to grow celery in a hanging bottle garden?
Celery typically takes 100-130 days to mature from seed. However, you can start harvesting celery stalks as soon as they are large enough to use. To harvest, simply cut the outer stalks near the base of the plant. The inner stalks will continue to grow.
8. Can I grow other vegetables in a hanging bottle garden?
Yes, you can grow other vegetables in a hanging bottle garden, such as lettuce, spinach, herbs, and strawberries. Choose vegetables that have shallow root systems and don’t require a lot of space. Be sure to provide adequate sunlight, water, and nutrients for each type of vegetable.
9. How do I overwinter my celery plants in a hanging bottle garden?
Celery is a biennial plant, meaning that it typically lives for two years. In cold climates, celery is often grown as an annual. However, you can overwinter your celery plants in a hanging bottle garden by bringing them indoors before the first frost. Place the bottles in a sunny location and water them regularly. You may need to provide supplemental lighting if you don’t have access to enough natural sunlight.
10. Is growing celery in a hanging bottle garden organic?
Yes, growing celery in a hanging bottle garden can be organic if you use organic soil, fertilizer, and pest control methods. Avoid using synthetic fertilizers, pesticides, and herbicides. Choose organic alternatives, such as compost, compost tea, insecticidal soap, and neem oil.

Leave a Comment