
Growing Squash in Pots might seem like a challenge reserved for those with sprawling gardens, but I’m here to tell you it’s totally achievable, even if your outdoor space is limited to a balcony or patio! Forget the myth that you need acres of land to enjoy the deliciousness of homegrown squash. This DIY guide is your ticket to a bountiful harvest, right at your doorstep.
Squash, a staple in many cultures for centuries, holds a special place in culinary history. From the ancient civilizations of the Americas, where squash was a dietary cornerstone, to its global spread and adaptation, this versatile vegetable has nourished generations. But what if you don’t have the sprawling fields of our ancestors? That’s where the magic of container gardening comes in!
Why should you learn this DIY trick? Well, imagine stepping outside and picking fresh, flavorful squash for your dinner, knowing exactly where it came from and how it was grown. No more questionable supermarket produce! Plus, growing squash in pots is incredibly rewarding. It’s a fantastic way to connect with nature, learn about the growing process, and enjoy the satisfaction of nurturing something from seed to table. This guide will provide you with all the tips and tricks you need to successfully grow your own squash, regardless of your space constraints. Let’s get started and transform your small space into a thriving squash patch!
Growing Squash in Pots: A Comprehensive DIY Guide
Hey there, fellow gardening enthusiasts! I’m so excited to share my experience with growing squash in pots. It’s totally doable, even if you don’t have a sprawling garden. I’ve had some amazing harvests using this method, and I’m confident you can too. Let’s dive in!
Choosing the Right Squash Variety
First things first, not all squash varieties are created equal when it comes to container gardening. You’ll want to opt for bush varieties rather than vining types, as they take up significantly less space. Here are some of my personal favorites:
* Bush Delicata: These are compact and produce delicious, sweet squash.
* Spaghetti Squash ‘Bush Delicata’: A smaller version of the classic spaghetti squash, perfect for pots.
* Zucchini ‘Black Beauty’ or ‘Gold Rush’: Zucchinis are prolific producers, and these bush varieties are well-suited for containers.
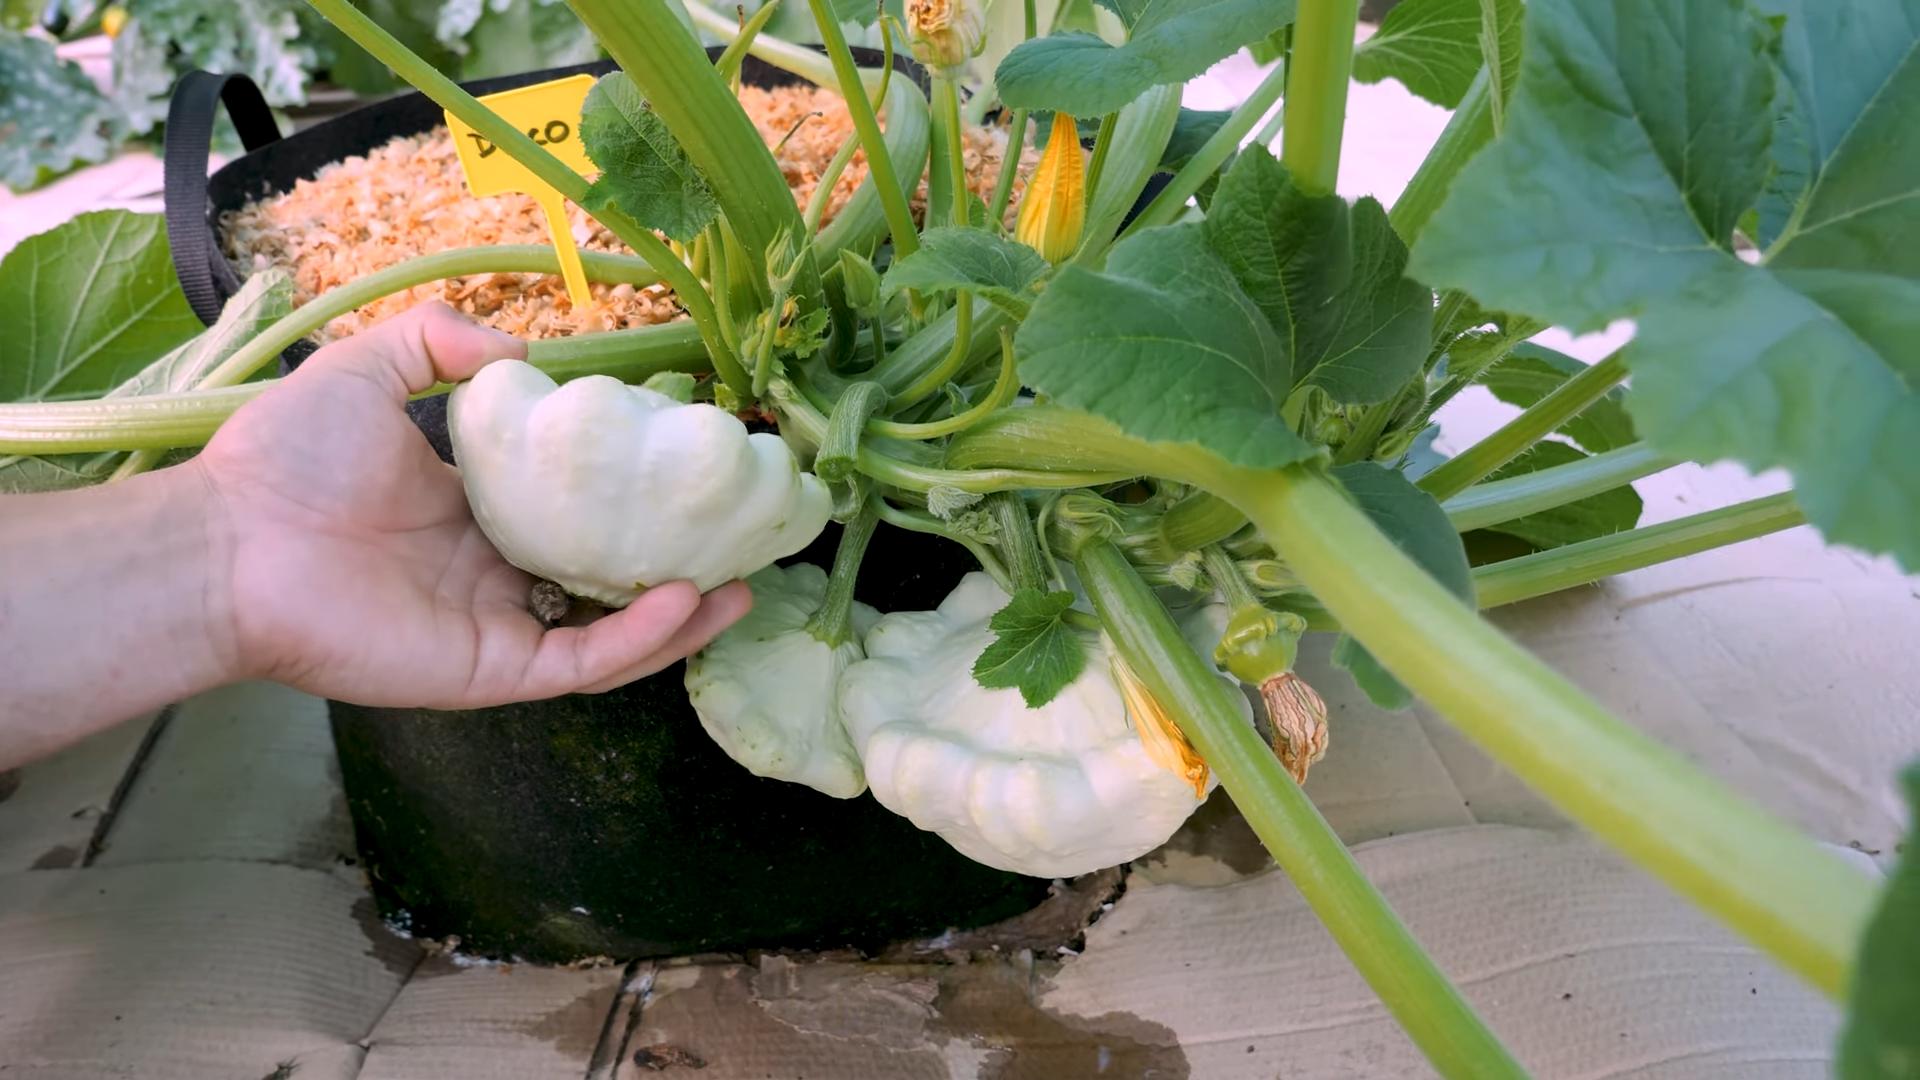
* Patty Pan Squash: These cute, saucer-shaped squash are fun to grow and eat.
* Acorn Squash ‘Table Bush’: A compact acorn squash variety that’s perfect for smaller spaces.
Gathering Your Supplies
Okay, now that we’ve picked our squash, let’s gather everything we need. Trust me, having everything ready beforehand makes the whole process much smoother.
* Large Pots: This is crucial! Squash plants need plenty of room for their roots to grow. I recommend pots that are at least 24 inches in diameter and 24 inches deep. The bigger, the better, really.
* High-Quality Potting Mix: Don’t skimp on this! Use a well-draining potting mix specifically formulated for containers. Avoid using garden soil, as it can compact and hinder drainage.
* Slow-Release Fertilizer: Squash are heavy feeders, so a slow-release fertilizer will provide them with a steady supply of nutrients throughout the growing season.
* Watering Can or Hose: You’ll need a reliable way to water your plants.
* Trowel: For planting and transplanting.
* Optional: Trellis or Support: While bush varieties are generally compact, they can still benefit from some support, especially when the squash start to develop. A small trellis or tomato cage can work wonders.
* Seeds or Seedlings: Of course, you’ll need your squash seeds or seedlings!
* Gardening Gloves: To keep your hands clean and protected.
Planting Your Squash
Alright, let’s get our hands dirty! Here’s how I plant my squash in pots:
1. Prepare the Pot: Fill your pot with potting mix, leaving a few inches of space at the top.
2. Add Fertilizer: Mix in the slow-release fertilizer according to the package instructions.
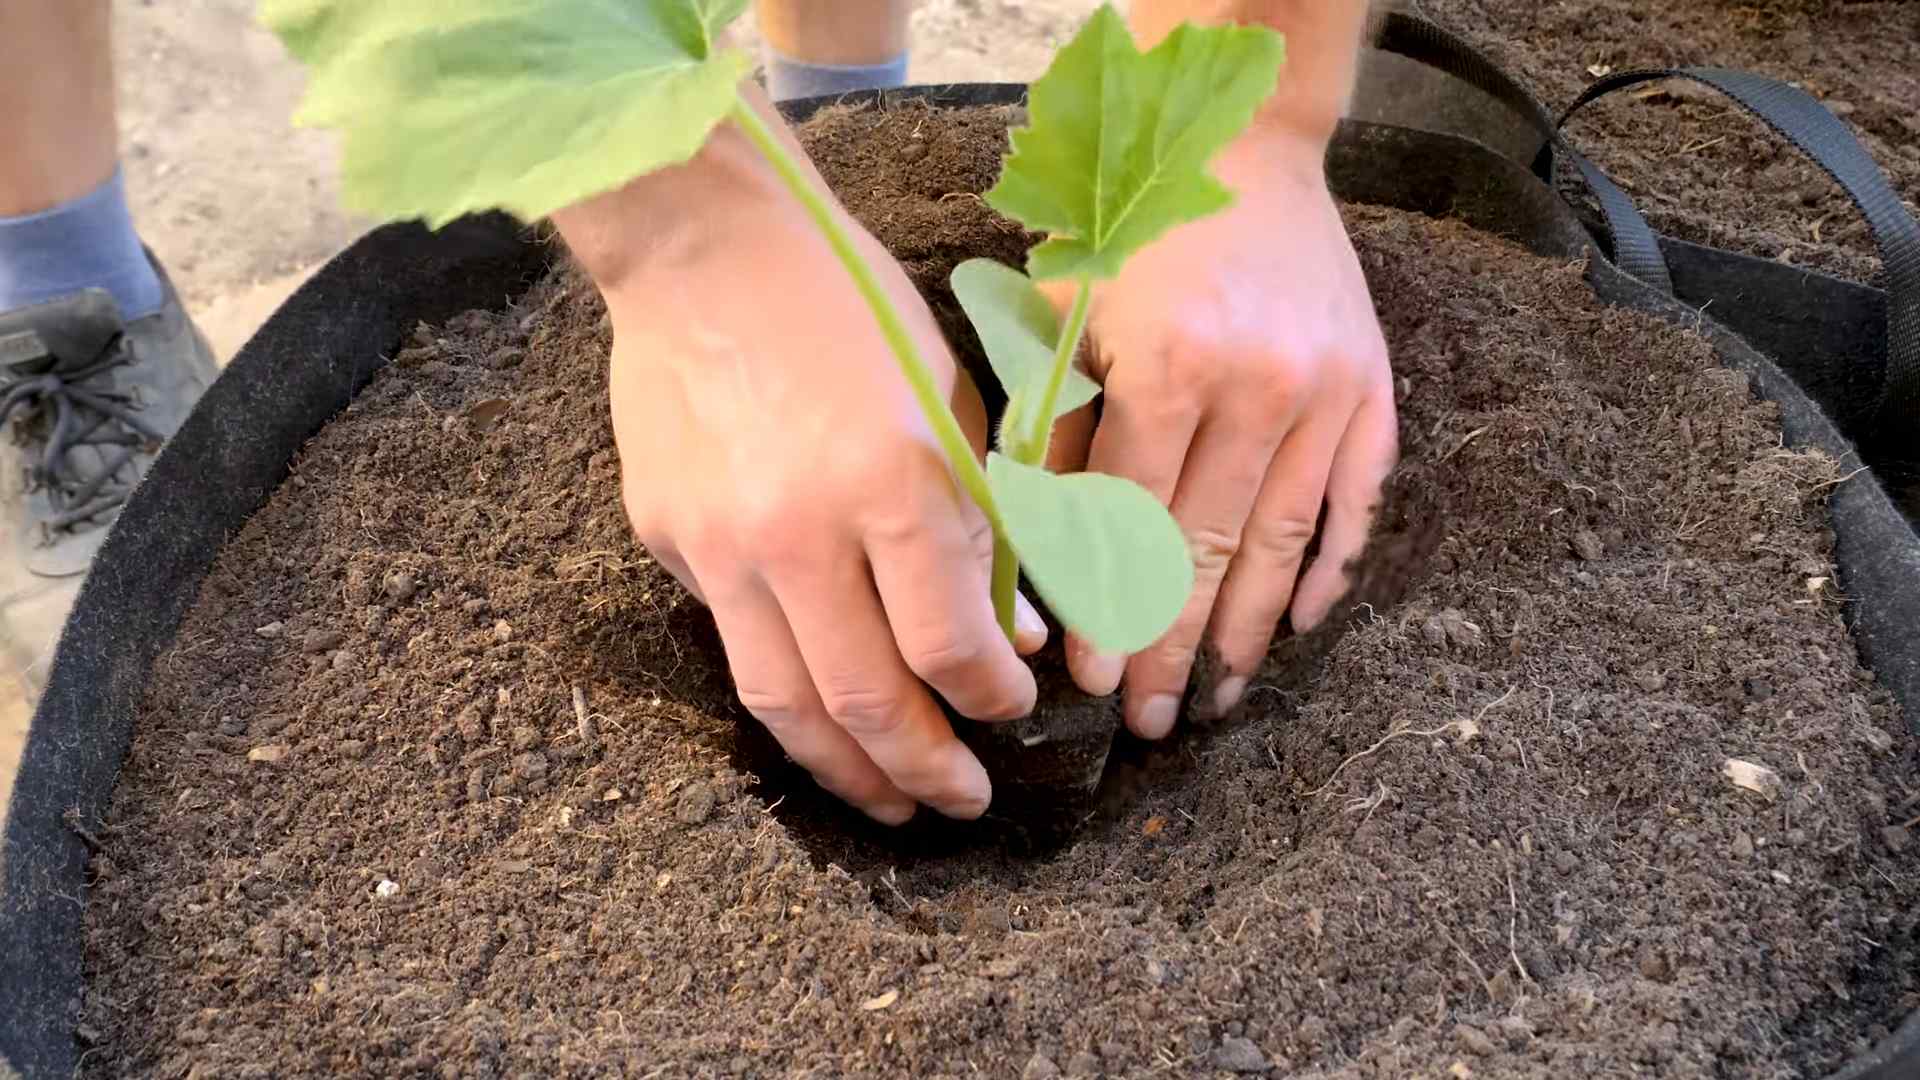
3. Plant the Seeds or Seedlings:
* From Seed: Sow 2-3 seeds per pot, about 1 inch deep. Water gently. Once the seedlings emerge, thin them to one plant per pot.
* From Seedling: Gently remove the seedling from its container and loosen the roots slightly. Dig a hole in the potting mix large enough to accommodate the root ball. Place the seedling in the hole and backfill with potting mix. Water thoroughly.
4. Water Well: Water the newly planted squash thoroughly, ensuring the soil is evenly moist.
5. Mulch (Optional): Add a layer of mulch around the base of the plant to help retain moisture and suppress weeds. I like to use straw or shredded bark.
Caring for Your Potted Squash
Now that your squash is planted, it’s time to provide them with the care they need to thrive.
1. Sunlight: Squash plants need at least 6-8 hours of sunlight per day. Place your pots in a sunny location.
2. Watering: Water regularly, especially during hot, dry weather. Check the soil moisture by sticking your finger into the soil. If the top inch feels dry, it’s time to water. Avoid overwatering, as this can lead to root rot. I usually water deeply every 2-3 days, but this depends on the weather.
3. Fertilizing: In addition to the slow-release fertilizer, you can supplement with a liquid fertilizer every 2-3 weeks. Look for a fertilizer that’s high in phosphorus and potassium, which are essential for fruit development. I like to use a diluted fish emulsion or seaweed extract.
4. Pollination: Squash plants have separate male and female flowers. The female flowers need to be pollinated in order to produce fruit. If you’re not seeing any fruit develop, you may need to hand-pollinate the flowers.
* How to Hand-Pollinate: Identify the male and female flowers. The male flowers have a long, thin stem, while the female flowers have a small, immature squash at the base. In the early morning, use a small paintbrush or cotton swab to collect pollen from the male flower. Gently transfer the pollen to the stigma (the center part) of the female flower.
5. Pest and Disease Control: Keep an eye out for common squash pests, such as squash bugs, squash vine borers, and aphids. You can use insecticidal soap or neem oil to control these pests. Also, watch out for diseases like powdery mildew. Ensure good air circulation around the plants and avoid overhead watering to prevent fungal diseases. If you spot powdery mildew, you can treat it with a fungicide.
6. Support (If Needed): As the squash plants grow and the fruits develop, they may need some support. Use a trellis or tomato cage to keep the plants upright and prevent the fruits from touching the ground.
Harvesting Your Squash
The moment we’ve all been waiting for! Harvesting your homegrown squash is incredibly rewarding.
1. Harvest Time: The time it takes for squash to mature depends on the variety. Generally, summer squash (like zucchini and patty pan) are ready to harve
Hey there, fellow gardening enthusiasts! I’m so excited to share my experience with growing squash in pots. It’s totally doable, even if you don’t have a sprawling garden. I’ve had some amazing harvests using this method, and I’m confident you can too. Let’s dive in!
Choosing the Right Squash Variety
First things first, not all squash varieties are created equal when it comes to container gardening. You’ll want to opt for bush varieties rather than vining types, as they take up significantly less space. Here are some of my personal favorites:
* Bush Delicata: These are compact and produce delicious, sweet squash.
* Spaghetti Squash ‘Bush Delicata’: A smaller version of the classic spaghetti squash, perfect for pots.
* Zucchini ‘Black Beauty’ or ‘Gold Rush’: Zucchinis are prolific producers, and these bush varieties are well-suited for containers.
* Patty Pan Squash: These cute, saucer-shaped squash are fun to grow and eat.
* Acorn Squash ‘Table Bush’: A compact acorn squash variety that’s perfect for smaller spaces.
Gathering Your Supplies
Okay, now that we’ve picked our squash, let’s gather everything we need. Trust me, having everything ready beforehand makes the whole process much smoother.
* Large Pots: This is crucial! Squash plants need plenty of room for their roots to grow. I recommend pots that are at least 24 inches in diameter and 24 inches deep. The bigger, the better, really.
* High-Quality Potting Mix: Don’t skimp on this! Use a well-draining potting mix specifically formulated for containers. Avoid using garden soil, as it can compact and hinder drainage.
* Slow-Release Fertilizer: Squash are heavy feeders, so a slow-release fertilizer will provide them with a steady supply of nutrients throughout the growing season.
* Watering Can or Hose: You’ll need a reliable way to water your plants.
* Trowel: For planting and transplanting.
* Optional: Trellis or Support: While bush varieties are generally compact, they can still benefit from some support, especially when the squash start to develop. A small trellis or tomato cage can work wonders.
* Seeds or Seedlings: Of course, you’ll need your squash seeds or seedlings!
* Gardening Gloves: To keep your hands clean and protected.
Planting Your Squash
Alright, let’s get our hands dirty! Here’s how I plant my squash in pots:
1. Prepare the Pot: Fill your pot with potting mix, leaving a few inches of space at the top.
2. Add Fertilizer: Mix in the slow-release fertilizer according to the package instructions.
3. Plant the Seeds or Seedlings:
* From Seed: Sow 2-3 seeds per pot, about 1 inch deep. Water gently. Once the seedlings emerge, thin them to one plant per pot.
* From Seedling: Gently remove the seedling from its container and loosen the roots slightly. Dig a hole in the potting mix large enough to accommodate the root ball. Place the seedling in the hole and backfill with potting mix. Water thoroughly.
4. Water Well: Water the newly planted squash thoroughly, ensuring the soil is evenly moist.
5. Mulch (Optional): Add a layer of mulch around the base of the plant to help retain moisture and suppress weeds. I like to use straw or shredded bark.
Caring for Your Potted Squash
Now that your squash is planted, it’s time to provide them with the care they need to thrive.
1. Sunlight: Squash plants need at least 6-8 hours of sunlight per day. Place your pots in a sunny location.
2. Watering: Water regularly, especially during hot, dry weather. Check the soil moisture by sticking your finger into the soil. If the top inch feels dry, it’s time to water. Avoid overwatering, as this can lead to root rot. I usually water deeply every 2-3 days, but this depends on the weather.
3. Fertilizing: In addition to the slow-release fertilizer, you can supplement with a liquid fertilizer every 2-3 weeks. Look for a fertilizer that’s high in phosphorus and potassium, which are essential for fruit development. I like to use a diluted fish emulsion or seaweed extract.
4. Pollination: Squash plants have separate male and female flowers. The female flowers need to be pollinated in order to produce fruit. If you’re not seeing any fruit develop, you may need to hand-pollinate the flowers.
* How to Hand-Pollinate: Identify the male and female flowers. The male flowers have a long, thin stem, while the female flowers have a small, immature squash at the base. In the early morning, use a small paintbrush or cotton swab to collect pollen from the male flower. Gently transfer the pollen to the stigma (the center part) of the female flower.
5. Pest and Disease Control: Keep an eye out for common squash pests, such as squash bugs, squash vine borers, and aphids. You can use insecticidal soap or neem oil to control these pests. Also, watch out for diseases like powdery mildew. Ensure good air circulation around the plants and avoid overhead watering to prevent fungal diseases. If you spot powdery mildew, you can treat it with a fungicide.
6. Support (If Needed): As the squash plants grow and the fruits develop, they may need some support. Use a trellis or tomato cage to keep the plants upright and prevent the fruits from touching the ground.
Harvesting Your Squash
The moment we’ve all been waiting for! Harvesting your homegrown squash is incredibly rewarding.
1. Harvest Time: The time it takes for squash to mature depends on the variety. Generally, summer squash (like zucchini and patty pan) are ready to harvest in about 50-60 days, while winter squash (like butternut and acorn) take 80-100 days.
2. How to Harvest:
* Summer Squash: Harvest summer squash when they are young and tender. Zucchini should be about 6-8 inches long, and patty pan squash should be about 3-4 inches in diameter. Use a sharp knife or pruning shears to cut the squash from the vine, leaving a short stem attached.
* Winter Squash: Harvest winter squash when the skin is hard and the stem is dry and brown. Use a sharp knife or pruning shears to cut the squash from the vine, leaving a 2-3 inch stem attached.
3. Curing Winter Squash: Before storing winter squash, it’s important to cure them. This helps to harden the skin and improve their storage life. To cure winter squash, place them in a warm, dry place (around 80-85°F) for 1-2 weeks.
Troubleshooting
Even with the best care, you might encounter some challenges along the way. Here are a few common problems and how to address them:
* Yellowing Leaves: This could be a sign of overwatering, underwatering, or nutrient deficiency. Check the soil moisture and adjust your watering accordingly. If the leaves are yellowing due to nutrient deficiency, fertilize with a balanced fertilizer.
* Lack of Fruit: This could be due to poor pollination. Try hand-pollinating the flowers. Also, make sure the plants are getting enough sunlight and water.
* Powdery Mildew: This is a fungal disease that appears as a white, powdery coating on the leaves. Ensure good air circulation around the plants and avoid overhead watering. Treat with a fungicide if necessary.
* Squash Bugs: These pests can damage the leaves and stems of squash plants. Handpick the bugs and their eggs (which are usually found on the undersides of the leaves). You can also use insecticidal soap or neem oil.
* Squash Vine Borers: These pests bore into the stems of squash plants, causing them to wilt and die. Look for small holes in the stems and sawdust-like frass. If you find squash vine borers, you can try to remove them by slitting the stem open and extracting the larvae. You can also wrap the base of the stems with aluminum foil to prevent the borers from entering.
Extra Tips for Success
Here are a few extra tips that I’ve learned over the years that can help you grow even more amazing squash in pots:
* Choose the Right Potting Mix: I can’t stress this enough! A high-quality potting mix is essential for good drainage and aeration.
* Don’t Overcrowd: Give your squash plants plenty of space to grow. Don’t try to cram too many plants into one pot.
* Rotate Your Crops: If you’re growing squash in the same pots year after
Conclusion
So, there you have it! Growing squash in pots isn’t just a possibility; it’s a surprisingly rewarding and accessible way to bring the bounty of the garden to even the smallest of spaces. We’ve walked through the essential steps, from selecting the right variety and pot size to nurturing your plants with the proper soil, sunlight, and water.
Why is this DIY trick a must-try? Because it democratizes gardening. It removes the barriers of large yards and extensive garden beds, allowing anyone, regardless of their living situation, to experience the joy of harvesting their own fresh, delicious squash. Imagine stepping onto your balcony or patio and picking a vibrant zucchini for tonight’s dinner, or watching a butternut squash ripen in the autumn sun, all thanks to your own efforts. It’s a connection to nature, a source of fresh produce, and a satisfying hobby all rolled into one.
But the beauty of growing squash in pots lies not only in its accessibility but also in its adaptability. Feel free to experiment! Try different varieties of squash to see which thrive best in your specific climate and conditions. Consider companion planting – basil, marigolds, and nasturtiums can help deter pests and attract beneficial insects. You could even try vertical gardening techniques, training your squash vines up a trellis or support structure to maximize space and create a stunning visual display.
Don’t be afraid to get creative with your container choices. While we’ve emphasized the importance of size and drainage, you can use a variety of materials, from terracotta pots to repurposed containers, as long as they meet the basic requirements. Just ensure they are clean and food-safe if you are using recycled containers.
And speaking of creativity, think about the different ways you can use your homegrown squash. From classic zucchini bread and summer squash salads to hearty butternut squash soups and roasted acorn squash, the possibilities are endless. Growing your own squash opens up a world of culinary adventures, allowing you to savor the fresh, vibrant flavors of the season.
Ultimately, growing squash in pots is about more than just producing food; it’s about fostering a connection to the natural world, learning new skills, and enjoying the satisfaction of nurturing something from seed to harvest. It’s a journey of discovery, and we encourage you to embark on it.
So, grab a pot, some seeds, and a little bit of enthusiasm, and get ready to experience the joy of growing your own squash. We’re confident that you’ll be amazed by what you can achieve.
We’d love to hear about your experiences! Share your photos, tips, and challenges in the comments below. Let’s create a community of container squash growers and learn from each other. What varieties are you growing? What challenges have you faced? What successes have you celebrated? Your insights can help others on their own gardening journeys. Let’s cultivate a thriving community of potted squash enthusiasts!
Now, let’s address some frequently asked questions to help you get started on your squash-growing adventure.
Frequently Asked Questions (FAQ)
What is the best type of squash to grow in a pot?
The best types of squash to grow in pots are bush varieties, as they are more compact and don’t require as much space as vining varieties. Some excellent choices include:
* Bush Zucchini: These are prolific producers and relatively easy to grow in containers. Look for varieties like ‘Black Beauty,’ ‘Early Crookneck,’ or ‘Gold Rush.’
* Patty Pan Squash: These unique, saucer-shaped squash are also well-suited for container gardening.
* Acorn Squash (Bush Varieties): Some bush acorn squash varieties are available that are specifically bred for smaller spaces.
* Spaghetti Squash (Bush Varieties): Similar to acorn squash, look for bush varieties of spaghetti squash for container growing.
* Dwarf Butternut Squash: These are smaller versions of the popular butternut squash, making them a good choice for larger pots.
Avoid growing large vining varieties like pumpkins or some types of winter squash in pots, as they require a lot of space and may not thrive in a confined environment.
How big of a pot do I need for growing squash?
The size of the pot is crucial for successful squash growing. A general rule of thumb is to use a pot that is at least 24 inches in diameter and 12 inches deep. Larger pots are always better, as they provide more room for the roots to grow and help retain moisture. A 5-gallon bucket is the absolute minimum, but a 10-gallon or larger container is preferable. Ensure the pot has adequate drainage holes to prevent waterlogging.
What kind of soil should I use for growing squash in pots?
Use a high-quality potting mix that is well-draining and rich in organic matter. Avoid using garden soil, as it can become compacted in pots and doesn’t provide adequate drainage. A good potting mix will contain ingredients like peat moss, perlite, vermiculite, and compost. You can also amend your potting mix with slow-release fertilizer to provide your squash plants with a steady supply of nutrients.
How much sunlight do squash plants need?
Squash plants need at least 6-8 hours of direct sunlight per day to thrive. Choose a location for your pots that receives plenty of sunlight throughout the day. If you live in a particularly hot climate, you may need to provide some afternoon shade to prevent the plants from overheating.
How often should I water my squash plants in pots?
Water your squash plants regularly, especially during hot, dry weather. Check the soil moisture daily and water when the top inch of soil feels dry to the touch. Avoid overwatering, as this can lead to root rot. Water deeply, allowing the water to drain out of the bottom of the pot.
Do I need to fertilize my squash plants in pots?
Yes, squash plants are heavy feeders and require regular fertilization. Use a balanced fertilizer (e.g., 10-10-10) or a fertilizer specifically formulated for vegetables. Fertilize every 2-3 weeks, following the instructions on the fertilizer label. You can also use organic fertilizers like compost tea or fish emulsion.
How do I deal with pests and diseases on my squash plants?
Monitor your squash plants regularly for pests and diseases. Common pests include squash bugs, squash vine borers, and aphids. Common diseases include powdery mildew and squash mosaic virus. Use organic pest control methods like insecticidal soap, neem oil, or handpicking pests. Ensure good air circulation around your plants to prevent fungal diseases.
How do I pollinate my squash plants?
Squash plants have separate male and female flowers. Pollination is necessary for fruit to develop. If you’re not seeing fruit develop, you may need to hand-pollinate the flowers. To do this, use a small brush to transfer pollen from the male flower to the female flower. The female flower has a small fruit (the squash) at the base of the flower, while the male flower has a straight stem.
When is the best time to harvest my squash?
The best time to harvest your squash depends on the variety. Summer squash, like zucchini and patty pan, should be harvested when they are young and tender. Winter squash, like butternut and acorn squash, should be harvested when they are fully mature and the skin is hard. Check the seed packet or plant tag for specific harvesting instructions.
Can I grow more than one squash plant in a pot?
It’s generally best to grow only one squash plant per pot, especially if you’re using a smaller container. Overcrowding can lead to stunted growth and reduced yields. If you’re using a very large container (e.g., a half wine barrel), you may be able to grow two plants, but be sure to provide them with plenty of space and nutrients.
Leave a Comment