
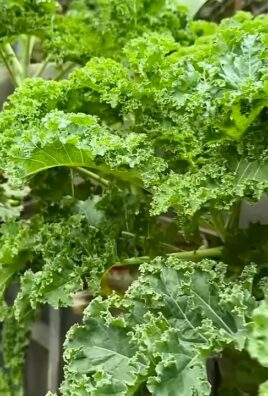
Growing kale in plastic bottles might sound unconventional, but trust me, it’s a game-changer for urban gardeners and anyone looking to maximize their space and minimize waste! Have you ever dreamed of fresh, homegrown kale but thought you didn’t have the room? Or perhaps you’re looking for a fun and eco-friendly DIY project? Well, you’re in the right place!
The concept of container gardening, including repurposing materials like plastic bottles, has roots stretching back centuries. From ancient hanging gardens to resourceful wartime victory gardens, people have always found innovative ways to cultivate food in limited spaces. Today, with increasing urbanization and a growing awareness of sustainability, this practice is more relevant than ever.
Let’s be honest, buying kale from the store can be expensive, and sometimes it’s not even that fresh. Plus, there’s the satisfaction of knowing exactly where your food comes from and that you’re reducing your carbon footprint. This DIY trick not only provides you with a constant supply of nutritious kale but also helps you recycle those pesky plastic bottles that often end up in landfills. I’m excited to share this simple, effective, and budget-friendly method for growing kale in plastic bottles, so you can enjoy fresh, homegrown greens all year round!

Creative DIY Garden: Growing Kale in Plastic Bottles
Hey garden friends! Do you also feel like you need more green in your life but have little space? Or do you just want to do something sustainable and reduce plastic waste? Then I have just the thing for you: growing kale in plastic bottles! It’s super easy, inexpensive, and a lot of fun. Let’s get started!
What you need:
- Plastic bottles: Large PET bottles (1.5 or 2 liters) are best – the more, the more kale!
- Kale seeds: Available at garden centers or online. Look for organic quality if you want to avoid pesticides.
- Seed-starting mix: Special soil for starting plants.
- Potting soil: Regular potting soil for later transplanting.
- Scissors or knife: For cutting the plastic bottles.
- Drill or nail: for the drainage holes.
- Watering can or spray bottle: For watering.
- Optional: Cord or wire for hanging the bottles.
- Optional: Small stones or clay shards for drainage.
Phase 1: Preparing the Plastic Bottles
- Cleaning: First, you need to clean the plastic bottles thoroughly. Remove all labels and rinse them with warm water and a little dish soap. Make sure no soap residue remains.
- Cutting: Now comes the fun part! There are different ways to cut the bottles, depending on how you want to set them up or hang them. Here are two versions:
- Version 1 (Hanging): Cut the bottle about a third of the way from the top. The top part will later be inverted and placed into the bottom part.
- Version 2 (Standing): Cut the bottle horizontally in the middle. The top part is also inverted and placed into the bottom part.
- Important: Be careful when cutting! Use a sharp knife or scissors and watch your fingers.
- Drainage holes: To allow water to drain well and prevent waterlogging, drill or nail a few holes in the bottom of the bottles. Four to five holes should be enough.
- Optional: Prepare for hanging: If you want to hang the bottles, now drill two more holes on the sides of the upper part of the bottle. You can later pull a cord or wire through these holes.
Phase 2: Sowing the Kale Seeds
- Drainage (Optional): Place a layer of small stones or clay shards at the bottom of the bottle. This improves drainage and prevents the soil from clogging the drainage holes.
- Fill with seed-starting mix: Fill the bottles with seed-starting mix. Leave about 2-3 cm of space to the rim.
- Sow seeds: Distribute the kale seeds evenly on the soil. Press them down lightly.
- Cover with soil: Cover the seeds with a thin layer of seed-starting mix (approx. 0.5 cm).
- Water: Gently moisten the soil with a spray bottle or a watering can with a sprinkler head. The soil should be damp, but not wet.
- Location: Place the planted bottles in a bright and warm place. A windowsill or a greenhouse are ideal.
- Keep moist: Make sure the soil always stays moist. Spray it regularly with water.
Phase 3: Caring for the Kale Seedlings
- Germination: After about a week, the first small kale seedlings should sprout.
- Observation: Observe the plants closely. If they are too close together, you may need to thin them out (prick them out). This means you remove the weaker seedlings so that the stronger ones have enough space to grow.
- Transplanting: As soon as the seedlings are large enough (about 5-10 cm high), you can transplant them into larger pots or directly into the garden.
- Preparation: Fill the larger pots or the bed with potting soil.
- Transplanting: Dig a small hole in the soil and carefully place the kale seedlings in it. Make sure the roots are not damaged.
- Watering in: Water the plants well after transplanting.
- Fertilizing: Kale is a heavy feeder and needs regular fertilizer. Use an organic fertilizer or compost.
- Watering: Water the plants regularly, especially on hot days. The soil should always be moist, but not wet.
- Pest protection: Kale can be infested by various pests, such as cabbage whites or aphids. Check the plants regularly and remove pests by hand or with a biological pesticide if necessary.
- Harvest: After about 2-3 months, you can harvest the first kale. Cut off the outer leaves; the inner leaves will continue to grow.
Additional Tips and Tricks
- Variety selection: There are different varieties of kale. Find out which variety is best suited for your location and needs.
- Location: Kale needs a sunny spot.
- Soil: The soil should be loose, rich in humus, and nutritious.
- Crop rotation: Do not grow kale in the same location every year to prevent diseases and pests.
- Overwintering: Kale is hardy and can also be harvested in winter.
- Creativity: Paint the plastic bottles with bright colors or patterns to make your DIY garden even more individual.
- Upcycling: Also use other plastic containers, such as yogurt cups or ice cream tubs, for starting seeds.
- Community: Exchange ideas with other garden friends and share your experiences.
Why grow kale in plastic bottles?
- Sustainability: You recycle plastic waste and contribute to waste reduction.
- Space-saving: Ideal for balconies, terraces, or small gardens.
- Cost-effective: You save money because you don’t have to buy expensive pots.
- Flexible: You can place or hang the bottles anywhere.
- Healthy: You always have fresh kale on hand.
- Fun: It’s just fun to grow something yourself and watch it grow.
Frequently Asked Questions (FAQ)
Kale is a heavy feeder and needs regular fertilizer. Use an organic fertilizer or compost.
What soil is best for kale?
For starting seeds, seed-starting mix is ideal as it is low in nutrients and promotes root formation. For later transplanting, you can use regular potting soil.
How often do I have to water kale?
Water the kale regularly, especially on hot days. The soil should always be moist, but not wet.

Conclusion
So, there you have it! Growing kale in plastic bottles isn’t just a quirky gardening experiment; it’s a genuinely practical and rewarding way to cultivate fresh, nutritious greens, even if you’re short on space or resources. We’ve walked you through the simple steps, highlighting the benefits of this upcycling method – from its eco-friendliness to its space-saving design.
But why is this DIY trick a must-try? Because it empowers you to take control of your food source, reduces your environmental footprint, and adds a touch of green to even the smallest living spaces. Imagine stepping outside your apartment and snipping off a few fresh kale leaves for your morning smoothie or adding them to a vibrant salad. That’s the power of this simple technique.
Beyond the basic method, there’s plenty of room for experimentation. Consider using different types of plastic bottles – larger ones for more mature kale varieties or smaller ones for baby kale. You can also explore different soil mixtures to optimize growth. Adding compost tea or diluted liquid fertilizer can give your kale a boost. Think about painting the bottles in bright colors to add a decorative element to your balcony or patio. You could even create a vertical garden by hanging multiple bottle planters from a wall or fence.
Don’t be afraid to get creative and adapt the method to suit your specific needs and preferences. The beauty of this DIY project lies in its flexibility and adaptability. It’s a chance to learn, experiment, and connect with nature in a meaningful way.
We wholeheartedly encourage you to give growing kale in plastic bottles a try. It’s an inexpensive, sustainable, and incredibly satisfying project that will reward you with fresh, healthy greens. And most importantly, we want to hear about your experience! Share your photos, tips, and challenges in the comments below. Let’s build a community of bottle-gardening enthusiasts and inspire others to embrace this simple yet powerful way to grow their own food. Your insights could be invaluable to someone just starting out. Let’s all learn together how to best grow our own kale!
Frequently Asked Questions (FAQs)
What type of kale grows best in plastic bottles?
While you can technically grow any type of kale in plastic bottles, some varieties are better suited than others. Dwarf varieties like Dwarf Blue Curled Vates or Red Russian kale tend to thrive in smaller spaces. These varieties don’t grow as tall or wide as other types, making them ideal for container gardening. Lacinato kale (also known as dinosaur kale) can also be grown, but you might need a larger bottle to accommodate its longer leaves. Experiment with different varieties to see what works best for your climate and growing conditions. Remember to provide adequate support if the kale starts to get too top-heavy.
How often should I water my kale plants in plastic bottles?
Watering frequency depends on several factors, including the size of the bottle, the type of soil, the climate, and the stage of growth. Generally, you should water your kale plants when the top inch of soil feels dry to the touch. Avoid overwatering, as this can lead to root rot. During hot, dry weather, you may need to water daily, while in cooler, wetter weather, you may only need to water every few days. Check the soil moisture regularly and adjust your watering schedule accordingly. Ensure the bottle has adequate drainage holes to prevent waterlogging.
What kind of soil should I use for growing kale in plastic bottles?
A well-draining potting mix is essential for growing healthy kale in plastic bottles. Avoid using garden soil, as it can be too heavy and compact, hindering drainage and root growth. A good potting mix should contain a blend of peat moss, perlite, and vermiculite. You can also add compost to enrich the soil and provide essential nutrients. Consider adding a slow-release fertilizer to the potting mix to provide a steady supply of nutrients throughout the growing season. The ideal pH for kale is between 6.0 and 7.5.
How much sunlight does kale need when grown in plastic bottles?
Kale thrives in full sun, meaning it needs at least 6 hours of direct sunlight per day. However, it can also tolerate partial shade, especially in hot climates. If you’re growing kale indoors, place the bottles near a sunny window or use grow lights to provide adequate illumination. Insufficient sunlight can result in leggy growth and reduced yields. Rotate the bottles regularly to ensure that all sides of the plant receive equal exposure to sunlight.
How do I fertilize kale grown in plastic bottles?
Kale is a heavy feeder, so regular fertilization is essential for optimal growth. You can use a balanced liquid fertilizer diluted to half strength every two to three weeks. Alternatively, you can add a slow-release fertilizer to the potting mix at planting time. Organic options include compost tea, fish emulsion, and seaweed extract. Avoid over-fertilizing, as this can lead to excessive foliage growth at the expense of root development. Monitor the plants for signs of nutrient deficiencies, such as yellowing leaves, and adjust your fertilization schedule accordingly.
How do I protect my kale plants from pests and diseases?
Kale is susceptible to various pests and diseases, including aphids, cabbage worms, and fungal infections. Regularly inspect your plants for signs of infestation or disease. Handpick pests or use insecticidal soap to control aphids and cabbage worms. Ensure good air circulation to prevent fungal diseases. Avoid overhead watering, as this can create a humid environment that promotes fungal growth. If necessary, use a fungicide to treat fungal infections. Companion planting with herbs like rosemary and thyme can also help deter pests.
Can I grow kale in plastic bottles indoors during the winter?
Yes, you can grow kale in plastic bottles indoors during the winter, provided you have adequate light and temperature control. Place the bottles near a sunny window or use grow lights to provide sufficient illumination. Maintain a consistent temperature between 60 and 70 degrees Fahrenheit. Water regularly and fertilize as needed. Be mindful of humidity levels, as indoor environments can be dry during the winter. Consider using a humidifier or placing the bottles on a tray filled with water and pebbles to increase humidity.
How do I harvest kale from plastic bottles?
Harvest kale leaves when they are about 4-6 inches long. Start by harvesting the outer leaves, leaving the inner leaves to continue growing. You can harvest kale continuously throughout the growing season. Avoid harvesting more than one-third of the plant at a time, as this can stress the plant and reduce yields. Wash the harvested leaves thoroughly before using them. Freshly harvested kale is best enjoyed immediately, but it can also be stored in the refrigerator for several days.
What do I do with the plastic bottles after I’m done growing kale?
One of the great things about this method is its sustainability! After you’ve harvested all your kale, you can clean the plastic bottles and reuse them for other gardening projects. You can also recycle them properly. Consider using them to start seedlings or to grow other herbs and vegetables. If the bottles are damaged or no longer suitable for gardening, dispose of them responsibly according to your local recycling guidelines.
Is growing kale in plastic bottles really effective?
Absolutely! While it might seem unconventional, growing kale in plastic bottles is a surprisingly effective method, especially for those with limited space. It allows you to control the growing environment, minimize soil-borne diseases, and easily move the plants to optimal locations. The key is to provide the kale with adequate sunlight, water, nutrients, and well-draining soil. With a little care and attention, you can enjoy a bountiful harvest of fresh, homegrown kale, all thanks to this simple and sustainable DIY technique.

Leave a Comment