
Growing green onions in bottles might sound like something out of a science fiction movie, but trust me, it’s a super simple and rewarding DIY project that anyone can do! I’m so excited to share this clever trick with you because it’s a game-changer for anyone who loves fresh green onions but hates constantly buying them at the store.
For centuries, resourceful gardeners have sought innovative ways to maximize their yields, even in limited spaces. While the exact origins of bottle gardening are hard to pinpoint, the spirit of resourcefulness and upcycling has always been a part of gardening culture. Think about it – our grandparents and great-grandparents were masters of making the most of what they had! This method taps into that same ingenuity, allowing us to enjoy fresh produce with minimal effort and waste.
Let’s face it, buying green onions from the grocery store can be a bit of a letdown. They often wilt quickly, and you end up throwing half of them away. Plus, who wants to make a special trip to the store just for a few sprigs? That’s where this DIY trick comes in! Growing green onions in bottles is not only incredibly convenient, but it’s also a fantastic way to reduce food waste and save money. Imagine having a constant supply of fresh, flavorful green onions right on your windowsill, ready to add a zing to your favorite dishes. Ready to get started? Let’s dive in!

Grow Green Onions Indoors: A Simple DIY Guide
Hey there, fellow plant enthusiasts! Ever find yourself needing just a sprinkle of green onion for a recipe and hating to buy a whole bunch that ends up wilting in the fridge? Well, I’ve got the perfect solution for you: growing green onions indoors using just water and a recycled bottle! It’s super easy, incredibly rewarding, and a fantastic way to reduce food waste. Let’s dive in!
What You’ll Need
Before we get started, let’s gather our supplies. This is a pretty low-key project, so you probably have most of this stuff lying around already.
* **Green Onions:** Obviously! You can use the leftover ends from a bunch you bought at the store. Make sure the roots are still attached. If they’re not, don’t worry, we can still try!
* **Plastic Bottle:** A water bottle, soda bottle, or even a juice bottle will work. Just make sure it’s clean.
* **Scissors or a Knife:** For cutting the bottle. Be careful!
* **Water:** Tap water is fine.
* **Optional: Pebbles or Gravel:** These help weigh down the bottle and provide a bit of support for the onions.
* **Optional: Liquid Fertilizer (Balanced):** A little fertilizer can boost growth, but it’s not essential.
Preparing the Bottle
Okay, let’s get our growing container ready. This is where the magic (or at least, the green onion magic) will happen!
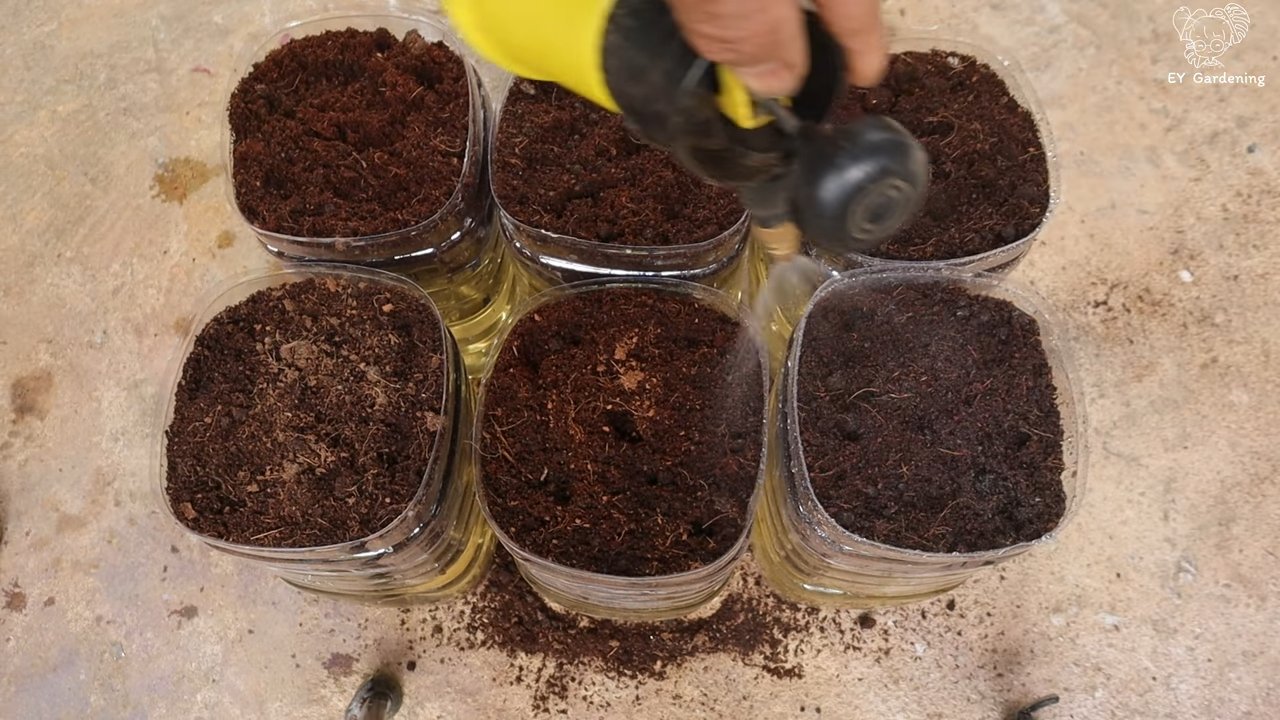
1. Clean the Bottle: First things first, give your plastic bottle a good rinse with soap and water. Make sure to remove any labels or sticky residue. We want a clean environment for our green onions to thrive.
2. Cut the Bottle: This is where the scissors or knife come in. You’ll want to cut the bottle in half. The exact location of the cut isn’t super critical, but I usually aim for about two-thirds of the way up from the bottom. You want the bottom part to be deep enough to hold water and support the onions.
3. Invert the Top (Optional): Some people like to invert the top half of the bottle into the bottom half, creating a self-watering system. If you want to try this, make sure the opening of the bottle top is narrow enough to hold the green onions upright. You might need to add some cotton or paper towels to the neck to prevent the onions from falling through. I personally prefer just using the bottom half, as it’s simpler.
4. Add Pebbles (Optional): If you’re using pebbles or gravel, add a layer to the bottom of the bottle. This will help weigh it down and provide some drainage.
Planting the Green Onions
Now for the fun part: planting! This is where we give those little green onion ends a new lease on life.
1. Prepare the Green Onion Ends: If you’re using leftover green onion ends, trim off any dead or mushy parts. You want to keep about 2-3 inches of the white part with the roots attached. If there are no roots, don’t despair! Sometimes they’ll still grow.
2. Place the Green Onions in the Bottle: Arrange the green onion ends in the bottle, root-side down (if they have roots). If you’re using the inverted bottle method, carefully insert the green onions into the opening of the bottle top.
3. Add Water: Pour water into the bottle until it covers the roots (or the bottom inch or so of the white part if there are no roots). Be careful not to overwater; you don’t want the green onions to rot.
4. Add Fertilizer (Optional): If you’re using liquid fertilizer, add a few drops to the water according to the package instructions. Don’t overdo it! Too much fertilizer can harm the plants.
Caring for Your Green Onions
Okay, the hard part is over! Now it’s just a matter of providing the right environment and watching your green onions grow.
1. Location, Location, Location: Place your bottle of green onions in a sunny spot. A windowsill is ideal. Green onions need at least 6 hours of sunlight per day to thrive. If you don’t have a sunny spot, you can use a grow light.
2. Water Regularly: Check the water level every day or two and add more water as needed to keep the roots submerged. Change the water completely every week or so to prevent algae growth.
3. Rotate the Bottle: To ensure even growth, rotate the bottle every few days. This will prevent the green onions from leaning towards the light.
4. Harvesting: You can start harvesting your green onions as soon as they’re long enough to use. Simply snip off the green tops with scissors. The green onions will continue to grow from the base, so you can harvest them multiple times.
5. Fertilize (Optional): If you’re using fertilizer, add a few drops to the water every few weeks.
Troubleshooting
Sometimes things don’t go exactly as planned. Here are a few common problems you might encounter and how to fix them.
* Yellowing Leaves: This could be a sign of overwatering, underwatering, or lack of nutrients. Make sure you’re watering properly and consider adding a little fertilizer.
* Slow Growth: This could be due to lack of sunlight or nutrients. Move the bottle to a sunnier spot and add some fertilizer.
* Rotting: This is usually caused by overwatering. Make sure the roots aren’t constantly submerged in water. Change the water more frequently.
* Algae Growth: Algae can grow in the water, especially in sunny locations. This isn’t harmful to the green onions, but it can be unsightly. Change the water more frequently and consider using a darker bottle.
Extending the Life of Your Green Onions
While green onions grown in water won’t last forever, you can extend their lifespan with a few simple tricks.
* Repotting: After a few weeks, the green onions might start to look a little tired. You can repot them in soil to give them a boost. Simply plant the green onions in a pot filled with potting soil and water regularly.
* Starting New Ones: The easiest way to keep a steady supply of green onions is to start new ones every few weeks. That way, you’ll always have fresh green onions on hand.
Why This Works (The Science Behind It!)
You might be wondering, “How can green onions grow in just water?” Well, it’s all thanks to the magic of hydroponics! Hydroponics is a method of growing plants without soil, using water and nutrients. Green onions are particularly well-suited to hydroponic growing because they have shallow roots and don’t require a lot of support.
The water provides the green onions with the moisture they need to survive, and the nutrients (either from the leftover onion itself or from added fertilizer) provide them with the building blocks they need to grow. The sunlight provides the energy for photosynthesis, which is the process by which plants convert light energy into chemical energy.
Beyond Green Onions: Other Veggies to Regrow
The beauty of this method is that you can apply it to other vegetables too! Here are a few other veggies I’ve successfully regrown using water:
* Celery: Place the celery base in a shallow dish of water and watch it sprout new leaves.
* Lettuce: Similar to celery, place the lettuce base in water and wait for new growth.
* Garlic Sprouts: Plant a garlic clove in water and harvest the green sprouts for a mild garlic flavor.
* Bok Choy: Regrow bok choy from its base in water, just like lettuce and celery.
Final Thoughts
Growing green onions in water is a fun, easy, and rewarding project that anyone can do. It’s a great way to reduce food waste, save money, and add a little bit of green to your home. So, grab a plastic bottle, some green onion ends, and get growing! You’ll be amazed at how quickly and easily you can grow your own fresh green onions. Happy gardening!
Conclusion
So, there you have it! Transforming humble plastic bottles into a thriving green onion garden is not just a fun project; it’s a sustainable, cost-effective, and incredibly rewarding way to ensure you always have fresh green onions at your fingertips. Forget those sad, wilted bunches from the grocery store – with this simple DIY trick, you’ll be snipping vibrant, flavorful green onions whenever you need them.
But why is this method a must-try? Beyond the obvious convenience, growing green onions in bottles offers several compelling advantages. First, it’s an excellent way to recycle and repurpose plastic bottles, reducing waste and contributing to a more eco-friendly lifestyle. Second, it’s incredibly space-efficient, making it perfect for apartment dwellers or anyone with limited gardening space. You can easily place your bottle gardens on a windowsill, balcony, or even a well-lit countertop. Third, it’s surprisingly low-maintenance. Once established, your green onions require minimal care, primarily just regular watering and occasional fertilization. Finally, and perhaps most importantly, the taste of homegrown green onions is simply superior to store-bought varieties. The flavor is fresher, more vibrant, and adds a delightful zing to any dish.
Don’t be afraid to experiment with variations! Try using different types of plastic bottles – larger bottles can accommodate more green onions, while smaller bottles are perfect for individual servings. You can also explore different growing mediums, such as coco coir or perlite, to see which works best for you. Consider adding a small amount of slow-release fertilizer to the soil to provide your green onions with a steady supply of nutrients. For a decorative touch, paint or decorate your bottles to match your home décor. You can even create a vertical garden by hanging multiple bottle gardens from a wall or fence.
This DIY project is not just about growing green onions; it’s about connecting with nature, embracing sustainability, and enjoying the satisfaction of creating something with your own hands. It’s a simple yet powerful way to bring a touch of green into your life and elevate your culinary creations.
We wholeheartedly encourage you to give this DIY trick a try. It’s easy, affordable, and incredibly rewarding. Once you experience the joy of harvesting your own fresh green onions, you’ll never look at a plastic bottle the same way again. And most importantly, we want to hear about your experience! Share your photos, tips, and variations in the comments below. Let’s create a community of green onion enthusiasts and inspire others to embrace this sustainable and delicious way of gardening. So, grab those plastic bottles, gather your supplies, and get ready to grow your own supply of fresh, flavorful **green onions**! Happy gardening!
Frequently Asked Questions (FAQ)
1. What kind of plastic bottles are best for growing green onions?
The best plastic bottles for growing green onions are those that are clean, sturdy, and have a wide enough opening to easily plant the green onion bulbs or sets. Clear or translucent bottles are preferable as they allow you to monitor the soil moisture levels. Avoid using bottles that have contained harmful chemicals or pesticides. Soda bottles, water bottles, and juice bottles are all good options. Make sure to thoroughly wash and rinse the bottles before using them to remove any residue.
2. What type of soil should I use for growing green onions in bottles?
A well-draining potting mix is ideal for growing green onions in bottles. Avoid using garden soil, as it can be too heavy and compact, hindering root growth. A good potting mix will provide adequate drainage and aeration, preventing waterlogging and root rot. You can also amend the potting mix with compost or other organic matter to improve its fertility and water-holding capacity. A mix of equal parts potting soil, compost, and perlite is a great option.
3. How often should I water my green onions grown in bottles?
Water your green onions regularly, keeping the soil consistently moist but not waterlogged. The frequency of watering will depend on factors such as the weather, the size of the bottle, and the type of soil you’re using. Check the soil moisture levels regularly by sticking your finger into the soil. If the top inch of soil feels dry, it’s time to water. Water thoroughly until excess water drains out of the bottom of the bottle. Avoid overwatering, as this can lead to root rot.
4. How much sunlight do green onions need when grown in bottles?
Green onions need at least 6 hours of sunlight per day to thrive. Place your bottle gardens in a sunny location, such as a windowsill, balcony, or patio. If you don’t have access to enough natural sunlight, you can supplement with artificial grow lights. Position the grow lights close to the plants and provide them with 12-14 hours of light per day. Rotate the bottles regularly to ensure that all sides of the plants receive adequate sunlight.
5. How do I harvest green onions from my bottle garden?
You can start harvesting green onions when they are about 6-8 inches tall. Simply snip off the green tops with scissors or a knife, leaving about an inch of the white base intact. The green onions will continue to grow, allowing you to harvest them multiple times. Avoid pulling out the entire plant, as this will prevent further growth. Harvest only what you need, and the remaining green onions will continue to grow and provide you with a continuous supply.
6. Can I grow green onions from scraps in bottles?
Yes, you can easily grow green onions from scraps in bottles. After using green onions in your cooking, save the white bulb ends with the roots attached. Place the bulb ends in a glass of water, ensuring that the roots are submerged. Change the water every day or two. After a few days, you’ll notice new green shoots emerging from the top of the bulbs. Once the roots have grown a few inches long, you can transplant the bulb ends into your bottle garden.
7. How do I fertilize green onions grown in bottles?
Green onions benefit from regular fertilization. You can use a liquid fertilizer diluted to half strength or a slow-release fertilizer. Apply the fertilizer according to the package instructions. Avoid over-fertilizing, as this can burn the roots. You can also amend the soil with compost or other organic matter to provide your green onions with a steady supply of nutrients.
8. Are there any pests or diseases that affect green onions grown in bottles?
Green onions are generally resistant to pests and diseases, but they can occasionally be affected by aphids, thrips, or onion maggots. Inspect your plants regularly for signs of infestation. If you notice any pests, you can try spraying them with insecticidal soap or neem oil. To prevent diseases, ensure that your plants have good air circulation and avoid overwatering.
9. How long will green onions last when grown in bottles?
With proper care, green onions can last for several months when grown in bottles. However, they will eventually start to decline in productivity. When this happens, you can either start a new batch of green onions from scraps or purchase new bulbs or sets.
10. Can I grow other herbs or vegetables in bottles using the same method?
Yes, you can grow other herbs and vegetables in bottles using the same method. Some good options include lettuce, spinach, basil, mint, and parsley. Choose plants that have shallow roots and don’t require a lot of space. Be sure to provide the plants with adequate sunlight, water, and nutrients.
Leave a Comment