
Growing chili on balcony gardens is easier than you might think, and I’m here to show you how! Forget those expensive supermarket chilies that lack that homegrown zest. Imagine stepping onto your balcony and plucking fresh, fiery peppers whenever you need a kick of flavor. Sounds amazing, right?
Chili peppers have a rich history, dating back thousands of years in the Americas. They weren’t just a food source; they were used in medicine, rituals, and even as currency! Today, they’re a staple in cuisines worldwide, adding heat and depth to countless dishes. But why settle for store-bought when you can cultivate your own vibrant chili garden, even in a small space?
Many people shy away from gardening, especially in urban environments, thinking it’s too complicated or time-consuming. But growing chili on balcony spaces is incredibly rewarding and doesn’t require a green thumb of expert level. This DIY guide will provide you with simple, effective tricks and hacks to ensure a bountiful harvest. From choosing the right pot size and soil to understanding watering needs and pest control, I’ll walk you through every step. Get ready to transform your balcony into a chili paradise and enjoy the satisfaction of growing your own delicious, spicy peppers!
Growing Chili on the Balcony: Your DIY Guide for a Spicy Harvest
Hey chili lovers! Do you dream of your own chili harvest right on your balcony? Then you’ve come to the right place! I’ll show you how to grow your own hot peppers with a few simple steps and a little patience. Don’t worry, it’s easier than you think!
What You Need: The Checklist for Your Chili Garden
Before we get started, let’s make sure you have everything ready. Here is a list of the most important things:
- Chili Seeds: Choose your favorite varieties! Whether it’s Jalapeño, Habanero, or a milder type – the selection is huge. Look for high-quality seeds from a trusted supplier.
- Seed Starting Mix: Special seed starting mix is low in nutrients and loose, ideal for seed germination.
- Seed Starting Pots or Trays: Small pots or trays where you can start the seeds.
- Larger Pots: Once the chili plants get bigger, they need more space. Choose pots with a diameter of at least 20 cm.
- Potting Soil: High-quality potting soil with good drainage is important for the growth of the plants.
- Fertilizer: Special chili fertilizer or tomato fertilizer provides the plants with the necessary nutrients.
- Watering Can or Spray Bottle: For watering the plants.
- Plant Labels: To keep track of which variety is growing where.
- Optional: Mini-greenhouse or plastic wrap to speed up germination.
- Optional: A trellis or support if your chili variety grows very tall.
Phase 1: Starting the Seeds – The Foundation for Your Chili Harvest
Starting seeds is an important step to get healthy and strong chili plants. I usually start in February or March so the plants have enough time to grow big by summer.
- Prepare Seeds: You can let the seeds soak in lukewarm water for a few hours before sowing. This is said to speed up germination. I don’t always do this, but it can’t hurt.
- Fill Seed Starting Pots: Fill the seed starting pots with seed starting mix. Press the soil down lightly.
- Sow Seeds: Place 1-2 seeds per pot on the soil. Cover the seeds with a thin layer of soil (approx. 0.5 cm).
- Water: Gently moisten the soil with a spray bottle. The soil should be damp, but not wet.
- Place in a Warm and Bright Spot: Place the seed starting pots in a warm and bright location. A temperature of 22-28°C is ideal. A mini-greenhouse or plastic wrap can help to increase the temperature and humidity.
- Be Patient: Now it’s time to wait! Germination can take 1-3 weeks, depending on the variety and temperature. Keep the soil moist and ventilate the greenhouse or plastic wrap regularly to prevent mold.
Phase 2: Pricking Out – Giving the Little Chili Plants More Space
Once the chili plants have developed their first true leaves (after the cotyledons), it’s time to prick them out. This means you transplant the small plants into larger pots so they have more space to grow.
- Preparation: Fill larger pots (approx. 8-10 cm in diameter) with potting soil.
- Carefully Lift Plants: Gently loosen the soil around the chili plants with a pricking-out tool or a spoon. Carefully lift the plants out of the seed starting pot without damaging the roots.
- Planting: Place the chili plants in the prepared pots. The plants can be set a little deeper than before.
- Water: Water the plants gently.
- Bright Location: Place the pricked-out plants in a bright, but not too sunny, spot.
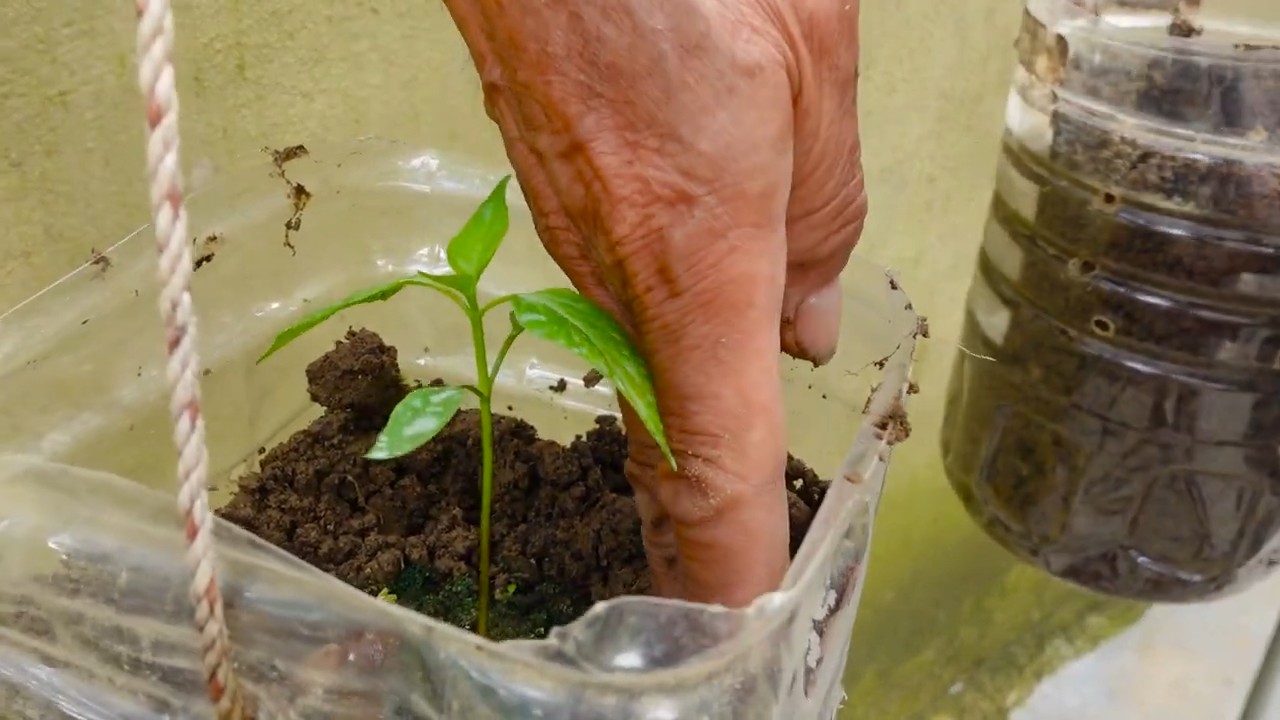
Phase 3: Repotting and Moving to the Balcony – Finally Out in the Sun!
When the chili plants are big enough (approx. 15-20 cm high) and the temperatures outside are mild enough (no more risk of frost!), they can be moved to their final pots on the balcony. I usually wait until mid-May, after the last frost, to be safe.
- Prepare Pots: Choose pots with a diameter of at least 20 cm. Fill the pots with high-quality potting soil. Ensure good drainage so that water can drain well. A layer of expanded clay at the bottom of the pot can help.
- Repot Plants: Carefully remove the chili plants from their pots. Gently loosen the roots.
- Planting: Place the chili plants in the prepared pots. Fill the pots with soil and press down lightly.
- Water: Water the plants thoroughly.
- Choose a Location: Place the pots in a sunny and warm spot on the balcony. Chili plants love the sun! Make sure the location is sheltered from the wind.
- Acclimate to the Sun Slowly: If the plants have only been indoors so far, you should slowly acclimate them to the sun. Initially, place them in the sun for only a few hours and then gradually increase the time. This will prevent sunburn.
Phase 4: Care – So Your Chili Plants Thrive Magnificently
Proper care is crucial for a bountiful chili harvest. Here are a few tips you should follow:
- Watering: Water the chili plants regularly, especially on hot days. The soil should always be slightly moist, but not wet. Avoid waterlogging, as this can lead to root rot. It’s best to water in the morning or evening when the sun is not as strong.
- Fertilizing: Fertilize the chili plants regularly with special chili fertilizer or tomato fertilizer. Start fertilizing about 2-3 weeks after repotting. Follow the instructions on the fertilizer package.
- Pruning (Pinching): For some chili varieties, it can be beneficial to pinch off the side shoots. This promotes the growth of the main stems and the formation of fruit.
- Pest Control: Watch out for pests like aphids or spider mites. If infested, you can treat the plants with a natural pesticide.
- Support: If your chili variety grows very tall, a support or trellis can be useful to hold up the plants.
- Pollination: Chili plants are self-pollinators, but you can assist pollination by gently shaking the flowers or pollinating them with a brush.
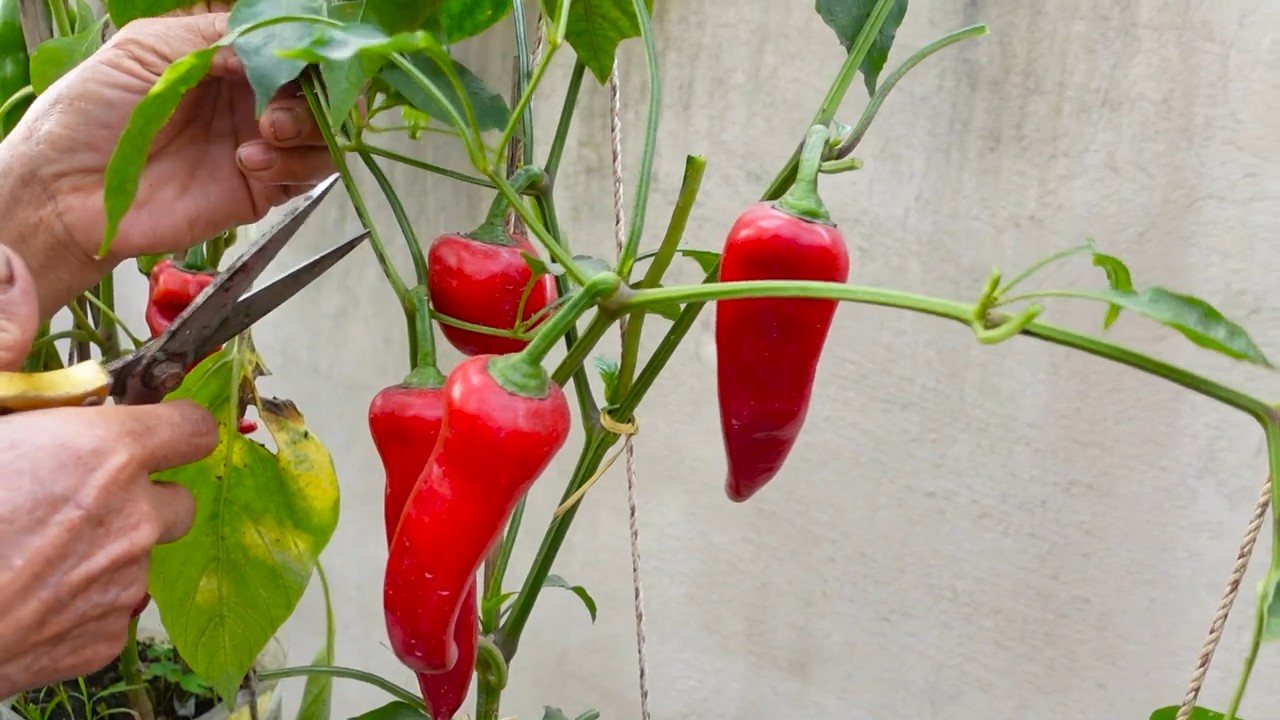
Phase 5: Harvest – The Reward for Your Effort!
The time has finally come! The chili peppers are ripe and can be harvested. The ripening time depends on the variety. Most chili varieties are ripe when they have reached their final color (e.g., red, yellow, or orange).
Processing: You can use the chili peppers fresh, dry them, pickle them, or make them into sauces and powders.
Harvesting: Cut the chili peppers with scissors or a knife. It’s best to wear gloves to avoid skin irritation.
Conclusion
So, there you have it! Growing chili on your balcony isn’t just a whimsical dream; it’s a tangible reality waiting to be cultivated. We’ve walked you through the essentials, from selecting the perfect chili variety for container gardening to nurturing your plants with the right soil, sunlight, and watering techniques. We’ve even tackled common challenges like pests and diseases, arming you with the knowledge to keep your chili plants thriving.
But why is this DIY trick a must-try? Because it’s more than just growing peppers; it’s about connecting with nature, even in the heart of the city. It’s about experiencing the satisfaction of nurturing a plant from seed to harvest, and then enjoying the fruits (or rather, the chilies!) of your labor. It’s about adding a touch of vibrant color and spicy flavor to your life, all while reducing your carbon footprint and knowing exactly where your food comes from.
Beyond the basic guidelines, the possibilities for variation are endless. Experiment with different chili varieties to find your perfect heat level and flavor profile. Try companion planting with herbs like basil or oregano to deter pests and enhance the flavor of your chilies. Get creative with your container choices, using recycled materials or decorative pots to add a personal touch to your balcony garden. Consider adding a small trellis or support structure for taller chili varieties to keep them upright and productive. You can even explore hydroponic or aquaponic systems for a more advanced and efficient growing experience.
Growing chili on your balcony is a journey of discovery, and we encourage you to embark on it! Don’t be afraid to experiment, learn from your mistakes, and most importantly, have fun. The reward of fresh, homegrown chilies is well worth the effort.
We’re confident that with a little patience and dedication, you’ll be harvesting a bountiful crop of chilies in no time. And when you do, we want to hear all about it! Share your experiences, tips, and photos with us in the comments below. Let’s create a community of balcony chili growers, sharing our knowledge and inspiring each other to cultivate even greener and spicier urban spaces. So, grab your seeds, pots, and soil, and get ready to experience the joy of growing your own chilies! Let’s get those balconies bursting with vibrant color and fiery flavor!
Frequently Asked Questions (FAQ)
What are the best chili varieties to grow on a balcony?
Choosing the right chili variety is crucial for successful balcony gardening. Compact varieties that thrive in containers are ideal. Some excellent choices include:
* **Thai Chilies:** These are small, prolific, and pack a significant punch of heat. They are well-suited for containers and produce a continuous harvest.
* **Jalapeños:** A classic choice, jalapeños are relatively easy to grow and offer a moderate level of heat. They are also versatile in the kitchen.
* **Serrano Peppers:** Similar to jalapeños but with a slightly higher heat level, serranos are another great option for container gardening.
* **Habaneros:** If you’re looking for intense heat, habaneros can be grown in containers, but they require more attention and a longer growing season.
* **Cayenne Peppers:** These long, slender peppers are known for their fiery flavor and are perfect for drying and making chili powder.
* **Poblano Peppers:** While larger than some other varieties, poblanos can be successfully grown in larger containers and offer a mild, smoky flavor.
Consider your climate and personal preference for heat level when selecting your chili varieties.
How much sunlight do chili plants need on a balcony?
Chili plants are sun-loving and require at least 6-8 hours of direct sunlight per day to thrive. If your balcony doesn’t receive enough direct sunlight, you may need to supplement with grow lights. Position your chili plants in the sunniest spot on your balcony, and rotate them regularly to ensure even exposure to sunlight. If you live in a particularly hot climate, you may need to provide some afternoon shade to prevent the plants from overheating.
What type of soil is best for growing chili plants in containers?
Well-draining soil is essential for growing chili plants in containers. A good potting mix should be light, airy, and rich in organic matter. Avoid using garden soil, as it can become compacted in containers and impede drainage. You can create your own potting mix by combining equal parts of peat moss, perlite, and vermiculite. Alternatively, you can purchase a commercially available potting mix specifically formulated for vegetables or container gardening. Adding compost to your potting mix will provide essential nutrients and improve drainage.
How often should I water my chili plants on a balcony?
Watering frequency will depend on several factors, including the size of your container, the type of soil, the climate, and the stage of growth of your plants. As a general rule, water your chili plants when the top inch of soil feels dry to the touch. Avoid overwatering, as this can lead to root rot. When watering, water deeply until water drains out of the bottom of the container. During hot weather, you may need to water your plants more frequently.
How do I fertilize my chili plants on a balcony?
Chili plants are heavy feeders and require regular fertilization to produce a bountiful harvest. Use a balanced fertilizer with an NPK ratio of 10-10-10 or 14-14-14. Start fertilizing your plants a few weeks after transplanting them into their containers. Follow the instructions on the fertilizer package for application rates. You can also use organic fertilizers, such as compost tea or fish emulsion. Avoid over-fertilizing, as this can burn the roots of your plants.
How do I protect my chili plants from pests and diseases on a balcony?
Balcony gardens are generally less susceptible to pests and diseases than in-ground gardens, but it’s still important to take preventative measures. Regularly inspect your plants for signs of pests or diseases. Common pests that affect chili plants include aphids, spider mites, and whiteflies. You can control these pests with insecticidal soap or neem oil. Diseases that can affect chili plants include powdery mildew and fungal leaf spots. Improve air circulation around your plants and avoid overhead watering to prevent these diseases. You can also use fungicides to control fungal diseases.
When can I harvest my chilies?
The time it takes for chilies to mature will depend on the variety. Generally, chilies are ready to harvest when they have reached their mature color and size. The color will vary depending on the variety, but common colors include green, red, yellow, and orange. The chilies should also feel firm to the touch. Use pruning shears or scissors to harvest the chilies, cutting them off at the stem.
Can I grow chili plants indoors if my balcony doesn’t get enough sunlight?
Yes, you can grow chili plants indoors if your balcony doesn’t get enough sunlight. However, you will need to provide supplemental lighting with grow lights. Place the grow lights about 6-12 inches above the plants and keep them on for 14-16 hours per day. You will also need to ensure that your plants receive adequate ventilation and humidity.
How do I overwinter my chili plants on a balcony?
If you live in a climate with cold winters, you can overwinter your chili plants indoors. Before the first frost, prune back your plants and transplant them into smaller containers. Bring the plants indoors and place them in a sunny location. Water sparingly during the winter months. In the spring, gradually acclimate the plants to outdoor conditions before transplanting them back into their larger containers.
What if my chili plant is not producing any chilies?
There could be several reasons why your chili plant is not producing chilies. Common causes include insufficient sunlight, lack of pollination, nutrient deficiencies, and stress. Ensure that your plant is receiving at least 6-8 hours of direct sunlight per day. You can hand-pollinate the flowers by gently shaking the plant or using a small brush to transfer pollen from one flower to another. Fertilize your plant with a balanced fertilizer to provide essential nutrients. Protect your plant from stress by providing adequate water and avoiding extreme temperatures.
Leave a Comment