
Growing carrots in bags might sound a little unconventional, right? But trust me, it’s a game-changer for anyone who dreams of harvesting sweet, crunchy carrots without the hassle of extensive garden space or battling rocky soil. For centuries, gardeners have toiled, amending soil and fighting pests to get that perfect carrot. While traditional methods have their charm, sometimes a little DIY ingenuity is exactly what we need!
Have you ever dug up a carrot only to find it’s stunted, forked, or riddled with pests? It’s heartbreaking! That’s where this clever trick comes in. Growing carrots in bags offers a controlled environment, allowing you to create the ideal soil conditions and protect your precious crop from unwanted critters. Plus, it’s perfect for apartment dwellers, balcony gardeners, or anyone with limited space. Imagine the satisfaction of plucking fresh, vibrant carrots from your own little bag garden – it’s easier than you think, and I’m here to show you how!
This DIY guide will walk you through every step, from choosing the right bag and soil mix to watering and harvesting. Get ready to unlock the secrets to bountiful carrot harvests, no matter where you live!
Growing Carrots in Bags: A Bumper Crop on Your Patio!
Hey there, fellow gardening enthusiasts! Are you dreaming of fresh, crunchy carrots but short on garden space? Well, I’ve got fantastic news: you can absolutely grow carrots in bags! It’s a super rewarding and surprisingly easy way to enjoy homegrown goodness, even if you only have a balcony or patio. I’ve been doing this for a few years now, and I’m excited to share my secrets to success with you.
Why Grow Carrots in Bags?
Before we dive into the how-to, let’s quickly cover why this method is so great:
* Space-Saving: Perfect for small spaces like balconies, patios, or even a sunny windowsill.
* Control Over Soil: You get to choose the perfect soil mix, ensuring optimal drainage and nutrient content.
* Fewer Pests: Bags can help deter some soil-borne pests that might attack carrots in the ground.
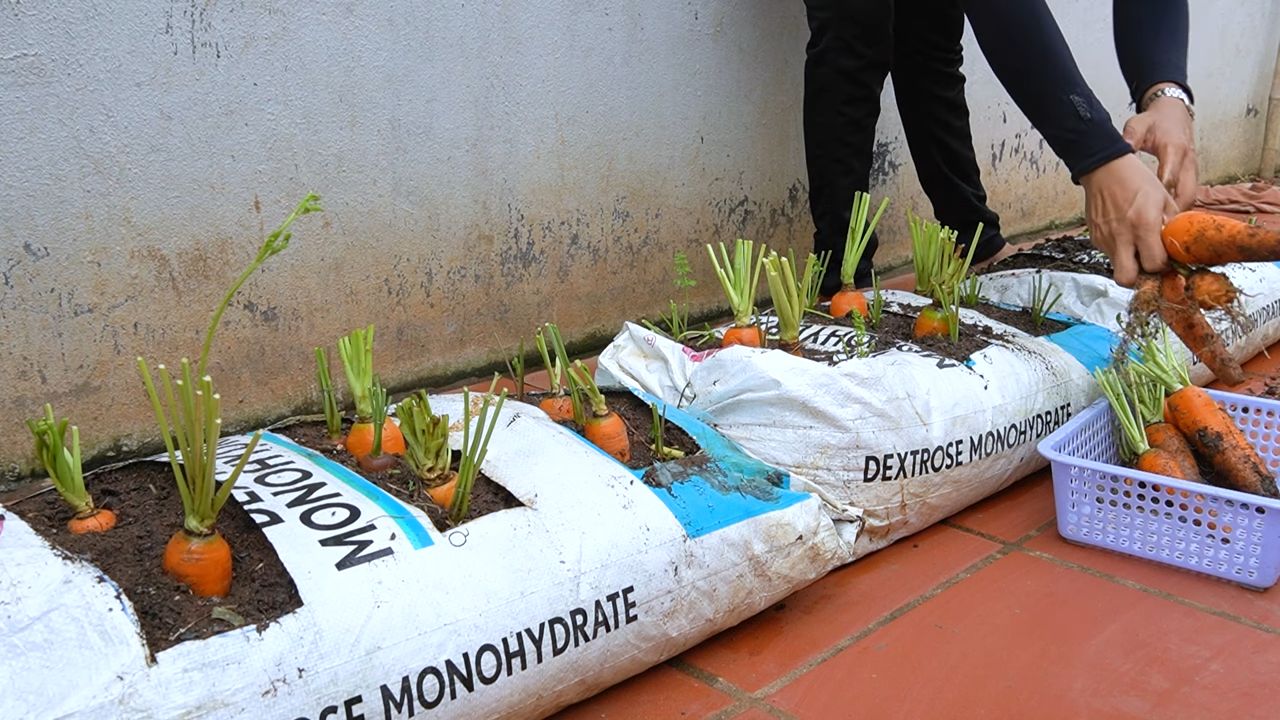
* Easy Harvesting: No more struggling to dig up carrots from compacted soil! Just tip the bag and harvest.
* Early Start: You can start your carrots indoors earlier in the season, giving them a head start.
What You’ll Need
Okay, let’s gather our supplies. Here’s what you’ll need to get started:
* Large Bags: Choose sturdy bags that are at least 12 inches in diameter and 12 inches deep. Fabric grow bags are ideal because they allow for good drainage and aeration, but you can also use heavy-duty plastic bags (just make sure to add drainage holes). I personally prefer the 15-gallon fabric grow bags.
* Potting Mix: This is crucial! Carrots need loose, well-draining soil. Avoid using garden soil, as it’s often too heavy and can cause stunted or misshapen carrots. I recommend a mix of:
* 1 part peat moss or coco coir (for moisture retention)
* 1 part perlite or vermiculite (for drainage and aeration)
* 1 part compost (for nutrients)
* Carrot Seeds: Choose a variety that’s suitable for container growing. Shorter, rounder varieties like ‘Thumbelina,’ ‘Paris Market,’ or ‘Little Finger’ are excellent choices.
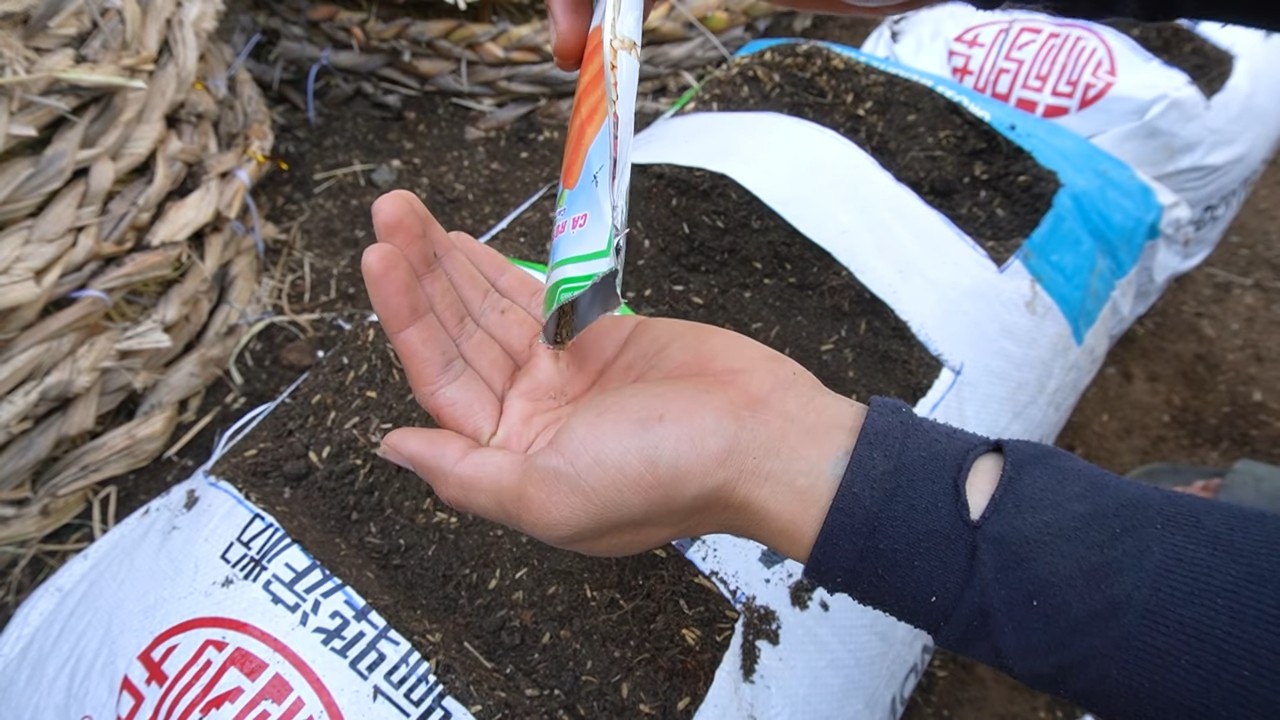
* Slow-Release Fertilizer: A balanced slow-release fertilizer will provide your carrots with the nutrients they need throughout the growing season. Look for one with an NPK ratio of around 5-10-10.
* Watering Can or Hose: For regular watering.
* Trowel or Small Shovel: For filling the bags with soil.
* Optional:
* Seed starting tray (if starting seeds indoors)
* Heat mat (to speed up germination indoors)
* Grow lights (if starting seeds indoors)
Step-by-Step Guide: Planting Your Carrots
Alright, let’s get our hands dirty! Here’s how to plant your carrots in bags:
1. Prepare the Bags
* Choose Your Location: Select a sunny spot that receives at least 6-8 hours of direct sunlight per day.
* Drainage: If you’re using plastic bags, poke several drainage holes in the bottom. Fabric grow bags already provide excellent drainage.
* Fill the Bags: Gradually fill the bags with your prepared potting mix, leaving about 2-3 inches of space at the top. Gently tap the sides of the bag to settle the soil.
2. Sowing the Seeds
* Water the Soil: Moisten the soil thoroughly before sowing the seeds. This will help with germination.
* Sow the Seeds: Carrot seeds are tiny, so it’s easy to sow them too thickly. To avoid overcrowding, sprinkle the seeds thinly over the surface of the soil. Aim for about 1/2 inch spacing between seeds.
* Cover the Seeds: Lightly cover the seeds with a thin layer (about 1/4 inch) of potting mix or vermiculite.
* Water Gently: Water the soil again very gently, using a watering can with a fine rose attachment. Avoid washing away the seeds.
3. Germination and Early Care
* Keep the Soil Moist: The soil needs to stay consistently moist during germination. Check the soil daily and water as needed.
* Warmth: Carrot seeds germinate best in temperatures between 65-75°F (18-24°C). If you’re starting seeds indoors, a heat mat can help speed up germination.
* Light: Once the seedlings emerge (usually in 7-14 days), they’ll need plenty of light. If you’re growing them indoors, place them under grow lights or in a very sunny window.
* Thinning: This is crucial for healthy carrot development! Once the seedlings are about 1-2 inches tall, thin them out so that they are about 2-3 inches apart. This will give the carrots enough space to grow without competing for resources. It might feel brutal, but trust me, it’s necessary! I usually use small scissors to snip the unwanted seedlings at the soil line.
Caring for Your Carrots
Now that your carrots are growing, here’s how to keep them happy and healthy:
1. Watering
* Consistent Moisture: Carrots need consistent moisture to develop properly. Water deeply whenever the top inch of soil feels dry to the touch.
* Avoid Overwatering: Overwatering can lead to root rot, so make sure the bags have good drainage.
* Watering Time: Water in the morning to allow the foliage to dry before nightfall, which can help prevent fungal diseases.
2. Fertilizing
* Slow-Release Fertilizer: The slow-release fertilizer you added at planting will provide a good base of nutrients.
* Liquid Fertilizer: You can supplement with a liquid fertilizer every 2-3 weeks. Use a balanced fertilizer or one that’s slightly higher in phosphorus and potassium (the second and third numbers in the NPK ratio). I like to use a seaweed emulsion or fish emulsion.
3. Sunlight
* Full Sun: Carrots need at least 6-8 hours of direct sunlight per day. If you’re growing them indoors, make sure they’re under strong grow lights.
4. Pest and Disease Control
* Carrot Rus
Hey there, fellow gardening enthusiasts! Are you dreaming of fresh, crunchy carrots but short on garden space? Well, I’ve got fantastic news: you can absolutely grow carrots in bags! It’s a super rewarding and surprisingly easy way to enjoy homegrown goodness, even if you only have a balcony or patio. I’ve been doing this for a few years now, and I’m excited to share my secrets to success with you.
Why Grow Carrots in Bags?
Before we dive into the how-to, let’s quickly cover why this method is so great:
* Space-Saving: Perfect for small spaces like balconies, patios, or even a sunny windowsill.
* Control Over Soil: You get to choose the perfect soil mix, ensuring optimal drainage and nutrient content.
* Fewer Pests: Bags can help deter some soil-borne pests that might attack carrots in the ground.
* Easy Harvesting: No more struggling to dig up carrots from compacted soil! Just tip the bag and harvest.
* Early Start: You can start your carrots indoors earlier in the season, giving them a head start.
What You’ll Need
Okay, let’s gather our supplies. Here’s what you’ll need to get started:
* Large Bags: Choose sturdy bags that are at least 12 inches in diameter and 12 inches deep. Fabric grow bags are ideal because they allow for good drainage and aeration, but you can also use heavy-duty plastic bags (just make sure to add drainage holes). I personally prefer the 15-gallon fabric grow bags.
* Potting Mix: This is crucial! Carrots need loose, well-draining soil. Avoid using garden soil, as it’s often too heavy and can cause stunted or misshapen carrots. I recommend a mix of:
* 1 part peat moss or coco coir (for moisture retention)
* 1 part perlite or vermiculite (for drainage and aeration)
* 1 part compost (for nutrients)
* Carrot Seeds: Choose a variety that’s suitable for container growing. Shorter, rounder varieties like ‘Thumbelina,’ ‘Paris Market,’ or ‘Little Finger’ are excellent choices.
* Slow-Release Fertilizer: A balanced slow-release fertilizer will provide your carrots with the nutrients they need throughout the growing season. Look for one with an NPK ratio of around 5-10-10.
* Watering Can or Hose: For regular watering.
* Trowel or Small Shovel: For filling the bags with soil.
* Optional:
* Seed starting tray (if starting seeds indoors)
* Heat mat (to speed up germination indoors)
* Grow lights (if starting seeds indoors)
Step-by-Step Guide: Planting Your Carrots
Alright, let’s get our hands dirty! Here’s how to plant your carrots in bags:
1. Prepare the Bags
* Choose Your Location: Select a sunny spot that receives at least 6-8 hours of direct sunlight per day.
* Drainage: If you’re using plastic bags, poke several drainage holes in the bottom. Fabric grow bags already provide excellent drainage.
* Fill the Bags: Gradually fill the bags with your prepared potting mix, leaving about 2-3 inches of space at the top. Gently tap the sides of the bag to settle the soil.
2. Sowing the Seeds
* Water the Soil: Moisten the soil thoroughly before sowing the seeds. This will help with germination.
* Sow the Seeds: Carrot seeds are tiny, so it’s easy to sow them too thickly. To avoid overcrowding, sprinkle the seeds thinly over the surface of the soil. Aim for about 1/2 inch spacing between seeds.
* Cover the Seeds: Lightly cover the seeds with a thin layer (about 1/4 inch) of potting mix or vermiculite.
* Water Gently: Water the soil again very gently, using a watering can with a fine rose attachment. Avoid washing away the seeds.
3. Germination and Early Care
* Keep the Soil Moist: The soil needs to stay consistently moist during germination. Check the soil daily and water as needed.
* Warmth: Carrot seeds germinate best in temperatures between 65-75°F (18-24°C). If you’re starting seeds indoors, a heat mat can help speed up germination.
* Light: Once the seedlings emerge (usually in 7-14 days), they’ll need plenty of light. If you’re growing them indoors, place them under grow lights or in a very sunny window.
* Thinning: This is crucial for healthy carrot development! Once the seedlings are about 1-2 inches tall, thin them out so that they are about 2-3 inches apart. This will give the carrots enough space to grow without competing for resources. It might feel brutal, but trust me, it’s necessary! I usually use small scissors to snip the unwanted seedlings at the soil line.
Caring for Your Carrots
Now that your carrots are growing, here’s how to keep them happy and healthy:
1. Watering
* Consistent Moisture: Carrots need consistent moisture to develop properly. Water deeply whenever the top inch of soil feels dry to the touch.
* Avoid Overwatering: Overwatering can lead to root rot, so make sure the bags have good drainage.
* Watering Time: Water in the morning to allow the foliage to dry before nightfall, which can help prevent fungal diseases.
2. Fertilizing
* Slow-Release Fertilizer: The slow-release fertilizer you added at planting will provide a good base of nutrients.
* Liquid Fertilizer: You can supplement with a liquid fertilizer every 2-3 weeks. Use a balanced fertilizer or one that’s slightly higher in phosphorus and potassium (the second and third numbers in the NPK ratio). I like to use a seaweed emulsion or fish emulsion.
3. Sunlight
* Full Sun: Carrots need at least 6-8 hours of direct sunlight per day. If you’re growing them indoors, make sure they’re under strong grow lights.
4. Pest and Disease Control
* Carrot Rust Fly: This is a common pest that can damage carrot roots. To prevent it, cover your bags with insect netting.
* Aphids: These tiny pests can suck the sap from carrot leaves. Blast them off with a strong stream of water or use insecticidal soap.
* Fungal Diseases: To prevent fungal diseases, avoid overwatering and ensure good air circulation around the plants.
5. Crop Rotation
* Avoid Planting in the Same Soil: If you’re reusing bags, avoid planting carrots in the same soil year after year. This can help prevent the buildup of soil-borne diseases.
Harvesting Your Carrots
The moment we’ve all been waiting for! Here’s how to harvest your homegrown carrots:
* Maturity Time: Carrot varieties vary in their maturity time, but most are ready to harvest in 60-80 days. Check the seed packet for specific information.
* Check the Size: Gently brush away some of the soil around the base of the plant to check the size of the carrot.
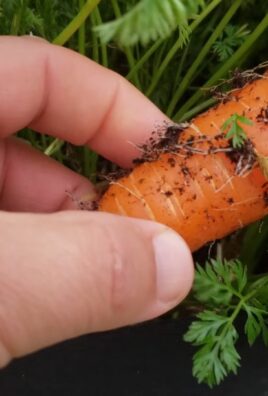
* Harvesting: To harvest, gently pull the carrot straight up from the soil. If the soil is dry, water it beforehand to make it easier to pull the carrots.
* Enjoy! Wash your freshly harvested carrots and enjoy them raw, roasted, or in your favorite recipes.
Troubleshooting
Even with the best care, you might encounter some challenges. Here are a few common problems and how to fix them:
* Stunted Carrots: This can be caused by compacted soil, lack of nutrients, or overcrowding. Make sure you’re using a loose, well-draining potting mix, fertilizing regularly, and thinning the seedlings properly.
* Forked Carrots: This is often caused by rocks or other obstacles in the soil. Remove any rocks or debris from the potting mix before planting.
* Bitter Carrots: This can be caused by inconsistent watering or high temperatures. Water regularly and provide shade during the hottest part of the day.
* Pests and Diseases: Regularly inspect your plants for pests and diseases and take action promptly.
Tips for Success
Here are a few extra tips to help you grow the best carrots possible:
* Choose the Right Variety: As I mentioned earlier, shorter, rounder varieties are best for container growing.
* Don’t Overcrowd: Thinning is essential for healthy carrot development.
* Water Consistently: Carrots need consistent moisture to thrive.
Conclusion
So, there you have it! Growing carrots in bags isn’t just a quirky gardening experiment; it’s a game-changer for anyone with limited space, poor soil, or a hankering for fresh, homegrown goodness. We’ve walked you through the simple steps, highlighted the benefits, and hopefully, inspired you to ditch the traditional garden bed (at least for a few carrots!).
Why is this DIY trick a must-try? Because it democratizes gardening. It removes the barriers of needing acres of land or perfectly loamy soil. It’s accessible to apartment dwellers, balcony gardeners, and anyone who wants to experience the joy of harvesting their own vibrant, sweet carrots. Imagine the satisfaction of pulling those bright orange roots from the bag, knowing you nurtured them from seed to table. That’s a feeling worth chasing.
But the beauty of this method lies in its adaptability. Feel free to experiment! Try different carrot varieties – Nantes for classic sweetness, Chantenay for shorter, sturdier roots, or even colorful heirloom varieties for a visual feast. Consider adding companion plants like marigolds or basil to your bags to deter pests and enhance flavor. You can also adjust the size of your bags to accommodate different carrot types or the amount of space you have available.
Don’t be afraid to get creative with your container choices, either. While we’ve focused on grow bags, you can also use large buckets, plastic tubs (with drainage holes, of course!), or even repurposed burlap sacks. The key is to ensure adequate drainage and enough space for the carrots to develop.
And speaking of development, remember that patience is key. Carrots take time to mature, so don’t be discouraged if you don’t see immediate results. Keep the soil consistently moist, provide plenty of sunlight, and thin the seedlings as needed. The reward of freshly harvested, homegrown carrots is well worth the wait.
Ultimately, **growing carrots in bags** is about more than just producing food; it’s about connecting with nature, learning new skills, and enjoying the simple pleasures of life. It’s a sustainable, rewarding, and surprisingly easy way to bring the garden to your doorstep.
So, what are you waiting for? Grab some seeds, a bag, and some soil, and get started on your carrot-growing adventure today! We’re confident you’ll be amazed by the results. And most importantly, we want to hear about your experience! Share your photos, tips, and triumphs in the comments below. Let’s build a community of bag-grown carrot enthusiasts and inspire others to embrace this fantastic DIY trick. Happy gardening!
Frequently Asked Questions (FAQ)
What kind of soil should I use for growing carrots in bags?
The ideal soil for growing carrots in bags is a well-draining, loose, and fertile mix. Carrots need room to grow downwards, and compacted soil can lead to stunted or misshapen roots. A good starting point is a mix of equal parts potting soil, compost, and sand or perlite. The potting soil provides a base for nutrients, the compost adds organic matter and improves drainage, and the sand or perlite helps to keep the soil loose and prevents compaction. Avoid using garden soil directly in your bags, as it can be too heavy and may contain pests or diseases. You can also purchase specialized vegetable potting mixes that are formulated for optimal growth. Remember to amend the soil with a slow-release fertilizer at planting time to provide a steady supply of nutrients throughout the growing season.
How often should I water my carrots grown in bags?
Watering frequency depends on several factors, including the weather, the size of your bag, and the type of soil you’re using. Generally, you should aim to keep the soil consistently moist, but not waterlogged. Check the soil moisture level regularly by sticking your finger about an inch into the soil. If it feels dry to the touch, it’s time to water. During hot, dry weather, you may need to water daily, while in cooler, wetter conditions, you can water less frequently. When watering, water deeply and slowly, allowing the water to soak into the soil and reach the roots. Avoid watering from above, as this can lead to fungal diseases. A soaker hose or drip irrigation system can be a great way to provide consistent moisture to your carrots.
How much sunlight do carrots need when grown in bags?
Carrots need at least six hours of direct sunlight per day to thrive. Choose a location for your bags that receives plenty of sunlight throughout the day. If you live in a particularly hot climate, you may want to provide some afternoon shade to prevent the soil from drying out too quickly. If you’re growing carrots indoors, you’ll need to supplement with grow lights to provide adequate light. Rotate the bags regularly to ensure that all sides of the plants receive equal sunlight. Insufficient sunlight can lead to leggy growth and poor root development.
What are some common pests and diseases that affect carrots grown in bags, and how can I prevent them?
Carrot rust flies, aphids, and nematodes are common pests that can affect carrots. To prevent these pests, consider using companion planting. Marigolds, for example, can deter nematodes, while onions and garlic can repel aphids and carrot rust flies. You can also use row covers to protect your carrots from pests. Regularly inspect your plants for signs of infestation and take action promptly if you notice any problems. Diseases such as leaf blight and powdery mildew can also affect carrots. To prevent these diseases, ensure good air circulation around your plants and avoid overwatering. If you notice any signs of disease, remove the affected leaves immediately.
How do I know when my carrots are ready to harvest?
The time it takes for carrots to mature depends on the variety you’re growing, but generally, they’re ready to harvest in 60-80 days. You can check the size of the carrots by gently digging around the top of the root. The diameter of the carrot at the crown should be about 1/2 to 3/4 inch for most varieties. You can also harvest a few carrots early to check their size and flavor. To harvest, gently loosen the soil around the carrot and pull it straight up. If the soil is dry, water it beforehand to make it easier to pull the carrots.
Can I reuse the soil from my carrot bags for other plants?
Yes, you can reuse the soil from your carrot bags, but it’s important to amend it before planting other crops. Carrots can deplete the soil of nutrients, so you’ll need to replenish them with compost or fertilizer. You should also check the soil for any signs of pests or diseases and take action accordingly. If you’re planning to grow other root vegetables in the same soil, make sure to loosen it up and remove any remaining carrot roots. You can also use the soil as a soil amendment in your garden beds.
What are some good companion plants for carrots grown in bags?
Companion planting can help to improve the growth and flavor of your carrots, as well as deter pests and diseases. Some good companion plants for carrots include:
* **Marigolds:** Repel nematodes and other soil pests.
* **Onions and Garlic:** Repel aphids and carrot rust flies.
* **Rosemary:** Deters carrot rust flies.
* **Sage:** Deters carrot rust flies.
* **Lettuce:** Provides shade and helps to keep the soil cool.
* **Radishes:** Help to break up the soil and make it easier for carrots to grow.
* **Beans:** Fix nitrogen in the soil, which benefits carrots.
Can I grow carrots in bags indoors?
Yes, you can grow carrots in bags indoors, but you’ll need to provide them with adequate light. Carrots need at least six hours of direct sunlight per day, so you’ll likely need to supplement with grow lights. Choose a sunny window or set up a grow light system to provide the necessary light. Make sure to rotate the bags regularly to ensure that all sides of the plants receive equal light. You’ll also need to monitor the soil moisture level carefully, as indoor environments can be drier than outdoor environments.
What if my carrots are forked or misshapen?
Forked or misshapen carrots are often caused by compacted soil or rocks in the soil. Carrots need loose, well-draining soil to grow properly. If your carrots are forked or misshapen, try amending the soil with compost and sand or perlite to improve drainage and loosen it up. You should also remove any rocks or debris from the soil. Another possible cause of forked carrots is nematode infestation. If you suspect nematodes, consider using a soil amendment that contains beneficial nematodes or planting marigolds as a companion plant.
Leave a Comment