
Growing Cabbage in Bottles might sound like something out of a science fiction novel, but trust me, it’s a surprisingly effective and space-saving method for cultivating this leafy green! Have you ever dreamed of harvesting fresh, crisp cabbage right from your balcony or even your kitchen countertop? Well, this DIY trick makes that dream a reality, even if you’re short on garden space.
While the exact origins of bottle gardening are a bit hazy, the concept of utilizing unconventional containers for growing plants has been around for centuries. Think of the ancient hanging gardens or even the more recent trend of upcycling materials during times of resource scarcity. It’s a testament to human ingenuity and our innate desire to connect with nature, regardless of our circumstances.
But why should you bother growing cabbage in bottles? Well, for starters, it’s incredibly space-efficient, perfect for apartment dwellers or anyone with limited gardening real estate. It also allows for better control over soil conditions and pest management, leading to healthier and more productive plants. Plus, let’s be honest, it’s a fantastic conversation starter! In this article, I’ll guide you through the simple steps of this innovative gardening technique, ensuring you can enjoy homegrown cabbage, no matter where you live. Get ready to unleash your inner gardener and transform those empty bottles into thriving cabbage patches!
Kohl im Flaschengarten: Dein DIY-Guide für Mini-Kohlköpfe
Hey Gärtnerfreunde! Habt ihr Lust auf ein ungewöhnliches Gartenprojekt? Ich zeige euch heute, wie ihr Kohl in Flaschen ziehen könnt – ja, richtig gelesen! Das ist nicht nur platzsparend, sondern auch ein echter Hingucker. Und das Beste: Ihr könnt den ganzen Prozess von Anfang bis Ende beobachten. Los geht’s!
Was du brauchst: Die Materialliste
Bevor wir loslegen, hier eine Liste mit allem, was du benötigst:
* Plastikflaschen: Am besten eignen sich 1,5- oder 2-Liter-Flaschen. Je größer die Flasche, desto mehr Platz hat der Kohl. Denk dran, sie gründlich zu reinigen!
* Kohl-Samen: Wähle eine Kohlsorte, die für den Anbau in Containern geeignet ist. Frühkohl oder Mini-Kohlköpfe sind ideal.
* Anzuchterde: Diese Erde ist nährstoffarm und locker, perfekt für die Keimung.
* Blumenerde: Nachdem die Keimlinge etwas größer sind, brauchen sie nährstoffreichere Erde.
* Schere oder Messer: Zum Zuschneiden der Flaschen. Sei vorsichtig!
* Sprühflasche: Zum Befeuchten der Erde.
* Gießkanne: Für die spätere Bewässerung.
* Drainagematerial: Kleine Steine, Kies oder Blähton für den Boden der Flasche.
* Optional: Flüssigdünger für Gemüse (organisch, wenn möglich).
Phase 1: Die Vorbereitung der Flaschen
Die Flaschen sind unser Zuhause für den Kohl, also müssen wir sie gut vorbereiten.
1. Reinigung: Spüle die Plastikflaschen gründlich mit warmem Wasser und Spülmittel aus. Achte darauf, alle Rückstände zu entfernen. Gut trocknen lassen.
2. Zuschneiden: Schneide die Flasche etwa 10-15 cm unterhalb des Flaschenhalses ab. Du kannst den oberen Teil (den Flaschenhals) später umgedreht als eine Art Mini-Gewächshaus verwenden, um die Keimung zu beschleunigen.
3. Drainagelöcher: Bohre oder schneide einige kleine Löcher in den Boden der Flasche. Diese sind wichtig, damit überschüssiges Wasser ablaufen kann und die Wurzeln nicht faulen.
4. Drainageschicht: Fülle eine Schicht Drainagematerial (Kies, Steine oder Blähton) auf den Boden der Flasche. Das sorgt für eine gute Drainage und verhindert Staunässe.
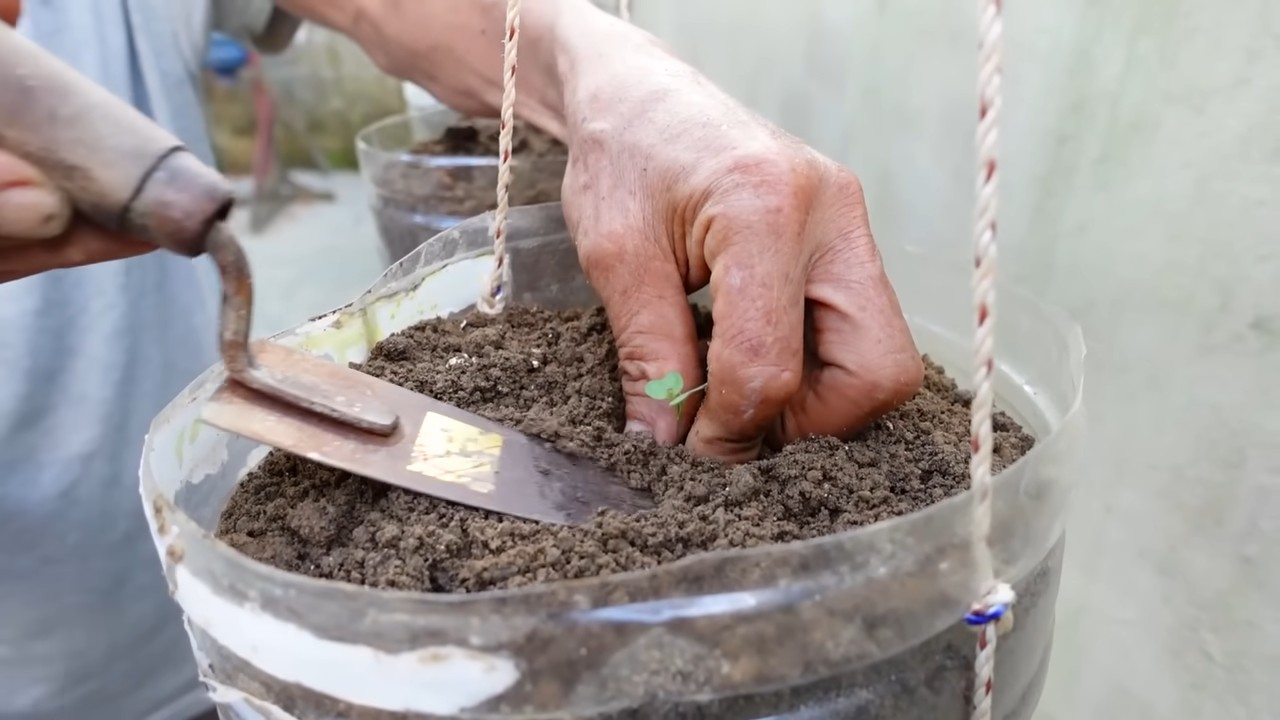
Phase 2: Die Aussaat der Kohl-Samen
Jetzt geht’s ans Eingemachte – die Aussaat!
1. Anzuchterde einfüllen: Fülle die Flasche mit Anzuchterde bis etwa 2-3 cm unter den Rand. Drücke die Erde leicht an.
2. Samen aussäen: Verteile die Kohl-Samen gleichmäßig auf der Erde. Achte darauf, sie nicht zu dicht zu säen, da die Pflanzen sonst um Platz konkurrieren. Ich säe meistens 3-4 Samen pro Flasche.
3. Samen bedecken: Bedecke die Samen mit einer dünnen Schicht Anzuchterde (ca. 0,5 cm).
4. Bewässerung: Befeuchte die Erde vorsichtig mit einer Sprühflasche. Die Erde sollte feucht, aber nicht nass sein.
5. Mini-Gewächshaus (optional): Setze den abgeschnittenen Flaschenhals umgedreht auf die Flasche. Das erhöht die Luftfeuchtigkeit und beschleunigt die Keimung. Denk daran, den “Deckel” regelmäßig zu lüften, um Schimmelbildung zu vermeiden.
Phase 3: Die Pflege der Keimlinge
Die ersten grünen Spitzen sind da! Jetzt ist es wichtig, die kleinen Pflänzchen gut zu pflegen.
1. Standort: Stelle die Flaschen an einen hellen, warmen Ort. Ein sonniges Fensterbrett ist ideal.
2. Bewässerung: Halte die Erde feucht, aber nicht nass. Gieße regelmäßig mit einer Sprühflasche oder einer Gießkanne mit feinem Strahl. Vermeide Staunässe.
3. Lüften: Wenn du den Flaschenhals als Mini-Gewächshaus verwendest, lüfte ihn regelmäßig, um Schimmelbildung zu vermeiden. Nimm ihn am besten ganz ab, sobald die Keimlinge größer werden.
4. Vereinzeln: Sobald die Keimlinge ein paar Blätter haben (ca. 2-3 Wochen nach der Aussaat), musst du sie vereinzeln. Das bedeutet, dass du die schwächsten Pflänzchen entfernst, damit die stärksten genug Platz zum Wachsen haben. Lass nur ein oder zwei kräftige Pflänzchen pro Flasche stehen.
5. Umtopfen: Wenn die Keimlinge größer werden und die Anzuchterde durchwurzelt ist, ist es Zeit, sie in Blumenerde umzutopfen. Fülle die Flasche mit Blumenerde und setze die Pflänzchen vorsichtig um.
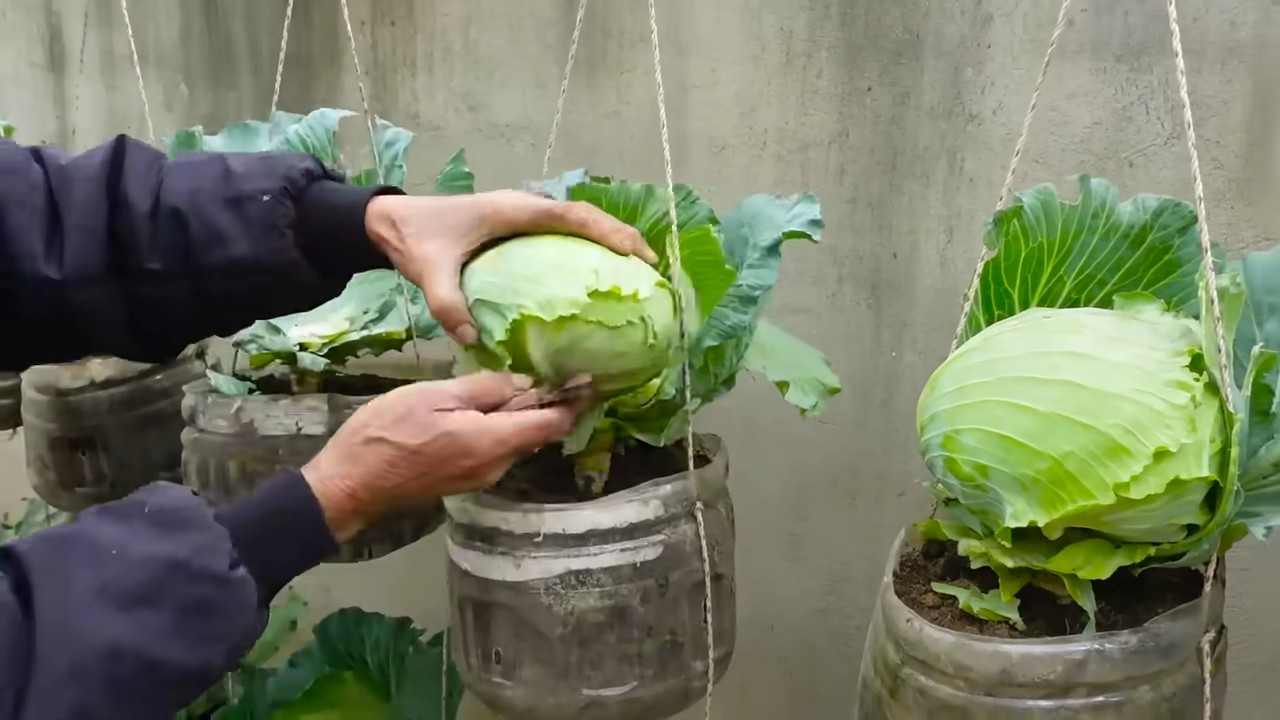
Phase 4: Die Aufzucht des Kohls
Jetzt geht’s ans Eingemachte – die Aufzucht des Kohls!
1. Standort: Stelle die Flaschen an einen hellen, warmen Ort. Ein sonniges Fensterbrett oder ein geschützter Platz im Garten oder auf dem Balkon ist ideal. Kohl braucht viel Sonne!
2. Bewässerung: Halte die Erde gleichmäßig feucht, aber nicht nass. Gieße regelmäßig, besonders an heißen Tagen.
3. Düngung: Beginne etwa 4-6 Wochen nach dem Umtopfen mit dem Düngen. Verwende einen Flüssigdünger für Gemüse und befolge die Anweisungen auf der Packung. Ich bevorzuge organische Dünger, da sie schonender für die Umwelt sind.
4. Schutz vor Schädlingen: Kontrolliere die Pflanzen regelmäßig auf Schädlinge wie Blattläuse oder Kohlweißlingsraupen. Bei Bedarf kannst du biologische Schädlingsbekämpfungsmittel einsetzen.
5. Drehen: Drehe die Flaschen regelmäßig, damit die Pflanzen gleichmäßig von allen Seiten Licht bekommen und nicht schief wachsen.
6. Unterstützung: Wenn der Kohlkopf größer wird, kann es sein, dass die Pflanze zusätzliche Unterstützung benötigt. Du kannst einen kleinen Stab oder ein Stück Draht verwenden, um die Pflanze zu stützen.
Phase 5: Die Ernte
Juhu, Erntezeit!
1. Erntezeitpunkt: Der Zeitpunkt der Ernte hängt von der Kohlsorte ab. Frühkohl kann oft schon nach 2-3 Monaten geerntet werden, während andere Sorten länger brauchen. Achte darauf, dass der Kohlkopf fest und kompakt ist.
2. Ernten: Schneide den Kohlkopf mit einem scharfen Messer oder einer Gartenschere ab. Lasse einige Blätter an der Pflanze, damit sie weiterwachsen kann.
3. Genießen: Genieße deinen selbstgezogenen Kohl! Er schmeckt besonders gut in Salaten, Suppen oder als Beilage.
Zusätzliche Tipps und Tricks
* Sortenwahl: Wähle Kohlsorten, die für den Anbau in Containern geeignet sind. Frühkohl, Mini-Kohlköpfe oder Pak Choi sind gute Optionen.
* Belüftung: Achte auf eine gute Belüftung, um Schimmelbildung zu vermeiden. Stelle die Flaschen an einen luftigen Ort und lüfte sie regelmäßig.
* Sonnenbrand: An sehr heißen Tagen kann es passieren, dass die Blätter Sonnenbrand bekommen. Schütze die Pflanzen vor direkter Mittagssonne.
* Schädlinge: Kontrolliere die Pflanzen regelmäßig auf Schädlinge und ergreife bei Bedarf Maßnahmen.
* Upcycling: Verwende alte Plastikflaschen, um Ressourcen zu schonen und die Umwelt zu schützen.
* Experimentieren: Probiere verschiedene Kohlsorten und Anbaumethoden aus, um herauszufinden, was am besten funktioniert.
Ich hoffe, dieser Guide hat dir geholfen, deinen eigenen kleinen Kohl-Garten in Flaschen anzulegen. Viel Spaß beim Gärtnern! Und denk dran: Auch kleine Gärten können große Freude bereiten!
Conclusion
So, there you have it! Growing cabbage in bottles isn’t just a quirky gardening experiment; it’s a game-changer for small spaces, a defense against pests, and a surprisingly efficient way to cultivate this nutritious vegetable. We’ve walked you through the process, from selecting the right bottle to nurturing your cabbage seedlings. The benefits are undeniable: reduced pest damage, efficient water usage, and the sheer joy of watching a cabbage thrive in an unexpected environment.
This method is particularly beneficial for urban gardeners, apartment dwellers with limited balcony space, or anyone looking to maximize their yield in a small area. Imagine the satisfaction of harvesting fresh, crisp cabbage heads from your own recycled bottles, knowing you’ve contributed to a more sustainable and resourceful way of gardening.
But don’t stop there! Experiment with different varieties of cabbage. Red cabbage, Savoy cabbage, or even smaller varieties like bok choy can all be successfully grown using this method. You can also explore different types of bottles. While we’ve focused on plastic water bottles, consider using larger juice bottles or even repurposed glass containers (with appropriate safety precautions, of course).
Consider adding companion plants to your bottle gardens. Herbs like dill or rosemary can deter pests and enhance the flavor of your cabbage. Marigolds are another excellent choice, adding a splash of color and further protecting your precious cabbage from unwanted visitors.
The key to success lies in consistent care and attention. Regularly check the moisture levels of the soil, provide adequate sunlight, and be vigilant for any signs of pests or diseases. Remember, patience is a virtue when it comes to gardening. It may take a few weeks to see significant growth, but the reward of harvesting your own homegrown cabbage will be well worth the wait.
We firmly believe that this DIY trick for growing cabbage in bottles is a must-try for any gardener, regardless of experience level. It’s a fun, educational, and ultimately rewarding way to connect with nature and enjoy the fruits (or rather, vegetables) of your labor.
Now, it’s your turn! We encourage you to give this method a try and share your experiences with us. Post pictures of your bottle gardens, share your tips and tricks, and let us know what worked (and what didn’t). Together, we can learn and grow a community of resourceful and innovative gardeners. Let’s revolutionize the way we grow cabbage, one bottle at a time! Embrace the challenge and discover the joy of growing your own fresh, delicious cabbage, even in the most unexpected of places. This method of growing cabbage is not only sustainable but also incredibly rewarding.
Frequently Asked Questions (FAQ)
What type of cabbage is best suited for growing in bottles?
While you can technically grow any type of cabbage in a bottle, smaller varieties tend to thrive best. Consider varieties like:
* **Dwarf varieties:** These are specifically bred to be compact and are ideal for container gardening.
* **Early-maturing varieties:** These varieties mature quickly, reducing the risk of them outgrowing their container.
* **Bok choy:** Although technically a Chinese cabbage, bok choy is relatively small and well-suited for bottle gardening.
* **Red cabbage:** Red cabbage can be grown, but ensure the bottle is large enough to accommodate its growth.
* **Savoy cabbage:** Similar to red cabbage, choose a smaller variety and a larger bottle.
Ultimately, the best cabbage for bottle gardening is one that fits comfortably within the container and has a relatively short growing season.
How often should I water my cabbage plants in bottles?
Watering frequency depends on several factors, including the size of the bottle, the type of soil, the climate, and the stage of growth. As a general rule, check the soil moisture daily. If the top inch of soil feels dry to the touch, it’s time to water.
Water thoroughly until excess water drains out of the bottom of the bottle. Avoid overwatering, as this can lead to root rot. During hot, dry weather, you may need to water more frequently. During cooler, wetter weather, you may need to water less frequently.
A good way to gauge the moisture level is to lift the bottle. If it feels light, it likely needs watering. If it feels heavy, it’s probably still moist enough.
What type of soil should I use for growing cabbage in bottles?
The ideal soil for growing cabbage in bottles is a well-draining, nutrient-rich potting mix. Avoid using garden soil, as it can be too heavy and compact, hindering drainage and root growth.
Look for a potting mix that contains a blend of peat moss, perlite, and vermiculite. These ingredients provide good drainage, aeration, and water retention. You can also amend the potting mix with compost or other organic matter to boost its nutrient content.
A slightly acidic to neutral pH (around 6.0 to 7.0) is ideal for cabbage. You can test the pH of your soil using a soil testing kit. If the pH is too high, you can lower it by adding sulfur or peat moss. If the pH is too low, you can raise it by adding lime.
How much sunlight do cabbage plants need when grown in bottles?
Cabbage plants need at least 6 hours of direct sunlight per day to thrive. Choose a location that receives plenty of sunlight throughout the day. If you’re growing your cabbage indoors, you may need to supplement with artificial lighting, such as grow lights.
If you live in a hot climate, you may need to provide some shade during the hottest part of the day to prevent the leaves from scorching.
Rotate the bottles regularly to ensure that all sides of the plant receive equal sunlight. This will help to prevent the plant from leaning towards the light source.
How do I protect my cabbage plants from pests and diseases when growing them in bottles?
Growing cabbage in bottles can actually help to reduce pest and disease problems, as the elevated position makes it more difficult for ground-dwelling pests to reach the plants. However, you still need to be vigilant and take preventative measures.
* **Inspect your plants regularly:** Check for signs of pests or diseases, such as holes in the leaves, discoloration, or wilting.
* **Use organic pest control methods:** If you find pests, try using organic pest control methods, such as insecticidal soap or neem oil.
* **Ensure good air circulation:** Good air circulation can help to prevent fungal diseases.
* **Remove any diseased leaves:** If you find any diseased leaves, remove them immediately to prevent the disease from spreading.
* **Companion planting:** Plant herbs like dill or rosemary near your cabbage to deter pests.
* **Netting:** Cover the bottles with netting to prevent cabbage white butterflies from laying eggs on the leaves.
Can I fertilize my cabbage plants grown in bottles?
Yes, fertilizing your cabbage plants is essential for healthy growth and a good harvest. Use a balanced fertilizer that is specifically formulated for vegetables.
Start fertilizing your plants a few weeks after transplanting them into the bottles. Follow the instructions on the fertilizer packaging for application rates.
You can also use organic fertilizers, such as compost tea or fish emulsion. These fertilizers are gentle on the plants and provide a slow-release source of nutrients.
Avoid over-fertilizing, as this can lead to excessive foliage growth and reduced head formation.
How do I know when my cabbage is ready to harvest from the bottles?
Cabbage is ready to harvest when the head is firm and compact. The size of the head will vary depending on the variety.
To harvest, simply cut the head off at the base of the plant using a sharp knife. Leave the roots in the bottle, as they can decompose and provide nutrients to the soil.
After harvesting the main head, some varieties of cabbage will produce smaller side shoots that can also be harvested.
What are some variations I can try when growing cabbage in bottles?
* **Vertical gardening:** Create a vertical garden by stacking multiple bottles on top of each other.
* **Hydroponics:** Grow your cabbage hydroponically in bottles using a nutrient-rich water solution.
* **Aquaponics:** Combine cabbage growing with fish farming in a closed-loop system.
* **Different bottle sizes:** Experiment with different bottle sizes to see which works best for different varieties of cabbage.
* **Different growing mediums:** Try using different growing mediums, such as coco coir or perlite.
The possibilities are endless! Don’t be afraid to experiment and find what works best for you. Remember, growing cabbage in bottles is all about having fun and learning along the way.
Leave a Comment