
Grow wheatgrass with water – sounds too good to be true, right? I thought so too, until I discovered this incredibly simple and rewarding DIY project! Forget messy soil and complicated setups. This method lets you cultivate vibrant, nutrient-rich wheatgrass using just water, a container, and some patience.
Wheatgrass has a fascinating history, dating back to ancient Egypt and Mesopotamia, where it was revered for its healing properties. Today, it’s a popular health food, packed with vitamins, minerals, and antioxidants. But buying it pre-grown can be expensive and often lacks that fresh, vibrant flavor. That’s where this DIY trick comes in!
Why should you learn to grow wheatgrass with water? Because it’s a game-changer! Imagine having a constant supply of fresh wheatgrass juice for your smoothies, or adding a vibrant green garnish to your meals. This method is not only cost-effective but also incredibly convenient, especially if you live in an apartment or have limited outdoor space. Plus, it’s a fantastic way to connect with nature and experience the joy of growing your own food, even on a small scale. I’m excited to share this easy and effective technique with you, so let’s get started!
Growing Wheatgrass with Only Water: A Simple DIY Guide
Hello, dear plant friends! Do you feel like growing your own wheatgrass, completely without soil? It’s easier than you think and a great way to bring fresh, healthy greens into your kitchen. I’ll show you how!
What you need:
- Wheat seeds: Organic wheat seeds, specifically for growing wheatgrass, are best. Make sure they are untreated.
- A container: A flat dish, a tray, or a special wheatgrass growing container. It’s important that it has holes for water drainage or you have a way to pour off excess water.
- Water: Clean, filtered water is ideal.
- A sieve or a fine-mesh cloth: For rinsing the seeds.
- A dark place: For the germination phase.
- A bright place: For the growth phase (but not in direct, harsh sun).
- Spray bottle: To keep the seeds and grass moist.
- Patience: Wheatgrass needs a few days to grow.
Step-by-Step Guide:
Phase 1: Preparing the Seeds
- Soak the seeds: Put the wheat seeds in a large jar or bowl. Add plenty of water so the seeds are well covered. Let them soak for 8-12 hours (or overnight). Soaking softens the seed coat and speeds up the germination process. I usually do this in the evening, so they are ready in the morning.
- Rinse the seeds: After soaking, drain the water and rinse the seeds thoroughly with fresh water. Use a sieve or a fine-mesh cloth for this. Make sure all residues are removed.
- Let the seeds sprout: Put the rinsed seeds back into the jar or bowl. Cover the opening with a cloth or a lid (don’t seal it completely, so air can circulate) and place the jar in a dark place. Rinse the seeds 2-3 times a day with fresh water and let the water drain well each time. This prevents mold. After 1-2 days, the seeds should form small roots.
Phase 2: Sowing and Starting the Wheatgrass
- Prepare the container: If you are using a container without holes, place a layer of pebbles or expanded clay at the bottom to avoid waterlogging. This is important so the roots don’t rot.
- Sow the seeds: Distribute the sprouted seeds evenly on the bottom of the container. They should be close together, but not on top of each other. A dense sowing ensures a nice, full field of wheatgrass.
- Moisten: Spray the seeds thoroughly with water. They should be moist, but not drenched.
- Cover: Cover the container with a lid, plastic wrap, or a damp cloth. This creates high humidity, which promotes growth. Place the container in a dark place.
- Moisten regularly: Spray the seeds 2-3 times a day with water to keep them moist. Make sure that no mold forms. If you discover mold, remove the affected areas immediately and ensure better ventilation.
Phase 3: Growth and Care
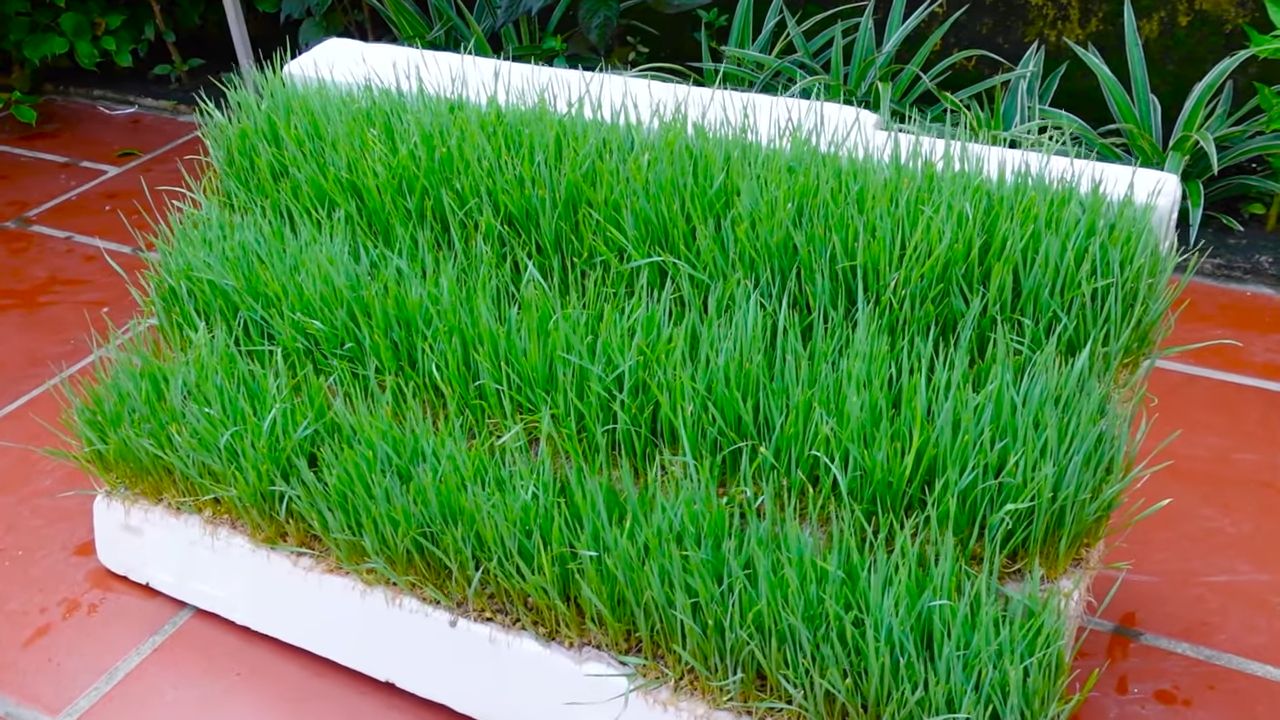
- Bring to light: After 2-3 days, when the seeds have sprouted and show small green shoots, you can move the container to a bright place. However, avoid direct sunlight, as it can burn the young plants. A windowsill that is not directly exposed to the sun is ideal.
- Continue to moisten: Continue to spray the wheatgrass 2-3 times a day with water. Make sure the bottom is always moist.
- Water (optional): If you are using a container with holes, you can also water the wheatgrass from below. Place the container in a tray of water and let the water be absorbed from the bottom. After about 30 minutes, pour off the excess water.
- Observe and enjoy: The wheatgrass will now grow quickly. After about 7-10 days, it is ready for harvest. It should be about 10-15 cm high.
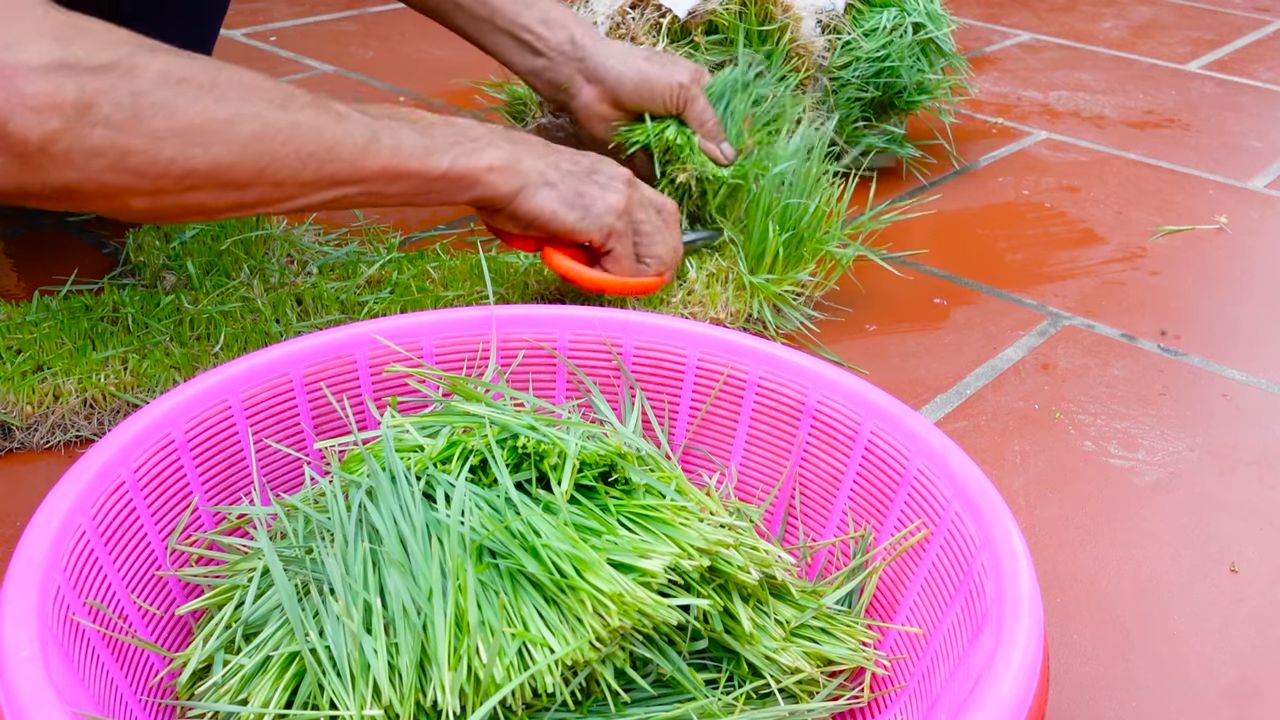
Harvest and Use
- Harvest: Cut the wheatgrass with scissors or a knife just above the base. Only harvest as much as you need at the moment.
- Use: Wheatgrass can be used in various ways:
- Wheatgrass juice: The classic! Juice the wheatgrass with a juicer and drink the juice immediately. It is rich in vitamins, minerals, and enzymes.
- Smoothies: Add a handful of wheatgrass to your smoothie. It gives it a green color and a healthy kick.
- Salads: Chop the wheatgrass and add it to your salad.
- Garnish: Use the wheatgrass as a garnish for your dishes.
Tips and Tricks for a Successful Wheatgrass Project:
- Hygiene is important: Make sure all utensils are clean to prevent mold.
- Not too much water: Avoid waterlogging, as this can lead to rot.
- Regular ventilation: Ensure good ventilation to prevent mold.
- Try different varieties: There are different wheat varieties suitable for growing wheatgrass. Try different ones to find out which you like best.
- Start multiple containers: Start several containers of wheatgrass so you always have a fresh supply.
- The right amount: Start with a small amount of wheatgrass to see how you tolerate it. Wheatgrass juice can take some getting used to at first.
- Don’t throw it away: The roots and cut stems can be composted.
Common Problems and Solutions:
Slow growth: Slow growth can be a sign of too little water, too little light, or temperatures that are too low. Ensure sufficient water, light, and warmth.
Mold growth: Mold is a common problem when growing wheatgrass. To avoid mold, ensure good hygiene, regular ventilation, and avoid waterlogging. If you discover mold, remove the affected areas immediately and spray the wheatgrass with a solution of water and apple cider vinegar (10:1 ratio).
Yellowing leaves: Yellowing leaves can be a sign of a nutrient deficiency or too little light. Move the wheatgrass to a brighter location and, if necessary, fertilize it with an organic fertilizer.
Conclusion
So, there you have it! Growing your own wheatgrass with just water is not only incredibly simple, but it’s also a rewarding and cost-effective way to access a powerhouse of nutrients right in your own home. Forget expensive juice bar trips or pre-packaged wheatgrass shots that often come with a hefty price tag and questionable freshness. This DIY method puts you in complete control, ensuring you’re getting the purest, most vibrant wheatgrass possible.
Why is this a must-try? Because it’s accessible to everyone, regardless of gardening experience. You don’t need a green thumb, fancy equipment, or a sprawling garden. All you need is wheatgrass seeds, water, a tray, and a little patience. The process is therapeutic, connecting you to the natural world and providing a sense of accomplishment as you watch your tiny seeds sprout and flourish into a lush green carpet.
Beyond the simplicity and cost-effectiveness, consider the health benefits. Freshly grown wheatgrass is packed with vitamins, minerals, antioxidants, and enzymes that can boost your energy levels, support your immune system, and promote overall well-being. Incorporating it into your daily routine, whether juiced, blended into smoothies, or simply chewed, can be a game-changer for your health.
Looking for variations? Experiment with different types of trays or containers. You can use plastic trays, glass dishes, or even repurposed containers like yogurt tubs (just make sure they have drainage holes). You can also try growing your wheatgrass in different locations in your home to see which spot provides the optimal light and temperature for growth. Some people prefer to grow their wheatgrass indoors under grow lights, while others find that a sunny windowsill works just as well.
Another variation is to experiment with different soaking times for the seeds. Some people find that soaking the seeds for longer periods (up to 12 hours) helps to improve germination rates. You can also try adding a small amount of hydrogen peroxide to the soaking water to help prevent mold growth.
Don’t be afraid to get creative with how you use your harvested wheatgrass. While juicing is the most common method, you can also add it to salads, soups, or even use it as a garnish. Some people even use wheatgrass pulp as a natural face mask!
We wholeheartedly encourage you to give this DIY wheatgrass growing method a try. It’s a fun, easy, and rewarding project that will provide you with a constant supply of fresh, nutritious wheatgrass. Once you experience the satisfaction of growing your own wheatgrass and the health benefits it provides, you’ll never go back to store-bought options.
And most importantly, we want to hear about your experience! Share your photos, tips, and tricks in the comments below. Let us know what worked for you, what challenges you faced, and how you’re incorporating your homegrown wheatgrass into your daily routine. Together, we can create a community of wheatgrass enthusiasts and inspire others to embrace this simple and sustainable way to boost their health and well-being. So, grab your seeds, water, and tray, and get growing! You’ll be amazed at how easy it is to cultivate your own little patch of green goodness. Remember, the key to successful **wheatgrass with water** cultivation is patience and consistency. Happy growing!
Frequently Asked Questions (FAQ)
What kind of wheatgrass seeds should I use?
The best type of wheatgrass seeds to use are hard red winter wheat seeds. These seeds are readily available online or at most health food stores. Make sure to purchase seeds that are specifically labeled for growing wheatgrass, as some wheat seeds are treated with chemicals that are not safe for consumption. Organic wheatgrass seeds are always a good choice to ensure you’re getting the purest product. Avoid using seeds that are old or damaged, as they may not germinate properly.
How much wheatgrass seed should I use per tray?
The amount of wheatgrass seed you need will depend on the size of your tray. A good rule of thumb is to use about 1/4 to 1/2 cup of seeds per 10×20 inch tray. You want to spread the seeds evenly across the tray, but not so densely that they are overcrowded. Overcrowding can lead to mold growth and poor air circulation. It’s better to err on the side of using slightly fewer seeds than too many.
How often should I water my wheatgrass?
You should water your wheatgrass at least once a day, and possibly twice a day depending on the humidity and temperature in your home. The goal is to keep the soil consistently moist, but not soggy. Overwatering can lead to mold growth, while underwatering can cause the wheatgrass to dry out and die. A good way to check if your wheatgrass needs watering is to stick your finger into the soil. If the soil feels dry to the touch, it’s time to water. When watering, be sure to water gently to avoid disturbing the seeds or seedlings.
How much light does wheatgrass need?
Wheatgrass needs plenty of light to grow properly. Ideally, it should receive at least 4-6 hours of direct sunlight per day. If you don’t have a sunny windowsill, you can use grow lights to supplement the natural light. Place the grow lights about 6-12 inches above the wheatgrass and keep them on for 12-16 hours per day. Insufficient light can result in pale, weak wheatgrass.
How long does it take for wheatgrass to grow?
Wheatgrass typically takes about 7-10 days to grow to a harvestable height. The exact time will depend on the temperature, humidity, and light conditions in your home. You’ll know your wheatgrass is ready to harvest when it’s about 6-8 inches tall and has a vibrant green color.
How do I harvest wheatgrass?
To harvest wheatgrass, simply cut it with scissors or a sharp knife about 1/2 inch above the soil line. You can harvest the entire tray at once, or you can harvest it in sections as needed. It’s best to harvest wheatgrass in the morning, as this is when it’s at its peak nutritional value.
How do I store harvested wheatgrass?
Harvested wheatgrass is best used immediately, but it can be stored in the refrigerator for up to a week. To store it, wrap it in a damp paper towel and place it in a plastic bag or container. This will help to keep it fresh and prevent it from drying out.
What if my wheatgrass gets moldy?
Mold growth is a common problem when growing wheatgrass, especially in humid environments. To prevent mold growth, make sure to provide good air circulation, avoid overwatering, and use clean trays and seeds. If you do notice mold growth, remove the affected areas immediately. You can also try spraying the wheatgrass with a diluted solution of hydrogen peroxide (1 part hydrogen peroxide to 10 parts water). If the mold growth is severe, it’s best to discard the entire tray and start over.
Can I regrow wheatgrass after harvesting?
Wheatgrass can be regrown after harvesting, but the second harvest will typically be less nutritious and less abundant than the first. To regrow wheatgrass, simply continue to water it as usual after harvesting. You may also want to add a small amount of fertilizer to the water to help replenish the nutrients in the soil.
Is it safe to eat the roots of wheatgrass?
While the green blades of wheatgrass are safe and nutritious to consume, it’s generally not recommended to eat the roots. The roots can be difficult to digest and may contain bacteria or mold. It’s best to discard the roots after harvesting the wheatgrass.

Leave a Comment