
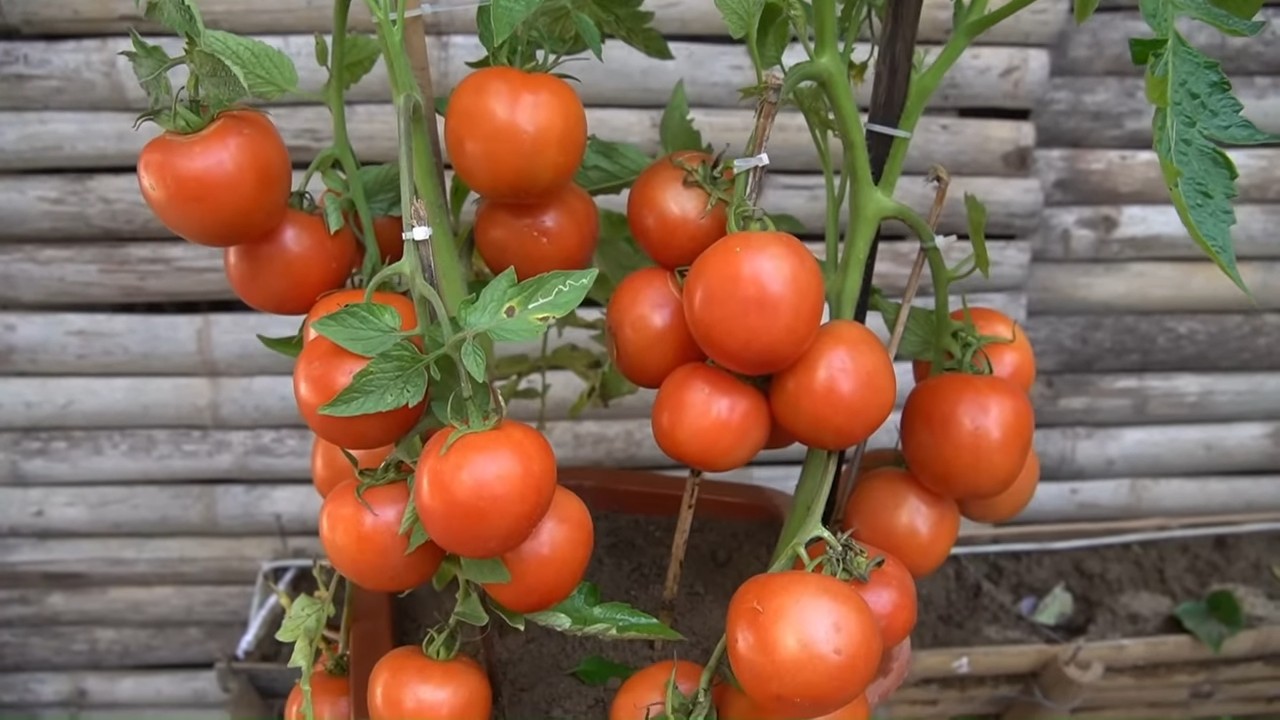
Grow tomatoes on a wall? Sounds like something out of a futuristic garden, right? Well, it’s not as far-fetched as you might think! Imagine juicy, sun-ripened tomatoes cascading down your patio wall, a vibrant and delicious living tapestry. Forget those sprawling vines taking over your garden; we’re talking vertical gardening magic!
For centuries, humans have sought innovative ways to cultivate food, especially in limited spaces. From the hanging gardens of Babylon to modern-day urban farms, the desire to connect with nature and grow our own food has always been strong. This DIY project taps into that very spirit, offering a unique and space-saving solution for tomato lovers everywhere.
Let’s be honest, traditional tomato gardening can be a bit of a hassle. Dealing with staking, pruning, and potential ground pests can be time-consuming and frustrating. But what if you could bypass all that and still enjoy the taste of homegrown tomatoes? That’s where this DIY trick comes in. By learning how to grow tomatoes on a wall, you’ll not only save space but also create a stunning visual feature in your outdoor area. Plus, it’s a fantastic conversation starter! I’m excited to share this simple, yet effective method that will transform your gardening experience. Get ready to impress your friends and family with your green thumb and enjoy a bountiful harvest of delicious, wall-grown tomatoes!
DIY Vertical Tomato Garden: Grow Tomatoes on Your Wall!
Hey there, fellow gardening enthusiasts! Are you short on space but dreaming of juicy, homegrown tomatoes? Well, I’ve got the perfect solution for you: a DIY vertical tomato garden! This project is not only space-saving but also adds a unique and beautiful touch to your outdoor area. I’m going to walk you through every step, so even if you’re a beginner, you can create your own thriving tomato wall. Let’s get started!
What You’ll Need
Before we dive in, let’s gather all the necessary materials. This will make the process much smoother and prevent any frustrating mid-project runs to the hardware store.
* Wooden Pallet: Look for a sturdy, untreated wooden pallet. You can often find these for free at local businesses or construction sites. Make sure it’s clean and free of any loose nails or splinters.
* Heavy-Duty Landscape Fabric: This will line the pallet and create pockets for the soil.
* Staple Gun and Staples: Essential for securing the landscape fabric to the pallet.
* Potting Soil: Choose a high-quality potting mix specifically formulated for vegetables.
* Tomato Seedlings: Select determinate (bush) tomato varieties, as they are more compact and suitable for vertical growing. Cherry tomatoes and Roma tomatoes are excellent choices.
* Gloves: To protect your hands from dirt and splinters.
* Measuring Tape: For accurate measurements when cutting the landscape fabric.
* Scissors or Utility Knife: For cutting the landscape fabric.
* Sandpaper (Optional): To smooth out any rough edges on the pallet.
* Wood Stain or Paint (Optional): To customize the look of your pallet garden.
* Drill and Screws (Optional): For reinforcing the pallet if needed.
* Watering Can or Hose: For watering your tomato plants.
* Fertilizer: A balanced fertilizer to feed your tomato plants.
* Eye Protection: Safety first!
Preparing the Pallet
This is a crucial step to ensure your vertical garden is stable and safe.
1. Inspect the Pallet: Carefully examine the pallet for any loose nails, splinters, or damaged boards. Remove any loose nails with a hammer and use sandpaper to smooth out any rough edges.
2. Clean the Pallet: Use a brush or hose to clean the pallet and remove any dirt or debris. You can also use a mild soap and water solution if needed. Let it dry completely before proceeding.
3. Reinforce the Pallet (Optional): If the pallet feels flimsy, you can reinforce it by adding extra screws to the joints. Use a drill and screws to secure the boards together.
4. Sand and Stain/Paint (Optional): If you want to customize the look of your pallet garden, now is the time to sand it down and apply a wood stain or paint. Choose a color that complements your outdoor space. Let it dry completely before moving on to the next step.
Creating the Planting Pockets
This is where the magic happens! We’ll be transforming the pallet into a series of individual planting pockets.
1. Measure and Cut the Landscape Fabric: Measure the width and depth of each section of the pallet where you want to create a planting pocket. Add a few extra inches to each measurement to allow for overlap and stapling. Cut the landscape fabric into rectangular pieces according to your measurements. You’ll need enough pieces to create pockets in each section of the pallet.
2. Attach the Landscape Fabric: Starting with the bottom row of the pallet, fold the landscape fabric over the bottom board and staple it securely to the inside of the pallet. Make sure the fabric is taut and wrinkle-free.
3. Create the Pocket Shape: Fold the sides of the landscape fabric inward to create a pocket shape. Staple the sides to the inside of the pallet, ensuring the pocket is deep enough to hold a good amount of soil.
4. Repeat for Each Pocket: Repeat steps 2 and 3 for each section of the pallet, creating individual planting pockets. Make sure each pocket is securely attached and can hold the weight of the soil and plants. Overlap the fabric generously to prevent soil from leaking out.
5. Reinforce the Pockets (Optional): For added security, you can reinforce the pockets by adding extra staples along the edges.
Planting Your Tomatoes
Now for the fun part – planting your tomato seedlings!
1. Fill the Pockets with Soil: Carefully fill each planting pocket with potting soil, leaving about an inch of space at the top. Gently pat down the soil to remove any air pockets.
2. Plant the Tomato Seedlings: Dig a small hole in the center of each pocket and carefully remove the tomato seedling from its container. Gently loosen the roots and place the seedling in the hole.
3. Cover the Roots with Soil: Cover the roots with soil and gently pat it down. Make sure the base of the stem is slightly above the soil level.
4. Water Thoroughly: Water each tomato plant thoroughly until the soil is moist but not soggy.
5. Add Support (Optional): As your tomato plants grow, they may need additional support. You can use tomato cages or stakes to help them stay upright.
Caring for Your Vertical Tomato Garden
Maintaining your vertical tomato garden is essential for a bountiful harvest.
1. Watering: Water your tomato plants regularly, especially during hot and dry weather. Check the soil moisture by sticking your finger into the soil. If it feels dry, it’s time to water. Water deeply and thoroughly, ensuring the water reaches the roots.
2. Fertilizing: Feed your tomato plants with a balanced fertilizer every two to three weeks. Follow the instructions on the fertilizer package.
3. Sunlight: Tomato plants need at least six to eight hours of sunlight per day. Choose a location for your vertical garden that receives plenty of sunlight.
4. Pruning: Prune your tomato plants regularly to remove any suckers (small shoots that grow between the main stem and the branches). This will help the plant focus its energy on producing fruit.
5. Pest Control: Keep an eye out for pests such as aphids, whiteflies, and tomato hornworms. If you notice any pests, treat them with an appropriate insecticide or organic pest control method.
6. Harvesting: Harvest your tomatoes when they are fully ripe and have reached their desired color. Gently twist the tomato off the vine.
Tips for Success
Here are a few extra tips to help you succeed with your vertical tomato garden:
* Choose the Right Location: Select a location that receives plenty of sunlight and is protected from strong winds.
* Use High-Quality Potting Soil: Don’t skimp on the potting soil. Use a high-quality mix that is specifically formulated for vegetables.
* Water Regularly: Consistent watering is essential for healthy tomato plants.
* Fertilize Regularly: Feeding your tomato plants with a balanced fertilizer will help them produce more fruit.
* Prune Regularly: Pruning your tomato plants will help them stay healthy and productive.
* Monitor for Pests: Keep an eye out for pests and treat them promptly.
* Rotate Your Crops: If you plan to reuse your vertical garden next year, rotate your crops to prevent soilborne diseases.
* Consider Companion Planting: Plant basil or marigolds near your tomatoes to help deter pests.
* Mulch: Add a layer of mulch to the top of the soil to help retain moisture and suppress weeds.
* Be Patient: Growing tomatoes takes time and patience. Don’t get discouraged if you don’t see results immediately.
Troubleshooting
Even with the best planning, you might encounter some challenges. Here are a few common problems and how to address them:
* Yellowing Leaves: This could be a sign of overwatering, underwatering, or nutrient deficiency. Check the soil moisture and adjust your watering schedule accordingly. Fertilize your plants with a balanced fertilizer.
* Blossom End Rot: This is caused by a calcium deficiency. Add calcium to the soil or use a calcium-rich fertilizer. Ensure consistent watering to help the plants absorb calcium.
* Pests: Inspect your plants regularly for pests and treat them with an appropriate insecticide or organic pest control method.
* Slow Growth: This could be due to lack of sunlight, poor soil, or nutrient deficiency. Ensure your plants are getting enough sunlight and fertilize them regularly.
* Fruit Cracking: This is often caused by inconsistent watering. Water your plants regularly and deeply.
Alternative Ideas and Customizations
The beauty of DIY is that you can customize it to your liking! Here are a few ideas to get your creative juices flowing:
* Use Different Materials: Instead of a wooden pallet, you could use a metal grid, plastic containers, or even repurposed gutters
Conclusion
So, there you have it! Growing tomatoes on a wall isn’t just a quirky gardening trend; it’s a genuinely effective and rewarding way to maximize your space, protect your precious plants, and enjoy a bountiful harvest of delicious, homegrown tomatoes. This DIY trick transforms even the smallest balcony or patio into a thriving vertical garden, bringing the joy of fresh produce right to your doorstep.
Think about it: no more bending over to weed, fewer pests reaching your ripening fruit, and a stunning green wall that adds beauty and vibrancy to your outdoor space. Plus, the improved air circulation around the plants helps prevent common tomato diseases, leading to healthier, more productive vines.
But the benefits don’t stop there. Growing tomatoes on a wall allows you to experiment with different varieties. Imagine a cascade of cherry tomatoes tumbling down your wall, or a robust beefsteak tomato proudly displayed for all to see. You can even tailor your soil mix to suit the specific needs of each variety, ensuring optimal growth and flavor.
Consider these variations to personalize your vertical tomato garden:
* **Herb Companion Planting:** Interplant your tomatoes with herbs like basil, oregano, or thyme. These not only add fragrance and beauty but also deter pests and attract beneficial insects.
* **Strawberry Underplanting:** Plant strawberries at the base of your vertical tomato garden. They’ll thrive in the shade provided by the tomato plants and create a beautiful, edible ground cover.
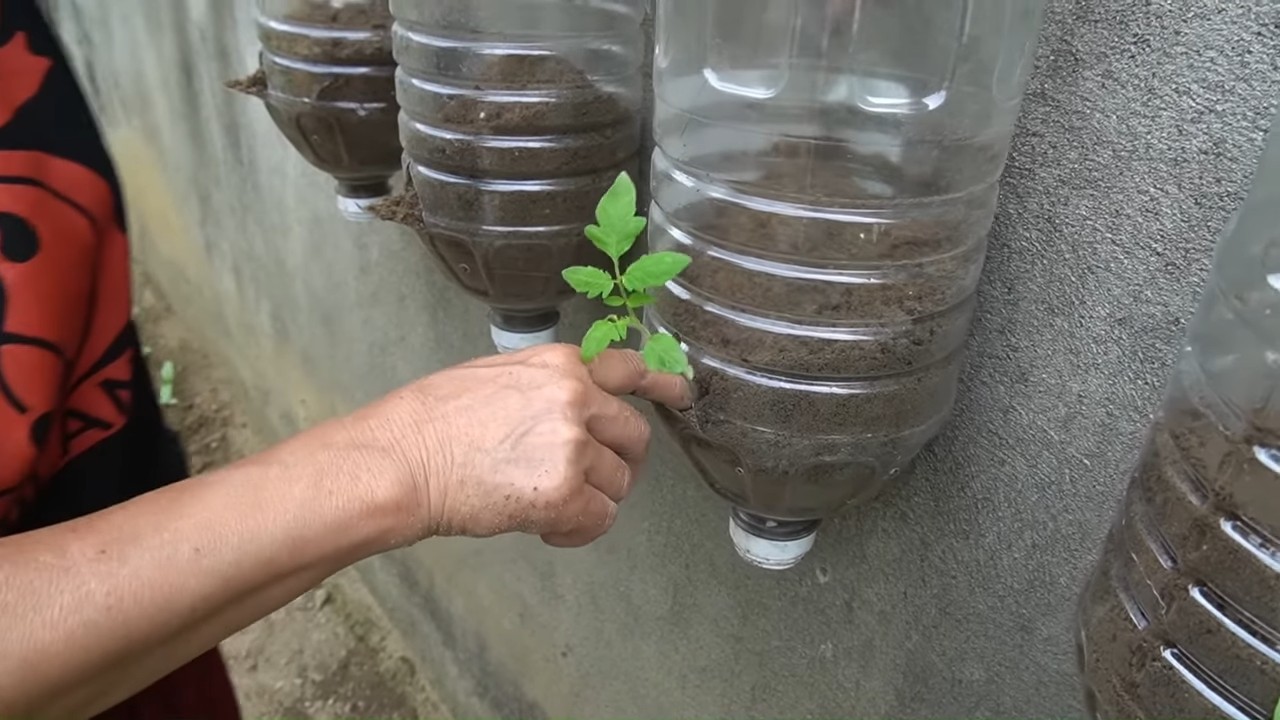
* **Upcycled Materials:** Get creative with your containers! Use repurposed plastic bottles, old gutters, or even fabric grow bags to create a unique and eco-friendly vertical garden.
* Automated Watering System: Install a simple drip irrigation system to ensure your tomatoes receive consistent moisture, especially during hot summer months. This will save you time and effort while promoting healthy growth.
We understand that venturing into a new gardening technique can seem daunting, but trust us, the rewards are well worth the effort. The satisfaction of harvesting your own sun-ripened tomatoes, knowing you grew them yourself in a space-saving and innovative way, is truly unparalleled.
Don’t just take our word for it – give it a try! We’re confident that you’ll be amazed by the results. And once you’ve experienced the joy of growing tomatoes on a wall, we encourage you to share your experiences with us. Post photos of your vertical gardens, share your tips and tricks, and let’s inspire others to embrace this fantastic DIY trick. Let’s cultivate a community of vertical gardeners, sharing our knowledge and passion for growing delicious, homegrown tomatoes in innovative ways. We can’t wait to see what you create!
Frequently Asked Questions (FAQ)
What type of tomatoes are best suited for growing on a wall?
Determinate tomato varieties, which are bush-type tomatoes that grow to a specific size and produce all their fruit at once, are generally better suited for wall growing than indeterminate varieties, which are vining tomatoes that continue to grow and produce fruit throughout the season. Determinate varieties are more compact and easier to manage in a vertical space. However, with proper support and pruning, you can successfully grow indeterminate varieties as well. Cherry tomatoes and other smaller varieties tend to thrive in vertical gardens due to their lighter weight and cascading growth habit. Consider the mature size of the tomato plant when selecting your variety to ensure it will fit comfortably in your chosen container and vertical space.
How much sunlight do tomatoes grown on a wall need?
Tomatoes require at least 6-8 hours of direct sunlight per day to thrive. When choosing a location for your vertical tomato garden, ensure it receives ample sunlight throughout the day. If you’re growing tomatoes indoors or in a shaded area, you may need to supplement with grow lights to provide the necessary light for healthy growth and fruit production. Rotate your plants regularly to ensure all sides receive equal exposure to sunlight.
What type of soil is best for growing tomatoes on a wall?
Use a well-draining potting mix specifically formulated for vegetables. Avoid using garden soil, as it can become compacted in containers and restrict root growth. A good potting mix will provide adequate drainage, aeration, and nutrients for your tomato plants. You can also amend your potting mix with compost or other organic matter to improve its fertility and water-holding capacity. Consider adding perlite or vermiculite to further enhance drainage.
How often should I water tomatoes grown on a wall?
Water your tomatoes regularly, especially during hot, dry weather. Check the soil moisture level daily and water when the top inch of soil feels dry to the touch. Avoid overwatering, as this can lead to root rot. Water deeply and thoroughly, ensuring the water reaches the roots of the plant. A drip irrigation system can be a convenient way to provide consistent moisture to your vertical tomato garden.
How do I support tomatoes grown on a wall?
Provide adequate support for your tomato plants as they grow. This can be done using stakes, trellises, or cages. Attach the tomato stems to the support structure using soft plant ties or twine. As the plants grow taller, continue to provide support to prevent them from falling over. For wall-mounted containers, ensure the containers are securely attached to the wall and can support the weight of the mature tomato plants.
How do I fertilize tomatoes grown on a wall?
Tomatoes are heavy feeders and require regular fertilization to produce abundant fruit. Use a balanced fertilizer specifically formulated for tomatoes, following the instructions on the package. Fertilize your tomatoes every 2-3 weeks during the growing season. You can also use organic fertilizers, such as compost tea or fish emulsion. Avoid over-fertilizing, as this can lead to excessive foliage growth and reduced fruit production.
How do I prevent pests and diseases on tomatoes grown on a wall?
Monitor your tomato plants regularly for signs of pests and diseases. Common tomato pests include aphids, whiteflies, and tomato hornworms. Common tomato diseases include early blight, late blight, and blossom end rot. Use organic pest control methods, such as insecticidal soap or neem oil, to control pests. Ensure good air circulation around your plants to prevent diseases. Remove any diseased leaves or fruit promptly to prevent the spread of disease. Proper watering and fertilization can also help prevent diseases.
Can I grow tomatoes on a wall indoors?
Yes, you can grow tomatoes on a wall indoors, but you will need to provide adequate light and ventilation. Use grow lights to supplement natural sunlight and ensure your plants receive at least 6-8 hours of light per day. Provide good air circulation to prevent diseases. Choose a compact tomato variety that is well-suited for indoor growing.
What are some creative container ideas for growing tomatoes on a wall?
There are many creative container ideas for growing tomatoes on a wall. You can use repurposed plastic bottles, old gutters, fabric grow bags, or even wooden pallets to create a unique and eco-friendly vertical garden. Ensure the containers are large enough to accommodate the root system of the mature tomato plants and have adequate drainage holes. Get creative and personalize your vertical garden with your own unique style.
How do I prune tomatoes grown on a wall?
Pruning tomatoes grown on a wall can help improve air circulation, reduce disease, and encourage fruit production. Remove suckers, which are small shoots that grow between the main stem and the branches. Prune away any yellowing or diseased leaves. For indeterminate tomato varieties, prune the lower leaves to improve air circulation and prevent soil-borne diseases. Pruning can also help direct the plant’s energy towards fruit production.
Leave a Comment