
Grow Swiss Chard: Your Guide to a Bountiful Harvest
Growing Swiss chard might seem daunting, but I’m here to tell you it’s surprisingly easy! This article is packed with Grow Swiss Chard tips and tricks, transforming your backyard into a vibrant, productive garden. Forget expensive grocery store produce; I’ll show you how to cultivate your own delicious, nutritious Swiss chard, saving you money and providing a rewarding experience.
For centuries, Swiss chard has been a staple in many cultures, prized for its versatility and nutritional value. From ancient Roman times to modern-day kitchens, this leafy green has graced tables worldwide. Its rich history adds to the satisfaction of growing it yourself – it’s more than just a plant; it’s a connection to culinary heritage.
Why Grow Your Own Swiss Chard?
In today’s fast-paced world, we often overlook the simple pleasures of homegrown food. Growing your own Swiss chard offers unparalleled freshness and flavor. Imagine biting into a tender leaf, bursting with nutrients, knowing exactly where it came from and how it was grown. Beyond the taste, you’ll gain a deeper appreciation for the process of cultivation and the satisfaction of nurturing something from seed to plate. Plus, you’ll be reducing your carbon footprint by sourcing your food locally and minimizing transportation costs. This Grow Swiss Chard guide will equip you with the knowledge and confidence to achieve a thriving harvest.
So, let’s get started on your journey to growing your own delicious Swiss chard! I’ll share my favorite Grow Swiss Chard techniques, from seed starting to harvesting, ensuring you have a bountiful crop to enjoy all season long.
Growing Your Own Swiss Chard: A Step-by-Step Guide
I love Swiss chard! It’s so versatile and packed with nutrients. Growing it yourself is incredibly rewarding, and honestly, easier than you might think. Follow these steps and you’ll be harvesting your own delicious chard in no time!
Phase 1: Planning and Preparation
- Choose your location: Swiss chard needs at least six hours of sunlight per day. Find a sunny spot in your garden or on your patio. Consider the soil drainage – chard doesn’t like soggy feet!
- Prepare the soil: Good soil is key! Amend your soil with compost or other organic matter to improve drainage and fertility. I like to till the soil to a depth of about 12 inches. This ensures good root penetration.
- Decide on your method: You can start seeds indoors or sow them directly outdoors. Starting indoors gives you a head start, especially in cooler climates. Direct sowing is simpler, but the plants will take a little longer to mature.
- Gather your supplies: You’ll need seeds (or seedlings), a trowel or garden spade, a watering can, and possibly some row covers or other protection from pests or harsh weather.
Phase 2: Starting Seeds (Indoor Method)
- Choose your containers: Use seed starting trays, small pots, or even recycled containers with drainage holes. Fill them with seed starting mix – don’t use garden soil, as it can be too dense for delicate seedlings.
- Sow the seeds: Plant seeds about ¼ inch deep and about 1 inch apart. Gently cover with soil and water thoroughly but gently, avoiding washing away the seeds. I usually use a spray bottle for this.
- Provide warmth and light: Place your containers in a warm location (around 70-75°F) with plenty of sunlight. You may need to supplement with grow lights, especially during winter months. Aim for at least 12-14 hours of light per day.
- Keep the soil moist: Don’t let the soil dry out completely, but avoid overwatering, which can lead to damping off (a fungal disease). Water when the top inch of soil feels dry.
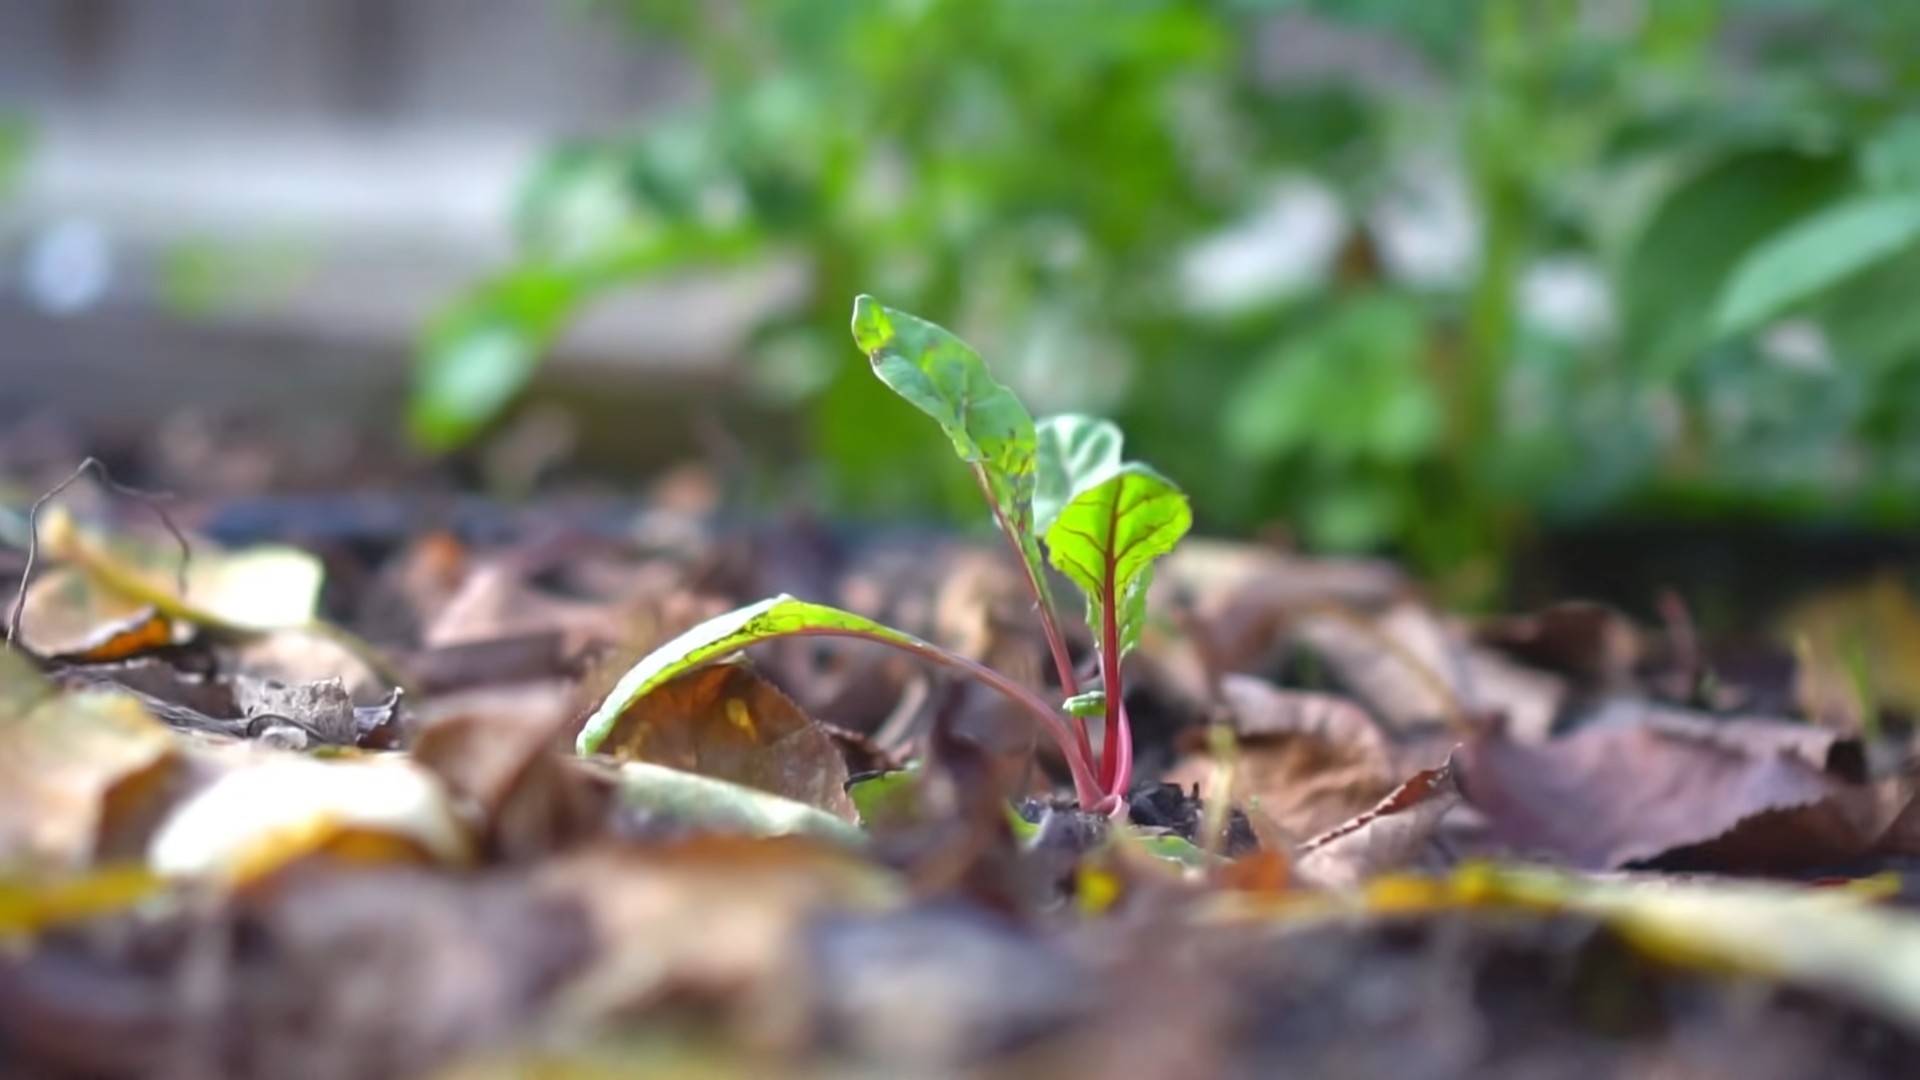
- Thin seedlings: Once the seedlings have a few true leaves (the leaves that appear after the cotyledons), thin them out to give each plant enough space to grow. You can transplant the extra seedlings into other containers.
- Harden off seedlings: Before transplanting outdoors, gradually acclimate your seedlings to the outdoor environment. Start by placing them outside for a few hours each day, gradually increasing the time over a week or two. This prevents shock when they are finally planted in the garden.
Phase 3: Direct Sowing (Outdoor Method)
- Wait for the right time: Direct sow seeds after the last frost and when the soil temperature is consistently above 50°F (10°C). This usually falls in spring or early summer.
- Prepare the seedbed: Loosen the soil and remove any weeds or rocks. Create shallow furrows about ½ inch deep.
- Sow the seeds: Space seeds about 1 inch apart in the furrows. Cover with soil and gently firm the soil around the seeds.
- Water gently: Water thoroughly after sowing to help the seeds germinate. Use a gentle spray to avoid dislodging the seeds.
- Thin seedlings: Once the seedlings have a few true leaves, thin them to about 6-12 inches apart, depending on the variety of Swiss chard you’ve planted. This allows for optimal growth.
Phase 4: Transplanting and Ongoing Care
- Transplant seedlings (if starting indoors): Once your seedlings have several true leaves and are about 4-6 inches tall, it’s time to transplant them outdoors. Dig holes slightly larger than the root ball and gently place the seedlings in the holes. Fill in the soil around the roots and water well.
- Water regularly: Swiss chard needs consistent moisture, especially during dry periods. Water deeply and regularly, aiming for about 1 inch of water per week. Mulching around the plants helps retain moisture.
- Fertilize (optional): While not strictly necessary, a balanced fertilizer can promote vigorous growth. Follow the instructions on the fertilizer package for application rates.
- Weed regularly: Keep the area around your chard plants free of weeds, which compete for water and nutrients.
- Pest and disease control: Monitor your plants for pests like aphids or slugs. Use organic pest control methods if necessary. Good air circulation can help prevent fungal diseases.
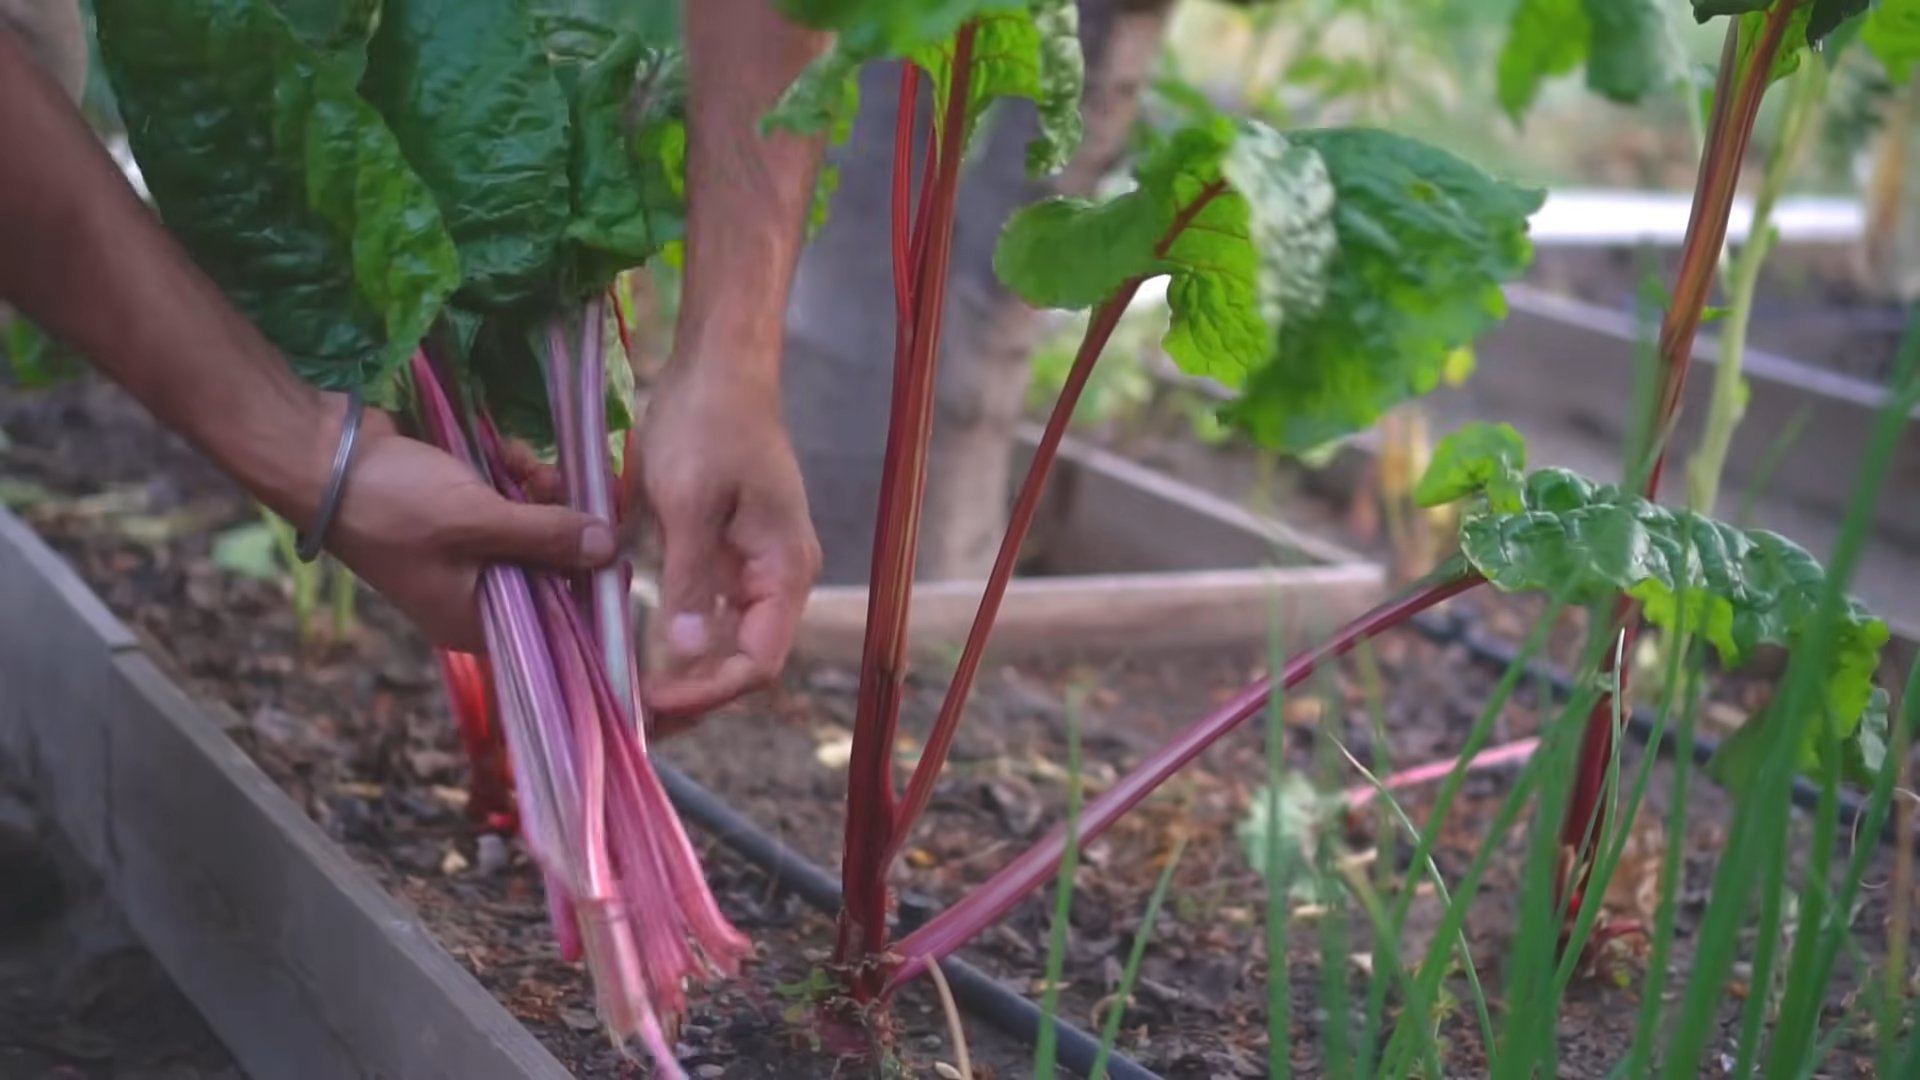
- Harvesting: You can start harvesting outer leaves when they are about 6-8 inches long. Simply cut them off at the base of the plant. This encourages further growth from the center of the plant. You can continue harvesting leaves throughout the growing season.
Phase 5: Troubleshooting
Yellowing Leaves:
This could indicate a nutrient deficiency, overwatering, or underwatering. Check your watering schedule and consider adding a balanced fertilizer.
Bolting:
Bolting (going to seed) occurs when the plant is stressed by heat or long days. Choose a variety suited to your climate and provide consistent watering.
Pest Infestations:
Inspect your plants regularly for pests. Handpick pests or use organic pest control methods like insecticidal soap or neem oil.
Remember to enjoy the process! Growing your own Swiss chard is a rewarding experience, and the taste of homegrown vegetables is unbeatable.
Conclusion
So there you have it – a comprehensive guide to successfully growing your own Swiss chard! This DIY approach to cultivating this nutritious leafy green is a must-try for several reasons. First and foremost, you gain unparalleled control over the quality of your produce. You know exactly what’s gone into your chard, from the soil to the water, ensuring a healthier, more flavorful crop than anything you’d find in the supermarket. Secondly, growing your own Swiss chard is incredibly rewarding. There’s a deep satisfaction in nurturing a seed from tiny sprout to a bountiful harvest, a connection to the land and the food you consume that’s hard to replicate. Finally, it’s surprisingly easy! Even beginners can achieve great results with a little patience and the right techniques, as outlined in this guide. Growing your own Swiss chard is a journey of discovery, a testament to the power of nature, and a delicious addition to your table.
Beyond the basic method described, there are numerous exciting variations you can explore. Experiment with different Swiss chard varieties – from the vibrant red stems of ‘Bright Lights’ to the deeply green leaves of ‘Fordhook Giant’ – to discover your favorites. Consider companion planting, incorporating herbs like basil or rosemary to deter pests and enhance the flavor profile of your chard. If space is limited, try vertical gardening techniques or container growing, adapting the method to suit your available space. For those with particularly challenging climates, consider using a greenhouse or grow lights to extend the growing season and ensure a consistent harvest. The possibilities are truly endless!
We strongly encourage you to embark on this rewarding journey of growing your own Swiss chard. Share your experiences with us! Post pictures of your thriving plants and delicious recipes on social media using #GrowSwissChard and tag us. Let’s build a community of home gardeners, sharing tips, tricks, and the joy of harvesting homegrown goodness. Don’t hesitate to reach out if you have any questions – we’re here to support you every step of the way. Remember, the most important ingredient is your enthusiasm! So get your hands dirty, sow those seeds, and prepare to be amazed by the delicious results of your own homegrown Swiss chard.
Frequently Asked Questions
Q: When is the best time to plant Swiss chard seeds?
A: The ideal time to plant Swiss chard seeds depends on your climate. In warmer regions, you can direct sow seeds in spring after the last frost. In cooler climates, starting seeds indoors 4-6 weeks before the last frost is recommended. You can also sow seeds in the fall for a fall/winter harvest in milder climates.
Q: How much sunlight does Swiss chard need?
A: Swiss chard thrives in full sun (at least 6 hours of direct sunlight per day), but it can tolerate some partial shade, especially in hot climates. Aim for a location that receives plenty of sunlight but avoids the harshest midday sun in extremely hot areas.
Q: How often should I water my Swiss chard?
A: Consistent moisture is key for healthy Swiss chard growth. Water deeply and regularly, especially during dry spells. Aim to keep the soil consistently moist but not waterlogged. Mulching around the plants can help retain soil moisture.
Q: What are some common pests and diseases that affect Swiss chard?
A: Common pests include aphids, flea beetles, and slugs. Diseases such as downy mildew and leaf spot can also occur. Regular inspection, proper spacing of plants for good air circulation, and the use of organic pest control methods can help prevent these issues. Companion planting with herbs can also deter some pests.
Q: How do I harvest Swiss chard?
A: You can begin harvesting Swiss chard leaves when they are about 6-8 inches tall. Harvest outer leaves individually, leaving the inner leaves to continue growing. This allows for a continuous harvest throughout the growing season. For a larger harvest, you can cut the entire plant down to about 2 inches above the ground, allowing it to regrow.
Q: Can I grow Swiss chard in containers?
A: Absolutely! Swiss chard grows well in containers, making it a great option for those with limited garden space. Choose a container that is at least 12 inches deep and wide to allow for adequate root development. Ensure the container has drainage holes to prevent waterlogging.
Q: What are the nutritional benefits of homegrown Swiss chard?
A: Homegrown Swiss chard is packed with essential nutrients, including vitamins A, K, and C, as well as minerals like iron and potassium. Because you control the growing process, you can minimize the use of pesticides and fertilizers, resulting in a healthier and more nutritious crop.
Q: What should I do if my Swiss chard plants are not growing well?
A: Several factors can affect Swiss chard growth, including insufficient sunlight, inadequate watering, nutrient deficiencies, or pest infestations. Assess the growing conditions and address any potential issues. Consider soil testing to determine nutrient levels and amend the soil as needed. If pests or diseases are present, implement appropriate control measures.
Q: Can I save seeds from my Swiss chard plants for next year?
A: While you can try saving seeds, it’s important to note that Swiss chard is a hybrid plant, meaning the seeds may not produce plants identical to the parent plant. If you want to maintain a specific variety, it’s best to purchase new seeds each year. However, experimenting with seed saving can be a fun and educational experience.

Leave a Comment