
Grow mushrooms at home? Absolutely! Imagine harvesting fresh, flavorful mushrooms right from your own kitchen, ready to elevate your next culinary masterpiece. Forget those bland, store-bought varieties – with a few simple tricks and a little DIY spirit, you can cultivate a thriving mushroom patch indoors.
Mushroom cultivation has a rich history, dating back centuries in Eastern cultures where they were prized for their medicinal and culinary properties. From ancient Chinese emperors seeking the “elixir of life” to modern-day foodies craving unique flavors, mushrooms have always held a special place in our hearts (and stomachs!).
But why should you learn to grow mushrooms at home? Well, for starters, it’s incredibly rewarding! There’s something magical about nurturing these fascinating fungi from spore to fruiting body. Plus, it’s a sustainable way to enjoy fresh, organic produce, reduce your carbon footprint, and save money on groceries. And let’s be honest, who wouldn’t want to impress their friends and family with their newfound mushroom-growing skills? I know I would!
This DIY guide will walk you through everything you need to know to successfully grow mushrooms at home, even if you’re a complete beginner. We’ll cover the basics of mushroom biology, different cultivation methods, and troubleshooting tips to ensure a bountiful harvest. So, grab your gardening gloves and get ready to embark on a fun and flavorful adventure!
Grow Your Own Gourmet Mushrooms at Home: A Beginner’s Guide
Okay, mushroom lovers, gather ’round! Have you ever dreamed of harvesting your own delicious, fresh mushrooms right in your kitchen? Well, dream no more! I’m going to walk you through a simple and rewarding method for growing mushrooms at home using the humble coffee grounds. Yes, you read that right! We’re turning waste into wonderful, edible fungi.
This guide focuses on growing oyster mushrooms (Pleurotus ostreatus) because they are relatively easy to cultivate and thrive on coffee grounds. Plus, they’re incredibly versatile in the kitchen.
What You’ll Need
Before we dive in, let’s gather our supplies. Don’t worry, you probably have many of these items already!
* Oyster Mushroom Spawn: This is the “seed” of the mushroom. You can purchase it online or from a local mushroom supplier. Look for grain spawn or sawdust spawn.
* Used Coffee Grounds: The fresher, the better! Ask your local coffee shop for their spent grounds. Make sure they haven’t been treated with any chemicals.
* Heat-Resistant Bags or Buckets: These will be our growing containers. I prefer using polypropylene (PP) bags with a filter patch, but food-grade buckets with lids also work well.
* Rubbing Alcohol (Isopropyl Alcohol): For sterilizing surfaces and tools.
* Spray Bottle: For misting.
* Gloves: To keep things sanitary.
* Mask: To avoid inhaling mushroom spores.
* Optional: Micropore tape (if using buckets).
* Optional: Hydrogen peroxide (3%) for extra sterilization.
Phase 1: Preparing the Substrate (Coffee Grounds)
This is arguably the most crucial step. Mushrooms are susceptible to contamination, so we need to make sure our coffee grounds are as clean as possible.
1. Collect Your Coffee Grounds: Start collecting used coffee grounds. Aim for at least 5 pounds of wet grounds for a decent yield. Store them in a clean, airtight container in the refrigerator if you can’t use them immediately. This helps prevent mold growth.
2. Pasteurize the Coffee Grounds: Pasteurization reduces the number of competing organisms in the coffee grounds, giving your oyster mushrooms a head start. There are a couple of ways to do this:
* Oven Method: Preheat your oven to 170°F (77°C). Spread the coffee grounds in a shallow baking dish and bake for 2 hours, stirring occasionally. This method can dry out the grounds, so keep an eye on them.
* Hot Water Method: This is my preferred method. Bring a large pot of water to a boil. Carefully pour the boiling water over the coffee grounds in a heat-resistant container. Let the grounds sit in the hot water for 1-2 hours. Then, drain the water thoroughly using a colander or cheesecloth.
3. Cool the Coffee Grounds: Allow the pasteurized coffee grounds to cool completely to room temperature. This is important because hot grounds can kill the mushroom spawn.
Phase 2: Inoculation (Mixing Spawn and Substrate)
Now for the fun part – introducing the mushroom spawn to the coffee grounds!
1. Sanitize Your Work Area: Clean your work surface thoroughly with rubbing alcohol. This includes your hands, gloves, and any tools you’ll be using.
2. Prepare Your Container: If you’re using PP bags, make sure they are clean and have a filter patch. If you’re using buckets, drill a few small holes (about 1/4 inch) in the lid for air exchange. Cover the holes with micropore tape to prevent contamination.
3. Mix Spawn and Substrate: In a clean container, gently mix the cooled coffee grounds with the oyster mushroom spawn. A good ratio is about 1 part spawn to 10 parts coffee grounds (by weight). Break up the spawn clumps as you mix to ensure even distribution.
4. Pack the Mixture: Carefully pack the inoculated coffee grounds into your chosen container. If using bags, seal them tightly with a heat sealer or tape. If using buckets, snap the lid on securely. Don’t pack too tightly, as the mushrooms need room to breathe.
Phase 3: Incubation (Letting the Mycelium Grow)
This is the waiting game. The mycelium (the vegetative part of the mushroom) will colonize the coffee grounds.
1. Find a Dark, Warm Place: Place your inoculated container in a dark, warm location with a temperature between 65-75°F (18-24°C). A closet, basement, or under the sink works well.
2. Monitor Colonization: Check on your container every few days. You should start to see white, fuzzy growth (the mycelium) spreading throughout the coffee grounds. This process usually takes 2-4 weeks.
3. Be Patient: Avoid disturbing the container during this phase. The mycelium needs time to establish itself.
4. Look for Contamination: Keep an eye out for any signs of contamination, such as green, black, or orange mold. If you see contamination, it’s best to discard the entire batch to prevent it from spreading.
Phase 4: Fruiting (Encouraging Mushroom Growth)
Once the coffee grounds are fully colonized (completely covered in white mycelium), it’s time to trigger fruiting.
1. Increase Humidity: Oyster mushrooms need high humidity to fruit. Mist the inside of the container (or the surrounding area) with water several times a day to maintain a humidity level of 80-90%. You can also use a humidity tent or place the container in a plastic bag with a few air holes.
2. Introduce Light: Move the container to a location with indirect light. Direct sunlight can dry out the mushrooms.
3. Increase Airflow: Oyster mushrooms also need fresh air to fruit properly. Open the container (or the bag) for a few minutes each day to allow for air exchange. If you’re using a bucket, you may need to fan the air around the holes.
4. Wait for Pins: After a few days, you should start to see small mushroom “pins” forming. These are the baby mushrooms!
Phase 5: Harvesting and Enjoying Your Mushrooms
The moment you’ve been waiting for!
1. Harvest When Mature: Harvest the mushrooms when the caps are fully developed but before they start to drop spores. The edges of the caps will start to curl upwards.
2. Harvesting Technique: Gently twist and pull the mushrooms from the substrate. You can also use a clean knife to cut them off at the base.
3. Enjoy Your Harvest: Cook your freshly harvested oyster mushrooms in your favorite recipes! They’re delicious sautéed, grilled, or added to soups and stews.
4. Second Flush: After harvesting, you can often get a second (or even third) flush of mushrooms. Simply continue to mist and provide fresh air. You may need to soak the substrate in water for a few hours to rehydrate it.
Troubleshooting
Even with the best intentions, things can sometimes go wrong. Here are a few common problems and how to address them:
* Contamination: If you see mold, discard the batch. Prevention is key – sterilize everything thoroughly!
* Slow Colonization: Make sure the temperature is within the ideal range (65-75°F). Also, ensure the coffee grounds are not too wet or too dry.
* No Fruiting: Increase humidity and airflow. Make sure the mushrooms are getting enough light (indirect).
* Small Mushrooms: This could be due to lack of nutrients or insufficient humidity. Try adding a small amount of gypsum to the coffee grounds during pasteurization.
Tips for Success
* Start Small: Don’t try to grow too much at once. Start with a small batch to get the hang of it.
* Be Patient: Mushroom growing takes time and patience. Don’t get discouraged if it doesn’t work perfectly the first time.
* Keep Records: Keep track of your process, including dates, temperatures, and humidity levels. This will help you identify what works best for you.
* Experiment: Don’t be afraid to experiment with different techniques and substrates.
Growing your own mushrooms is a rewarding and educational experience. With a little patience and effort, you can enjoy fresh, delicious mushrooms right from your own home. Happy growing!
Conclusion
So, there you have it! Growing mushrooms at home isn’t just a quirky hobby; it’s a gateway to fresh, flavorful fungi right at your fingertips. Forget those wilted, overpriced mushrooms at the grocery store. With a little patience and this simple DIY trick, you can cultivate a thriving mushroom patch in your own home, offering a sustainable and delicious addition to your meals.
This method, while straightforward, opens up a world of culinary possibilities. Imagine sautéing your own oyster mushrooms with garlic and herbs, adding shiitake to a hearty ramen broth, or creating a creamy mushroom sauce with your homegrown delicacies. The satisfaction of harvesting something you nurtured from start to finish is truly unparalleled.
But the benefits extend beyond the kitchen. Growing mushrooms at home is an incredibly rewarding experience. It connects you to the natural world, teaches you about the fascinating life cycle of fungi, and provides a sense of accomplishment that’s hard to replicate. Plus, it’s a fantastic conversation starter!
Don’t be afraid to experiment! Try different types of mushrooms to find your favorites. Oyster mushrooms are a great starting point due to their resilience and rapid growth. Shiitake mushrooms offer a richer, more complex flavor, while lion’s mane is prized for its unique texture and potential health benefits. You can also explore different substrates, such as straw, coffee grounds, or hardwood sawdust, to see what works best for your chosen mushroom variety.
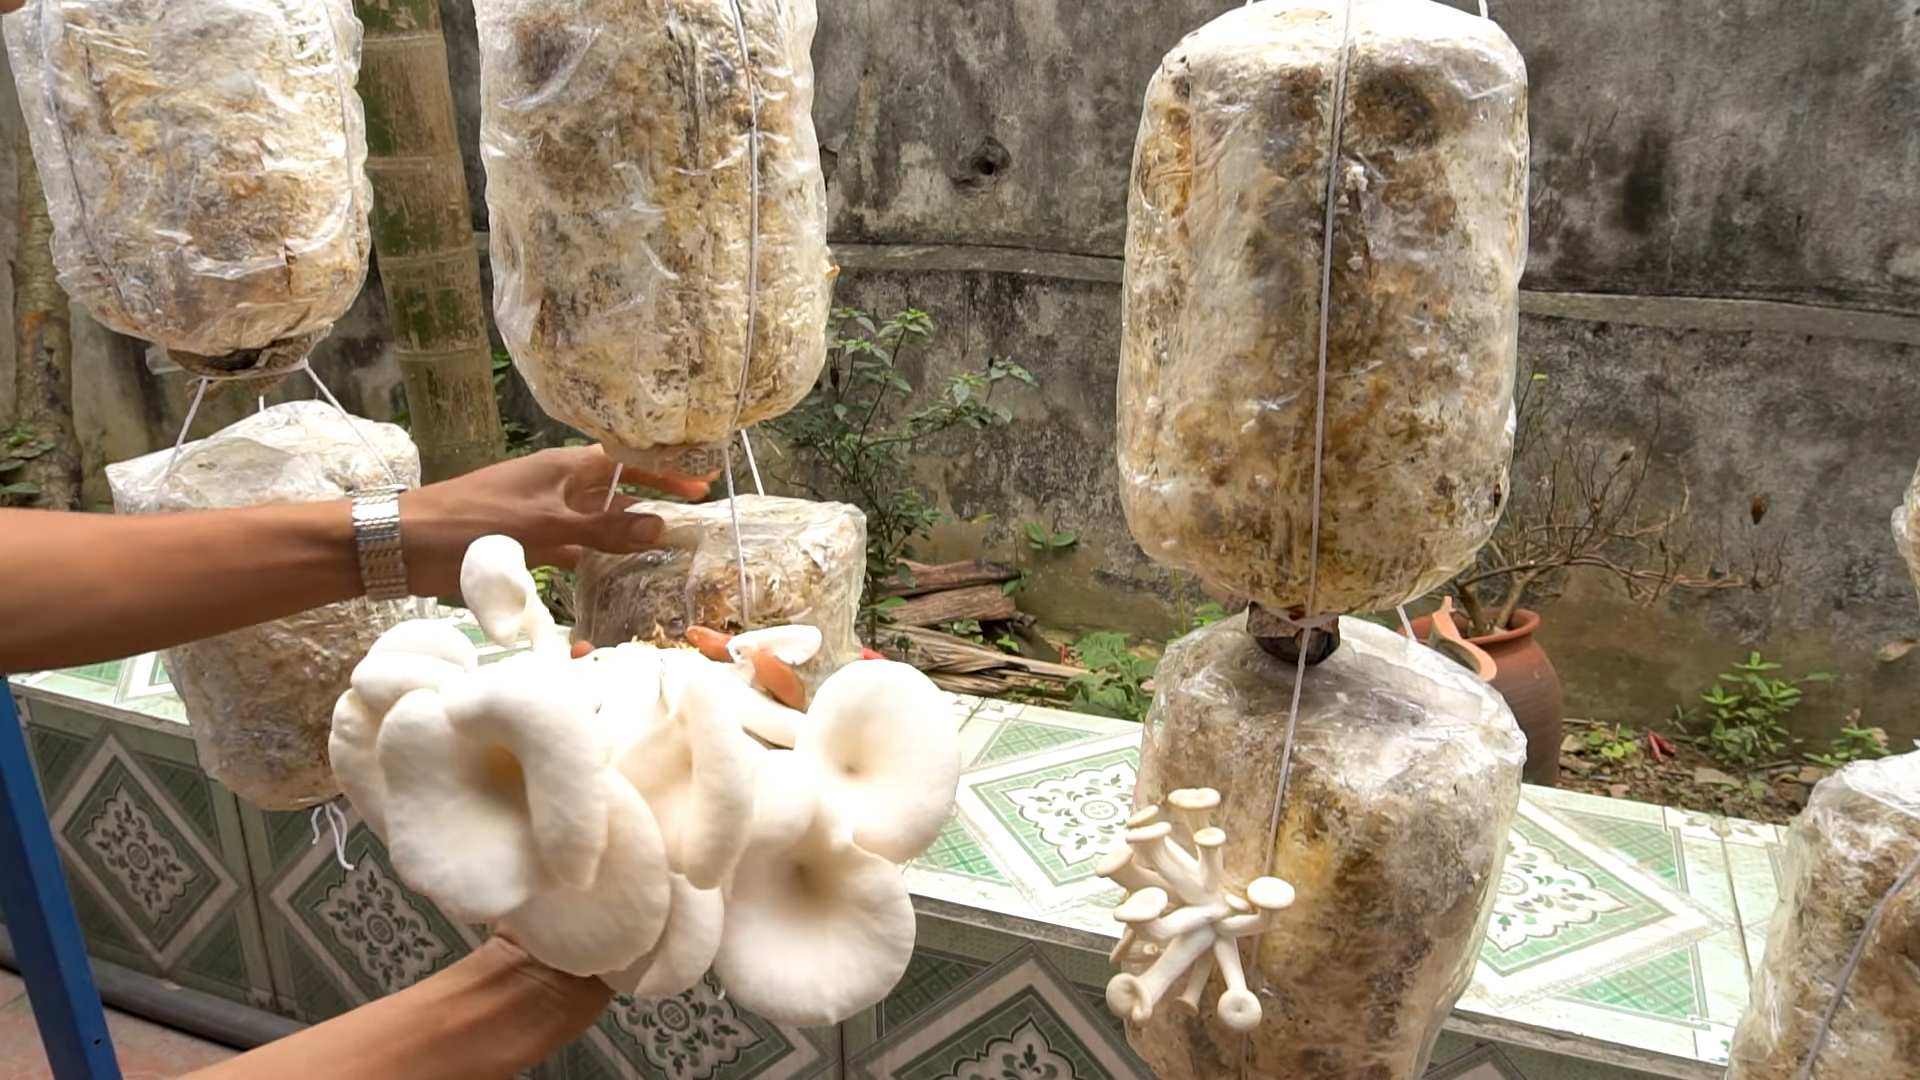
Consider these variations to personalize your mushroom growing journey:
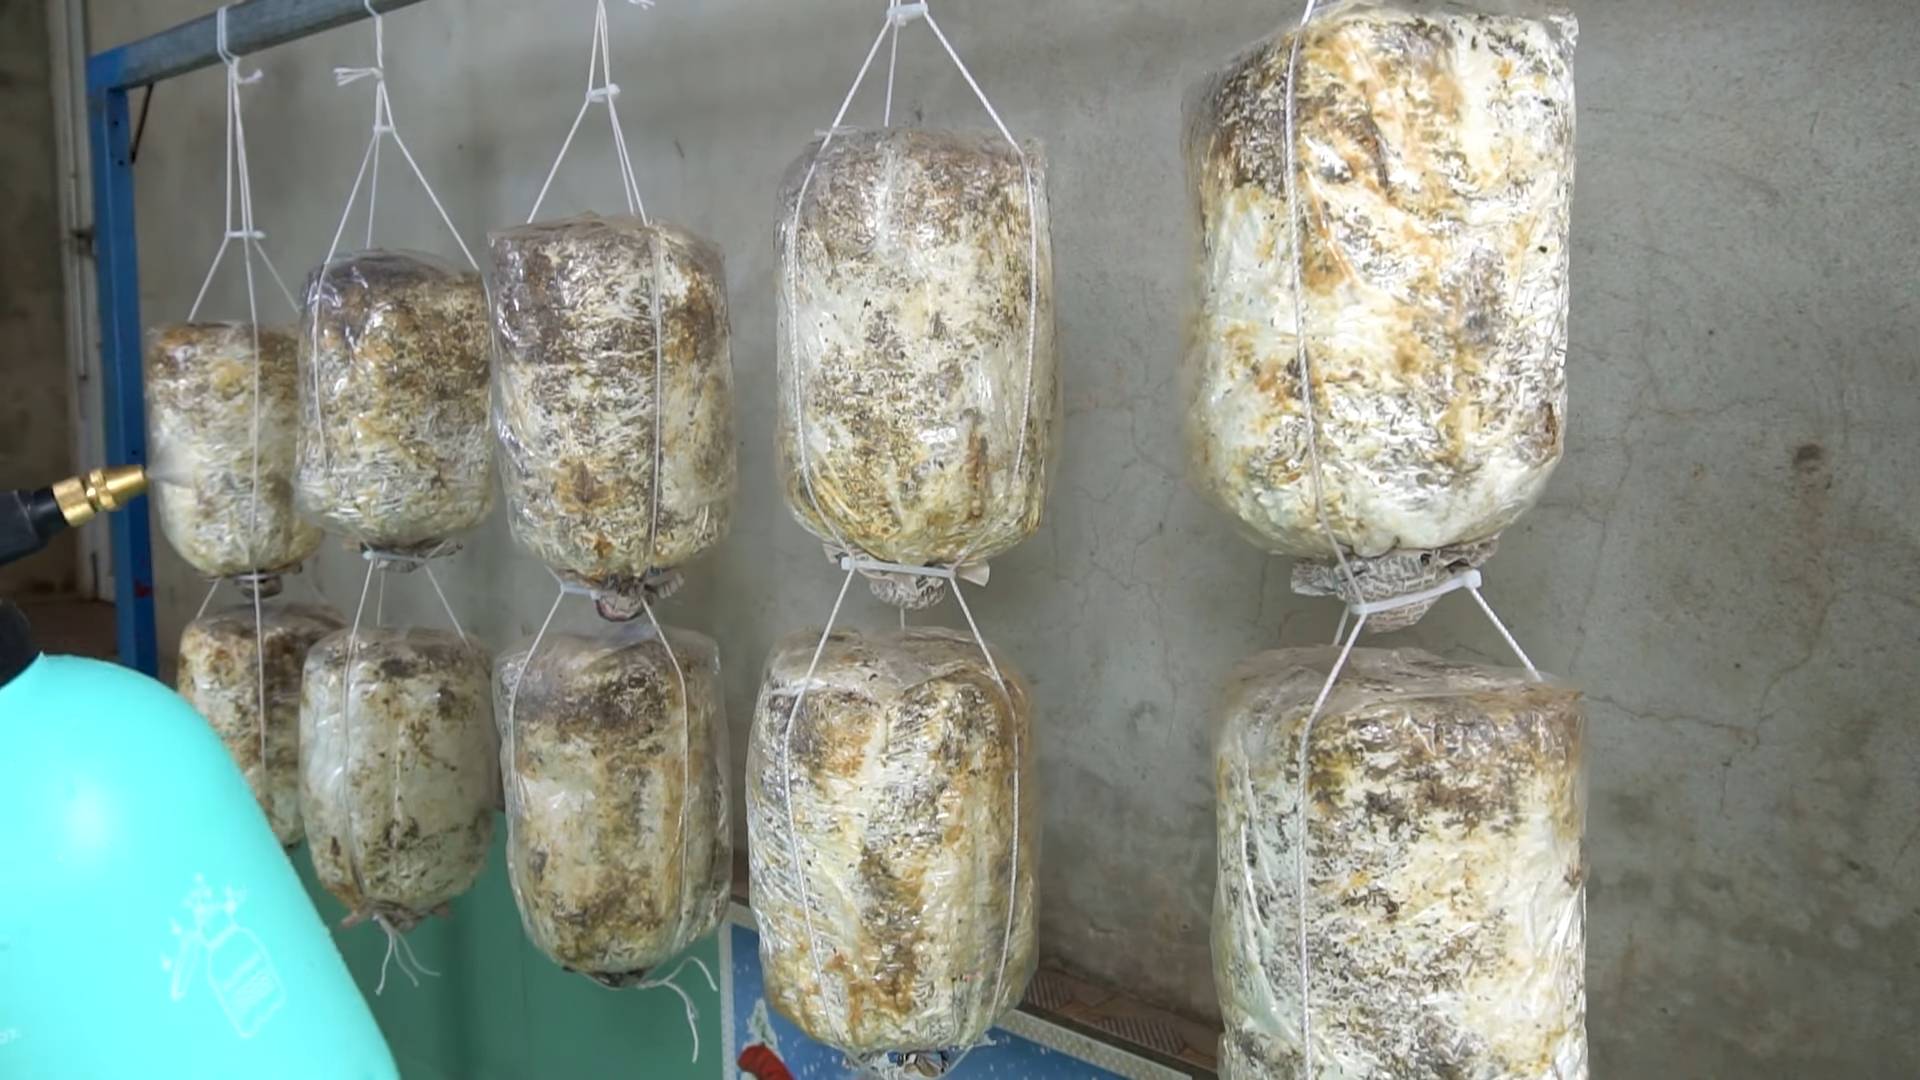
* Vertical Gardening: If space is limited, explore vertical mushroom growing systems. Stackable containers or hanging bags can maximize your yield in a small area.
* Outdoor Patches: For a more natural approach, create an outdoor mushroom patch in a shady, moist area of your garden. This is particularly well-suited for wood-loving mushrooms like shiitake.
* Mushroom Logs: Inoculate logs with mushroom spawn for a long-term, low-maintenance growing solution. This method is ideal for shiitake and oyster mushrooms.
* Composting: Integrate mushroom cultivation into your composting system. Certain mushroom species can help break down organic matter and enrich your compost.
We understand that embarking on a new DIY project can be daunting, but we encourage you to take the plunge. The initial setup is minimal, and the rewards are immense. The taste of freshly grown mushrooms is simply incomparable to store-bought varieties.
We are confident that you’ll find this DIY trick for growing mushrooms at home to be a game-changer. It’s a sustainable, cost-effective, and incredibly satisfying way to enjoy these culinary treasures.
So, what are you waiting for? Gather your supplies, follow the steps outlined in this article, and prepare to be amazed by the magic of mushroom cultivation. And most importantly, we want to hear about your experience! Share your photos, tips, and triumphs in the comments below. Let’s build a community of home mushroom growers and inspire others to discover the joys of this fascinating hobby. Happy growing!
Frequently Asked Questions
What type of mushrooms are easiest to grow at home?
Oyster mushrooms are generally considered the easiest for beginners. They are fast-growing, relatively tolerant of environmental variations, and produce a generous yield. Shiitake mushrooms are also a good option, although they require a bit more patience and attention to detail. Button mushrooms, the kind you typically find in grocery stores, are more challenging to grow at home and require specialized equipment and conditions. Lion’s mane is also becoming increasingly popular for home cultivation due to its unique texture and flavor.
What is the best substrate for growing mushrooms?
The best substrate depends on the type of mushroom you’re growing. Oyster mushrooms thrive on a variety of substrates, including straw, coffee grounds, and cardboard. Shiitake mushrooms prefer hardwood sawdust or logs. Button mushrooms require a composted substrate made from straw, manure, and other organic materials. It’s crucial to research the specific substrate requirements of your chosen mushroom species to ensure optimal growth.
How long does it take to grow mushrooms at home?
The time it takes to grow mushrooms varies depending on the species and growing conditions. Oyster mushrooms can typically be harvested within a few weeks of inoculation. Shiitake mushrooms may take several months to produce their first flush. Button mushrooms require a longer cultivation period, typically several weeks from spawning to pinning. Maintaining optimal temperature, humidity, and light levels can significantly impact the growth rate.
What are the ideal temperature and humidity conditions for growing mushrooms?
Most mushrooms prefer a cool, humid environment. Oyster mushrooms typically thrive in temperatures between 60-75°F (15-24°C) and humidity levels of 80-90%. Shiitake mushrooms prefer slightly cooler temperatures, around 50-65°F (10-18°C), and similar humidity levels. Maintaining consistent humidity is crucial to prevent the substrate from drying out and inhibiting mushroom growth. You can use a humidifier or misting bottle to increase humidity levels.
How do I prevent contamination when growing mushrooms?
Contamination is a common challenge in mushroom cultivation. To minimize the risk of contamination, it’s essential to maintain a clean and sterile environment. Sterilize your substrate thoroughly before inoculation. Use sterile tools and gloves when handling the substrate and spawn. Ensure proper ventilation to prevent the buildup of mold and bacteria. Regularly inspect your mushroom growing area for signs of contamination, such as mold or unusual odors. If you detect contamination, remove the affected area immediately to prevent it from spreading.
How often should I water my mushrooms?
The frequency of watering depends on the humidity levels and the type of substrate you’re using. Generally, you should mist your mushrooms regularly to maintain a moist but not waterlogged environment. Avoid overwatering, as this can lead to mold growth and other problems. Check the moisture level of the substrate regularly and water when it feels dry to the touch.
How do I know when my mushrooms are ready to harvest?
Mushrooms are typically ready to harvest when the caps have fully opened but before they start to flatten out or release spores. The exact timing depends on the species. Oyster mushrooms are ready when the caps are fully formed and the edges are slightly curled upwards. Shiitake mushrooms are ready when the caps have expanded and the gills are visible. Harvest your mushrooms by gently twisting or cutting them off at the base of the stem.
Can I grow mushrooms from store-bought mushrooms?
While it’s technically possible to grow mushrooms from store-bought mushrooms, it’s not recommended for beginners. Store-bought mushrooms are often treated with chemicals to prolong their shelf life, which can inhibit their ability to produce viable spores. Additionally, there’s a higher risk of contamination when using store-bought mushrooms. It’s best to start with a reputable source of mushroom spawn or a mushroom growing kit.
What are the health benefits of eating homegrown mushrooms?
Homegrown mushrooms are a nutritious and delicious addition to your diet. They are a good source of protein, fiber, vitamins, and minerals. They also contain antioxidants and other beneficial compounds that may help boost your immune system and protect against chronic diseases. Growing your own mushrooms ensures that they are free from pesticides and other harmful chemicals.
What if my mushrooms don’t grow?
If your mushrooms aren’t growing, there could be several reasons. Check the temperature and humidity levels to ensure they are within the optimal range for your chosen mushroom species. Make sure the substrate is properly sterilized and inoculated. Avoid overwatering or underwatering. If you suspect contamination, remove the affected area and try again. Sometimes, it simply takes patience and persistence to successfully grow mushrooms at home. Don’t give up!


Leave a Comment