
Grow mushrooms at home? Absolutely! Imagine harvesting fresh, flavorful mushrooms right from your own kitchen – it’s easier than you think! For centuries, cultivating mushrooms has been a prized skill, dating back to ancient civilizations who recognized their culinary and medicinal value. From the elaborate cave systems of ancient China to the royal gardens of France, mushroom cultivation has a rich and fascinating history.
But you don’t need to be a seasoned botanist or a royal gardener to enjoy the delights of homegrown mushrooms. In today’s world, where access to fresh, organic produce is increasingly important, learning how to grow mushrooms at home offers a fantastic way to supplement your diet, reduce your grocery bills, and connect with nature. Plus, it’s a super rewarding hobby!
This DIY guide is packed with simple, step-by-step instructions and clever hacks that will empower you to cultivate a thriving mushroom patch, even in the smallest of spaces. Whether you’re a complete beginner or have a bit of gardening experience, I’m here to show you how to unlock the secrets of mushroom cultivation and enjoy the delicious rewards of your labor. Let’s get started!
Grow Your Own Gourmet Mushrooms at Home: A Beginner’s Guide
Hey there, fellow fungi enthusiasts! Ever dreamt of harvesting your own delicious mushrooms right in your kitchen? Well, dream no more! Growing mushrooms at home is surprisingly achievable, even for beginners. I’m going to walk you through a simple and effective method using readily available materials. Get ready to impress your friends (and your taste buds!) with your homegrown gourmet mushrooms.
What You’ll Need: The Mushroom Growing Shopping List
Before we dive in, let’s gather our supplies. This is crucial for a smooth and successful mushroom-growing adventure.
* Oyster Mushroom Spawn: This is the “seed” of your mushrooms. You can find it online or at specialty gardening stores. Oyster mushrooms are a great choice for beginners because they’re relatively easy to grow and quite forgiving.
* Straw: This will be our growing medium. Wheat straw is ideal, but other types of straw can work too. Make sure it’s clean and free of mold.
* Large Plastic Bags: Heavy-duty garbage bags work perfectly. We’ll use these to create our mushroom-growing containers.
* Bleach: For sterilizing the straw. This is important to prevent unwanted mold and bacteria from competing with our mushrooms.
* Large Container: A tub or bucket big enough to submerge the straw in.
* Drill or Punch: To create ventilation holes in the plastic bags.
* Spray Bottle: For misting the mushrooms as they grow.
* Gloves: To maintain cleanliness and prevent contamination.
* Optional: Hydrated Lime (Calcium Hydroxide): This helps adjust the pH of the straw, making it more favorable for mushroom growth.
Phase 1: Preparing the Straw Substrate
This is arguably the most important step. A properly prepared substrate is the foundation for a bountiful mushroom harvest. We need to pasteurize the straw to kill off any competing organisms.
1. Chop the Straw: Using scissors or garden shears, chop the straw into smaller pieces, about 2-4 inches long. This will make it easier to pack into the bags and will increase the surface area for the mushroom mycelium to colonize.
2. Prepare the Bleach Solution: In your large container, mix a bleach solution. A ratio of 1 tablespoon of bleach per gallon of water is sufficient. If you’re using hydrated lime, add it to the water *before* the bleach, following the instructions on the lime packaging (usually a couple of tablespoons per gallon). The lime will help raise the pH, making the straw less acidic and more favorable for mushroom growth.
3. Soak the Straw: Submerge the chopped straw completely in the bleach (or bleach/lime) solution. Make sure all the straw is saturated. You might need to weigh it down with a brick or a heavy object to keep it submerged.
4. Pasteurize the Straw: Let the straw soak in the bleach solution for at least 12-24 hours. This will kill off most of the unwanted microorganisms.
5. Drain the Straw: After soaking, drain the straw thoroughly. You can do this by placing it in a colander or on a screen. You want the straw to be damp, but not dripping wet. Squeeze out any excess water. The ideal moisture content is when you can squeeze a handful of straw and only a few drops of water come out.
Phase 2: Inoculating the Straw with Mushroom Spawn
Now for the fun part – introducing the mushroom spawn to our prepared straw! This is where the magic begins.
1. Clean Your Work Area: Before you start, wipe down your work surface with a disinfectant to minimize contamination.
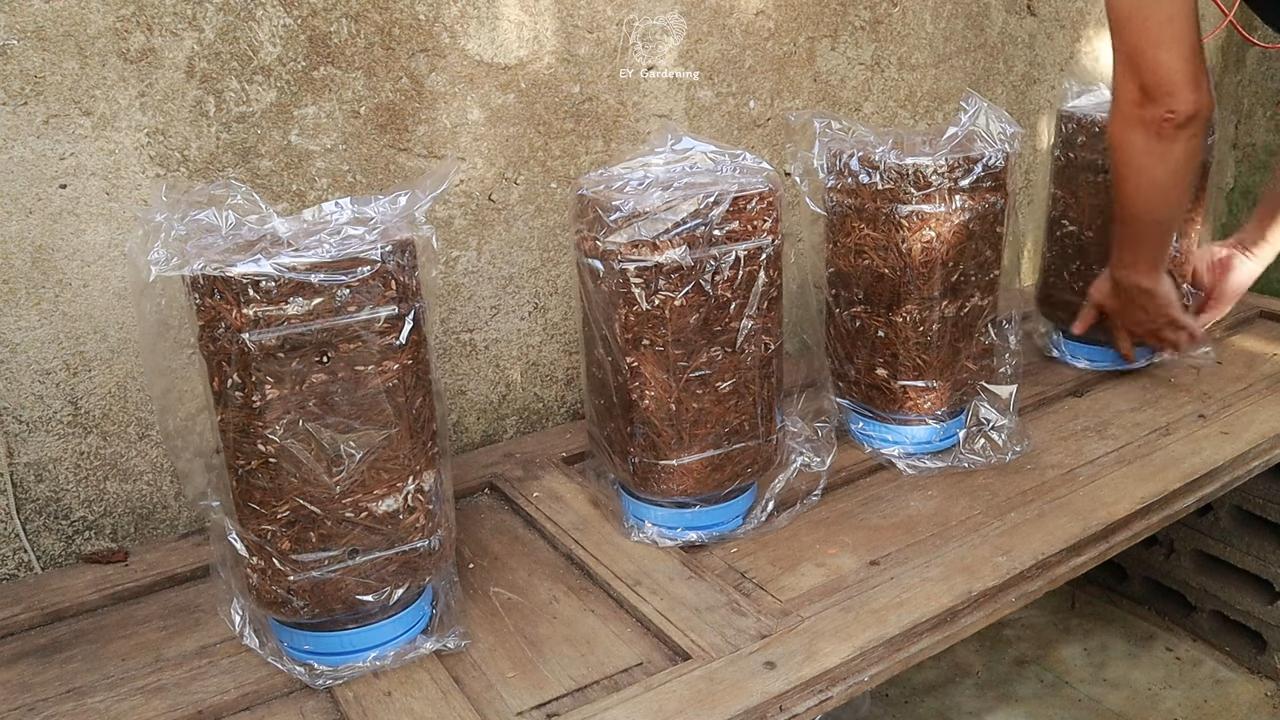
2. Prepare the Plastic Bags: Using your drill or punch, create several small ventilation holes (about ¼ inch in diameter) in the plastic bags. Space them evenly around the bag, about 4-6 inches apart. These holes will allow for air exchange, which is essential for mushroom growth.
3. Layer the Straw and Spawn: Now, it’s time to layer the straw and mushroom spawn in the plastic bags. Start with a layer of straw at the bottom of the bag. Then, sprinkle a generous amount of mushroom spawn over the straw. Add another layer of straw, followed by more spawn. Continue layering until the bag is almost full, leaving a few inches of space at the top.
4. Seal the Bag: Fold over the top of the bag and secure it with tape or a rubber band. You don’t need to seal it airtight; just enough to keep the straw and spawn contained.
5. Incubation: Place the inoculated bags in a dark, warm place with good air circulation. The ideal temperature for oyster mushroom incubation is between 65-75°F (18-24°C). A closet, basement, or spare room works well. Avoid direct sunlight.
6. Monitor Colonization: Over the next few weeks, you’ll see the mushroom mycelium (the white, thread-like network) spreading throughout the straw. This is called colonization. The straw will gradually turn white as the mycelium consumes it. This process usually takes 2-4 weeks, depending on the temperature and the amount of spawn used.
Phase 3: Fruiting the Mushrooms
Once the straw is fully colonized (completely covered in white mycelium), it’s time to trigger fruiting – the formation of mushrooms!
1. Increase Humidity: Mushrooms need high humidity to fruit properly. Mist the bags with water several times a day to keep the humidity level high. You can also place a tray of water near the bags to increase humidity.
2. Introduce Light: While mushrooms don’t need a lot of light, they do need some light to trigger fruiting. Move the bags to a location with indirect light. A north-facing window is ideal.
3. Lower Temperature (Optional): A slight drop in temperature can also help trigger fruiting. If possible, lower the temperature by a few degrees.
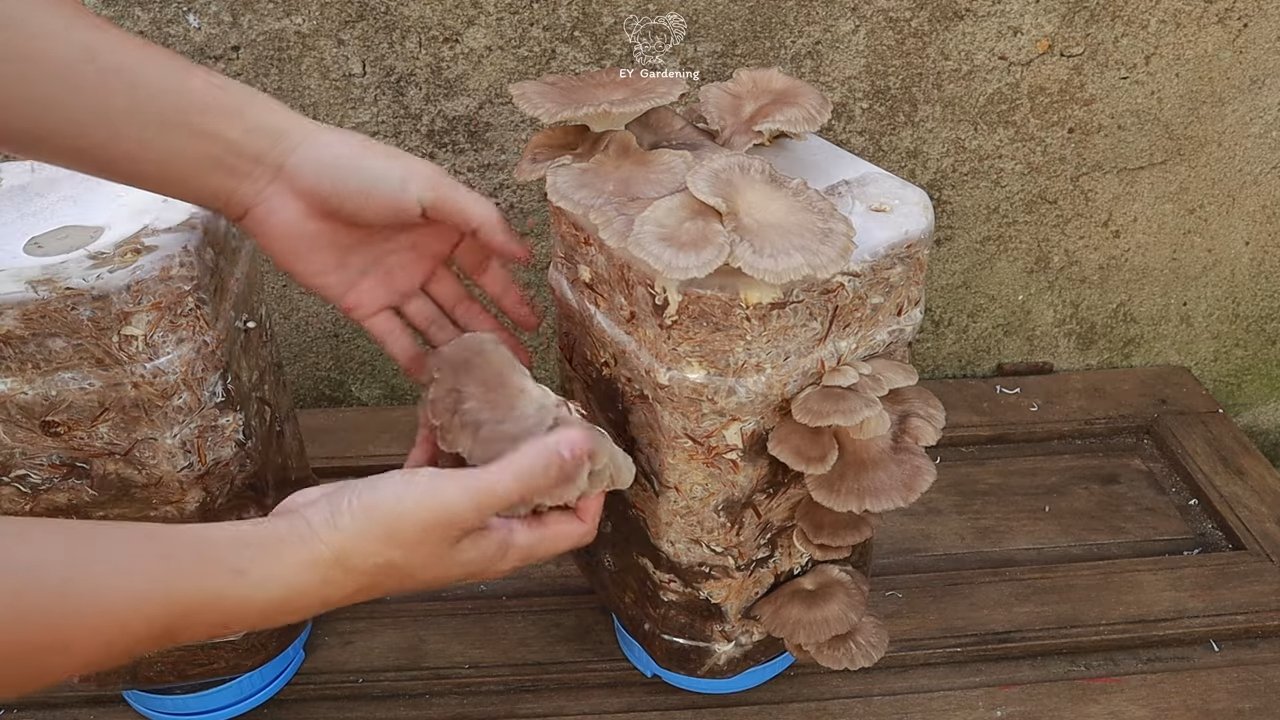
4. Monitor for Pinning: After a few days, you’ll start to see small mushroom “pins” forming on the surface of the straw, near the ventilation holes. These are the baby mushrooms!
5. Maintain Humidity and Ventilation: Continue to mist the mushrooms regularly to keep them moist. Make sure there’s good air circulation to prevent mold growth.
Phase 4: Harvesting and Enjoying Your Mushrooms
The moment you’ve been waiting for! Harvesting your own homegrown mushrooms is incredibly rewarding.
1. Harvest at the Right Time: Harvest the mushrooms when the caps are fully formed but before they start to drop spores (the powdery substance on the underside of the cap). The edges of the caps will start to flatten out or even curl upwards slightly when they’re ready to harvest.
2. Harvesting Technique: To harvest, gently twist and pull the mushrooms from the straw. Avoid cutting them, as this can leave behind a stump that can rot and contaminate the substrate.
3. Enjoy Your Harvest: Your freshly harvested oyster mushrooms are now ready to be cooked and enjoyed! They’re delicious sautéed, grilled, or added to soups, stews, and pasta dishes.
4. Second Flush: After harvesting, the straw will often produce a second (or even third) flush of mushrooms. Continue to mist the straw and maintain humidity to encourage further fruiting.
Troubleshooting: Common Mushroom Growing Problems
Even with the best preparation, you might encounter some challenges along the way. Here are a few common problems and how to address them:
* Contamination (Mold): If you see green, black, or other colored mold growing on the straw, it means the substrate has been contaminated. Unfortunately, there’s not much you can do at this point except discard the contaminated bag. To prevent contamination, make sure to sterilize the straw properly and maintain a clean work environment.
* Slow Colonization: If the mycelium is spreading slowly, it could be due to low temperature, poor air circulation, or insufficient moisture. Make sure the temperature is within the ideal range (65-75°F), provide good air circulation, and mist the straw regularly.
* No Fruiting: If the straw is fully colonized but no mushrooms are forming, it could be due to low humidity, insufficient light, or high temperature. Increase humidity by misting regularly, provide indirect light, and try lowering the temperature slightly.
* Small Mushrooms: If the mushrooms are small and stunted, it could be due to insufficient moisture or nutrients. Make sure to mist the mushrooms regularly and consider adding a small amount of nutrient-rich supplement to the straw (such as coffee grounds) before inoculation.
Tips for Success: Making Your Mushroom Garden Thrive
Here are a few extra tips to help you become a mushroom-growing pro:
* Start Small: Don’t try to grow too many mushrooms at once. Start with a few bags and gradually increase the scale as you gain experience.
* Use Fresh Spawn: Make sure your mushroom spawn is fresh and viable. Check
Conclusion
So, there you have it! Cultivating your own mushrooms at home is not only surprisingly simple, but it’s also incredibly rewarding. Imagine the satisfaction of harvesting fresh, flavorful mushrooms grown with your own two hands, knowing exactly where they came from and what went into their cultivation. Forget those bland, store-bought varieties – with this DIY trick, you’ll unlock a world of culinary possibilities and enjoy mushrooms bursting with unparalleled taste and texture.
This isn’t just about saving money (though that’s certainly a perk!). It’s about connecting with nature, learning a new skill, and adding a touch of magic to your kitchen. The process is far less intimidating than you might think, and the results are well worth the minimal effort involved. Plus, you’ll be reducing your carbon footprint by sourcing your food locally – right from your own home!
Why is this a must-try? Because it empowers you to take control of your food source, experiment with different mushroom varieties, and enjoy the freshest, most flavorful mushrooms imaginable. It’s a sustainable, educational, and delicious adventure all rolled into one.
Ready to take your mushroom growing to the next level? Consider experimenting with different substrates. While coffee grounds are a fantastic starting point, you can also try using straw, wood chips, or even cardboard. Each substrate will impart a slightly different flavor profile to your mushrooms. You can also explore different mushroom varieties beyond the common oyster mushroom. Shiitake, lion’s mane, and even wine cap mushrooms can be successfully grown at home with a little extra research and preparation. Don’t be afraid to experiment and find what works best for you and your environment.
We encourage you to embark on this exciting journey of growing mushrooms at home. It’s a fantastic way to connect with nature, learn a new skill, and enjoy the freshest, most flavorful mushrooms imaginable.
Don’t just take our word for it – try it yourself! We’re confident that you’ll be amazed by the results. And once you’ve harvested your first batch of homegrown mushrooms, be sure to share your experience with us! We’d love to hear about your successes, your challenges, and any tips or tricks you’ve discovered along the way. Share your photos and stories on social media using #HomeGrownMushrooms and let’s build a community of home mushroom growers!
Now, let’s address some frequently asked questions to help you get started on your mushroom growing adventure.
Frequently Asked Questions
What kind of mushrooms can I grow at home using this method?
The easiest and most recommended mushroom to start with is the oyster mushroom. They are relatively fast-growing, tolerant of a wide range of conditions, and readily available in spawn form. Other varieties like shiitake, lion’s mane, and wine cap mushrooms can also be grown at home, but they may require more specialized techniques and substrates. Start with oyster mushrooms to gain experience and then branch out to other varieties as you become more comfortable.
How long does it take to grow mushrooms at home?
The time it takes to grow mushrooms varies depending on the variety, the substrate used, and the environmental conditions. Oyster mushrooms typically take 2-4 weeks to colonize the substrate and another 1-2 weeks to fruit (produce mushrooms). Shiitake mushrooms, on the other hand, can take several months to colonize and fruit. Be patient and monitor your mushroom growing setup regularly.
What are the ideal conditions for growing mushrooms at home?
Mushrooms thrive in cool, humid, and dark environments. The ideal temperature range for most oyster mushrooms is between 60-75°F (15-24°C). Humidity levels should be around 80-90%. A dark, enclosed space like a basement, closet, or even a plastic storage bin can provide the necessary conditions. Ensure adequate ventilation to prevent the buildup of carbon dioxide.
Where can I get mushroom spawn?
Mushroom spawn can be purchased online from reputable mushroom suppliers or at local garden centers. Look for high-quality spawn that is free from contaminants. You can choose from different types of spawn, such as grain spawn, sawdust spawn, or plug spawn. Grain spawn is generally the easiest to work with for beginners.
What if my mushrooms don’t grow?
There are several reasons why your mushrooms might not be growing. The most common causes include:
* **Insufficient humidity:** Make sure the humidity levels are high enough by misting the substrate regularly.
* **Inadequate ventilation:** Ensure there is enough airflow to prevent the buildup of carbon dioxide.
* **Contamination:** If you see mold or other contaminants growing on the substrate, it may be necessary to discard the batch and start over.
* **Incorrect temperature:** Make sure the temperature is within the ideal range for the mushroom variety you are growing.
* **Lack of light:** While mushrooms don’t need direct sunlight, they do need some light to fruit.
Can I use any type of coffee grounds?
Yes, you can use any type of coffee grounds, including those from drip coffee makers, espresso machines, and French presses. However, it’s important to use fresh coffee grounds that haven’t been sitting around for too long, as they can become contaminated with mold.
How often should I water my mushrooms?
You should mist your mushrooms regularly to maintain high humidity levels. The frequency of watering will depend on the environmental conditions. In general, you should mist the substrate at least once or twice a day, or more often if the air is dry. Avoid overwatering, as this can lead to mold growth.
Are there any safety precautions I should take when growing mushrooms at home?
Yes, it’s important to take certain safety precautions when growing mushrooms at home. Always wash your hands thoroughly before and after handling the substrate and mushrooms. Avoid breathing in the spores, as they can cause allergic reactions in some people. Cook your mushrooms thoroughly before eating them to kill any harmful bacteria or fungi. And most importantly, only consume mushrooms that you have positively identified as edible. If you are unsure about the identity of a mushroom, do not eat it.
Can I grow mushrooms outdoors?
Yes, some mushroom varieties, such as wine cap mushrooms, can be grown outdoors in a suitable environment. However, outdoor mushroom cultivation requires more planning and preparation, as you need to consider factors such as sunlight, temperature, and humidity.
What do I do with the spent substrate after harvesting my mushrooms?
The spent substrate can be used as compost in your garden. It is rich in nutrients and can help improve soil fertility. You can also add it to your compost pile or use it as mulch around your plants.
Is growing mushrooms at home sustainable?
Yes, growing mushrooms at home can be a very sustainable practice. By using waste products like coffee grounds as a substrate, you are reducing waste and diverting it from landfills. You are also reducing your carbon footprint by sourcing your food locally.
Leave a Comment