
Grow Malabar Spinach Home with ease! Ever dreamt of stepping into your backyard and harvesting fresh, vibrant greens for a delicious and nutritious meal? Well, dream no more! This DIY guide is your passport to cultivating your very own Malabar Spinach haven, right in the comfort of your home. Forget those bland, store-bought vegetables; imagine the satisfaction of nurturing your own food from seed to table.
Malabar Spinach, also known as Basella alba, isn’t just another leafy green; it boasts a rich history, particularly in Asian and African cuisines, where it’s been cherished for centuries for its unique flavor and health benefits. It’s a climbing vine, offering both beauty and bounty to your garden. But why should *you* bother with this particular plant? In today’s world, where access to fresh, organic produce can be challenging and expensive, learning to grow Malabar Spinach home provides a sustainable and rewarding solution.
This DIY article will equip you with simple, effective tricks and hacks to successfully cultivate this delightful vegetable, regardless of your gardening experience. We’ll cover everything from seed starting to harvesting, ensuring you enjoy a continuous supply of fresh, homegrown goodness. So, grab your gardening gloves, and let’s embark on this exciting journey together!
Malabar Spinat zu Hause anbauen: Dein umfassender DIY-Leitfaden
Hallo Gartenfreunde! Ich freue mich riesig, euch heute zu zeigen, wie ihr Malabar Spinat (Basella alba) ganz einfach zu Hause anbauen könnt. Dieser köstliche und nahrhafte Blattspinat ist nicht nur superlecker, sondern auch unglaublich pflegeleicht. Also, krempeln wir die Ärmel hoch und legen los!
Was du für den Anbau von Malabar Spinat brauchst
Bevor wir loslegen, hier eine Liste der Dinge, die du benötigst:
* Samen oder Stecklinge: Du kannst Malabar Spinat entweder aus Samen ziehen oder Stecklinge von einer bestehenden Pflanze nehmen. Ich persönlich finde Stecklinge einfacher, aber beides funktioniert prima.
* Töpfe oder Pflanzkästen: Wähle Töpfe mit guter Drainage. Die Größe sollte mindestens 20 cm Durchmesser haben.
* Hochwertige Blumenerde: Eine gut durchlässige, nährstoffreiche Erde ist ideal.
* Rankhilfe: Malabar Spinat ist eine Kletterpflanze, also brauchst du etwas, woran er hochwachsen kann. Ein Rankgitter, Bambusstäbe oder sogar ein Zaun eignen sich gut.
* Gießkanne oder Schlauch: Zum regelmäßigen Gießen.
* Dünger (optional): Ein organischer Dünger kann das Wachstum fördern.
* Sonniger Standort: Malabar Spinat liebt die Sonne!
Malabar Spinat aus Samen ziehen
Wenn du dich für den Anbau aus Samen entscheidest, befolge diese Schritte:
1. Samen vorbereiten: Die Samen des Malabar Spinats haben eine harte Schale. Um die Keimung zu beschleunigen, kannst du sie vor dem Aussäen 24 Stunden in warmem Wasser einweichen. Das hilft, die Schale aufzuweichen.
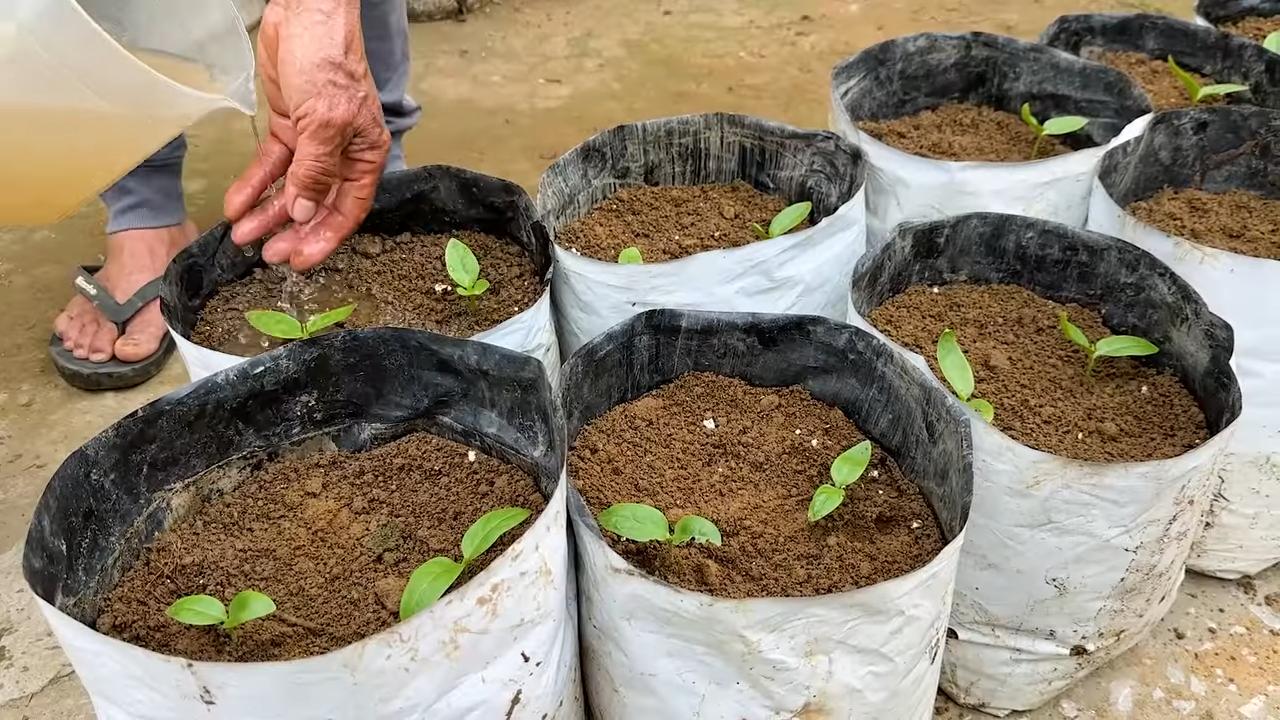
2. Aussaat: Fülle deine Töpfe oder Pflanzkästen mit Blumenerde. Säe die Samen etwa 1 cm tief in die Erde. Ich säe meistens 2-3 Samen pro Topf, um sicherzustellen, dass mindestens einer keimt.
3. Gießen: Gieße die Erde vorsichtig, sodass sie feucht, aber nicht durchnässt ist.
4. Standort: Stelle die Töpfe an einen warmen und sonnigen Ort. Malabar Spinat braucht viel Licht, um gut zu wachsen.
5. Keimung: Die Keimung kann je nach Temperatur und Feuchtigkeit 1-3 Wochen dauern. Hab Geduld!
6. Vereinzeln: Sobald die Sämlinge ein paar Blätter haben, kannst du die schwächsten entfernen, sodass nur der stärkste Sämling pro Topf übrig bleibt.
Malabar Spinat aus Stecklingen ziehen
Das Ziehen aus Stecklingen ist meiner Meinung nach die einfachste Methode. So geht’s:
1. Stecklinge schneiden: Suche dir eine gesunde Malabar Spinat Pflanze und schneide etwa 10-15 cm lange Stecklinge ab. Achte darauf, dass die Stecklinge mindestens 2-3 Blattknoten haben.
2. Blätter entfernen: Entferne die unteren Blätter von den Stecklingen, sodass nur noch die oberen Blätter übrig bleiben. Das reduziert die Verdunstung und fördert die Wurzelbildung.
3. Bewurzelung: Du hast zwei Möglichkeiten, die Stecklinge zu bewurzeln:
* Im Wasser: Stelle die Stecklinge in ein Glas mit Wasser. Achte darauf, dass die unteren Blattknoten unter Wasser sind. Wechsle das Wasser alle paar Tage. Nach etwa 1-2 Wochen sollten sich Wurzeln bilden.
* Direkt in der Erde: Tauche die unteren Enden der Stecklinge in Bewurzelungspulver (optional) und stecke sie dann direkt in feuchte Blumenerde.
4. Pflanzen: Sobald die Stecklinge Wurzeln gebildet haben (entweder im Wasser oder direkt in der Erde), kannst du sie in Töpfe oder Pflanzkästen mit Blumenerde pflanzen.
5. Gießen: Gieße die Stecklinge vorsichtig, sodass die Erde feucht, aber nicht durchnässt ist.
6. Standort: Stelle die Töpfe an einen warmen und sonnigen Ort.
Pflege des Malabar Spinats
Sobald dein Malabar Spinat angewachsen ist, ist die Pflege relativ einfach:
1. Gießen: Gieße regelmäßig, besonders bei heißem Wetter. Die Erde sollte immer leicht feucht sein, aber vermeide Staunässe. Ich überprüfe die Erde täglich und gieße, wenn sich die oberste Schicht trocken anfühlt.
2. Düngen: Dünge den Malabar Spinat alle paar Wochen mit einem organischen Dünger. Das fördert das Wachstum und die Blattproduktion. Ich verwende gerne Komposttee oder verdünnten Flüssigdünger.
3. Rankhilfe: Leite die Triebe des Malabar Spinats an der Rankhilfe entlang. Er wird sich von selbst daran festhalten und hochklettern.
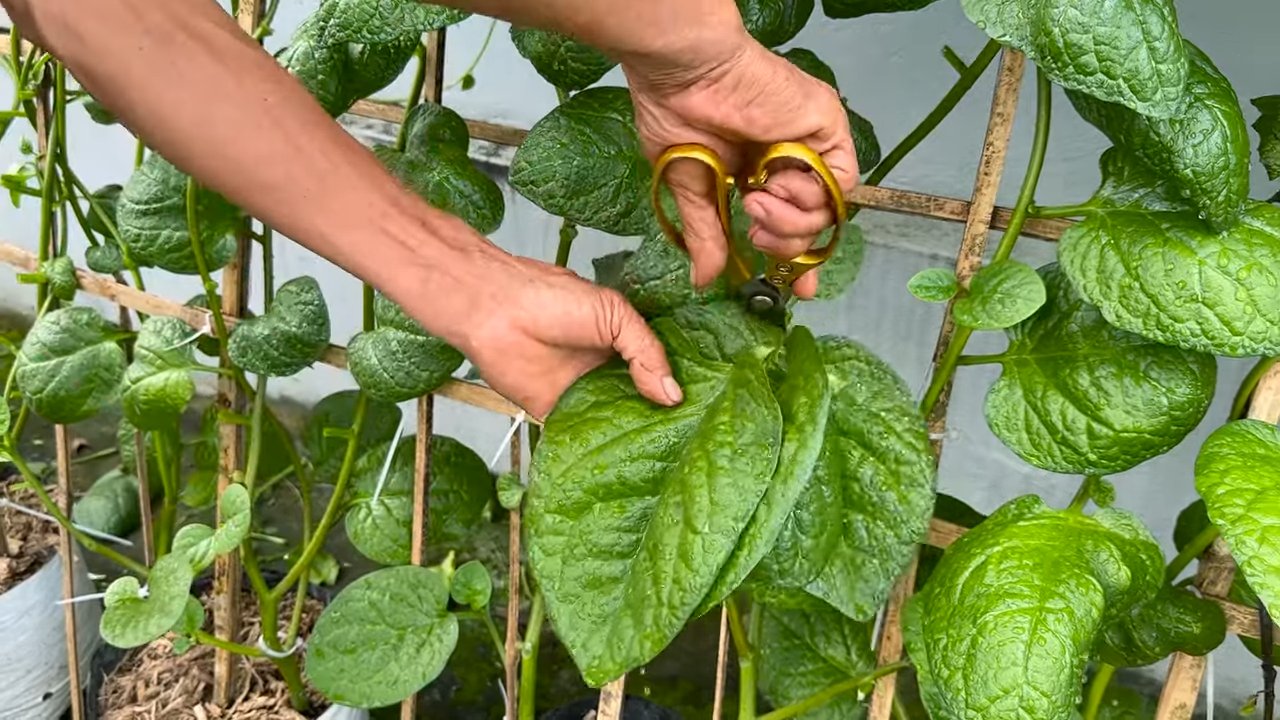
4. Schneiden: Schneide regelmäßig die Triebspitzen ab, um das Wachstum zu fördern und die Pflanze buschiger zu machen. Du kannst die abgeschnittenen Blätter und Triebe natürlich essen!
5. Schädlinge und Krankheiten: Malabar Spinat ist relativ resistent gegen Schädlinge und Krankheiten. Gelegentlich können Blattläuse auftreten. Diese kannst du einfach mit einem Wasserstrahl abspritzen oder mit einer milden Seifenlösung behandeln.
Ernte des Malabar Spinats
Du kannst den Malabar Spinat ernten, sobald die Blätter groß genug sind. Das ist normalerweise etwa 6-8 Wochen nach dem Pflanzen der Fall.
* Erntemethode: Schneide die Blätter und Triebe mit einer Schere oder einem Messer ab. Du kannst entweder einzelne Blätter ernten oder ganze Triebe abschneiden.
* Regelmäßige Ernte: Je öfter du erntest, desto mehr Blätter produziert die Pflanze. Ernte regelmäßig, um das Wachstum anzuregen.
* Lagerung: Malabar Spinat ist nicht sehr lange haltbar. Am besten verarbeitest du ihn sofort nach der Ernte. Im Kühlschrank hält er sich in einem Plastikbeutel etwa 2-3 Tage.
Verwendung des Malabar Spinats
Malabar Spinat ist vielseitig einsetzbar in der Küche. Die Blätter können roh in Salaten gegessen oder wie Spinat gekocht werden. Sie haben einen leicht säuerlichen Geschmack und sind reich an Vitaminen und Mineralstoffen.
* Salate: Junge, zarte Blätter eignen sich hervorragend für Salate.
* Gekocht: Du kannst Malabar Spinat wie normalen Spinat kochen, dünsten oder braten. Er passt gut zu Currys, Suppen und Eintöpfen.
* Smoothies: Füge eine Handvoll Malabar Spinat zu deinem Smoothie hinzu, um ihn mit Nährstoffen anzureichern.
* Suppen: Malabar Spinat ist eine tolle Ergänzung für Suppen. Er verleiht ihnen eine frische Note und macht sie nahrhafter.
Zusätzliche Tipps für den erfolgreichen Anbau
* Bodenverbesserung: Wenn dein Boden nicht ideal ist, kannst du ihn mit Kompost oder anderem organischen Material verbessern. Das sorgt für eine bessere Drainage und Nährstoffversorgung.
* Mulchen: Eine Mulchschicht um die Pflanzen herum hilft, die Feuchtigkeit im Boden zu halten und Unkraut zu unterdrücken.
* Sonnenschutz: In sehr heißen Klimazonen kann es sinnvoll sein, den Malabar Spinat während der heißesten Stunden des Tages vor direkter Sonneneinstrahlung zu schützen.
* Überwinterung: Malabar Spinat ist nicht winterhart. In kälteren Klimazonen kannst du ihn entweder als einjährige Pflanze anbauen oder ihn im Herbst in einen Topf umpflanzen und im Haus überwintern.
Häufige Probleme und Lösungen
* Gelbe Blätter: Gelbe Blätter können ein Zeichen für Nährstoffmangel oder Überwässerung sein. Überprüfe die Bewässerung und dünge die Pflanze gegebenenfalls.
* Langsame Wachstum: Langsames Wachstum kann durch zu wenig Licht, Nährstoffmangel oder kalte Temperaturen verursacht werden. Stelle sicher, dass die Pflanze genügend Licht bekommt und dünge sie regelmäßig.
* Blattläuse: Blattläuse können mit einem Wasser
Conclusion
So, there you have it! Growing Malabar Spinach at home is not only achievable but also incredibly rewarding. We’ve walked you through the simple steps, from sourcing your seeds or cuttings to nurturing your vibrant, leafy greens. This isn’t just about adding another plant to your garden; it’s about embracing a sustainable lifestyle, reducing your reliance on store-bought produce, and enjoying the unparalleled freshness of homegrown vegetables.
Why is this DIY trick a must-try? Because it empowers you to control the quality of your food. You know exactly what goes into your Malabar Spinach – no harmful pesticides, no long-distance transportation, just pure, unadulterated goodness. Plus, the taste difference is remarkable. Homegrown Malabar Spinach boasts a more intense, earthy flavor that elevates any dish.
But the benefits extend beyond taste and health. Growing your own Malabar Spinach is a fantastic way to connect with nature, relieve stress, and beautify your surroundings. Imagine stepping into your garden and harvesting fresh greens for a delicious stir-fry, soup, or salad. It’s a truly satisfying experience.
Looking for variations? Consider growing Malabar Spinach in containers if you have limited space. A sunny balcony or patio is all you need. You can also experiment with different trellising methods to create a stunning vertical garden. For those in cooler climates, starting your seeds indoors a few weeks before the last frost can give you a head start. And don’t be afraid to try different companion plants to enhance growth and deter pests. Basil, marigolds, and nasturtiums are all excellent choices.
We’ve shared our tips and tricks, but the real magic happens when you get your hands dirty. Don’t be intimidated if you’re a beginner gardener. Malabar Spinach is relatively easy to grow, and the rewards are well worth the effort.
We wholeheartedly encourage you to give this DIY trick a try. Start small, be patient, and enjoy the process. And most importantly, share your experience with us! We’d love to hear your success stories, see your photos, and learn from your challenges. Let’s build a community of Malabar Spinach enthusiasts and inspire others to embrace the joys of homegrown food. So, grab your seeds, prepare your soil, and get ready to embark on a delicious and rewarding gardening adventure. You’ll be amazed at how easy it is to grow Malabar Spinach at home and the incredible difference it makes in your meals and your life.
Frequently Asked Questions (FAQ)
What exactly is Malabar Spinach, and why should I grow it?
Malabar Spinach (Basella alba or Basella rubra) isn’t a true spinach, but a leafy green vine that thrives in warm weather. It’s an excellent alternative to spinach, especially in hot climates where traditional spinach struggles. It’s packed with vitamins A and C, iron, and calcium, making it a nutritious addition to your diet. Growing it yourself ensures you have access to fresh, organic greens without relying on store-bought options. Plus, it’s a beautiful and productive plant that can add visual appeal to your garden.
How do I start growing Malabar Spinach? Seeds or cuttings?
You can start Malabar Spinach from either seeds or cuttings. Seeds require a bit more patience, as they can be slow to germinate. Soak the seeds in warm water for 24 hours before planting to improve germination rates. Plant them about half an inch deep in well-draining soil. Cuttings, on the other hand, offer a faster route to harvest. Simply take a 4-6 inch cutting from a healthy vine, remove the lower leaves, and place it in water until roots develop. Once the roots are an inch or two long, you can transplant the cutting into soil.
What are the ideal growing conditions for Malabar Spinach?
Malabar Spinach loves warm weather and plenty of sunshine. Aim for at least 6 hours of direct sunlight per day. The ideal temperature range is between 70°F and 90°F (21°C and 32°C). It prefers well-draining soil that is rich in organic matter. Regular watering is essential, especially during hot, dry periods. However, avoid overwatering, as this can lead to root rot. A trellis or other support structure is necessary, as Malabar Spinach is a climbing vine.
How often should I water and fertilize my Malabar Spinach?
Water your Malabar Spinach regularly, keeping the soil consistently moist but not waterlogged. Check the soil moisture level daily, especially during hot weather. Fertilize every 2-3 weeks with a balanced organic fertilizer to promote healthy growth. You can also amend the soil with compost or aged manure to provide essential nutrients. Avoid over-fertilizing, as this can lead to excessive foliage growth at the expense of flavor.
What are some common pests and diseases that affect Malabar Spinach, and how can I prevent them?
Malabar Spinach is generally resistant to pests and diseases, but it can occasionally be affected by aphids, spider mites, or fungal diseases. To prevent pest infestations, inspect your plants regularly and remove any affected leaves. You can also use insecticidal soap or neem oil to control pests. To prevent fungal diseases, ensure good air circulation around your plants and avoid overwatering. If you notice any signs of disease, remove the affected leaves immediately.
When and how should I harvest my Malabar Spinach?
You can start harvesting Malabar Spinach about 60-70 days after planting. Harvest the leaves and tender stems regularly to encourage continued growth. Simply snip off the leaves and stems with scissors or pruning shears. Avoid harvesting more than one-third of the plant at a time. The more you harvest, the more the plant will produce.
Can I grow Malabar Spinach in containers?
Yes, Malabar Spinach grows very well in containers, making it an excellent option for those with limited space. Choose a large container (at least 12 inches in diameter) with drainage holes. Use a well-draining potting mix that is rich in organic matter. Provide a trellis or other support structure for the vine to climb. Water and fertilize regularly, as container-grown plants tend to dry out and deplete nutrients more quickly than those grown in the ground.
How can I use Malabar Spinach in my cooking?
Malabar Spinach can be used in a variety of dishes, just like regular spinach. It’s delicious in stir-fries, soups, stews, salads, and omelets. It has a slightly mucilaginous texture, which can be reduced by blanching it briefly before cooking. The leaves can also be used as a thickening agent in soups and stews. Try adding it to your favorite spinach recipes for a unique and flavorful twist.
Is Malabar Spinach a perennial or an annual?
Malabar Spinach is a perennial in tropical and subtropical climates (USDA zones 9-11). In colder climates, it is typically grown as an annual. However, you can overwinter it indoors by bringing it inside before the first frost and providing it with adequate light and water.
How do I save seeds from my Malabar Spinach plant?
To save seeds from your Malabar Spinach plant, allow some of the flowers to mature and form berries. Once the berries turn black and dry, harvest them and remove the seeds. Allow the seeds to dry completely before storing them in an airtight container in a cool, dark place. These seeds can be used to grow new plants the following season.

Leave a Comment