
Grow Ginger at Home – imagine the satisfaction of snipping fresh, fragrant ginger root right from your own backyard! Forget those sad, shriveled pieces at the grocery store; we’re diving headfirst into the wonderful world of homegrown ginger. For centuries, ginger has been treasured not just for its zesty flavor, but also for its incredible medicinal properties. From ancient Ayurvedic practices to traditional Chinese medicine, ginger has been a go-to remedy for everything from nausea to inflammation.
But why should you bother growing it yourself? Well, for starters, the flavor of homegrown ginger is simply unmatched. It’s more vibrant, more potent, and undeniably fresher than anything you can buy. Plus, let’s be honest, there’s a certain magic to nurturing a plant from rhizome to harvest. In this article, I’m going to share some easy-to-follow DIY tricks and hacks that will have you harvesting your own supply of this amazing spice in no time. Whether you’re a seasoned gardener or a complete beginner, I’ll show you how to grow ginger at home successfully, even if you only have a small balcony or patio. Get ready to unleash your inner gardener and enjoy the delicious rewards!
Growing Ginger at Home: Your Comprehensive DIY Guide
Hello, dear garden friends! Have you ever wondered how you can grow fresh, aromatic ginger right in your own home? I’ll show you how! It’s easier than you think and incredibly fun. Plus, you’ll always have fresh ginger on hand, perfect for tea, curries, or just for nibbling. Let’s get started!
What You Need: The Ingredients for Your Ginger Success
Before we begin, here is a list of everything you will need:
- A Ginger Rhizome: Preferably one from the supermarket that is plump, firm, and has well-developed “eyes” (small buds). Organic ginger is often the better choice as it is less likely to have been treated with growth inhibitors.
- A Planter: Choose a pot that is at least 30 cm wide and deep. Ginger roots spread horizontally, so width is more important than depth.
- High-Quality Potting Soil: Well-draining potting soil is crucial. You can also make your own mix of potting soil, compost, and perlite.
- Water: Clear, clean water for watering.
- A Sunny Location: Ginger loves warmth and light, but not direct, harsh midday sun. An east or west-facing window is ideal.
- A Spray Bottle: To increase humidity.
- Patience: Ginger takes time to grow!
Step-by-Step Guide: From Rhizome to Ginger Plant
Here is a detailed guide on how to grow your own ginger:
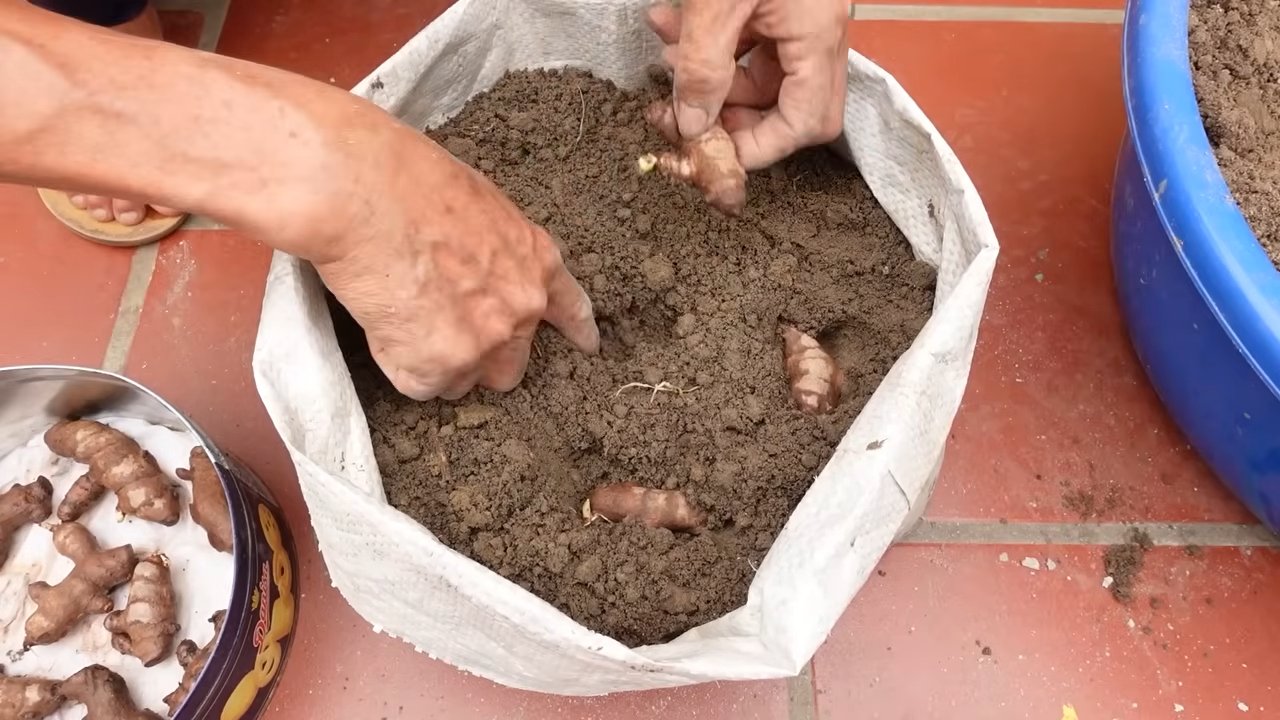
1. Preparing the Ginger Rhizome:
- Choose a ginger rhizome with several “eyes.” These eyes are where the new shoots will grow from.
- If the rhizome is very large, you can cut it into several pieces with a clean knife. Make sure each piece has at least one or two eyes.
- Let the cut surfaces air dry for a few days before planting. This helps prevent rot.
2. Preparing the Pot:
- Fill the pot with potting soil. Leave about 2-3 cm of space to the rim.
- Lightly moisten the soil with water. It should be damp, but not waterlogged.
3. Planting the Rhizome:
- Place the ginger rhizome horizontally on the soil, with the eyes facing up.
- Cover the rhizome with about 2-5 cm of soil.
- Gently press the soil down.
4. Watering and Choosing a Location:
- Water the soil carefully until it is evenly moist. Avoid waterlogging.
- Place the pot in a warm, bright spot, but avoid direct sunlight. An east or west-facing window is ideal.
5. Care:
- Keep the soil moist, but not soggy. Water when the top layer of soil feels dry.
- Spray the leaves regularly with water to increase humidity. Ginger loves humid conditions.
- Fertilize the plant every few weeks with an organic liquid fertilizer.
- Rotate the pot regularly so the plant gets even light.
Patience is a Virtue: The Growth Phase
It can take a few weeks before you see the first shoots. Be patient! Ginger is not a fast starter.
- The First Shoots: As soon as the first shoots appear, it’s a sign that your ginger has taken root well.
- Further Growth: The plant will continue to grow and form new leaves.
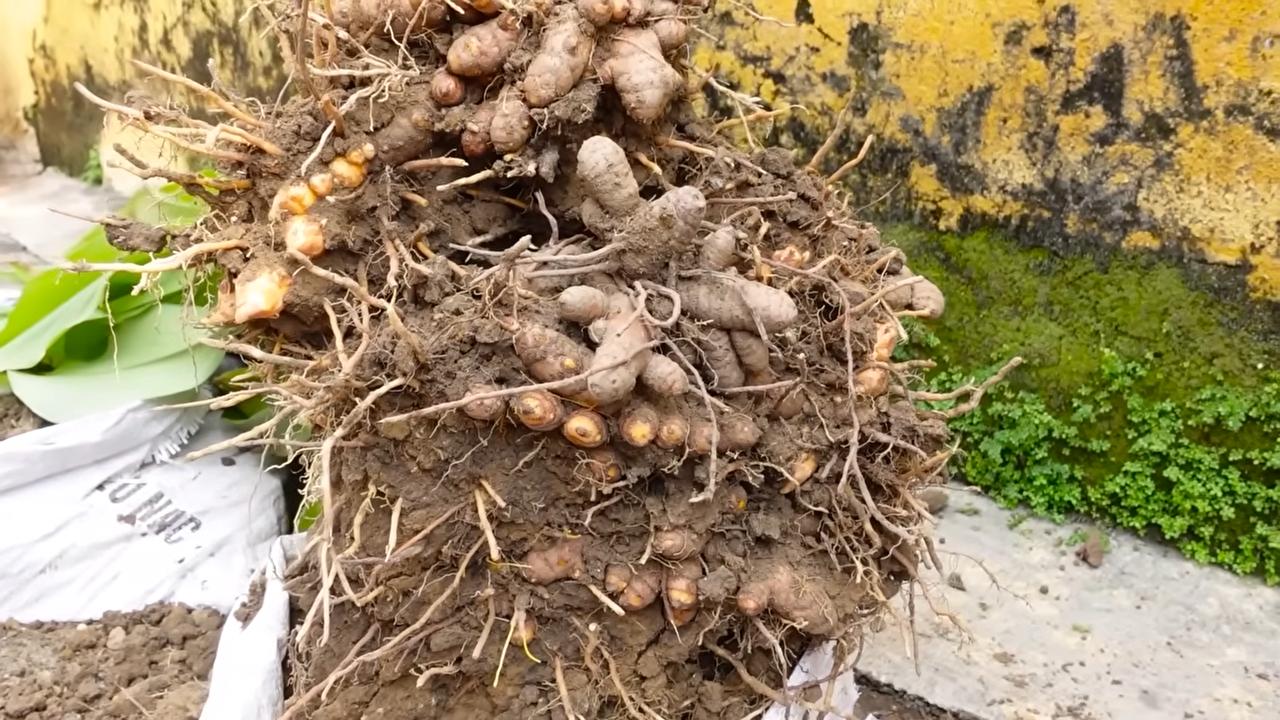
- The Harvest: You can harvest ginger once the plant is about 8-10 months old. You can either dig up the whole plant or just cut off a piece of the rhizome and let the rest continue to grow.
Troubleshooting: What to Do When Something Goes Wrong?
Problems can also arise when growing ginger. Here are some common issues and how to fix them:
- Yellow Leaves: Yellow leaves can be a sign of overwatering, underwatering, or a nutrient deficiency. Check the soil moisture and fertilize the plant if necessary.
- Rot: Rot can occur if the soil is too wet. Make sure the pot has good drainage and water less.
- Pests: Ginger can be infested by pests like spider mites or aphids. Treat the plant with a natural insecticide.
Extra Tips for the Ginger Pro
Here are a few additional tips to help you optimize your ginger cultivation:
- Use Rainwater: Rainwater is softer than tap water and contains no chemicals that could harm the plant.
- Mulch the Soil: A layer of mulch made of straw or compost helps to retain moisture in the soil and suppress weeds.
- Overwintering: In colder climates, you need to bring the ginger indoors for the winter. Place it in a bright, cool spot and water it sparingly.
- Propagation: You can easily propagate ginger by dividing the rhizome into several pieces.
Harvesting and Using Ginger: The Reward for Your Work
After about 8-10 months, you can harvest your own ginger!
- Harvest Time: You’ll know the ginger is ready to harvest when the leaves turn yellow and die back.
- Harvesting Methods: You can either dig up the whole plant or just cut off a part of the rhizome. If you only harvest a part, leave the rest in the pot and it will continue to grow.
- Use: Fresh ginger is incredibly versatile. You can use it in tea, curries, soups, smoothies, or just to nibble on.
- Storage: You can store fresh ginger in an airtight container in the refrigerator or in the freezer.
Conclusion: Your Own Ginger Garden
I hope this guide has helped you to grow your own ginger at home. It is a rewarding project that provides you with fresh, aromatic ginger right at your doorstep. Happy gardening! And remember: patience is the key to success. With a little care and attention, you will soon be able to enjoy your own ginger harvest.
Conclusion
So, there you have it! Growing ginger at home is not only achievable, but it’s also a rewarding experience that brings the vibrant flavors of fresh, homegrown ginger right to your fingertips. Forget those bland, store-bought rhizomes that have been sitting on shelves for weeks. Imagine the burst of flavor from freshly harvested ginger, adding a zesty kick to your stir-fries, teas, smoothies, and baked goods. This DIY project is a game-changer for anyone who appreciates fresh ingredients and enjoys a touch of green in their living space.
Why is this a must-try? Because it empowers you to control the quality and freshness of your ginger. You know exactly where it came from and how it was grown, free from harmful pesticides and chemicals. Plus, it’s incredibly satisfying to nurture a plant from a simple rhizome to a thriving source of culinary delight. It’s a sustainable way to enjoy a spice that’s often shipped from far away, reducing your carbon footprint and supporting a more eco-conscious lifestyle.
But the benefits don’t stop there. Growing ginger indoors can also add a touch of tropical beauty to your home. The lush green foliage is visually appealing and can brighten up any room. It’s a conversation starter, a unique hobby, and a constant reminder of the power of nature.
Ready to take your ginger game to the next level? Consider these variations:
* **Container Gardening:** Experiment with different pot sizes and materials. Terracotta pots offer excellent drainage, while larger containers allow for more extensive root development.
* **Soil Amendments:** Enhance your soil with compost, worm castings, or other organic matter to provide your ginger with the nutrients it needs to thrive.
* **Companion Planting:** Plant your ginger alongside other herbs like turmeric or galangal, which share similar growing requirements and can create a beautiful and productive mini-garden.
* **Ginger Varieties:** Explore different varieties of ginger, such as the common ginger (Zingiber officinale), the ornamental ginger (Alpinia purpurata), or the blue ginger (Dichorisandra thyrsiflora). Each variety offers unique flavors and characteristics.
* **Hydroponics:** For the more adventurous gardener, try growing ginger hydroponically. This method involves growing plants without soil, using nutrient-rich water solutions.
Don’t be intimidated by the process. Growing ginger at home is surprisingly easy, even for beginners. With a little patience, attention, and the right conditions, you’ll be harvesting your own delicious ginger in no time.
We encourage you to embark on this exciting culinary adventure. Try growing ginger at home and discover the joy of fresh, homegrown flavor. And most importantly, share your experience with us! We’d love to hear about your successes, challenges, and creative ways you’re using your homegrown ginger. Post your photos, tips, and recipes in the comments below. Let’s build a community of ginger-growing enthusiasts and inspire others to embrace the magic of DIY gardening. Happy growing!
Frequently Asked Questions (FAQ)
1. What kind of ginger should I use to start growing?
The best ginger to use for planting is fresh, plump ginger rhizomes from a grocery store or nursery. Look for rhizomes that are firm, with visible “eyes” or buds. Organic ginger is often recommended, as it’s less likely to be treated with growth inhibitors. Avoid using dried or powdered ginger, as it won’t sprout. Make sure the ginger you choose looks healthy and free from any signs of mold or decay. The more prominent the eyes, the better the chances of successful germination.
2. How long does it take to grow ginger at home?
The time it takes to grow ginger at home can vary depending on several factors, including the variety of ginger, the growing conditions, and the climate. Generally, it takes around 8 to 10 months from planting to harvest mature ginger. However, you can start harvesting small pieces of ginger after about 4 months, as needed. The leaves will start to turn yellow and die back when the ginger is ready for harvest. Be patient and provide your ginger with the optimal conditions for growth, and you’ll be rewarded with a bountiful harvest.
3. What are the ideal growing conditions for ginger?
Ginger thrives in warm, humid environments with partial shade. The ideal temperature range is between 65°F and 85°F (18°C and 29°C). It needs well-draining soil that is rich in organic matter. Avoid planting ginger in direct sunlight, as it can scorch the leaves. Consistent moisture is essential, but avoid overwatering, which can lead to root rot. A good rule of thumb is to water when the top inch of soil feels dry. Provide your ginger with a sheltered location, away from strong winds, and it will flourish.
4. How do I prevent root rot in my ginger plant?
Root rot is a common problem when growing ginger, but it can be prevented with proper care. The key is to ensure well-draining soil and avoid overwatering. Use a potting mix that is specifically designed for container gardening, and make sure your pot has drainage holes. Water your ginger only when the top inch of soil feels dry, and avoid letting the pot sit in standing water. If you live in a humid climate, consider using a dehumidifier to reduce the risk of fungal growth. You can also add a layer of mulch around the base of the plant to help retain moisture and prevent soil from splashing onto the leaves.
5. Can I grow ginger indoors year-round?
Yes, you can grow ginger indoors year-round, especially in climates with cold winters. To successfully grow ginger indoors, provide it with the right conditions, including warm temperatures, partial shade, and consistent moisture. Use a grow light if your home doesn’t receive enough natural light. Rotate the pot regularly to ensure even growth. During the winter months, reduce watering slightly, as the plant’s growth will slow down. With proper care, you can enjoy fresh, homegrown ginger all year long.
6. What are some common pests and diseases that affect ginger plants?
Ginger plants can be susceptible to certain pests and diseases, including aphids, spider mites, and fungal infections. Aphids and spider mites can be controlled with insecticidal soap or neem oil. Fungal infections, such as root rot and leaf spot, can be prevented by ensuring well-draining soil and avoiding overwatering. If you notice any signs of pests or diseases, treat them promptly to prevent them from spreading. Regularly inspect your ginger plant for any signs of problems, and take action as needed.
7. How do I harvest ginger from my plant?
You can start harvesting small pieces of ginger after about 4 months of growth. To harvest, gently dig around the base of the plant and cut off a piece of the rhizome. Be careful not to damage the remaining plant. You can harvest more ginger as needed, or wait until the leaves start to turn yellow and die back, which indicates that the ginger is mature. At this point, you can harvest the entire plant. After harvesting, wash the ginger rhizomes and store them in a cool, dry place.
8. Can I regrow ginger from the harvested rhizomes?
Yes, you can regrow ginger from the harvested rhizomes. Simply select a healthy piece of rhizome with visible “eyes” or buds, and plant it in a pot with well-draining soil. Follow the same planting instructions as before, and you’ll have a new ginger plant in no time. This is a great way to continuously grow ginger and enjoy a sustainable supply of fresh, homegrown spice.
9. What are some creative ways to use homegrown ginger?
Homegrown ginger can be used in a variety of culinary applications. Add it to stir-fries, soups, and stews for a zesty kick. Use it to make ginger tea, ginger ale, or ginger-infused water. Incorporate it into baked goods, such as gingerbread, cookies, and cakes. You can also use it to make ginger candy, ginger jam, or ginger syrup. Get creative and experiment with different recipes to discover your favorite ways to use your homegrown ginger.
10. Is growing ginger at home worth the effort?
Absolutely! Growing ginger at home is a rewarding experience that offers numerous benefits. You’ll have access to fresh, flavorful ginger that is free from harmful chemicals. You’ll save money on store-bought ginger, and you’ll reduce your carbon footprint by growing your own food. Plus, you’ll enjoy the satisfaction of nurturing a plant from a simple rhizome to a thriving source of culinary delight. So, give it a try and discover the joy of growing ginger at home!
Leave a Comment