
Grow Crunchy Celery at Home – and ditch the limp, lifeless stalks from the grocery store! Have you ever dreamed of biting into a crisp, refreshing piece of celery, bursting with flavor, straight from your own backyard? I know I have! For years, I struggled with store-bought celery that seemed to wilt the moment I brought it home. That’s why I dove headfirst into the world of home gardening, determined to cultivate my own crunchy, delicious celery.
Celery, believe it or not, has a rich history, dating back to ancient times where it was used for medicinal purposes. While we might not be prescribing it for ailments these days, its culinary versatility and health benefits are undeniable. But let’s be honest, nobody wants to munch on a soggy, bitter stalk. That’s where these DIY tricks come in!
This article is your ultimate guide to achieving celery perfection. We’ll explore simple, yet effective, techniques to ensure your homegrown celery is not only flavorful but also boasts that satisfying crunch we all crave. Whether you’re a seasoned gardener or just starting out, these tips will empower you to grow crunchy celery at home, save money, and enjoy the freshest possible produce. Get ready to transform your garden and your snacking habits!
Crunchy Celery from Your Own Garden: Here’s How!
I love the fresh, crunchy taste of celery! And what could be better than growing it yourself? It’s easier than you think, and with a few tips and tricks, you’ll soon be harvesting your own, super-crunchy celery. Let’s get started!
What you need:
- A bunch of celery from the supermarket (preferably organic to ensure it hasn’t been treated)
- A sharp knife
- A glass or bowl of water
- Toothpicks (optional)
- Seed starting mix or potting soil
- A pot or container with drainage holes
- A sunny location
- Patience!
Phase 1: Preparing and Rooting the Celery
- Cut the celery base: Take your bunch of celery and cut off the base with a sharp knife. Make sure you leave about 5-7 cm of the base with the root nubs intact. This is the part from which the new celery will grow.
- Remove outer stalks: Remove the outer, wilted, or damaged stalks. Focus on the inner, fresh stalks. These will provide the energy for growth.
- Place in water: Put the celery base in a glass or bowl of water. The water should be about 2-3 cm high, so the root base is covered.
- The toothpick trick (optional): If you like, you can stick toothpicks into the sides of the celery base to stabilize it and prevent it from slipping too deep into the water. However, this is not strictly necessary.
- Sunny location: Place the glass with the celery base in a bright, sunny spot. A windowsill is ideal.
- Change the water: Change the water every 1-2 days to prevent rot and ensure the celery has fresh water.
Phase 2: Observing and Caring for Root Formation
- Be patient: Now it’s time to wait! You should see the first roots after about 5-7 days. It might take a little longer, so don’t give up.
- Observe growth: Watch how the roots grow and how new, small leaves sprout from the center of the celery base. This is a good sign!
- Continue care: Keep changing the water regularly and make sure the celery gets enough sunlight.
Phase 3: Planting the Celery
- Prepare the pot: Fill a pot or container with drainage holes with seed starting mix or potting soil. Make sure the pot is large enough for the celery to have plenty of room to grow. A pot with a diameter of at least 15 cm is ideal.
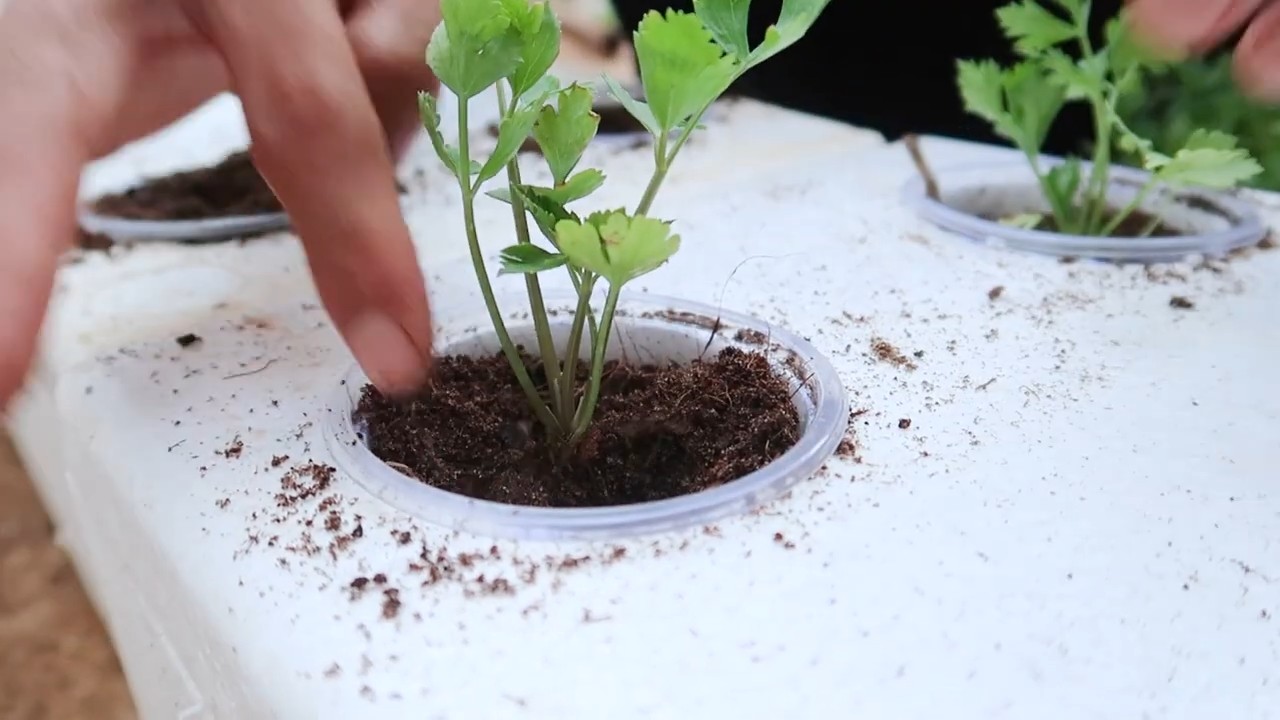
- Plant the celery: Once the roots are about 5-7 cm long, you can plant the celery in the pot. Dig a small hole in the soil and carefully place the celery base in it. The roots should be completely covered with soil, but the base of the celery should still be slightly above the soil level.
- Water in: Water the celery thoroughly after planting.
- Sunny location: Place the pot in a sunny location.
- Water regularly: Keep the soil moist, but not wet. Water the celery regularly, especially on hot days.
- Fertilize (optional): You can fertilize the celery every few weeks with an organic liquid fertilizer to promote growth.
Phase 4: Care and Harvest
- Observe and care: Watch how the celery grows and adjust its care accordingly. If the leaves turn yellow, it could be a sign of too much or too little water.
- Control pests: Watch out for pests like aphids or slugs. If necessary, you can use natural pesticides.
- Blanching (optional): To make the celery whiter and milder, you can blanch it. This means you cover the stalks with soil or cardboard a few weeks before harvesting to protect them from sunlight.
- Harvest: After about 2-3 months, you can harvest your own celery! Simply cut the stalks with a sharp knife. You can either harvest the whole celery at once or just individual stalks as needed.
Additional Tips for Crunchy Celery:
- Regular watering: Celery needs a lot of water to become crunchy. Make sure the soil is always moist.
- Good drainage: Waterlogging can lead to root rot. Ensure the pot has good drainage holes.
- Sunny location: Celery needs at least 6 hours of sunlight per day.
- Cool temperatures: Celery grows best in cool temperatures. Avoid extreme heat.
- Mulching: A layer of mulch around the celery plant helps to retain moisture in the soil and suppress weeds.
- Variety selection: There are different varieties of celery. Some are crunchier than others. Research the different varieties before buying.
- Soil quality: Celery prefers a humus-rich, well-draining soil. You can improve the soil with compost or other organic material.
- Protection from frost: Celery is not frost-hardy. If frost is threatening, you should cover the plant or bring it indoors.
Common Problems and Solutions:
- Yellow leaves: Yellow leaves can be a sign of too much or too little water, nutrient deficiency, or pests. Check the soil moisture, fertilize the celery, and inspect for pests.
- Limp stalks: Limp stalks are often a sign of a lack of water. Water the celery thoroughly.
- Root rot: Root rot is caused by waterlogging. Ensure the pot has good drainage holes and don’t overwater the celery.
- Pests: Aphids, slugs, and other pests can infest celery. Use natural pesticides to combat them.
Why Grow Your Own?
Homegrown celery not only tastes better but is also healthier and more sustainable. You know exactly what’s in it and can avoid pesticides. Plus, it’s a great feeling to grow and harvest something yourself!
I hope this guide helps you grow your own crunchy celery. Good luck and enjoy your meal!
Conclusion
So, there you have it! Growing your own crunchy celery at home is not just a fun gardening project; it’s a gateway to fresher, more flavorful meals and a deeper connection with the food you eat. Forget the limp, often tasteless celery stalks you find at the grocery store. With a little patience and these simple steps, you can cultivate vibrant, crisp celery that will elevate your salads, soups, and snacks to a whole new level.
The beauty of this DIY trick lies in its simplicity and the incredible reward it offers. You’re not just growing celery; you’re growing an experience. From nurturing the seedlings to harvesting your own bounty, each step is a testament to the power of home gardening. And the taste? Unmatched. The difference between store-bought and homegrown celery is like night and day. The homegrown variety boasts a more intense celery flavor, a satisfying crunch, and a vibrant freshness that you simply can’t replicate.
But don’t just take our word for it. We encourage you to embark on this celery-growing adventure yourself! Experiment with different varieties of celery to find your favorite flavor profile. Try blanching your celery stalks a few weeks before harvest by mounding soil around the base of the plants to create even sweeter, more tender stalks. Consider companion planting with herbs like chamomile or onions to deter pests and enhance the flavor of your celery. You can even try growing celery from the base of a store-bought stalk – a fantastic way to reduce food waste and start your own little celery farm.
The possibilities are endless, and the rewards are plentiful. Imagine the satisfaction of serving a salad made with celery you grew yourself, or adding a handful of your own freshly harvested celery to a hearty soup. It’s a feeling of accomplishment and a taste of pure, unadulterated goodness.
We’re confident that once you experience the joy of growing your own crunchy celery, you’ll never look at store-bought celery the same way again. It’s a simple, sustainable, and incredibly rewarding way to enhance your culinary creations and connect with nature.
So, grab your seeds, prepare your soil, and get ready to experience the magic of homegrown celery. And don’t forget to share your experiences with us! We’d love to hear about your successes, your challenges, and any tips or tricks you discover along the way. Share your photos and stories on social media using #HomegrownCelery and let’s inspire others to join the crunchy celery revolution! Let us know what works best for you in your specific climate and soil conditions. Your insights could help other gardeners achieve celery-growing success.
This DIY trick for growing crunchy celery is more than just a gardening project; it’s an investment in your health, your taste buds, and your connection to the natural world. So, what are you waiting for? Get growing!
Frequently Asked Questions (FAQ)
1. What is the best time of year to plant celery?
Celery is a cool-season crop, so the best time to plant it depends on your climate. In regions with mild winters, you can start seeds indoors in late winter or early spring for transplanting outdoors after the last frost. In areas with hot summers, it’s best to start seeds indoors in late summer for transplanting in the fall, allowing the celery to mature during the cooler months. Generally, aim for a growing season where temperatures remain consistently between 60°F and 70°F (15°C and 21°C).
2. What kind of soil does celery need?
Celery thrives in rich, well-draining soil that is high in organic matter. Amend your soil with compost or well-rotted manure before planting to improve its fertility and drainage. Celery also prefers a slightly acidic to neutral soil pH, ideally between 6.0 and 6.8. Conduct a soil test to determine your soil’s pH and nutrient levels, and adjust accordingly.
3. How much sunlight does celery need?
Celery needs at least six hours of sunlight per day to grow properly. However, in hot climates, it can benefit from some afternoon shade to prevent the leaves from scorching. Choose a planting location that receives morning sun and afternoon shade, or provide shade during the hottest part of the day using shade cloth.
4. How often should I water celery?
Celery needs consistent moisture to thrive. Water deeply and regularly, especially during hot, dry weather. Aim to keep the soil consistently moist but not waterlogged. Mulching around the plants can help retain moisture and suppress weeds. Check the soil moisture regularly and water when the top inch feels dry to the touch.
5. What are some common celery pests and diseases?
Celery can be susceptible to several pests and diseases, including aphids, celery leaf tiers, and fungal diseases like early blight and late blight. Inspect your plants regularly for signs of pests or diseases, and take action promptly to prevent them from spreading. Use organic pest control methods like insecticidal soap or neem oil to control aphids and leaf tiers. Ensure good air circulation around the plants to prevent fungal diseases, and remove any infected leaves immediately.
6. How long does it take for celery to mature?
Celery typically takes 100-130 days to mature from seed. You can start harvesting individual stalks when they reach a usable size, or harvest the entire plant at once when it is fully mature. The exact time will depend on the variety of celery you are growing and the growing conditions.
7. How do I blanch celery?
Blanching celery involves excluding light from the stalks to make them more tender and less bitter. You can blanch celery by mounding soil around the base of the plants a few weeks before harvest, or by wrapping the stalks with newspaper or cardboard. This process reduces chlorophyll production, resulting in paler, sweeter stalks.
8. Can I grow celery in containers?
Yes, you can grow celery in containers, but you’ll need to choose a large container that is at least 12 inches deep and wide to accommodate the plant’s root system. Use a high-quality potting mix and ensure the container has good drainage. Water regularly and fertilize every few weeks with a balanced fertilizer.
9. How do I store harvested celery?
To store harvested celery, wrap the stalks in a damp paper towel and place them in a plastic bag in the refrigerator. This will help keep them crisp and fresh for up to two weeks. You can also freeze celery for later use in soups and stews. Chop the celery into small pieces and blanch it in boiling water for a few minutes before freezing.
10. What are some good companion plants for celery?
Celery benefits from being planted near certain companion plants that can help deter pests or improve its growth. Good companion plants for celery include onions, garlic, chamomile, marigolds, and nasturtiums. Avoid planting celery near parsley, as they can attract the same pests.
11. Can I regrow celery from a store-bought stalk?
Yes, you can regrow celery from the base of a store-bought stalk. Cut off the celery stalks about 2 inches from the base and place the base in a shallow dish of water. Place the dish in a sunny location and change the water every day. After a few days, you should see new roots and leaves starting to grow. Once the roots are well-developed, you can transplant the celery base into a pot of soil or directly into your garden. This is a great way to reduce food waste and get a head start on growing your own celery.
Leave a Comment