
Grow bitter gourds abundantly, even if you think you have a “brown thumb”! Have you ever dreamt of harvesting baskets overflowing with these nutrient-packed vegetables right from your own backyard? I know I have! For generations, bitter gourd, also known as karela, has been a staple in Asian and African cuisines, revered not only for its unique flavor but also for its impressive health benefits. From traditional medicine to culinary delights, this humble vine has a rich history.
But let’s be honest, getting a bountiful harvest of bitter gourds can sometimes feel like a daunting task. That’s where these DIY tricks and hacks come in! Many gardeners struggle with common issues like poor germination, stunted growth, and low yields. I’m here to tell you that with a few simple, yet effective techniques, you can transform your garden into a bitter gourd paradise.
This article is your ultimate guide to unlocking the secrets to grow bitter gourds abundantly. We’ll explore easy-to-implement strategies, from soil preparation to pest control, ensuring you enjoy a continuous supply of fresh, homegrown bitter gourds. Get ready to roll up your sleeves and discover how to cultivate a thriving bitter gourd patch that will impress your neighbors and nourish your body!
Bittergurken im Überfluss: Dein DIY-Leitfaden für eine reiche Ernte
Hallo Gartenfreunde! Ich liebe Bittergurken, aber sie im Laden zu kaufen, kann teuer sein. Deshalb habe ich mich entschlossen, sie selbst anzubauen, und ich habe gelernt, wie man eine wirklich beeindruckende Ernte erzielen kann. Ich teile meine Tipps und Tricks mit dir, damit auch du bald deine eigenen, köstlichen Bittergurken ernten kannst!
Was du brauchst: Die Vorbereitung
Bevor wir loslegen, lass uns sicherstellen, dass wir alles haben, was wir brauchen. Eine gute Vorbereitung ist die halbe Miete!
* Bittergurkensamen: Kaufe hochwertige Samen von einer vertrauenswürdigen Quelle. Achte auf Sorten, die für dein Klima geeignet sind.
* Anzuchttöpfe oder -schalen: Kleine Töpfe oder Schalen für die Voranzucht der Samen.
* Anzuchterde: Spezielle Erde für die Anzucht, die locker und nährstoffarm ist.
* Gartenerde: Gute, nährstoffreiche Gartenerde für das Beet oder den Topf, in dem die Bittergurken wachsen sollen.
* Kompost oder gut verrotteter Mist: Zur Verbesserung der Bodenqualität.
* Dünger: Ein ausgewogener Dünger für Gemüse, idealerweise organisch.
* Rankhilfe: Bittergurken sind Kletterpflanzen und brauchen eine Rankhilfe. Das kann ein Spalier, ein Zaun oder ein selbstgebautes Gerüst sein.
* Gießkanne oder Schlauch: Zum Bewässern der Pflanzen.
* Gartengeräte: Spaten, Harke, Schaufel, eventuell eine kleine Hacke.
* Geduld: Bittergurken brauchen Zeit und Pflege, um zu wachsen und Früchte zu tragen.
Schritt-für-Schritt-Anleitung: Vom Samen zur Pflanze
Hier ist eine detaillierte Anleitung, wie du deine Bittergurken erfolgreich anbaust:
1. Samen vorquellen (optional, aber empfohlen)
* Warum? Das Vorquellen der Samen beschleunigt die Keimung.
* Wie? Lege die Samen für 24 Stunden in lauwarmes Wasser. Das Wasser sollte nicht heiß sein, da dies die Samen beschädigen kann.
2. Samen aussäen
* Wann? Beginne mit der Aussaat etwa 4-6 Wochen vor dem letzten erwarteten Frost.
* Wie?
1. Fülle die Anzuchttöpfe oder -schalen mit Anzuchterde.
2. Drücke die Erde leicht an.
3. Lege in jeden Topf oder jede Schale 1-2 Samen, etwa 1-2 cm tief.
4. Bedecke die Samen mit Erde und drücke sie leicht an.
5. Gieße die Erde vorsichtig an, sodass sie feucht, aber nicht nass ist.
6. Stelle die Töpfe oder Schalen an einen warmen, hellen Ort. Eine Temperatur von 20-25°C ist ideal.
7. Halte die Erde feucht, aber vermeide Staunässe.
3. Pikieren (falls nötig)
* Warum? Wenn du mehrere Samen in einem Topf gesät hast, musst du die stärksten Sämlinge pikieren, um ihnen genügend Platz zum Wachsen zu geben.
* Wann? Wenn die Sämlinge 2-3 echte Blätter haben.
* Wie?
1. Fülle einzelne Töpfe mit Anzuchterde.
2. Lockere die Erde um die Sämlinge vorsichtig mit einem Pikierstab oder einem Löffel.
3. Hebe die Sämlinge vorsichtig aus der Erde und achte darauf, die Wurzeln nicht zu beschädigen.
4. Pflanze jeden Sämling in einen eigenen Topf.
5. Gieße die Sämlinge vorsichtig an.
4. Vorbereitung des Pflanzplatzes
* Wo? Wähle einen sonnigen Standort mit gut durchlässigem Boden. Bittergurken brauchen mindestens 6 Stunden Sonne pro Tag.
* Wie?
1. Lockere die Erde gründlich auf.
2. Entferne Unkraut und Steine.
3. Verbessere die Bodenqualität, indem du Kompost oder gut verrotteten Mist einarbeitest.
4. Baue eine Rankhilfe auf. Das kann ein Spalier, ein Zaun oder ein selbstgebautes Gerüst sein. Die Rankhilfe sollte stabil sein, da die Bittergurkenpflanzen recht schwer werden können.
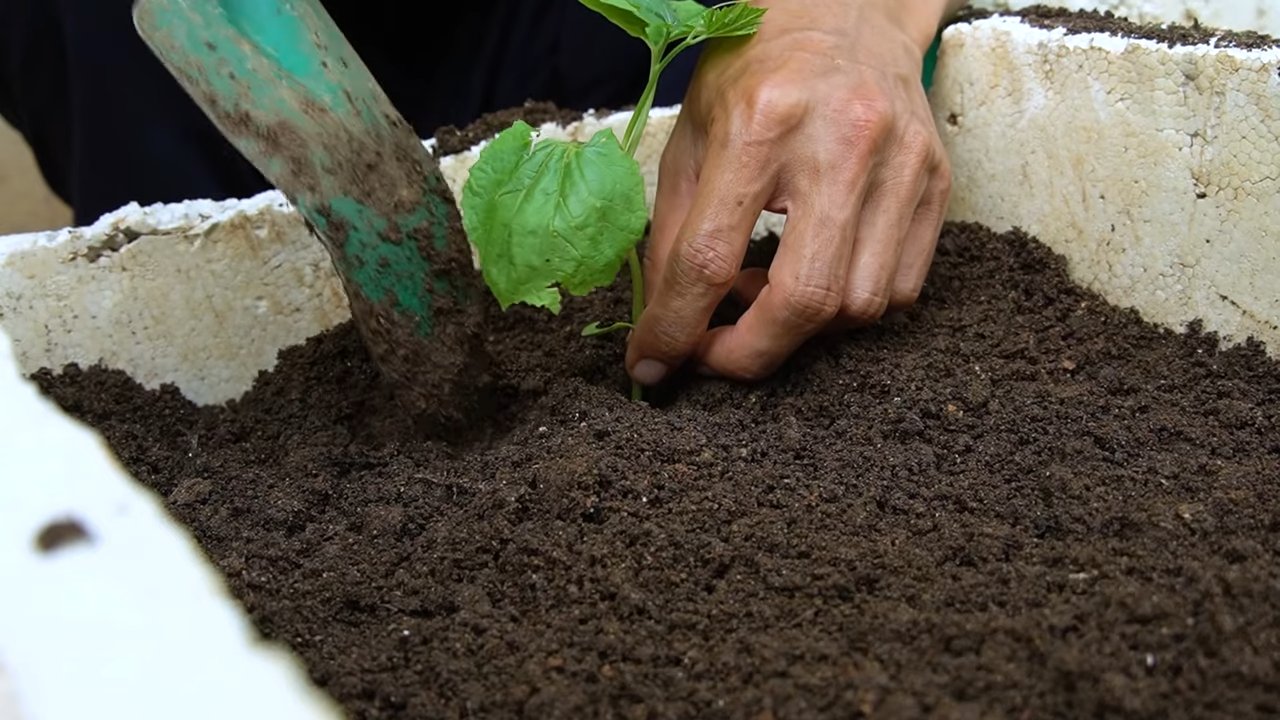
5. Auspflanzen
* Wann? Wenn keine Frostgefahr mehr besteht und die Bodentemperatur mindestens 15°C beträgt.
* Wie?
1. Grabe Löcher, die etwas größer sind als die Wurzelballen der Sämlinge.
2. Setze die Sämlinge vorsichtig in die Löcher.
3. Fülle die Löcher mit Erde und drücke sie leicht an.
4. Gieße die Pflanzen gründlich an.
5. Achte darauf, dass die Pflanzen genügend Platz haben, um zu wachsen. Ein Abstand von 60-90 cm zwischen den Pflanzen ist ideal.
Pflege deiner Bittergurken: Gießen, Düngen, Ernten
Jetzt, wo deine Bittergurken im Garten sind, ist es wichtig, sie gut zu pflegen, damit sie gesund wachsen und viele Früchte tragen.
1. Gießen
* Wie oft? Gieße die Pflanzen regelmäßig, besonders während trockener Perioden. Die Erde sollte immer feucht, aber nicht nass sein.
* Wie? Gieße direkt an die Wurzeln, um die Blätter trocken zu halten und Pilzkrankheiten vorzubeugen.
2. Düngen
* Wann? Dünge die Pflanzen alle 2-3 Wochen mit einem ausgewogenen Dünger für Gemüse.
* Wie? Befolge die Anweisungen auf der Düngerpackung. Ich bevorzuge organische Dünger, da sie die Bodenqualität verbessern und die Pflanzen auf natürliche Weise stärken.
3. Rankhilfe
* Warum? Bittergurken sind Kletterpflanzen und brauchen eine Rankhilfe, um sich daran festzuhalten und nach oben zu wachsen.
* Wie? Leite die Triebe der Pflanzen vorsichtig an der Rankhilfe entlang. Du kannst sie auch mit Pflanzenbindern befestigen.
4. Beschneiden (optional)
* Warum? Das Beschneiden kann die Fruchtbildung fördern und die Pflanzen kompakter halten.
* Wie? Entferne überflüssige Seitentriebe und Blätter, um die Luftzirkulation zu verbessern und die Früchte besser zu belichten.
5. Schädlinge und Krankheiten
* Worauf achten? Achte auf Schädlinge wie Blattläuse, Spinnmilben und Schnecken. Auch Pilzkrankheiten wie Mehltau können auftreten.
* Was tun?
* Blattläuse: Besprühe die Pflanzen mit einem Wasserstrahl oder verwende eine Seifenlösung.
* Spinnmilben: Besprühe die Pflanzen mit Wasser oder verwende ein spezielles Mittel gegen Spinnmilben.
* Schnecken: Sammle die Schnecken ab oder verwende Schneckenkorn.
* Mehltau: Sorge für gute Luftzirkulation und besprühe die Pflanzen mit einem Fungizid.
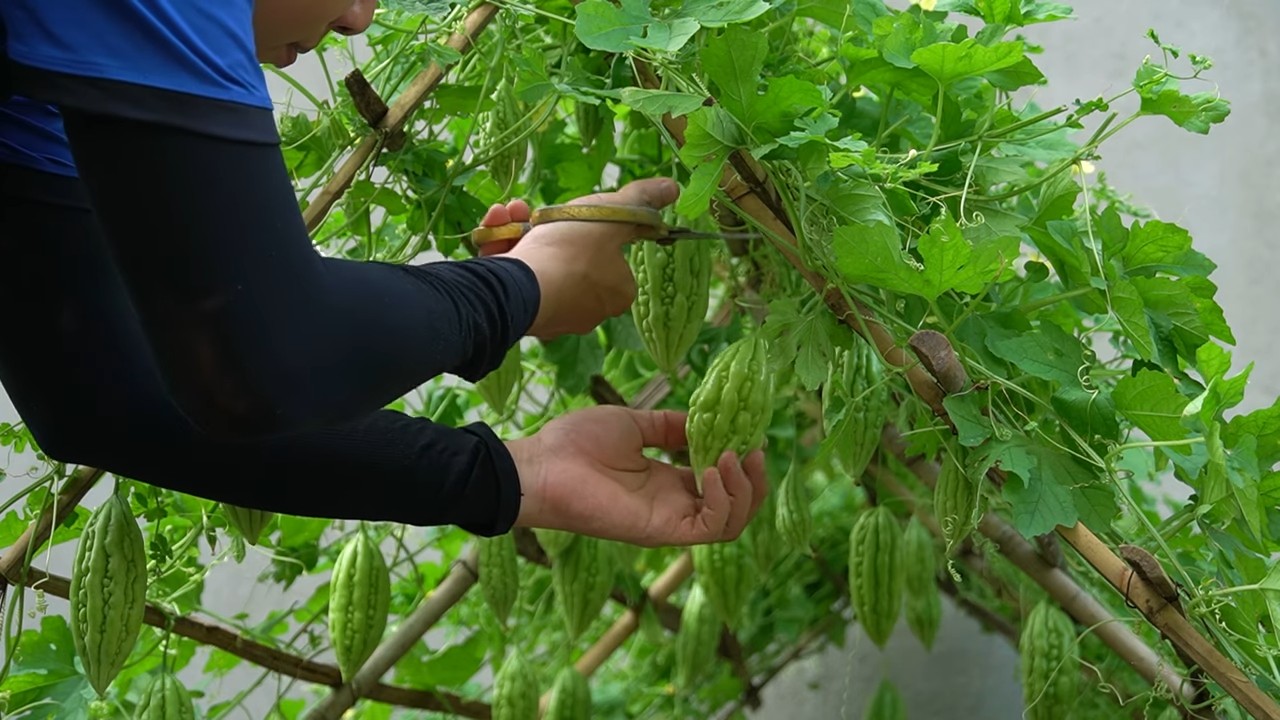
6. Ernten
* Wann? Die Bittergurken sind erntereif, wenn sie ihre typische grüne Farbe haben und sich leicht vom Stiel lösen lassen. Die Größe der Früchte hängt von der Sorte ab.
* Wie? Schneide die Bittergurken mit einem scharfen Messer oder einer Schere vom Stiel ab.
* Regelmäßig ernten: Je öfter du erntest, desto mehr Früchte werden die Pflanzen produzieren.
Zusätzliche Tipps für eine reiche Ernte
Hier sind noch ein paar zusätzliche Tipps, die dir helfen können, eine noch bessere Ernte zu erzielen:
* Mulchen: Bedecke den Boden um die Pflanzen mit Mulch, um die Feuchtigkeit zu speichern, Unkraut zu unterdrücken und die Bodentemperatur zu regulieren.
* Bestäubung: Bittergurken haben männliche und weibliche Blüten. Wenn du
Conclusion
So, there you have it! Mastering the art of growing bitter gourds abundantly is within your reach, even if you’ve struggled in the past. This DIY trick, focusing on [specific aspect of the trick mentioned in the main article, e.g., soil enrichment, pollination techniques, or pest control], is a game-changer because it directly addresses the common pitfalls that prevent a bountiful harvest. It’s not just about planting seeds and hoping for the best; it’s about creating the optimal environment for your bitter gourd plants to thrive.
Why is this a must-try? Because it’s effective, economical, and empowering. You’re taking control of your garden’s success, using readily available resources to boost your yield. Imagine the satisfaction of harvesting basketfuls of vibrant, healthy bitter gourds, knowing you played an active role in their growth. No more disappointing harvests or struggling plants!
But don’t stop there! Experiment with variations to tailor the trick to your specific garden conditions. For example, if you live in a particularly humid climate, consider [suggest a variation related to humidity control, e.g., improving air circulation around the plants]. Or, if you’re dealing with a specific pest problem, research natural remedies that can complement the main trick. You could also try different types of trellising to maximize sunlight exposure and vertical growth.
The key is to observe your plants closely and adapt the technique as needed. Gardening is a continuous learning process, and every season brings new opportunities to refine your skills.
We’re confident that this DIY trick will significantly improve your bitter gourd growing experience. It’s a simple yet powerful method that can transform your garden into a bitter gourd paradise.
Now, it’s your turn! We encourage you to try this DIY trick and witness the difference it makes. Don’t be afraid to get your hands dirty and experiment. And most importantly, share your experience with us! We’d love to hear about your successes, challenges, and any variations you discover along the way. Post your photos and stories in the comments section below. Let’s build a community of passionate bitter gourd growers and learn from each other. Together, we can unlock the secrets to abundant harvests and enjoy the delicious rewards of our labor. Remember, growing bitter gourds abundantly is not just a dream; it’s an achievable goal with the right knowledge and techniques. So, get started today and prepare to be amazed!
Frequently Asked Questions (FAQ)
Q: What kind of soil is best for growing bitter gourds abundantly?
A: Bitter gourds thrive in well-drained, fertile soil that is rich in organic matter. A slightly acidic to neutral pH (6.0 to 7.0) is ideal. Before planting, amend your soil with compost, well-rotted manure, or other organic amendments to improve drainage, fertility, and water retention. If your soil is heavy clay, consider adding sand or perlite to improve drainage. A soil test can help you determine the specific nutrient deficiencies in your soil and guide you on what amendments to add.
Q: How often should I water my bitter gourd plants?
A: Bitter gourds need consistent moisture, especially during hot and dry periods. Water deeply and regularly, aiming to keep the soil consistently moist but not waterlogged. The frequency of watering will depend on your climate, soil type, and the age of the plants. Generally, watering 2-3 times a week is sufficient, but check the soil moisture regularly and adjust accordingly. Mulching around the plants can help retain moisture and reduce the need for frequent watering. Avoid overhead watering, as it can increase the risk of fungal diseases. Drip irrigation is an excellent option for providing consistent moisture directly to the roots.
Q: How much sunlight do bitter gourd plants need?
A: Bitter gourds require at least 6-8 hours of direct sunlight per day to grow and produce abundant fruit. Choose a planting location that receives full sun throughout the day. If you live in a very hot climate, some afternoon shade may be beneficial to prevent the plants from scorching. Insufficient sunlight can lead to stunted growth, reduced flowering, and poor fruit production.
Q: What are some common pests and diseases that affect bitter gourds, and how can I control them?
A: Common pests that affect bitter gourds include aphids, spider mites, fruit flies, and squash bugs. Diseases include powdery mildew, downy mildew, and anthracnose. To control pests, you can use insecticidal soap, neem oil, or introduce beneficial insects like ladybugs. For diseases, ensure good air circulation around the plants, avoid overhead watering, and use fungicides if necessary. Regularly inspect your plants for signs of pests or diseases and take action promptly to prevent them from spreading. Crop rotation and using disease-resistant varieties can also help minimize problems.
Q: How do I know when my bitter gourds are ready to harvest?
A: Bitter gourds are typically ready to harvest about 10-12 weeks after planting. The fruits should be firm, green (or the color specific to the variety), and of the desired size. Avoid letting the fruits turn yellow or orange, as they will become overly ripe and bitter. Use a sharp knife or pruning shears to cut the fruit from the vine, leaving a short stem attached. Harvest regularly to encourage continued fruit production.
Q: Can I grow bitter gourds in containers?
A: Yes, you can grow bitter gourds in containers, but you’ll need a large container (at least 15-20 gallons) to accommodate their extensive root system. Use a well-draining potting mix and provide a sturdy trellis for the vines to climb. Container-grown bitter gourds may require more frequent watering and fertilization than those grown in the ground. Choose a sunny location for your container and monitor the plants closely for signs of stress.
Q: How can I improve pollination for my bitter gourd plants?
A: Bitter gourds have separate male and female flowers, and pollination is necessary for fruit set. If you’re not seeing many fruits developing, you may need to hand-pollinate the flowers. Use a small paintbrush to transfer pollen from the male flowers to the female flowers. The female flowers have a small, immature fruit at the base, while the male flowers do not. You can also attract pollinators to your garden by planting flowering plants nearby.
Q: What kind of fertilizer should I use for bitter gourd plants?
A: Bitter gourds benefit from regular fertilization throughout the growing season. Use a balanced fertilizer (e.g., 10-10-10) or a fertilizer specifically formulated for vegetables. Apply fertilizer according to the package directions, typically every 2-3 weeks. You can also supplement with organic fertilizers like compost tea or fish emulsion. Avoid over-fertilizing, as this can lead to excessive vegetative growth and reduced fruit production.
Q: How do I save seeds from my bitter gourds for next year?
A: To save seeds, allow a few fruits to fully ripen on the vine until they turn yellow or orange. Remove the seeds from the fruit, wash them thoroughly, and dry them completely. Store the dried seeds in an airtight container in a cool, dark, and dry place. Properly stored seeds can remain viable for several years.
Q: Is there anything else I should know about growing bitter gourds abundantly?
A: Growing bitter gourds abundantly requires patience, observation, and a willingness to experiment. Pay attention to your plants’ needs and adjust your growing practices accordingly. Don’t be afraid to try new things and learn from your mistakes. With a little effort and dedication, you can enjoy a bountiful harvest of delicious and nutritious bitter gourds. Remember that **growing bitter gourds abundantly** is a rewarding experience that connects you with nature and provides you with fresh, healthy food.

Leave a Comment