
Grow Asparagus All Year? Yes, you read that right! Imagine stepping into your garden in the dead of winter and harvesting fresh, tender asparagus spears. Sounds like a dream, doesn’t it? Well, it doesn’t have to be! For centuries, asparagus has been prized for its delicate flavor and nutritional benefits, enjoyed by ancient Romans and still a springtime delicacy today. But what if you could extend that springtime feeling throughout the entire year?
That’s where these incredible DIY tricks and hacks come in. Let’s face it, waiting for asparagus season can feel like an eternity. Many of us struggle with limited growing seasons, unpredictable weather, or simply not having enough space to dedicate to a traditional asparagus bed. That’s why I’m so excited to share these simple, yet effective, methods that will allow you to grow asparagus all year round, regardless of your climate or garden size.
This article is packed with practical tips and step-by-step instructions to help you create your own indoor asparagus haven. From choosing the right varieties to mastering the art of forced growth, we’ll cover everything you need to know to enjoy fresh, homegrown asparagus whenever you crave it. Get ready to ditch the store-bought asparagus and embrace the satisfaction of harvesting your own delicious spears, all year long!
Grow Asparagus Yourself All Year Round: Here’s How!
Hello dear garden friends! Are you also tired of the asparagus season always being so short? Me too! That’s why today I’m showing you how, with a few tips and tricks, you can harvest fresh asparagus all year round. Yes, you heard right! It’s a bit more effort than the classic spring cultivation, but the taste of homegrown asparagus is simply unbeatable.
The Basics: What Asparagus Needs to Grow
Before we get started, it’s important to understand what asparagus actually needs to grow optimally. Asparagus is a perennial plant that requires a lot of sun, well-draining soil, and sufficient nutrients. It’s also important to know that there are male and female asparagus plants. Only the female plants produce red berries, which are not suitable for consumption. For cultivation, male plants are better suited because they don’t put their energy into producing berries, but into the asparagus spears.
Important Factors for Successful Asparagus Cultivation:
- Sun: At least 6 hours of direct sunlight per day.
- Soil: Well-draining, sandy loam soil with a pH between 6.5 and 7.5.
- Nutrients: Regular fertilization with compost, horn shavings, or special asparagus fertilizer.
- Water: Sufficient watering, especially during the growth phase.
- Winter protection: Protection from frost in cold regions.
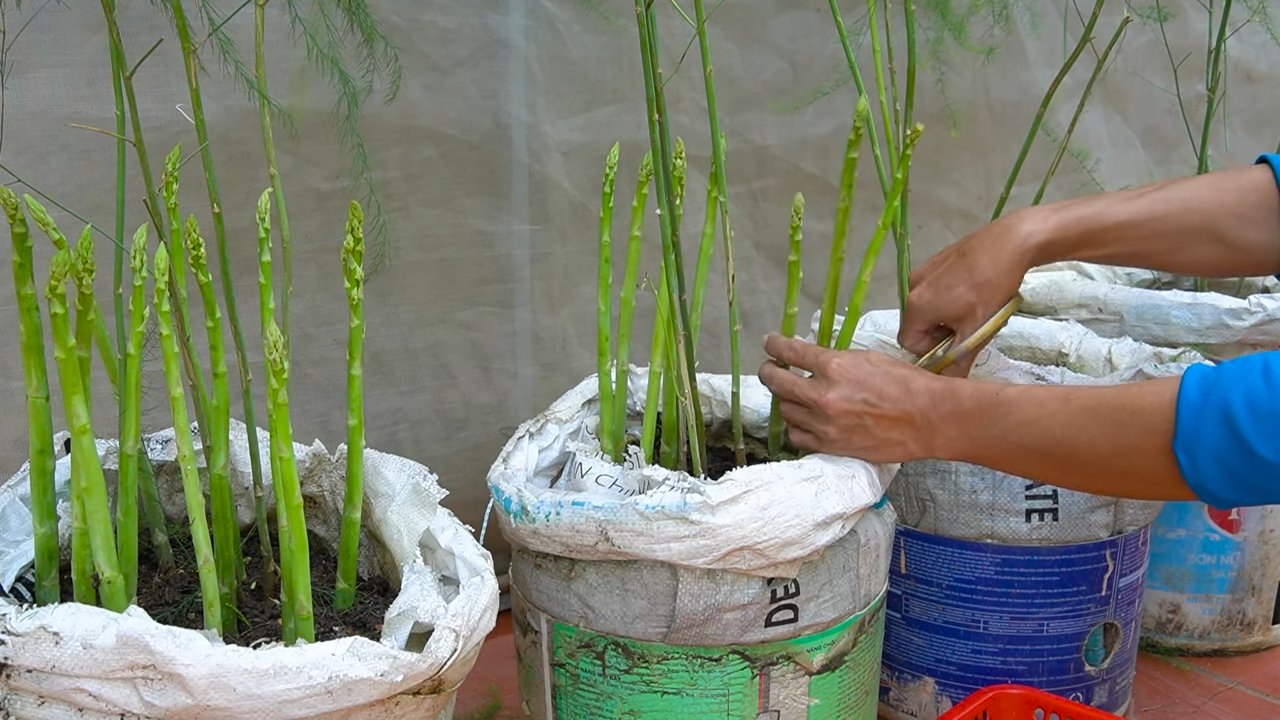
Starting Asparagus in a Pot: The First Step to Year-Round Cultivation
To harvest asparagus all year round, we need to start it in pots. This gives us the ability to better control the growing conditions and bring the plants indoors if necessary.
Required Materials:
- Asparagus plants (preferably male varieties)
- Large pots (at least 30 cm in diameter)
- High-quality potting soil (preferably asparagus soil)
- Drainage material (e.g., expanded clay or gravel)
- Compost or horn shavings
- Watering can
Step-by-Step Guide:
- Prepare pots: First, we fill the pots with a layer of drainage material to prevent waterlogging. On top of that comes the potting soil, which we mix with some compost or horn shavings.
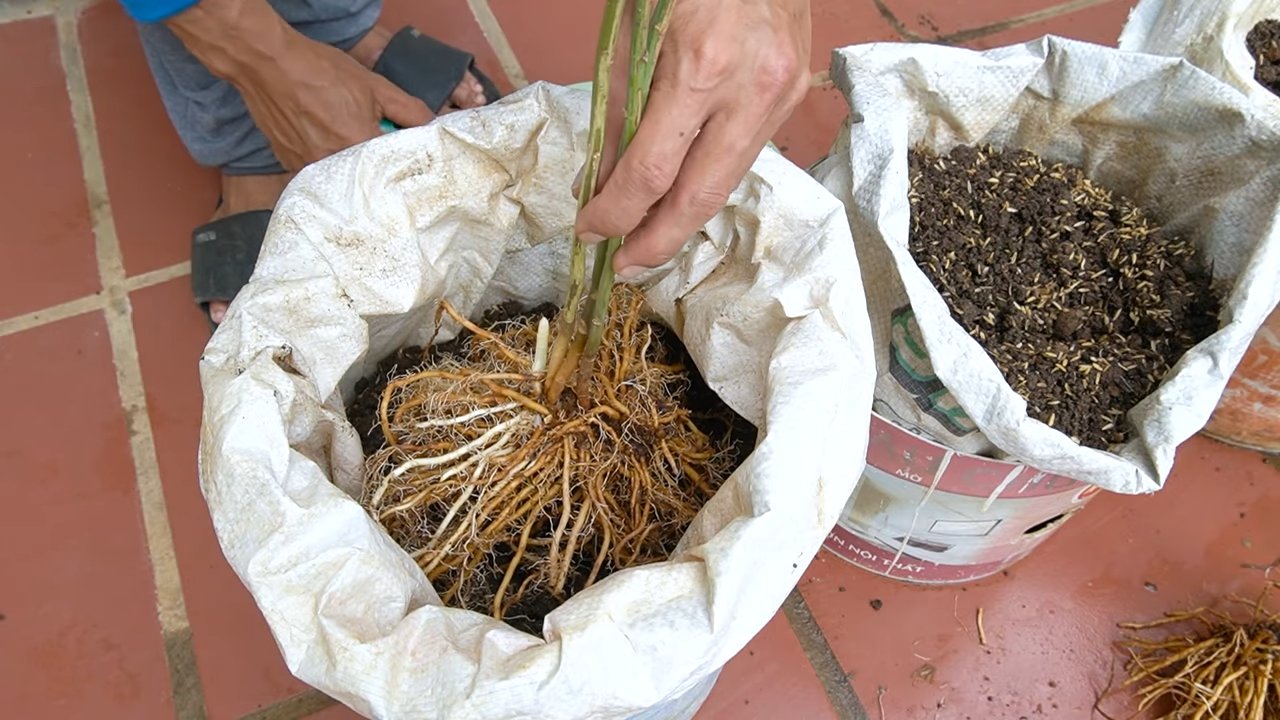
- Plant asparagus plants: Now we carefully place the asparagus plants in the pots. The roots should be able to spread out well. The top of the roots should be about 5 cm below the soil surface.
- Watering: After planting, we water the plants thoroughly.
- Choose a location: We place the pots in a sunny and warm spot.
The Trick: Growing Asparagus in Rotation
The key to year-round asparagus cultivation is to grow the plants in rotation. This means we have several pots of asparagus and force them to sprout at different times.
Here’s how it works:
- Group 1: These plants stay outside and grow normally. They are harvested in the spring.
- Group 2: These plants are moved to the basement or a cool, dark room in the summer. This puts them into a dormant phase.
- Group 3: These plants are brought indoors in the fall and placed in a warm, bright location. This encourages them to sprout and they can be harvested in the winter.
Important Notes:
- The dormant period in the basement should last at least 8 weeks.
- During the dormant period, the plants should be watered only sparingly.
- When moving them indoors, the plants should be slowly acclimated to the warmer temperatures and brighter light.
Forcing Asparagus to Sprout Indoors: How to Succeed
When we take the asparagus plants out of their dormant phase and bring them indoors, we need to provide them with optimal conditions so they sprout quickly.
Required Materials:
- Asparagus plants from the dormant phase
- Warm, bright location (e.g., windowsill)
- Watering can
- Fertilizer (optional)
Step-by-Step Guide:
- Prepare plants: First, we remove all dry or dead shoots.
- Water: Then we water the plants thoroughly.
- Choose a location: We place the pots in a warm, bright place.
- Fertilize (optional): If we want, we can now provide the plants with some fertilizer.
- Be patient: It takes a few weeks for the first asparagus spears to sprout.
The Harvest: When and How to Properly Cut Asparagus
When the asparagus spears have reached a height of about 20 cm, we can harvest them. It is important that we cut the asparagus correctly so that the plant is not damaged.
Required Materials:
- Asparagus knife or sharp knife
Step-by-Step Guide:
- Expose the asparagus spear: First, we carefully expose the asparagus spear.
- Cut: Then we cut the spear with the asparagus knife or a sharp knife about 5 cm below the soil surface.
- Close the hole: Finally, we close the hole again with soil.
Important Notes:
- It’s best to harvest asparagus in the morning, as it is particularly fresh and crisp then.
- Leave some asparagus spears standing so the plant can continue to photosynthesize.
- After the harvest, you should fertilize the plants again.
Asparagus Care: How to Keep Your Plants Healthy and Productive
To keep your asparagus plants healthy and productive, regular care is important.
Important Care Measures:
- Watering: Water regularly, especially during the growth phase.
- Fertilizing: Fertilize regularly, preferably with compost, horn shavings, or special asparagus fertilizer.
- Weeding: Remove weeds regularly so they don’t take nutrients from the asparagus plants.
- Winter protection: Protection from frost in cold regions.
- Repotting: Every few years, the plants should be repotted into larger pots.
Common Problems and Solutions
Problems can also arise with asparagus cultivation. Here are some of the most common problems and how you can solve them:
- Yellow leaves: Can be a sign of nutrient deficiency or too much water. Fertilize the plants and ensure good drainage.
- Asparagus beetles: These beetles can severely damage the asparagus plants. Collect the beetles or use a biological insecticide.
- Fungal diseases: Can occur in damp weather. Ensure good ventilation and remove affected plant parts.
Summary: Asparagus All Year Round – It’s Possible!
With a little patience and the right tricks, you can actually harvest fresh asparagus all year round. It’s a bit more effort than the classic spring cultivation, but the taste of homegrown asparagus is well worth the effort. Try it out and treat yourself to your own, year-round asparagus! I wish you much success with the cultivation.
Conclusion
So, there you have it! Growing asparagus all year round might seem like a feat reserved for seasoned gardeners with sprawling greenhouses, but with this simple, effective DIY trick, you can enjoy fresh, homegrown asparagus regardless of the season. This method isn’t just about extending your harvest; it’s about taking control of your food source, reducing your reliance on commercially grown produce (often shipped from afar), and experiencing the unparalleled satisfaction of nurturing your own food from sprout to spear.
Why is this a must-try? Because it’s accessible, affordable, and yields delicious results. Forget expensive equipment or complicated setups. All you need are a few basic materials, a little patience, and a willingness to experiment. Imagine the delight of serving freshly picked asparagus in the dead of winter, a vibrant reminder of warmer days and a testament to your gardening prowess.
But the benefits extend beyond the immediate gratification of a winter harvest. This DIY approach allows you to cultivate specific asparagus varieties tailored to your taste. Perhaps you prefer the sweeter, more delicate flavor of ‘Purple Passion,’ or the robust, earthy notes of ‘Jersey Knight.’ With this method, you’re not limited to what’s available at the grocery store; you can curate your own asparagus experience.
Looking for variations? Consider experimenting with different growing mediums. While soil works perfectly well, you could also try a hydroponic setup for even faster growth and nutrient control. Another option is to use grow lights with different spectrums to optimize growth at various stages. Some gardeners have even successfully used repurposed containers like old bathtubs or large storage bins to create their indoor asparagus gardens. The possibilities are truly endless!
Don’t be afraid to get creative and adapt this DIY trick to your specific environment and preferences. The key is to provide your asparagus plants with consistent moisture, adequate light, and a stable temperature. With a little attention and care, you’ll be rewarded with a bountiful harvest of tender, flavorful spears all year round.
We wholeheartedly encourage you to give this DIY trick a try. It’s a rewarding and sustainable way to enjoy fresh asparagus, and it’s a fantastic learning experience for gardeners of all levels. Once you’ve embarked on your year-round asparagus growing journey, we’d love to hear about your experiences! Share your tips, tricks, and triumphs in the comments below. Let’s build a community of asparagus enthusiasts and inspire others to embrace the joy of homegrown goodness. Remember, the best way to learn is by doing, so grab your supplies, get your hands dirty, and start growing your own delicious asparagus today! This **grow asparagus all year** method is sure to bring you joy and fresh produce.
Frequently Asked Questions (FAQ)
1. What are the best asparagus varieties to grow indoors for year-round harvesting?
While most asparagus varieties can be grown indoors with proper care, some are better suited for container gardening than others. ‘Jersey Knight’ and ‘Jersey Giant’ are popular choices due to their disease resistance and high yields. ‘Purple Passion’ is another excellent option, known for its sweet flavor and beautiful purple spears. When selecting a variety, consider its cold hardiness (especially if your indoor growing space experiences temperature fluctuations) and its overall growth habit. Dwarf varieties, if available, might be a good choice for smaller spaces. Research the specific needs of each variety to ensure optimal growth and yield.
2. How much light do asparagus plants need when grown indoors?
Asparagus plants require a significant amount of light to thrive, especially when grown indoors. Aim for at least 6-8 hours of direct sunlight per day. If you don’t have access to sufficient natural light, supplement with grow lights. Full-spectrum LED grow lights are an excellent choice, as they provide the necessary wavelengths for photosynthesis. Position the lights close enough to the plants to provide adequate illumination, but not so close that they cause scorching. Monitor your plants closely and adjust the light intensity and duration as needed. Signs of insufficient light include leggy growth, pale leaves, and reduced spear production.
3. What type of soil is best for growing asparagus in containers?
Asparagus prefers well-draining soil that is rich in organic matter. A good potting mix for asparagus should consist of a combination of compost, peat moss (or coconut coir), and perlite or vermiculite. This mixture will provide the necessary nutrients, moisture retention, and drainage. Avoid using heavy clay soils, as they can become waterlogged and lead to root rot. Before planting, amend the soil with a slow-release fertilizer to provide a steady supply of nutrients. Regularly monitor the soil pH and adjust as needed to maintain a slightly acidic to neutral range (6.0-7.0).
4. How often should I water my indoor asparagus plants?
Water asparagus plants regularly, keeping the soil consistently moist but not waterlogged. The frequency of watering will depend on factors such as the size of the container, the type of soil, and the ambient temperature. Check the soil moisture level regularly by inserting your finger into the soil. If the top inch feels dry, it’s time to water. Water deeply, allowing excess water to drain out of the bottom of the container. Avoid overhead watering, as this can promote fungal diseases. During the dormant season (fall and winter), reduce watering frequency.
5. How do I fertilize my indoor asparagus plants?
Asparagus plants are heavy feeders and require regular fertilization to maintain healthy growth and high yields. Use a balanced fertilizer (e.g., 10-10-10) or a fertilizer specifically formulated for vegetables. Apply fertilizer according to the manufacturer’s instructions, typically every 2-4 weeks during the growing season. You can also supplement with organic fertilizers such as compost tea or fish emulsion. Avoid over-fertilizing, as this can lead to nutrient imbalances and plant damage. Monitor your plants closely and adjust the fertilization schedule as needed based on their growth and appearance.
6. How long does it take to harvest asparagus spears after planting?
It typically takes 2-3 years for asparagus plants to mature enough to produce a significant harvest. During the first year, focus on establishing a strong root system and avoid harvesting any spears. In the second year, you can harvest a few spears, but limit the harvest to a couple of weeks. In the third year and beyond, you can harvest spears for a longer period, typically 6-8 weeks. To harvest, snap off the spears at or slightly below the soil surface when they are about 6-8 inches tall.
7. How do I deal with pests and diseases on my indoor asparagus plants?
Indoor asparagus plants are generally less susceptible to pests and diseases than outdoor plants, but they can still be affected. Common pests include aphids, spider mites, and asparagus beetles. Regularly inspect your plants for signs of infestation and take action promptly. You can control pests with insecticidal soap, neem oil, or by hand-picking them off the plants. Common diseases include rust and crown rot. Prevent diseases by providing good air circulation, avoiding overwatering, and using disease-resistant varieties. If you notice signs of disease, remove affected foliage and treat with a fungicide.
8. How do I overwinter my asparagus plants indoors?
Asparagus plants require a period of dormancy during the winter months. To overwinter your indoor asparagus plants, gradually reduce watering and fertilization in the fall. Allow the foliage to turn yellow and die back. Once the foliage has completely died back, cut it off at the soil surface. Move the plants to a cool, dark location (e.g., a basement or garage) where the temperature remains between 35-50°F. Water sparingly during the dormant period, just enough to keep the soil from completely drying out. In the spring, gradually increase watering and fertilization and move the plants back to a sunny location to resume growth.
9. Can I grow asparagus from seed indoors?
Yes, you can grow asparagus from seed indoors, but it’s a slow process. Start seeds indoors 12-14 weeks before the last expected frost. Soak the seeds in water for 24 hours before planting to improve germination. Sow the seeds in individual pots filled with well-draining potting mix. Keep the soil moist and warm (70-75°F) until germination occurs. Once the seedlings have emerged, provide them with plenty of light and water. Transplant the seedlings into larger containers as they grow. Be patient, as it will take several years for asparagus plants grown from seed to mature enough to produce a harvest.
10. What are some creative ways to use my homegrown asparagus?
The possibilities are endless! Freshly harvested asparagus can be steamed, roasted, grilled, or sautéed. It’s a delicious addition to salads, soups, and omelets. You can also pickle asparagus or use it to make asparagus soup. Try wrapping asparagus spears in prosciutto or bacon and grilling them for a savory appetizer. Asparagus pairs well with a variety of flavors, including lemon, garlic, parmesan cheese, and hollandaise sauce. Don’t be afraid to experiment and discover your own favorite ways to enjoy your homegrown asparagus.

Leave a Comment