
Grow Water Spinach Easily and unlock a world of fresh, homegrown goodness right in your backyard! Have you ever dreamt of harvesting your own vibrant, leafy greens, ready to add a delicious and nutritious boost to your meals? Well, dream no more! This DIY guide is your passport to cultivating this amazing vegetable with ease.
Water spinach, also known as Ong Choy or Kang Kong, isn’t just another leafy green; it’s a culinary staple across Southeast Asia, deeply woven into the region’s food culture for centuries. From stir-fries to soups, its versatility is unmatched. But you don’t need to travel to experience its fresh, slightly sweet flavor.
In today’s world, where access to fresh, affordable produce can be a challenge, learning to grow water spinach easily at home is more relevant than ever. Imagine bypassing the grocery store lines and enjoying organic, pesticide-free greens grown with your own two hands. Plus, it’s incredibly rewarding to nurture something from seed to table. This DIY trick not only saves you money but also connects you to nature and empowers you to take control of your food source. So, let’s dive in and discover the simple steps to a bountiful water spinach harvest!
Grow Your Own Water Spinach: A Beginner-Friendly DIY Guide
Hey there, fellow plant enthusiasts! Ever wanted to grow your own delicious and nutritious water spinach (also known as kangkong or ong choy)? It’s surprisingly easy, even if you don’t have a green thumb. I’m going to walk you through a simple DIY method that will have you harvesting fresh water spinach in no time. Get ready to impress your friends and family with your homegrown goodness!
What You’ll Need
Before we dive in, let’s gather our supplies. This is a pretty low-cost project, which is always a bonus!
* Water Spinach Seeds or Cuttings: You can find seeds online or at your local garden center. Cuttings from mature plants also work great, especially if you know someone who already grows it.
* A Container: A large bucket, tub, or even a repurposed plastic storage container will do. Make sure it’s at least 12 inches deep.
* Soil: Regular potting soil works just fine. You don’t need anything fancy.
* Water: Tap water is perfectly acceptable.
* Sunlight: Water spinach loves sunshine, so a sunny spot is crucial.
* Optional: Fertilizer (liquid or slow-release) to give your plants an extra boost.
* Optional: A small pump or air stone to aerate the water (especially if you’re growing a lot of plants).
Getting Started: Planting Your Water Spinach
Okay, let’s get our hands dirty! This first section covers planting from seeds or cuttings.
1. Prepare Your Container: If your container doesn’t have drainage holes, that’s perfect! Water spinach thrives in waterlogged conditions. If it *does* have drainage holes, you’ll need to line it with a plastic bag or pond liner to prevent water from escaping.
2. Add Soil: Fill the container with about 6-8 inches of soil. Don’t pack it down too tightly.
3. Planting Seeds: If you’re using seeds, scatter them evenly over the surface of the soil. Then, cover them with a thin layer (about ¼ inch) of soil. Gently water the soil until it’s thoroughly moist.
4. Planting Cuttings: If you’re using cuttings, choose healthy stems that are about 6-8 inches long. Remove the leaves from the bottom 2 inches of the stem. Then, simply stick the cuttings into the soil, spacing them a few inches apart. Make sure at least 2 inches of the stem are buried in the soil. Water thoroughly.
5. Watering: Keep the soil consistently moist. You want it to be almost waterlogged. Add water as needed to maintain a shallow layer of standing water on top of the soil.
6. Sunlight: Place your container in a location that receives at least 6 hours of direct sunlight per day. The more sun, the better!
Nurturing Your Water Spinach: Care and Maintenance
Now that your water spinach is planted, let’s talk about how to keep it happy and healthy.
1. Watering (Continued): This is probably the most important part. Water spinach *loves* water. Check the water level daily and add more as needed to maintain that shallow layer of standing water. If the soil dries out, your plants will suffer.
2. Fertilizing (Optional): If you want to give your plants an extra boost, you can fertilize them every few weeks. Use a liquid fertilizer diluted to half strength, or add a slow-release fertilizer to the soil when you plant. I’ve found that fertilizing really helps with growth and yield.
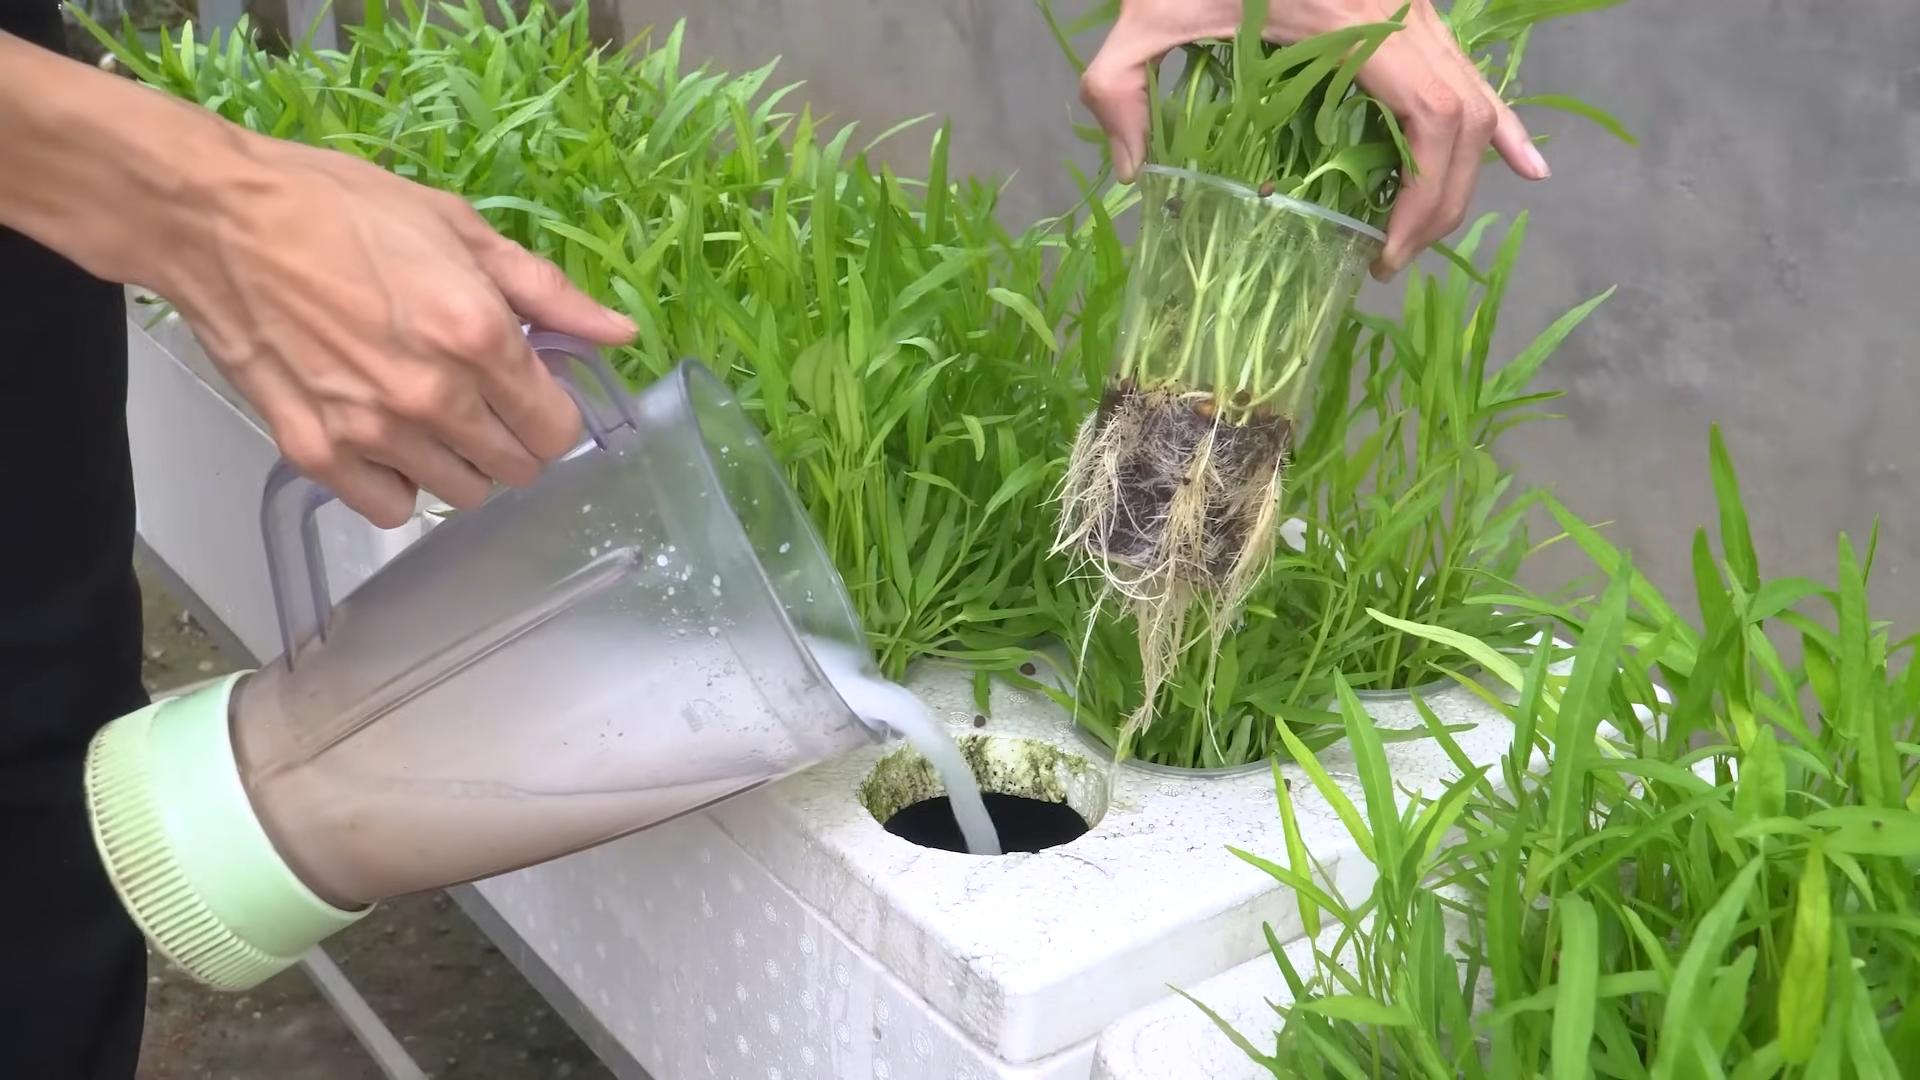
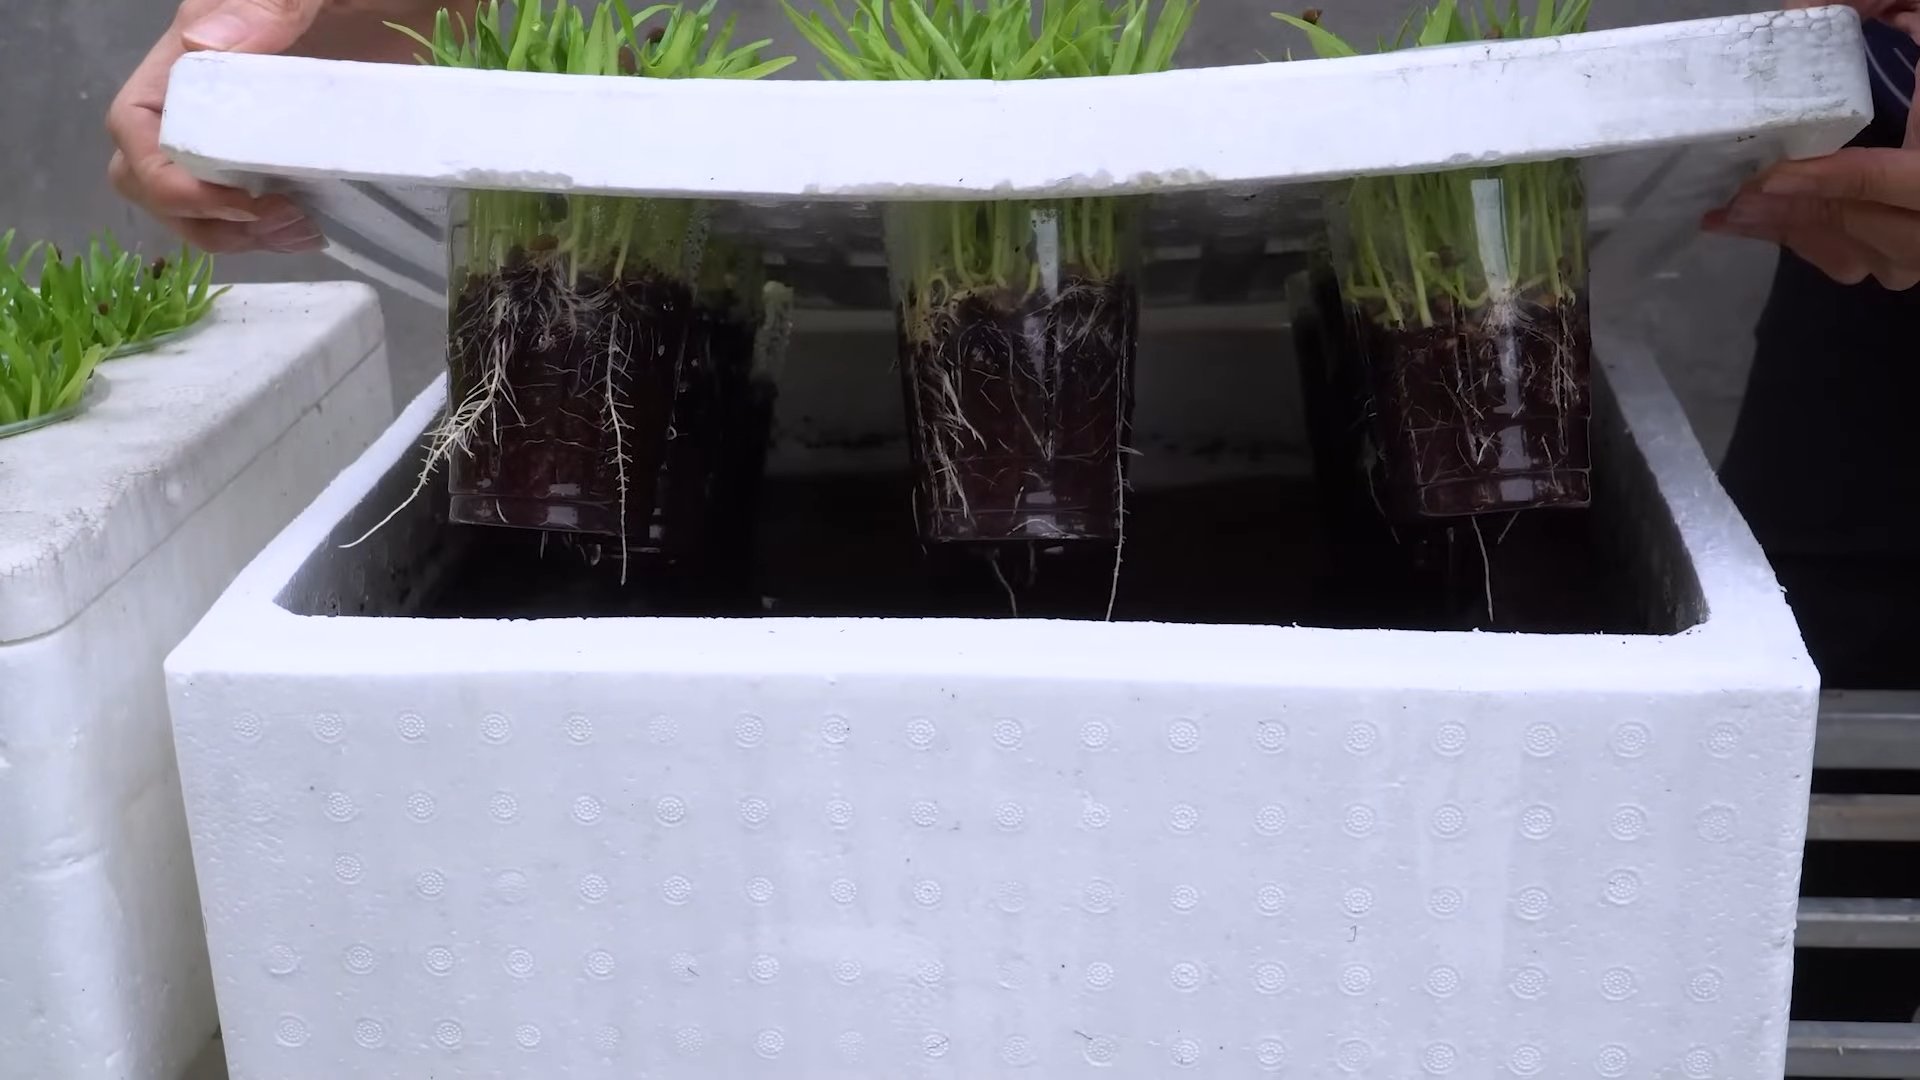
3. Aeration (Optional): If you’re growing a lot of water spinach in a large container, you might want to consider aerating the water. This helps to prevent the water from becoming stagnant and provides oxygen to the roots. A small aquarium pump and air stone will do the trick.
4. Pest Control: Water spinach is generally pretty resistant to pests, but occasionally you might encounter aphids or other small insects. If you do, you can try spraying them with a strong stream of water or using an insecticidal soap.
5. Pruning: As your water spinach grows, you can prune it to encourage bushier growth. Simply pinch off the tips of the stems. This will also help to prevent the plants from becoming too leggy.
Harvesting Your Water Spinach: Time to Enjoy!
The best part! Harvesting your own homegrown water spinach is incredibly rewarding.
1. When to Harvest: You can start harvesting your water spinach about 4-6 weeks after planting. The stems should be about 12-18 inches long.
2. How to Harvest: Use scissors or a sharp knife to cut the stems about 4-6 inches above the soil line. This will allow the plants to regrow and produce more stems.
3. Harvesting Technique: I like to harvest about a third of the plant at a time, leaving the rest to continue growing. This ensures a continuous supply of fresh water spinach.
4. Post-Harvest Care: After harvesting, give your plants a good watering and consider adding a little fertilizer to help them recover.
5. Storage: Freshly harvested water spinach is best used immediately. However, you can store it in the refrigerator for a few days. Wrap it in a damp paper towel and place it in a plastic bag.
Troubleshooting: Common Issues and Solutions
Even with the best care, you might encounter a few challenges along the way. Here are some common issues and how to address them:
* Yellowing Leaves: This could be a sign of nutrient deficiency. Try fertilizing your plants with a balanced fertilizer. It could also be a sign of overwatering, although this is less likely with water spinach.
* Slow Growth: This could be due to insufficient sunlight, lack of nutrients, or cold temperatures. Make sure your plants are getting enough sun, fertilize them regularly, and protect them from frost.
* Pest Infestation: As mentioned earlier, aphids and other small insects can sometimes be a problem. Spray them with a strong stream of water or use an insecticidal soap.
* Stagnant Water: If the water in your container becomes stagnant, it can attract mosquitoes and other pests. Aerate the water with a small pump and air stone, or change the water regularly.
Tips and Tricks for Success
Here are a few extra tips to help you grow the best water spinach possible:
* Start with Healthy Seeds or Cuttings: This is crucial for success. Choose seeds or cuttings that are free from disease and pests.
* Provide Plenty of Sunlight: Water spinach needs at least 6 hours of direct sunlight per day.
* Keep the Soil Consistently Moist: Water spinach thrives in waterlogged conditions.
* Fertilize Regularly: This will help to promote healthy growth and high yields.
* Harvest Regularly: This will encourage bushier growth and prevent the plants from becoming too leggy.
* Experiment with Different Varieties: There are several different varieties of water spinach available. Try growing a few different varieties to see which ones you like best.
* Consider Hydroponics: For an even easier and more efficient way to grow water spinach, consider using a hydroponic system. There are many DIY hydroponic setups you can create at home.
* Succession Planting: To ensure a continuous harvest, plant new seeds or cuttings every few weeks.
Enjoying Your Harvest: Delicious Water Spinach Recipes
Now that you’ve harvested your own water spinach, it’s time to enjoy the fruits (or rather, vegetables!) of your labor. Water spinach is a versatile ingredient that can be used in a variety of dishes. Here are a few ideas:
* Stir-fries: Water spinach is a classic ingredient in stir-fries. Simply stir-fry it with garlic, ginger, and your favorite sauce.
* Soups: Add water spinach to soups for a nutritious and flavorful boost.
* Salads: Use young, tender water spinach leaves in salads.
* Steamed: Steam water spinach and serve it with a dipping sauce.
* Water Spinach with Garlic: This is a super simple and delicious way to enjoy water spinach. Sauté garlic in oil, then add the water spinach and cook until wilted. Season with salt and pepper.
* Kangkong Belacan: A popular Malaysian dish where water spinach is stir-fried with shrimp paste (belacan), chili, and garlic. It’s spicy, savory, and incredibly flavorful.
Growing your own water spinach is a fun and rewarding experience. With a little bit of care and attention, you can enjoy a continuous supply of fresh, delicious greens. So, what are you waiting for? Get started today! I hope this guide helps you on your water spinach growing journey. Happy gardening!
Conclusion
So, there you have it! Growing your own water spinach, or kangkong, is not only surprisingly simple, but also incredibly rewarding. Forget those wilted, overpriced bunches at the grocery store. With this easy DIY trick, you can have a constant supply of fresh, crisp, and delicious water spinach right at your fingertips.
Why is this a must-try? Because it’s a game-changer for anyone who loves Asian cuisine, enjoys fresh, homegrown vegetables, or simply wants to add a touch of green to their lives. Imagine stir-fries bursting with vibrant flavor, salads with a satisfying crunch, and soups elevated by the unique taste of freshly harvested water spinach. This method is also incredibly space-efficient, making it perfect for apartment dwellers or those with limited garden space. You don’t need acres of land; a simple container on a balcony or patio will do the trick.
Beyond the basic method, there’s plenty of room for experimentation. Try different containers – from repurposed buckets to stylish planters – to find what works best for you. You can also experiment with different nutrient solutions. While the method described uses readily available resources, you can explore hydroponic solutions for even faster growth and potentially higher yields. Consider adding companion plants like basil or mint around your water spinach container to deter pests naturally. Another variation is to try growing different varieties of water spinach. Some varieties are more heat-tolerant, while others may have slightly different leaf shapes or flavors. Don’t be afraid to experiment and find your favorite!
The beauty of this DIY trick is its adaptability. Whether you’re a seasoned gardener or a complete beginner, you can easily adapt this method to your own needs and preferences. The key is to provide your water spinach with plenty of sunlight, consistent moisture, and a nutrient-rich environment.
We are confident that once you try this method, you’ll be hooked. The satisfaction of harvesting your own fresh vegetables is unparalleled, and the taste of homegrown water spinach is simply unbeatable. So, gather your supplies, follow the simple steps outlined, and get ready to enjoy a bountiful harvest of delicious, nutritious water spinach.
Don’t just take our word for it – give it a try yourself! We encourage you to embark on this exciting gardening adventure and discover the joys of growing your own water spinach. And most importantly, we want to hear about your experience! Share your photos, tips, and stories with us in the comments below. Let’s build a community of water spinach enthusiasts and learn from each other’s successes and challenges. Happy growing! Let us know how your DIY water spinach garden is flourishing!
Frequently Asked Questions (FAQ)
What exactly is water spinach, and what does it taste like?
Water spinach, also known as kangkong, ong choy, or swamp cabbage, is a semi-aquatic leafy green vegetable popular in Southeast Asian cuisine. It has long, hollow stems and arrow-shaped leaves. The taste is mild and slightly sweet, with a subtle earthy flavor. It’s often compared to spinach but has a slightly firmer texture and a more refreshing taste. It’s incredibly versatile and can be used in stir-fries, soups, salads, and even as a side dish.
How much sunlight does water spinach need?
Water spinach thrives in full sun, meaning it needs at least 6-8 hours of direct sunlight per day. If you don’t have a spot that gets full sun, you can still grow water spinach, but it may not grow as quickly or produce as many leaves. In that case, try to find the sunniest spot you have available and supplement with grow lights if necessary. Insufficient sunlight can lead to leggy growth and reduced yields.
What kind of container should I use to grow water spinach?
Almost any container that can hold water will work for growing water spinach. Popular options include plastic tubs, buckets, large pots, and even repurposed containers like old laundry baskets or storage bins. The key is to ensure the container is large enough to accommodate the roots and has drainage holes (although you’ll be keeping it consistently moist, good drainage is still important to prevent root rot). A container that is at least 12 inches deep and 12 inches wide is a good starting point.
What kind of soil or growing medium should I use?
Water spinach isn’t too picky about soil, but it prefers a rich, well-draining soil mix. You can use a standard potting mix, or you can create your own mix by combining equal parts of compost, peat moss, and perlite or vermiculite. The compost will provide nutrients, while the peat moss and perlite/vermiculite will help with drainage and aeration. You can also grow water spinach hydroponically, using a nutrient solution instead of soil.
How often should I water my water spinach?
Water spinach needs to be kept consistently moist, as its name suggests. The soil should never dry out completely. Check the soil moisture level daily, and water whenever the top inch of soil feels dry to the touch. In hot weather, you may need to water more frequently, even multiple times a day. Consider using a self-watering container or adding a layer of mulch to help retain moisture.
How do I fertilize my water spinach?
Water spinach is a heavy feeder, meaning it needs a good supply of nutrients to grow well. You can fertilize your water spinach every 2-3 weeks with a balanced liquid fertilizer, such as a 20-20-20 formula. Alternatively, you can use a slow-release fertilizer at planting time. You can also supplement with organic fertilizers like compost tea or fish emulsion. Avoid over-fertilizing, as this can lead to excessive vegetative growth and reduced yields.
When can I harvest my water spinach?
You can start harvesting water spinach about 4-6 weeks after planting. The leaves are ready to harvest when they are about 6-8 inches long. To harvest, simply cut the stems a few inches above the soil line. The plant will continue to produce new shoots and leaves, allowing you to harvest multiple times. Regular harvesting will also encourage bushier growth.
Are there any pests or diseases that affect water spinach?
Water spinach is generally resistant to pests and diseases, but it can be susceptible to aphids, spider mites, and whiteflies. These pests can be controlled with insecticidal soap or neem oil. Root rot can also be a problem if the soil is waterlogged. To prevent root rot, ensure the container has good drainage and avoid overwatering.
Can I grow water spinach indoors?
Yes, you can grow water spinach indoors, but it will require a sunny location and supplemental lighting. Place the container near a south-facing window that receives plenty of sunlight. You may also need to supplement with grow lights, especially during the winter months. Make sure to provide adequate ventilation and humidity to prevent fungal diseases.
Is water spinach safe to eat?
Yes, water spinach is safe to eat when grown in clean water and soil. However, it’s important to avoid growing water spinach in polluted water sources, as it can absorb contaminants. Always wash the leaves thoroughly before eating. If you are unsure about the safety of your water source, it’s best to use filtered or bottled water.


Leave a Comment