
Foam box peanut gardening: Ever dreamt of harvesting your own crunchy, delicious peanuts right from your backyard, balcony, or even your apartment patio? I know I have! Forget sprawling fields and complicated machinery – we’re talking about a simple, sustainable, and surprisingly rewarding DIY project that anyone can tackle.
Peanuts, though often called nuts, are actually legumes, and their cultivation has a rich history, dating back thousands of years in South America. They’ve since spread across the globe, becoming a staple in countless cuisines. But did you know you don’t need a farm to enjoy freshly grown peanuts?
In this article, I’m going to show you how to transform a humble foam box into a thriving peanut patch. Why a foam box? Because it’s lightweight, readily available (often free!), provides excellent insulation for the roots, and is perfect for small-space gardening. Plus, it’s a fantastic way to recycle! With rising food costs and a growing desire for fresh, locally sourced produce, learning foam box peanut gardening is more relevant than ever. Imagine the satisfaction of snacking on peanuts you nurtured from seed to harvest – it’s a truly rewarding experience, and I’m excited to guide you through every step!
DIY Peanut Growing in a Styrofoam Box: A Step-by-Step Guide
Hello dear garden friends! Do you want to grow your own peanuts? It’s easier than you might think, and a Styrofoam box is perfect for it! I’ll show you how you can get a bountiful harvest with little effort and recycled materials. Let’s go!
What you need for growing peanuts in a Styrofoam box:
- A Styrofoam box (preferably with a lid, but it’s not a must)
- A drill or screwdriver
- Garden fleece or old burlap sacks
- High-quality potting soil (especially for vegetables or legumes)
- Peanuts (raw, unsalted, and unroasted – preferably organic peanuts in the shell)
- Watering can or garden hose
- Optional: Compost or organic fertilizer
- Optional: Mulch material (straw, wood chips)
Preparing the Styrofoam Box:
Before we can start planting, we need to prepare the Styrofoam box. This is important so that water can drain well and the peanuts are not sitting in water.
- Drill holes: Take your drill or a screwdriver and drill several holes in the bottom of the Styrofoam box. I recommend drilling a hole about every 10-15 cm. This ensures that excess water can drain well. Make sure the holes are not too big, so that no soil falls out.
- Lining the box: Line the box with garden fleece or old burlap sacks. This prevents the soil from trickling through the holes and helps retain moisture in the box. Cut the fleece or burlap sacks to cover the entire inside of the box.
The Right Soil for Your Peanuts:
Peanuts are not particularly demanding, but the right soil is still important for a good harvest.
- Fill with soil: Fill the Styrofoam box with high-quality potting soil. I recommend a special soil for vegetables or legumes, as it already contains the right nutrients. Fill the box to about 5-10 cm below the rim. This leaves you space for watering and mulching.
- Optional: Add compost: If you have some, you can mix in some compost or organic fertilizer with the soil. This gives the peanuts an extra nutrient boost. But don’t overdo it; too much fertilizer can also be harmful.
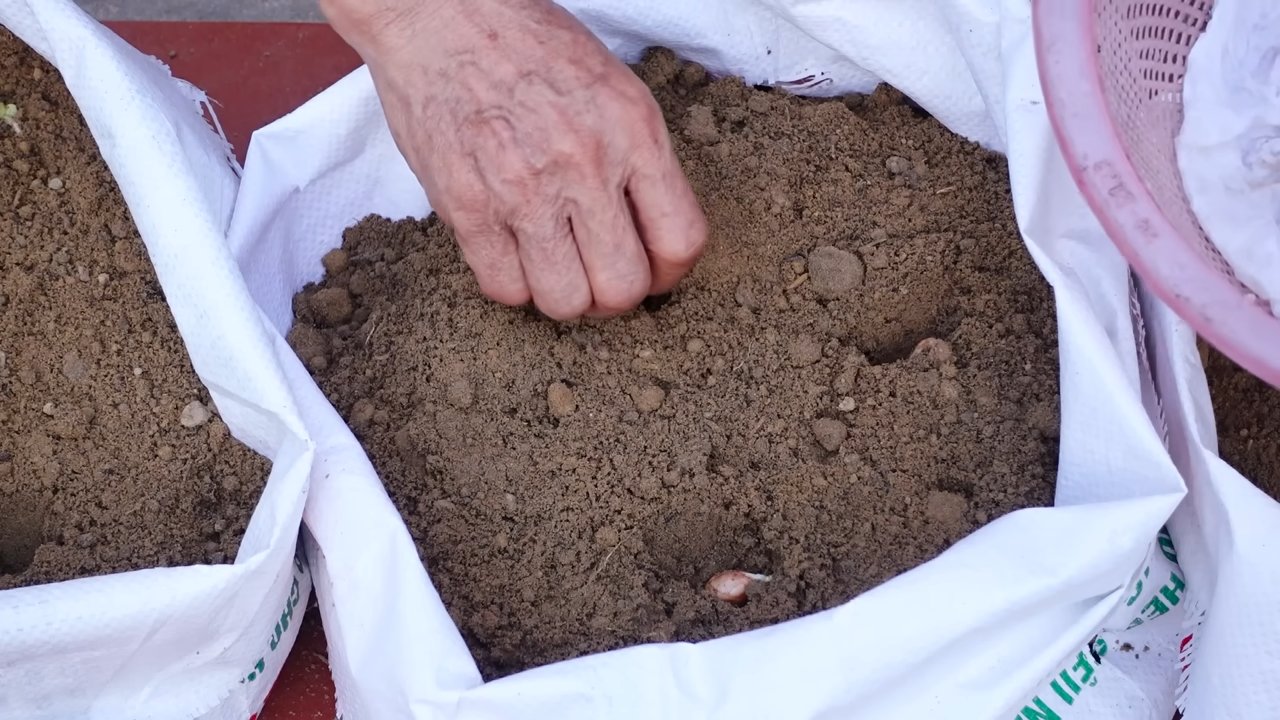
Planting Peanuts:
Now comes the exciting part: planting the peanuts!
- Prepare peanuts: Take your raw, unsalted, and unroasted peanuts. You can either leave the peanuts in the shell or carefully remove them. I’ve tried both and haven’t noticed a big difference. If you remove them from the shell, be careful not to damage the thin skins around the peanuts.
- Plant peanuts: Use your finger or a small spoon to make small holes in the soil, about 3-5 cm deep. Place one peanut in each hole and cover it carefully with soil. Make sure the peanuts are not too close to each other. I recommend a distance of about 15-20 cm between each plant.
- Water in: Gently water the soil so that it is well moistened. But avoid waterlogging! The soil should be damp, but not wet.
Caring for the Peanut Plants:
After planting, proper care is crucial for a bountiful harvest.
- Choose a location: Place the Styrofoam box in a sunny and warm spot. Peanuts love the sun! They need at least 6-8 hours of sunlight per day.
- Watering: Water the peanut plants regularly, especially during dry periods. The soil should always be slightly moist. However, avoid waterlogging, as this can lead to root rot. I usually water my peanuts every 2-3 days, depending on the weather.
- Fertilizing: If you wish, you can fertilize the peanut plants once or twice during the growing season with an organic fertilizer. I like to use nettle tea or diluted compost tea for this.
- Hilling: Once the peanut plants are about 15-20 cm tall, you should hill them up. This means you mound soil around the base of the plants. This encourages the formation of peanuts, as they grow underground.
- Optional: Mulching: To retain moisture in the soil and suppress weeds, you can mulch the soil around the peanut plants with straw or wood chips.
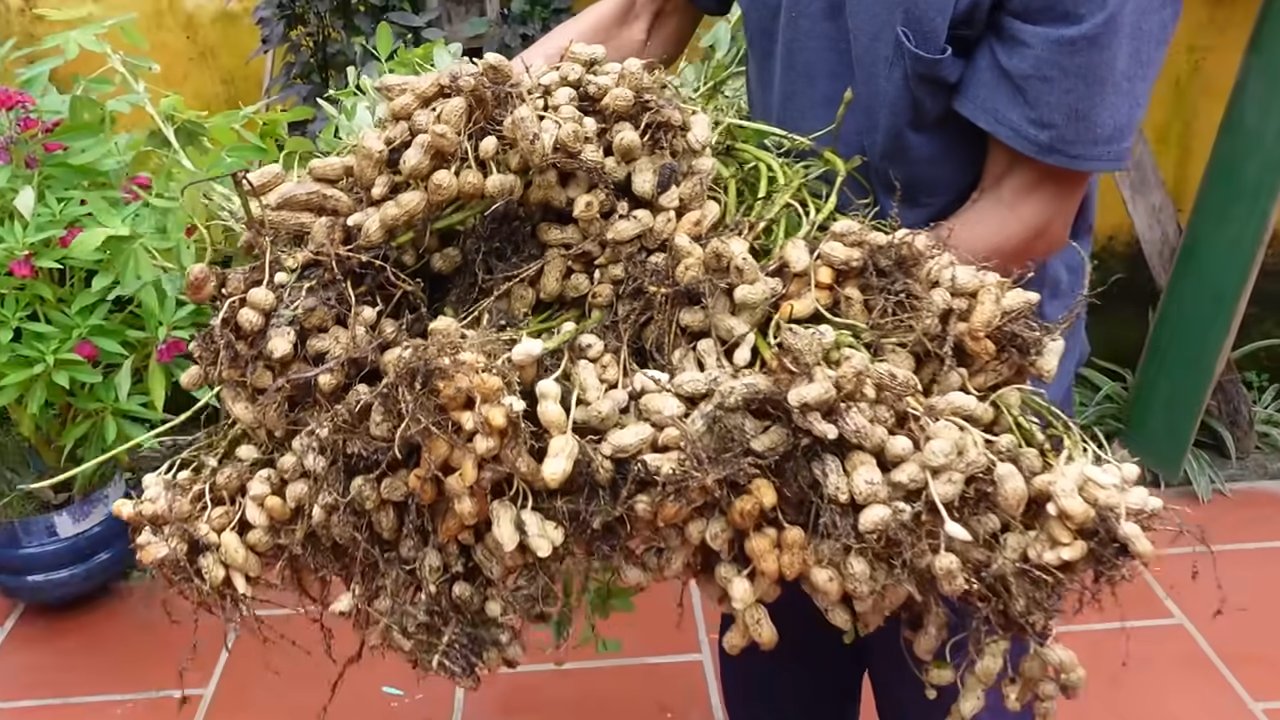
The Harvest:
The most exciting moment is, of course, the harvest!
- Determine harvest time: The harvest time depends on the variety and weather conditions. As a rule, peanuts are ready after about 4-5 months. You can tell they are ready when the leaves turn yellow and the plants slowly begin to die back.
- Harvesting: To harvest the peanuts, carefully pull the entire plant out of the soil. Shake off the soil and let the peanuts dry on the plant.
- Drying: Hang the peanut plants upside down in a dry and airy place. Let them dry there for about 2-3 weeks.
- Harvesting the peanuts: After drying, you can detach the peanuts from the plants. Sort the peanuts and remove any damaged or diseased ones.
- Storing: Store the peanuts in a cool, dry, and dark place. They keep longest in the shell.
Additional Tips and Tricks:
- Pest protection: Peanut plants are relatively robust, but sometimes pests like aphids or slugs can appear. Check your plants regularly and remove pests by hand or with natural remedies if necessary.
- Variety selection: There are different varieties of peanuts. Find out which variety is best suited for your region.
- Roasting peanuts: If you want to roast your peanuts, you can simply roast them in the oven at 180 degrees Celsius (350 degrees Fahrenheit) for about 15-20 minutes. Make sure they don’t burn!
I hope this guide helps you grow your own peanuts in a Styrofoam box. It’s a great project for the garden or balcony and a super way to harvest fresh and healthy peanuts. Happy gardening
Conclusion
So, there you have it! Transforming a simple foam box into a thriving peanut garden is not just a fun project; it’s a sustainable and rewarding way to enjoy fresh, homegrown peanuts. We’ve walked you through the process, highlighting the ease and affordability of this DIY trick. But why is this method a must-try?
First and foremost, it’s incredibly accessible. Whether you have a sprawling backyard or a small balcony, a foam box peanut garden can fit seamlessly into your space. The controlled environment of the box allows for better temperature regulation and moisture retention, crucial factors for successful peanut cultivation, especially in regions with unpredictable weather. This means you’re more likely to see a bountiful harvest compared to traditional in-ground planting.
Secondly, it’s a fantastic way to recycle and repurpose materials. Instead of discarding those foam boxes, you’re giving them a new lease on life, contributing to a more sustainable lifestyle. Plus, the lightweight nature of the foam box makes it easy to move around, allowing you to chase the sun or protect your plants from harsh weather conditions.
But the benefits don’t stop there. Growing your own peanuts offers a unique connection to your food. You get to witness the entire life cycle of the plant, from the initial sprouting to the eventual harvest. This hands-on experience is not only educational but also incredibly satisfying. Imagine the pride you’ll feel when you serve your homegrown peanuts to family and friends!
Now, let’s talk about variations. While we’ve outlined a basic method, feel free to experiment and personalize your foam box peanut garden. Consider adding companion plants like marigolds or basil to deter pests and attract beneficial insects. You can also try different varieties of peanuts to see which ones thrive best in your specific climate and growing conditions. For instance, Virginia peanuts are known for their large size, while Spanish peanuts are prized for their sweet flavor.
Another variation involves the type of soil you use. While a well-draining potting mix is generally recommended, you can amend it with compost or other organic matter to further enrich the soil and provide your peanut plants with the nutrients they need to flourish. Just be sure to avoid heavy clay soils, as they can hinder the development of the peanut pods.
Furthermore, think about the aesthetics of your foam box garden. You can paint the box with vibrant colors or decorate it with stencils to add a touch of personality to your outdoor space. You can even create a miniature trellis for the peanut plants to climb on, adding visual interest and supporting the growth of the vines.
Ultimately, the possibilities are endless. The key is to have fun and experiment until you find what works best for you.
We wholeheartedly encourage you to give this DIY trick a try. It’s a simple, affordable, and rewarding way to grow your own peanuts and connect with nature. And once you’ve harvested your first batch of homegrown peanuts, we’d love to hear about your experience! Share your photos, tips, and stories with us in the comments section below. Let’s create a community of foam box peanut gardeners and inspire others to embrace this sustainable and delicious hobby. Remember, growing your own food is not just about saving money; it’s about connecting with nature, promoting sustainability, and enjoying the satisfaction of harvesting the fruits (or in this case, the peanuts!) of your labor. So, grab a foam box, some peanut seeds, and get ready to embark on a rewarding gardening adventure!
Frequently Asked Questions (FAQ)
What kind of foam box should I use?
Ideally, you want a foam box that is at least 12 inches deep and wide enough to accommodate several peanut plants. The size will depend on how many plants you want to grow. Look for boxes that are clean and free from any harmful chemicals or residues. Food-grade foam boxes are generally a safe bet. Avoid boxes that have been used to store pesticides or other toxic substances. If you’re unsure about the history of the box, it’s best to err on the side of caution and find a different one. You can often find suitable foam boxes at grocery stores, fish markets, or even from online retailers. Remember to drill drainage holes in the bottom of the box before planting.
How many peanut plants can I grow in one foam box?
This depends on the size of your foam box. As a general rule, allow at least 6-8 inches of space between each plant. Overcrowding can lead to stunted growth and reduced yields. If you have a larger box, you can plant more peanuts, but be sure to provide adequate spacing for each plant to thrive. A good starting point is to plant 3-4 peanut plants in a standard-sized foam box (approximately 24 inches long, 18 inches wide, and 12 inches deep).
What kind of soil should I use for my foam box peanut garden?
Peanuts thrive in well-draining, sandy loam soil. A good quality potting mix will work well. Avoid heavy clay soils, as they can become waterlogged and hinder the development of the peanut pods. You can amend your potting mix with compost or other organic matter to improve drainage and fertility. Consider adding perlite or vermiculite to further enhance drainage. The ideal pH for peanut growth is between 6.0 and 6.5. You can test the pH of your soil using a soil testing kit and adjust it accordingly if necessary.
How often should I water my peanut plants in a foam box?
Water your peanut plants regularly, especially during hot and dry weather. The soil should be kept consistently moist but not waterlogged. Check the soil moisture by sticking your finger into the soil. If the top inch feels dry, it’s time to water. Avoid overwatering, as this can lead to root rot. During periods of heavy rain, you may need to reduce watering frequency. The foam box will help retain moisture, so you may not need to water as often as you would with in-ground planting.
How much sunlight do peanut plants need?
Peanut plants need at least 6-8 hours of direct sunlight per day to thrive. Choose a location for your foam box peanut garden that receives plenty of sunlight. If you live in a particularly hot climate, you may need to provide some afternoon shade to prevent the plants from scorching. You can use shade cloth or move the foam box to a shadier location during the hottest part of the day.
When is the best time to plant peanuts in a foam box?
The best time to plant peanuts is after the last frost, when the soil has warmed up to at least 65 degrees Fahrenheit. In most regions, this is typically in late spring or early summer. You can start peanut seeds indoors a few weeks before the last frost to get a head start on the growing season. Transplant the seedlings into your foam box once the weather has warmed up and the risk of frost has passed.
How long does it take for peanuts to mature in a foam box?
Peanuts typically take 120-150 days to mature, depending on the variety and growing conditions. You’ll know your peanuts are ready to harvest when the foliage starts to turn yellow and the pods feel plump and full. You can also dig up a few plants to check the maturity of the pods. The inside of the peanut shells should be dark and the kernels should be fully developed.
How do I harvest peanuts from a foam box?
To harvest your peanuts, carefully dig up the entire plant, being careful not to damage the pods. Gently shake off any excess soil. You can then hang the plants upside down in a well-ventilated area to dry for several weeks. Once the plants are dry, you can remove the peanuts from the pods.
Are there any common pests or diseases that affect peanut plants in foam boxes?
Peanut plants can be susceptible to various pests and diseases, including aphids, spider mites, and fungal diseases. Regularly inspect your plants for signs of infestation or disease. You can use organic pest control methods, such as insecticidal soap or neem oil, to control pests. To prevent fungal diseases, ensure good air circulation around the plants and avoid overwatering.
Can I reuse the soil in my foam box for future peanut crops?
It’s generally not recommended to reuse the soil for consecutive peanut crops, as this can increase the risk of soilborne diseases. However, you can amend the soil with compost and other organic matter to improve its fertility and drainage. Consider rotating your crops to prevent the buildup of pests and diseases. You can also sterilize the soil by baking it in the oven or using a soil solarization technique.
Leave a Comment