
DIY vegetable garden from trash: Imagine transforming discarded materials into a thriving source of fresh, organic produce right in your backyard! It’s not just a dream; it’s an achievable reality with a little creativity and elbow grease. For centuries, resourceful gardeners have found innovative ways to cultivate food, often out of necessity. Think of the “victory gardens” of World War II, where people turned every available patch of land into productive vegetable plots, boosting morale and supplementing rations.
Today, the spirit of resourcefulness is alive and well, fueled by a desire for sustainable living and a connection to our food. Why spend a fortune on fancy planters when you can repurpose items destined for the landfill? This DIY approach isn’t just about saving money; it’s about reducing waste, minimizing your environmental footprint, and enjoying the immense satisfaction of growing your own food. Plus, a DIY vegetable garden from trash adds a unique, personalized touch to your outdoor space.
In this article, I’ll guide you through some fantastic and easy-to-follow DIY tricks and hacks for creating your own thriving vegetable garden using materials you probably already have lying around. Get ready to unleash your inner gardener and turn trash into treasure!
Creating a Thriving Vegetable Garden from Trash: A DIY Guide
Hey there, fellow gardening enthusiasts! I’m so excited to share this project with you. We’re going to transform discarded items into a beautiful and productive vegetable garden. Not only is this a fantastic way to reduce waste, but it’s also incredibly rewarding to grow your own food using repurposed materials. Get ready to get your hands dirty and create something amazing!
Gathering Your Materials: The Treasure Hunt Begins!
Before we dive into the nitty-gritty, let’s talk about what you’ll need. The beauty of this project is that you can adapt it to whatever you have available. Think of it as a creative challenge!
* Containers: This is where the “trash” part comes in! Look for:
* Old tires (various sizes)
* Plastic storage bins (cracked or damaged are fine)
* Wooden pallets (free from hardware stores or construction sites)
* Buckets (paint buckets, cleaning buckets – just make sure they’re clean!)
* Old drawers (from dressers or desks)
* Washing machine drums (check with appliance repair shops)
* Even old shoes (for smaller herbs and succulents)
* Soil: You’ll need a good quality potting mix or garden soil. You can also create your own mix using compost, peat moss, and perlite.
* Seeds or Seedlings: Choose your favorite vegetables! Consider your local climate and the amount of sunlight your garden will receive.
* Tools:
* Gloves (to protect your hands)
* Shovel or trowel
* Drill (for drainage holes)
* Measuring tape
* Scissors or utility knife
* Staple gun (if using pallets)
* Safety glasses (especially when drilling or cutting)
* Optional Materials:
* Landscape fabric (to line containers and prevent soil erosion)
* Paint (to decorate your containers)
* Rocks or gravel (for drainage)
* Compost (for enriching the soil)
* Fertilizer (organic is best!)
* Labels (to identify your plants)
Preparing Your Containers: Giving Trash a New Life
This is a crucial step, so don’t skip it! Proper preparation will ensure your plants thrive.
Tire Planters: A Classic Repurpose
1. Cleaning: Thoroughly clean the tires with soap and water. Remove any dirt, debris, or loose rubber.
2. Drainage: Drill several drainage holes in the bottom of the tire. This is essential to prevent waterlogging.
3. Painting (Optional): If you want to add some color, paint the tires with exterior paint. Let them dry completely before moving on. I like to use bright colors to make my garden pop!
4. Placement: Decide where you want to place your tire planters. Once they’re filled with soil, they’ll be heavy!
5. Filling: Line the bottom of the tire with landscape fabric (optional) to prevent soil from escaping. Fill the tire with your chosen soil mix.
Plastic Bin Planters: Simple and Effective
1. Cleaning: Clean the plastic bins thoroughly.
2. Drainage: Drill plenty of drainage holes in the bottom of the bins.
3. Reinforcement (Optional): If the bins are cracked, you can reinforce them with duct tape or plastic sheeting.
4. Filling: Line the bottom with landscape fabric (optional) and fill with soil.
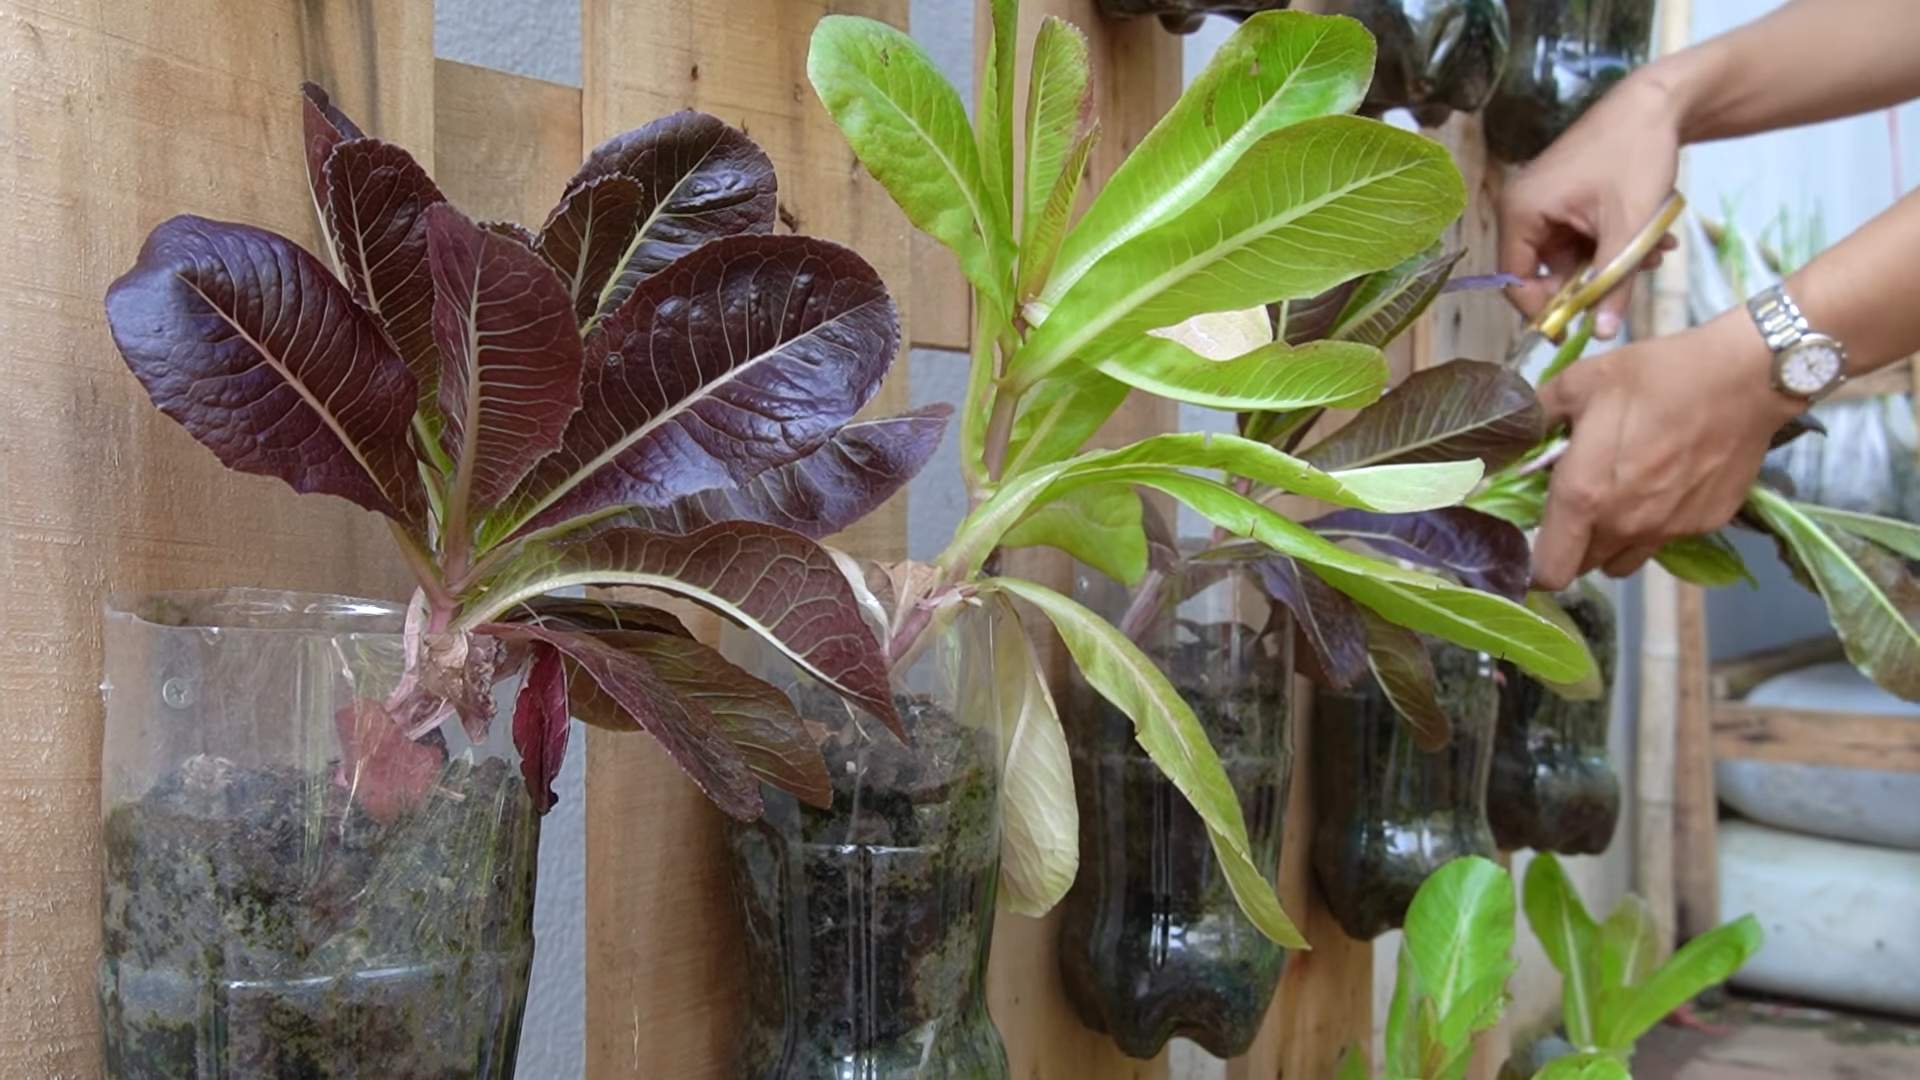
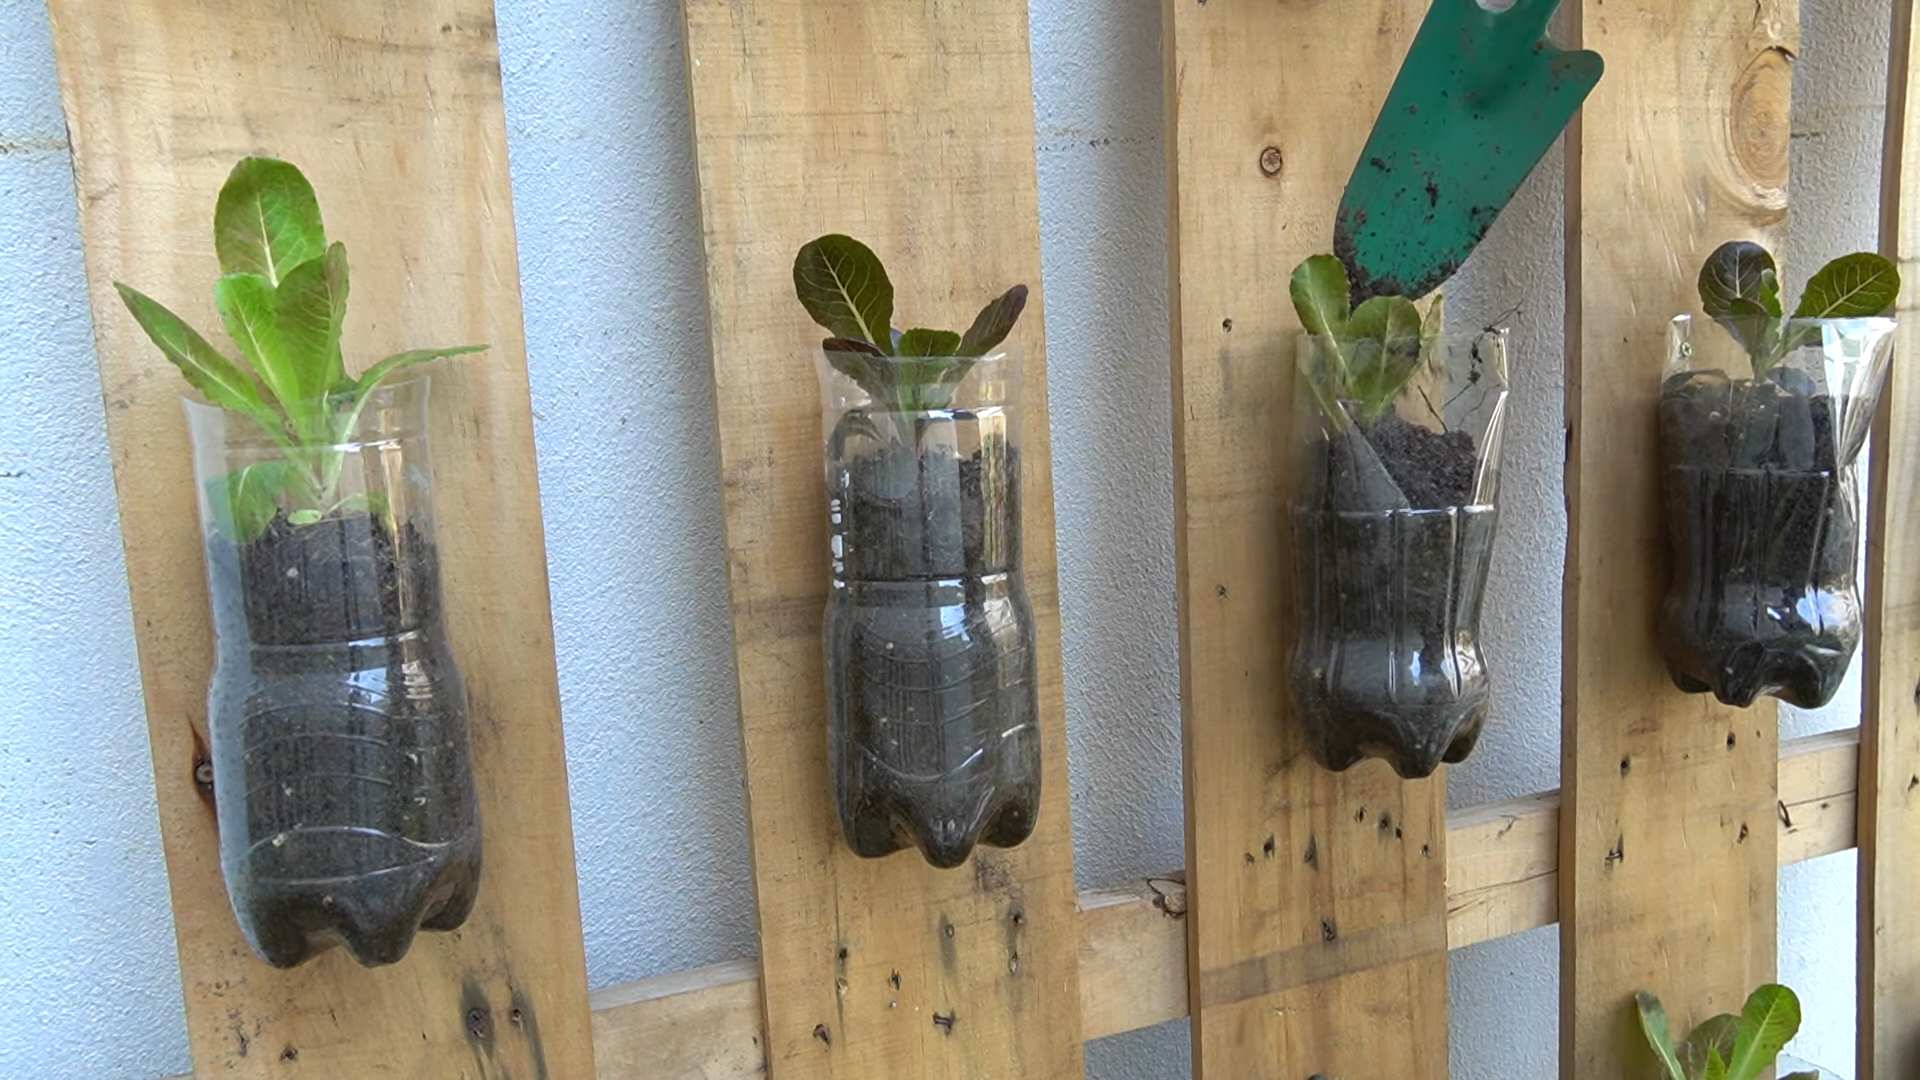
Pallet Planters: Vertical Gardening Made Easy
1. Safety First: Inspect the pallet for any loose nails or staples. Remove them carefully.
2. Sanding (Optional): Sand down any rough edges to prevent splinters.
3. Lining: This is important! You need to create pockets to hold the soil. Cut landscape fabric to fit the inside of each section of the pallet. Staple the fabric securely to the wood, creating a pouch.
4. Reinforcement (Optional): You can add extra support to the pockets by using wood scraps or cardboard.
5. Filling: Fill each pocket with soil.
6. Placement: Lean the pallet against a wall or fence, or secure it with brackets.
Bucket Planters: Versatile and Portable
1. Cleaning: Clean the buckets thoroughly, especially if they contained chemicals.
2. Drainage: Drill drainage holes in the bottom.
3. Painting (Optional): Decorate the buckets with paint or stencils.
4. Filling: Fill with soil.
Drawer Planters: Charming and Unique
1. Cleaning: Clean the drawers and remove any hardware you don’t want.
2. Sealing (Optional): If the drawers are made of wood, you can seal them with a waterproof sealant to protect them from moisture.
3. Lining: Line the drawers with plastic sheeting or landscape fabric.
4. Drainage: Drill drainage holes in the bottom.
5. Filling: Fill with soil.
Washing Machine Drum Planters: Industrial Chic
1. Safety First: These can have sharp edges! Wear gloves and be careful.
2. Cleaning: Clean the drum thoroughly.
3. Drainage: The drum already has drainage holes!
4. Placement: Choose a sturdy location for the heavy drum.
5. Filling: Fill with soil.
Planting Your Vegetables: Bringing Your Garden to Life
Now for the fun part!
1. Choosing Your Plants: Consider your climate, sunlight, and personal preferences. Some easy-to-grow vegetables for beginners include:
* Lettuce
* Spinach
* Radishes
* Tomatoes
* Peppers
* Herbs (basil, mint, oregano)
2. Planting Seeds: Follow the instructions on the seed packet for planting depth and spacing.
3. Planting Seedlings: Dig a hole slightly larger than the root ball of the seedling. Gently remove the seedling from its container and place it in the hole. Backfill with soil and water thoroughly.
4. Spacing: Give your plants enough space to grow. Overcrowding can lead to disease and reduced yields.
5. Watering: Water your plants regularly, especially during dry periods. Check the soil moisture by sticking your finger into the soil. If it feels dry, it’s time to water.
6. Sunlight: Most vegetables need at least 6 hours of sunlight per day. Choose a sunny location for your garden.
7. Fertilizing: Feed your plants with organic fertilizer every few weeks to promote healthy growth.
Maintaining Your Garden: Keeping Things Thriving
Gardening is an ongoing process. Here’s how to keep your trash-turned-treasure garden flourishing:
1. Watering: Water deeply and regularly, especially during hot weather. Aim for early morning watering to minimize evaporation.
2. Weeding: Remove weeds regularly to prevent them from competing with your vegetables for nutrients and water.
3. Pest Control: Keep an eye out for pests and diseases. Use organic pest control methods whenever possible.
4. Mulching: Apply a layer of mulch around your plants to help retain moisture, suppress weeds, and regulate soil temperature.
5. Pruning: Prune your plants as needed to encourage growth and improve air circulation.
6. Harvesting: Harvest your vegetables when they are ripe and ready to eat. Regular harvesting will encourage continued production.
Tips and Tricks for Success: Making Your Garden Even Better
* Vertical Gardening: Pallet planters are great for vertical gardening, especially in small spaces. You can grow herbs, strawberries, or even small vegetables like lettuce and spinach.
* Companion Planting: Plant certain vegetables together to benefit each other. For example, basil repels pests that attack tomatoes.
* Succession Planting: Plant new crops every few weeks to ensure a continuous harvest throughout the growing season.
* Composting: Start a compost pile to recycle kitchen scraps and yard waste into nutrient-rich soil for your garden.
* Water Conservation: Collect rainwater in barrels to use for watering your garden.
* Labeling: Label your plants so you know what you’re growing.
* Have Fun!: Gardening should be enjoyable! Don’t be afraid to experiment and try new things.
Troubleshooting: Addressing Common Problems
* Yellowing Leaves: This could be a sign of overwatering, underwatering, or nutrient deficiency. Check the soil moisture and fertilize if necessary.
* Pests: Identify the pest and use appropriate organic pest control methods
Conclusion
So, there you have it! Transforming your trash into a thriving vegetable garden is not just a whimsical idea; it’s a practical, sustainable, and incredibly rewarding endeavor. We’ve walked you through the process, highlighting the ease and accessibility of creating your own DIY vegetable garden from trash. But why is this a must-try?
First and foremost, it’s an environmentally conscious choice. By repurposing materials that would otherwise end up in landfills, you’re actively reducing waste and contributing to a greener planet. Imagine the satisfaction of knowing that your delicious, homegrown tomatoes are not only nourishing your body but also helping to nourish the Earth.
Secondly, it’s a budget-friendly option. Gardening can sometimes feel like an expensive hobby, with costs adding up for pots, soil, and other supplies. This DIY approach significantly cuts down on those expenses, allowing you to invest in quality seeds and seedlings instead. Think of all the delicious vegetables you can grow for the price of a few packets of seeds!
Thirdly, it’s a fantastic way to get creative and personalize your garden. From colorful painted tires to intricately designed pallet planters, the possibilities are endless. Let your imagination run wild and create a unique and eye-catching garden that reflects your personality.
But the benefits don’t stop there. Gardening is also a wonderful way to connect with nature, relieve stress, and get some much-needed fresh air and sunshine. It’s a therapeutic activity that can improve your mental and physical well-being. Plus, there’s nothing quite like the taste of freshly picked vegetables that you’ve grown yourself.
Ready to take your DIY vegetable garden to the next level? Consider these variations:
* **Vertical Gardening:** If you’re short on space, try creating a vertical garden using plastic bottles or repurposed gutters. This is a great way to maximize your growing area and add a unique architectural element to your outdoor space.
* **Herb Spiral:** Build a herb spiral using old bricks or stones. This design creates different microclimates, allowing you to grow a variety of herbs in a small space.
* **Composting:** Start a compost bin using food scraps and yard waste to create nutrient-rich soil for your garden. This is a great way to further reduce waste and improve the health of your plants.
* **Container Combinations:** Experiment with different plant combinations in your containers. Consider companion planting, where certain plants are grown together to benefit each other. For example, basil repels pests that attack tomatoes, making them a perfect pairing.
We encourage you to embrace the challenge and embark on this exciting journey of creating your own DIY vegetable garden from trash. Don’t be afraid to experiment, get your hands dirty, and learn from your mistakes. Every garden is a work in progress, and the most important thing is to have fun and enjoy the process.
So, grab your gloves, gather your materials, and get ready to transform your trash into treasure. We can’t wait to see what you create! Share your photos and stories with us on social media using [Your Hashtag]. Let’s inspire others to join the movement and create a more sustainable and delicious world, one DIY vegetable garden at a time. Remember, even small actions can make a big difference. Happy gardening!
FAQ
What types of trash are best for creating a DIY vegetable garden?
The beauty of this project lies in its versatility! You can use a wide variety of discarded items. Some popular choices include:
* **Plastic Bottles and Containers:** These are perfect for starting seedlings or growing smaller plants like herbs and lettuce. Make sure to clean them thoroughly and drill drainage holes.
* **Tires:** Old tires can be stacked and painted to create raised garden beds. They’re durable and can add a unique aesthetic to your garden.
* **Pallets:** Pallets can be repurposed into vertical gardens, raised beds, or even compost bins. Just be sure to check that they haven’t been treated with harmful chemicals. Look for the “HT” stamp, which indicates heat treatment. Avoid pallets marked with “MB,” which indicates methyl bromide treatment.
* **Buckets and Bins:** Large buckets and bins are great for growing larger plants like tomatoes, peppers, and eggplants.
* **Old Shoes and Boots:** These can be used as quirky and fun planters for small herbs or flowers.
* **Tin Cans:** Smaller tin cans are perfect for starting seeds or growing herbs. Be sure to remove any sharp edges.
Remember to clean all materials thoroughly before using them in your garden.
What kind of soil should I use in my DIY vegetable garden?
The quality of your soil is crucial for the success of your garden. While you can use soil directly from your yard, it’s often best to use a good quality potting mix or garden soil. These mixes are specifically formulated to provide the nutrients and drainage that plants need to thrive. You can also amend your existing soil with compost, aged manure, or other organic matter to improve its fertility and drainage.
Consider the specific needs of the plants you’re growing. Some plants prefer acidic soil, while others prefer alkaline soil. You can test your soil’s pH using a soil testing kit and amend it accordingly.
How do I ensure proper drainage in my DIY planters?
Proper drainage is essential to prevent root rot and other problems. Here are a few tips:
* **Drill Drainage Holes:** Make sure to drill plenty of drainage holes in the bottom of your containers.
* **Add a Layer of Gravel or Rocks:** Place a layer of gravel or rocks at the bottom of your containers to improve drainage.
* **Use Well-Draining Soil:** Choose a potting mix or garden soil that is specifically formulated for good drainage.
* **Avoid Overwatering:** Water your plants only when the soil is dry to the touch.
What vegetables are best suited for growing in containers?
Many vegetables thrive in containers, making them perfect for a DIY vegetable garden. Some popular choices include:
* **Tomatoes:** Choose determinate varieties, which are more compact and better suited for containers.
* **Peppers:** Peppers are relatively easy to grow in containers and come in a variety of colors and flavors.
* **Eggplants:** Eggplants require a bit more space but can be successfully grown in large containers.
* **Lettuce and Salad Greens:** These are quick-growing and can be harvested frequently.
* **Herbs:** Herbs are perfect for containers and can be grown indoors or outdoors.
* **Radishes:** Radishes are another quick-growing vegetable that is well-suited for containers.
* **Bush Beans:** Bush beans are more compact than pole beans and are a good choice for containers.
How much sunlight do my vegetables need?
Most vegetables need at least 6-8 hours of sunlight per day to thrive. Choose a location for your garden that receives plenty of sunlight. If you don’t have a sunny spot, you can supplement with grow lights.
How often should I water my vegetables?
The frequency of watering will depend on the type of plant, the weather, and the type of soil you’re using. As a general rule, water your plants when the soil is dry to the touch. Avoid overwatering, as this can lead to root rot.
How do I protect my vegetables from pests and diseases?
There are several things you can do to protect your vegetables from pests and diseases:
* **Choose Disease-Resistant Varieties:** Select vegetable varieties that are known to be resistant to common diseases.
* **Practice Good Sanitation:** Keep your garden clean and free of debris. Remove any diseased plants immediately.
* **Use Organic Pest Control Methods:** Consider using organic pest control methods, such as insecticidal soap, neem oil, or diatomaceous earth.
* **Attract Beneficial Insects:** Attract beneficial insects to your garden by planting flowers that provide nectar and pollen.
* **Rotate Your Crops:** Rotate your crops each year to prevent the buildup of pests and diseases in the soil.
How do I fertilize my vegetables?
Vegetables need nutrients to grow and produce a good harvest. You can fertilize your vegetables with compost, aged manure, or a commercial fertilizer. Follow the instructions on the fertilizer label carefully.
What if I don’t have a yard? Can I still create a DIY vegetable garden?
Absolutely! One of the best things about container gardening is that you don’t need a yard to participate. You can create a thriving DIY vegetable garden on a balcony, patio, or even indoors with the help of grow lights. Vertical gardening techniques are especially useful for maximizing space in small areas. So, even if you live in an apartment, you can still enjoy the benefits of fresh, homegrown vegetables.

Leave a Comment