
DIY Sink Clog Solution: Are you tired of staring into a murky pool of standing water in your sink, wondering if you’ll ever be able to wash your hands without feeling slightly disgusted? I know the feeling! A clogged sink is a common household headache, and it always seems to happen at the most inconvenient time. But before you reach for harsh chemicals or call a pricey plumber, let’s explore some simple, effective, and budget-friendly DIY solutions.
For generations, resourceful homeowners have relied on clever tricks to tackle household problems. Think about it – our grandparents didn’t have access to the array of specialized products we do today. They used ingenuity and readily available ingredients to keep their homes running smoothly. This tradition of DIY problem-solving is not only practical but also empowering! It connects us to a history of resourcefulness and self-sufficiency.
Why is a DIY sink clog solution so important? Because dealing with a clogged sink yourself saves you money, time, and the potential exposure to harsh chemicals that can damage your pipes and the environment. Plus, there’s a certain satisfaction that comes from fixing something yourself! In this article, I’ll share my favorite tried-and-true methods for clearing those stubborn clogs, using items you probably already have in your kitchen. Get ready to say goodbye to that standing water and hello to a smoothly flowing sink!
DIY Sink Clog Solution: Conquer That Drain Like a Pro!
Okay, let’s face it: a clogged sink is a total drag. Water pooling, that gurgling sound… nobody wants that! But before you reach for harsh chemicals or call a plumber (and spend a fortune!), let’s try some DIY magic. I’m going to walk you through a few methods, starting with the simplest and working our way up. Trust me, you’ll be surprised how often you can fix a clog yourself!
What You’ll Need (General Supplies)
No matter which method you choose, having these basics on hand will be super helpful:
* Rubber gloves (protect those hands!)
* Old towels or rags (for spills, because spills happen!)
* Bucket or basin (to catch water)
* Screwdriver (various types, just in case)
* Pliers (for grabbing stubborn debris)
* Flashlight (to peek into the drain)
Method 1: The Boiling Water Blitz
This is the easiest and often most effective first step, especially for grease-related clogs.
How it Works: Boiling water can melt away grease and soap buildup that’s causing the blockage.
Step-by-Step Instructions:
1. Clear the Sink: Remove any standing water from the sink. A cup or small container works well for this.
2. Boil Water: Heat a kettle or pot of water until it’s boiling vigorously. Be careful!
3. Pour Slowly: Slowly pour the boiling water down the drain in stages. Give the water a few seconds to work its magic between pours. Don’t just dump it all at once!
4. Observe: Watch to see if the water starts to drain. If it does, keep pouring until the sink is clear.
5. Repeat if Necessary: If the water is still draining slowly, repeat the process one or two more times. If it’s still not working, move on to the next method.
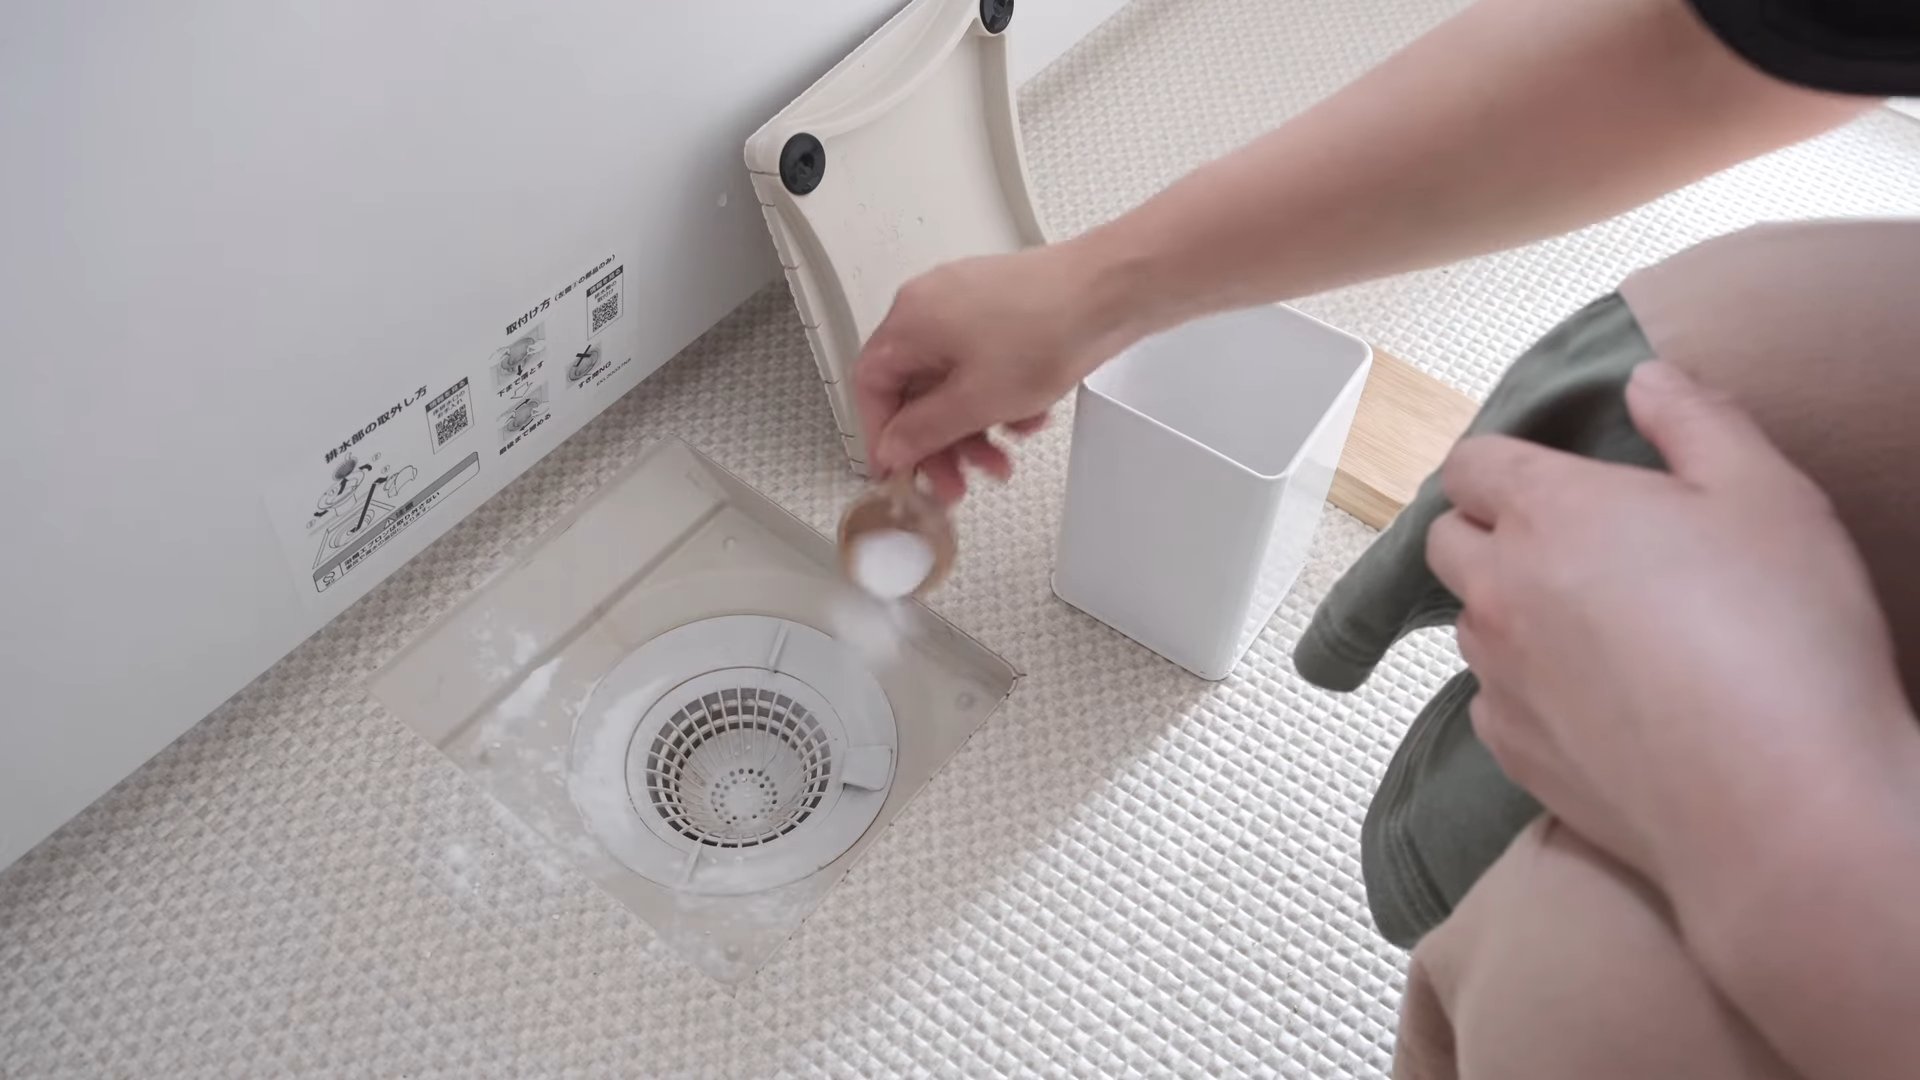
Method 2: Baking Soda and Vinegar Volcano
This is a classic DIY solution that’s safe, effective, and uses ingredients you probably already have.
How it Works: The baking soda and vinegar create a chemical reaction that fizzes and helps to break down the clog.
Step-by-Step Instructions:
1. Clear the Sink: Again, remove any standing water.
2. Pour Baking Soda: Pour about one cup of baking soda down the drain. Try to get it as far down as possible.
3. Add Vinegar: Slowly pour one cup of white vinegar down the drain after the baking soda.
4. The Fizz: You should hear a fizzing sound. That’s the reaction happening!
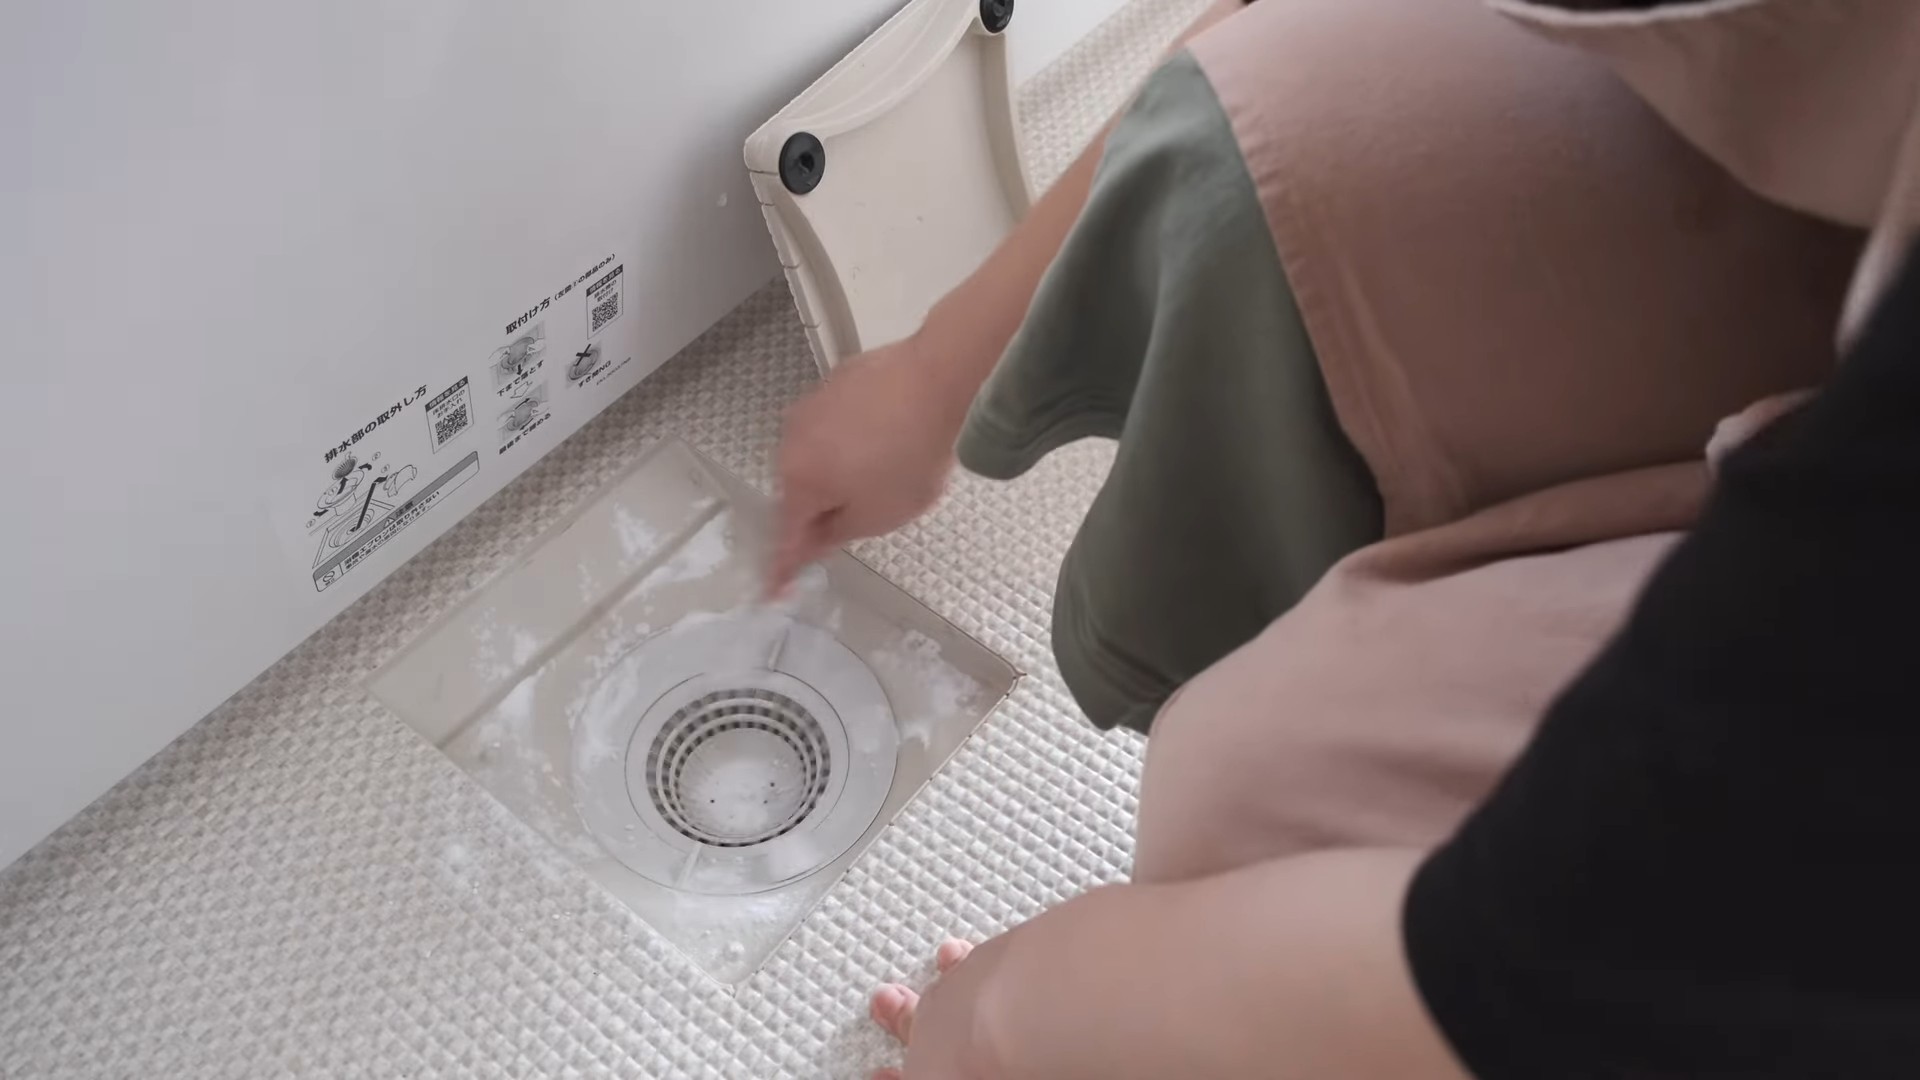
5. Wait: Let the mixture sit for at least 30 minutes, or even better, overnight. This gives it time to really work on the clog.
6. Flush with Boiling Water: After the waiting period, flush the drain with a kettle of boiling water, just like in Method 1.
7. Observe and Repeat: Watch to see if the water drains. If it does, great! If not, you can repeat the baking soda and vinegar treatment.
Method 3: The Plunger Power Play
Sometimes, you just need a little physical force to dislodge that stubborn clog.
How it Works: The plunger creates suction that can pull or push the clog loose.
Step-by-Step Instructions:
1. Choose the Right Plunger: Make sure you’re using a cup plunger (the kind with a flat rubber cup) for sinks, not a flange plunger (the kind with a fold-out flap) which is better for toilets.
2. Add Water: Add enough water to the sink to cover the cup of the plunger.
3. Create a Seal: Place the plunger over the drain opening, making sure you have a good seal. You might need to add a little more water to ensure a tight fit.
4. Plunge Vigorously: Push and pull the plunger up and down with a strong, steady motion. Keep the seal intact!
5. Repeat: Continue plunging for several minutes. You should hear gurgling sounds as the clog starts to break up.
6. Remove the Plunger: Carefully remove the plunger and see if the water drains.
7. Repeat if Necessary: If the water is still draining slowly, repeat the plunging process.
Method 4: The Bent Wire Hanger Hook
This is a great way to manually remove hair and other debris that’s causing the clog.
How it Works: The bent wire hanger acts as a hook to grab and pull out the blockage.
Step-by-Step Instructions:
1. Straighten the Hanger: Take a wire coat hanger and straighten it out as much as possible.
2. Create a Hook: Bend one end of the hanger into a small hook.
3. Insert and Fish: Carefully insert the hooked end of the hanger into the drain opening.
4. Twist and Pull: Gently twist and move the hanger around inside the drain to try to snag the clog.
5. Remove Debris: Slowly pull the hanger out, bringing any debris with it. Be prepared for some grossness!
6. Clean the Hanger: Clean the hanger thoroughly after each pull.
7. Repeat: Repeat the process until you’re no longer pulling out any debris.
8. Flush with Water: After you’ve removed as much debris as possible, flush the drain with hot water.
Method 5: Inspecting and Cleaning the P-Trap
This is a slightly more involved method, but it’s often necessary for stubborn clogs. The P-trap is the curved pipe under your sink, and it’s a common place for debris to accumulate.
How it Works: By removing and cleaning the P-trap, you can directly access and remove the clog.
Safety First!
Before you start, turn off the water supply to the sink. You’ll usually find shut-off valves under the sink. Turn them clockwise until they’re completely closed.
Step-by-Step Instructions:
1. Prepare for Mess: Place a bucket or basin under the P-trap to catch any water that will spill out.
2. Loosen the Slip Nuts: Use pliers to loosen the slip nuts that connect the P-trap to the drain pipes. These are the large, plastic nuts that hold the pipes together. Don’t remove them completely yet!
3. Carefully Remove the P-Trap: Once the slip nuts are loose, carefully remove the P-trap. Be prepared for water to spill out.
4. Inspect the P-Trap: Examine the P-trap for any visible clogs.
5. Remove the Clog: Use your fingers (with gloves!), a wire hanger, or a small brush to remove any debris from the P-trap. You can also rinse it out with a hose.
6. Clean the Drain Pipes: While the P-trap is removed, take the opportunity to clean the drain pipes that connect to it. You can use the wire hanger or a bottle brush to remove any buildup.
7. Reassemble the P-Trap: Carefully reassemble the P-trap, making sure the slip nuts are tightened securely. Don’t overtighten them, or you could crack the plastic!
8. Turn on the Water: Slowly turn the water supply back on and check for leaks. If you see any leaks, tighten the slip nuts a little more.
Method 6: Enzyme Drain Cleaner (For Maintenance)
This isn’t a quick fix for a major clog, but it’s a great way to prevent future problems.
How it Works: Enzyme drain cleaners use natural enzymes to break down organic matter like hair, grease, and food particles.
Important Note: Avoid chemical drain cleaners! They can damage your pipes and are harmful to the environment. Enzyme cleaners are a much safer and more eco-friendly option.
Step-by-Step Instructions:
1. Follow Product Instructions: Read and follow the instructions on the enzyme drain cleaner bottle carefully.
2. Pour Down the Drain: Typically, you’ll pour a specified amount of the cleaner down the drain.
3. Let it Sit: Let the cleaner sit in the drain for the recommended amount of time, usually overnight.
4. Flush with Water: Flush the drain with hot water in the morning.
5. Repeat Regularly: Use enzyme drain cleaner regularly (e.g., once a month) to help prevent clogs from forming.
Troubleshooting Tips
* Still Clogged?: If you’ve tried all of these methods and your sink is still clogged
Conclusion
So, there you have it! A simple, effective, and surprisingly satisfying DIY sink clog solution that will save you money and a potential headache. Forget reaching for those harsh chemical drain cleaners that can damage your pipes and harm the environment. This method, using ingredients you likely already have in your pantry, is a game-changer.
Why is this DIY trick a must-try? Because it works! It’s a powerful combination of baking soda, vinegar, and hot water that creates a fizzing action to break down grease, hair, and other common culprits behind stubborn sink clogs. Plus, it’s incredibly easy to do, requiring minimal effort and time. You’ll be amazed at how quickly your sink goes from a frustrating trickle to a free-flowing stream.
But the beauty of this DIY sink clog solution lies not only in its effectiveness but also in its versatility. Feel free to experiment with variations to suit your specific needs. For instance, if you suspect a particularly stubborn clog, you can increase the amount of baking soda and vinegar used. You could also try letting the mixture sit in the drain for a longer period, even overnight, before flushing with hot water.
Another variation involves adding a few drops of your favorite essential oil, such as lemon or tea tree oil, to the baking soda before pouring it down the drain. This will not only help to freshen up your sink but also provide additional antibacterial benefits. Just be sure to use essential oils sparingly, as too much can potentially damage your pipes.
For preventative maintenance, consider pouring a cup of boiling water down your drain once a week. This will help to flush away any build-up before it has a chance to form a clog. You can also use a drain strainer to catch hair and other debris before they enter your pipes.
We are confident that this DIY sink clog solution will become your go-to method for dealing with clogged sinks. It’s a cost-effective, eco-friendly, and highly effective alternative to commercial drain cleaners.
Now, it’s your turn! We encourage you to give this DIY sink clog solution a try and see the amazing results for yourself. Don’t be surprised if you find yourself wondering why you didn’t discover this trick sooner.
And most importantly, we want to hear about your experience! Share your results, variations, and any tips you may have in the comments below. Let’s create a community of DIY enthusiasts who are passionate about finding simple and effective solutions to common household problems. Your feedback will help others discover the power of this amazing DIY sink clog solution.
Frequently Asked Questions (FAQ)
What exactly causes sink clogs?
Sink clogs are typically caused by a build-up of various materials that accumulate over time within the drain pipes. Common culprits include:
* Hair: Hair is a major contributor to sink clogs, as it tends to bind together and trap other debris.
* Grease and Oil: When poured down the drain, grease and oil solidify as they cool, creating a sticky residue that clings to the pipe walls and traps food particles.
* Food Scraps: Even small food scraps can accumulate over time and contribute to clogs, especially if you don’t have a garbage disposal.
* Soap Scum: Soap scum, a combination of soap and minerals in hard water, can also build up and restrict water flow.
* Mineral Deposits: In areas with hard water, mineral deposits can accumulate inside the pipes, narrowing the passageway and leading to clogs.
* Small Objects: Occasionally, small objects like jewelry, toys, or cotton swabs can accidentally fall into the drain and cause a blockage.
How often should I use this DIY sink clog solution?
The frequency of using this DIY solution depends on how prone your sink is to clogging. If you notice that your sink is draining slowly, it’s a good idea to use this method as a preventative measure. Generally, using it once a month is a good starting point. However, if you frequently experience clogs, you may need to use it more often, perhaps once a week or every other week. Regular use can help prevent build-up and keep your drains flowing smoothly.
Is this DIY solution safe for all types of pipes?
This DIY sink clog solution is generally safe for most types of pipes, including PVC, copper, and cast iron. The baking soda and vinegar combination is a relatively gentle cleaning agent compared to harsh chemical drain cleaners. However, it’s always a good idea to exercise caution and avoid using excessive amounts of either ingredient. If you have older or more delicate pipes, you may want to test the solution in a small, inconspicuous area first to ensure that it doesn’t cause any damage. Also, avoid using boiling water on PVC pipes, as it can soften or warp them. Hot water is generally safe, but boiling water should be avoided.
What if the clog is still there after trying this solution?
If the clog persists after trying this DIY solution, there are a few things you can try:
* Repeat the Process: Sometimes, a particularly stubborn clog may require multiple treatments. Repeat the baking soda and vinegar process a second or even a third time.
* Use a Plunger: After the baking soda and vinegar treatment, try using a plunger to dislodge the clog. Make sure there’s enough water in the sink to cover the cup of the plunger.
* Try a Drain Snake: A drain snake, also known as a plumbing snake, is a flexible tool that can be inserted into the drain to break up or remove clogs. You can purchase a drain snake at most hardware stores.
* Call a Plumber: If you’ve tried all of these methods and the clog is still there, it’s time to call a professional plumber. They have the tools and expertise to handle more complex clogs and prevent further damage to your pipes.
Can I use this solution in my toilet?
While the baking soda and vinegar solution can be used in toilets, it’s generally more effective for sink clogs. Toilet clogs are often caused by different types of materials, such as excessive toilet paper or foreign objects. For toilet clogs, a plunger is usually the first and most effective tool to try. If the plunger doesn’t work, you can try using a toilet auger, which is a specialized type of drain snake designed for toilets. If the clog persists, it’s best to call a plumber.
How does the baking soda and vinegar actually work to unclog the sink?
The magic behind the baking soda and vinegar combination lies in the chemical reaction that occurs when they are mixed. Baking soda (sodium bicarbonate) is a mild alkali, while vinegar (acetic acid) is a mild acid. When they combine, they create a fizzing action that helps to break down grease, hair, and other debris that are causing the clog. The fizzing also helps to loosen the clog from the pipe walls, making it easier to flush away with hot water.
Are there any precautions I should take when using this DIY solution?
While this DIY solution is generally safe, there are a few precautions you should take:
* Avoid Mixing with Chemical Drain Cleaners: Never mix baking soda and vinegar with chemical drain cleaners. The combination can create dangerous fumes and potentially damage your pipes.
* Wear Gloves: While baking soda and vinegar are relatively mild, it’s always a good idea to wear gloves to protect your skin.
* Ventilate the Area: Ensure that the area is well-ventilated, especially if you’re using a large amount of baking soda and vinegar.
* Avoid Eye Contact: Avoid getting baking soda or vinegar in your eyes. If contact occurs, rinse thoroughly with water.
Can I use this solution to prevent clogs from forming?
Yes, this DIY solution can be used as a preventative measure to help keep your drains clear. Pouring a mixture of baking soda and vinegar down your drain once a month can help to flush away any build-up before it has a chance to form a clog. You can also pour a cup of boiling water down your drain once a week to help prevent clogs. In addition, using a drain strainer to catch hair and other debris can significantly reduce the likelihood of clogs.


Leave a Comment