
DIY Hydroponic Garden: Ever dreamed of fresh, vibrant greens gracing your table, even without a sprawling backyard? I know I have! Forget battling weeds and unpredictable weather – with a DIY hydroponic garden, you can cultivate a thriving oasis right in your home.
Hydroponics, the art of growing plants without soil, isn’t some futuristic fad. Its roots stretch back centuries! From the legendary Hanging Gardens of Babylon to the floating gardens of the Aztecs, humans have long sought innovative ways to nurture plants in water. Today, this ancient technique is experiencing a modern renaissance, empowering us to grow food sustainably and efficiently.
Why should you embrace the DIY hydroponic garden revolution? Well, imagine harvesting crisp lettuce in the dead of winter or enjoying fragrant herbs year-round. Beyond the convenience, hydroponics offers faster growth, higher yields, and reduced water consumption compared to traditional gardening. Plus, it’s incredibly rewarding to build your own system and witness the magic of plant life unfolding before your eyes. In this article, I’ll guide you through simple, budget-friendly methods to create your very own hydroponic haven, transforming your space into a flourishing edible landscape. Let’s get growing!
DIY Hydroponic Garden: Grow Your Own Food Indoors!
Hey there, fellow plant enthusiasts! Ever dreamed of having fresh herbs and veggies right at your fingertips, regardless of the season? Well, I’m here to tell you that dream can become a reality with a DIY hydroponic garden! It’s easier than you might think, and I’m going to walk you through every step of the process. We’ll be building a simple, yet effective, Kratky hydroponic system – perfect for beginners. Let’s get our hands dirty (well, not really, since it’s hydroponics!) and start growing!
What is Kratky Hydroponics?
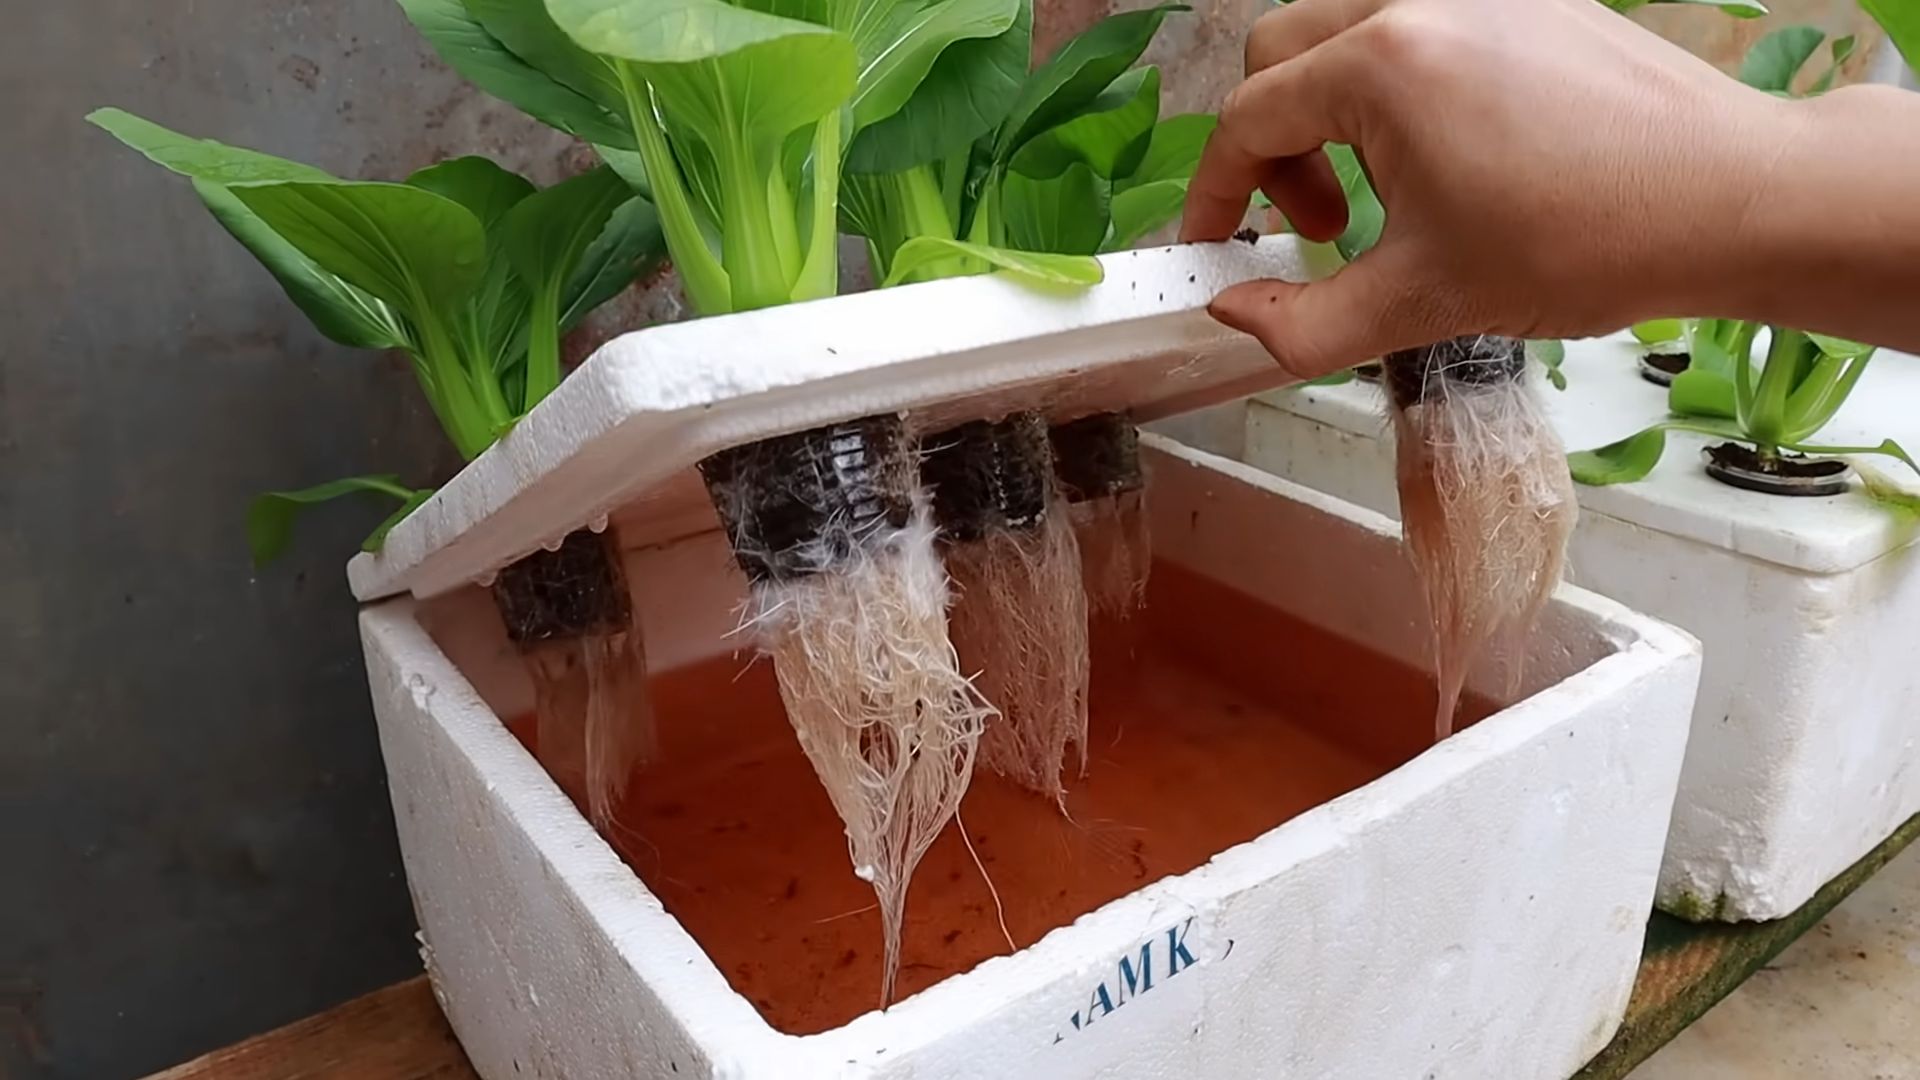
Before we dive in, let’s quickly understand what Kratky hydroponics is all about. It’s a passive hydroponic system, meaning it doesn’t require pumps, air stones, or electricity. The plant’s roots grow in a nutrient-rich solution, and as the plant consumes the solution, an air gap forms, providing the roots with the oxygen they need. It’s a “set it and forget it” kind of system, making it ideal for busy gardeners like us!
Materials You’ll Need
Okay, let’s gather our supplies. Here’s what you’ll need to build your own Kratky hydroponic garden:
* A container: I recommend a dark-colored plastic storage tote (around 5-10 gallons is a good size). Dark colors prevent algae growth. Make sure it’s food-grade plastic!
* Net pots: These will hold your plants and growing medium. Choose a size that fits comfortably in the holes you’ll be making in the lid. 3-inch net pots are a common choice.
* Growing medium: I prefer coco coir or rockwool cubes, but you can also use perlite or a mix of these. This provides support for the plant roots.
* Hydroponic nutrients: You’ll need a balanced nutrient solution specifically formulated for hydroponics. Look for a two-part or three-part nutrient system.
* Seeds or seedlings: Choose plants that thrive in hydroponic systems, such as lettuce, spinach, herbs (basil, mint, chives), strawberries, or even small peppers.
* A lid for your container: This can be the lid that comes with the storage tote, or you can use a sheet of rigid foam insulation.
* Drill with a hole saw attachment: The size of the hole saw should match the diameter of your net pots.
* Measuring cups and spoons: For accurately mixing your nutrient solution.
* pH testing kit or meter: To ensure your nutrient solution is at the correct pH level (usually between 5.5 and 6.5).
* Marker or pen: For marking the lid.
* Ruler or measuring tape: For accurate measurements.
* Gloves: To protect your hands.
* Safety glasses: To protect your eyes when drilling.
Step-by-Step Instructions: Building Your Kratky System
Alright, let’s get building! Follow these steps carefully, and you’ll have your hydroponic garden up and running in no time.
1. Preparing the Lid
* Mark the holes: Place your net pots on the lid and trace around them with a marker. Space them evenly, leaving enough room between each pot for the plants to grow. I usually aim for at least 6 inches between each plant.
* Drill the holes: Put on your safety glasses! Using the hole saw attachment on your drill, carefully drill out the holes you marked. Go slowly and steadily to avoid cracking the lid.
* Clean up the edges: Once you’ve drilled all the holes, check for any rough edges. You can use sandpaper or a utility knife to smooth them out.
2. Preparing the Container
* Clean the container: Thoroughly wash the container with soap and water to remove any dirt or debris. Rinse it well.
* (Optional) Paint the outside: While dark containers are preferred, if yours is light-colored, you can paint the outside with a dark, non-toxic paint to prevent algae growth. Let it dry completely before moving on.
3. Setting Up the System
* Add the nutrient solution: Fill the container with water, leaving about 2-3 inches of space at the top. Then, add your hydroponic nutrients according to the manufacturer’s instructions. Be precise! Too much or too little can harm your plants.
* Check the pH: Use your pH testing kit or meter to check the pH of the nutrient solution. Adjust it as needed to maintain a pH between 5.5 and 6.5. You can use pH up or pH down solutions to adjust the pH.
* Place the lid: Carefully place the lid on the container, ensuring it fits securely.
4. Planting Your Seeds or Seedlings
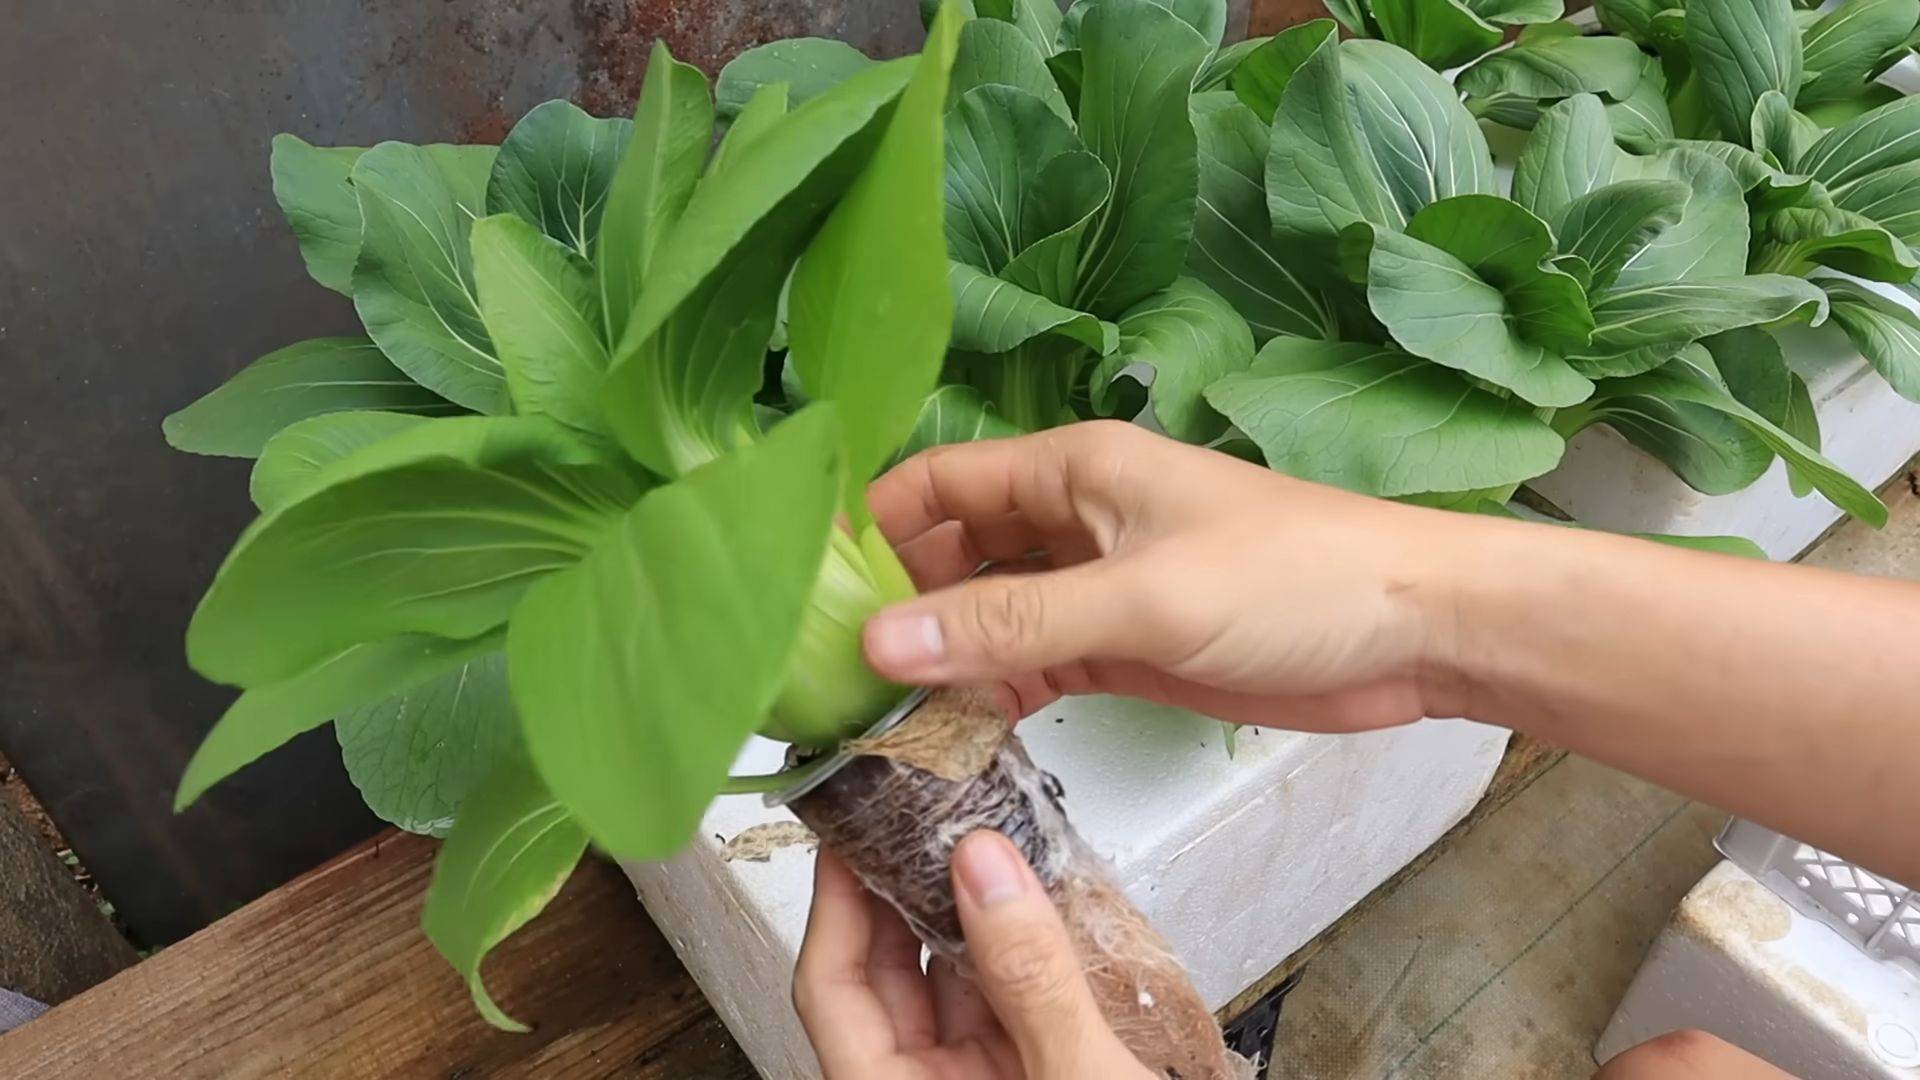
* Prepare the net pots: Fill the net pots with your chosen growing medium (coco coir, rockwool, etc.). If using rockwool cubes, soak them in water for a few hours before planting.
* Plant the seeds or seedlings: If you’re starting from seeds, sow a few seeds in each net pot. If you’re using seedlings, gently remove them from their containers and place them in the net pots, ensuring the roots are surrounded by the growing medium.
* Place the net pots in the holes: Carefully place the net pots into the holes you drilled in the lid. Make sure the bottom of the net pots is submerged in the nutrient solution. This is crucial for the Kratky method to work.
Maintaining Your Hydroponic Garden
Now that your hydroponic garden is set up, here’s how to keep it thriving:
* Monitor the water level: As the plants grow, they’ll consume the nutrient solution. Keep an eye on the water level and add more nutrient solution as needed to maintain the air gap between the water and the bottom of the net pots.
* Check the pH regularly: Check the pH of the nutrient solution every week or so and adjust it as needed.
* Provide adequate light: Hydroponic plants need plenty of light. If you’re growing indoors, you’ll likely need to supplement with grow lights. LED grow lights are a great option because they’re energy-efficient and don’t produce much heat.
* Control pests and diseases: Keep an eye out for pests and diseases. If you spot any problems, address them promptly with organic pest control methods or appropriate treatments.
* Harvest your crops: Harvest your herbs and veggies as they mature. Regular harvesting encourages continued growth.
Troubleshooting Tips
Even with the best planning, you might encounter some challenges. Here are a few common problems and how to solve them:
* Algae growth: Algae can grow in the nutrient solution, especially if the container is exposed to light. To prevent algae growth, use a dark-colored container, paint the outside of the container, or add a small amount of hydrogen peroxide to the nutrient solution (be careful not to add too much, as it can harm your plants).
* Nutrient deficiencies: If your plants are showing signs of nutrient deficiencies (e.g., yellowing leaves, stunted growth), check the pH of the nutrient solution and adjust it as needed. You may also need to adjust the nutrient concentration.
* Root rot: Root rot is a fungal disease that can occur if the roots are constantly submerged in water. To prevent root rot, ensure there’s an adequate air gap between the water and the bottom of the net pots. You can also add a small amount of hydrogen peroxide to the nutrient solution to help prevent fungal growth.
* Pest infestations: Pests can be a problem in hydroponic gardens, just like in traditional gardens. To control pests, use organic pest control methods, such as neem oil or insecticidal soap.
Choosing the Right Plants
Not all plants are created equal when it comes to hydroponics. Some plants thrive in hydroponic systems, while others struggle. Here are some of the best plants to grow in your Kratky hydroponic garden:
* Lettuce: Lettuce is a fast-growing and easy-to-grow crop that’s perfect for beginners.
* Spinach: Spinach is another leafy green that thrives in hydroponic systems.
* Herbs: Many herbs, such as basil, mint, chives, and oregano, grow well in hydroponics.
* Strawberries: Strawberries can be grown hydroponically, but they require more light and nutrients than leafy greens.
* Peppers: Small peppers, such as chili peppers, can also be grown hydroponically.
* Tomatoes: Dwarf tomato varieties are suitable for hydroponics.
Advanced Techniques (Optional)
Once you’ve mastered the basics of Kratky hydroponics, you can experiment with some advanced techniques to improve your yields and efficiency:
* Adding an air stone: While Kratky systems are designed to be
Conclusion
So, there you have it! Creating your own DIY hydroponic garden isn’t just a fun project; it’s a gateway to fresh, flavorful produce right at your fingertips, regardless of your outdoor space. We’ve walked you through the steps, highlighting the simplicity and affordability of building a system that can revolutionize how you access healthy food.
But why is this DIY hydroponic garden a must-try? Beyond the sheer satisfaction of building something with your own hands, it offers a multitude of benefits. Imagine plucking crisp lettuce leaves for your salad in the dead of winter, or enjoying vine-ripened tomatoes long before they appear in the grocery store. This system puts you in control of your food source, allowing you to cultivate organic produce without the need for pesticides or herbicides. You’ll know exactly what’s going into your food, and you’ll be reducing your carbon footprint by minimizing transportation costs.
Furthermore, a DIY hydroponic garden is incredibly adaptable. Feel free to experiment with different nutrient solutions to find the perfect blend for your chosen plants. Consider adding a timer to your grow lights for optimal growth, or incorporating a small pump to automate the watering process. You can even explore different hydroponic methods, such as the Kratky method for a truly passive system or a deep water culture (DWC) setup for faster growth.
Don’t be afraid to get creative with your container choices! While we’ve suggested specific materials, you can repurpose old buckets, plastic bins, or even glass jars to create a unique and sustainable system. The possibilities are truly endless.
We understand that embarking on a new project can be daunting, but we encourage you to take the plunge. The rewards of a thriving DIY hydroponic garden are well worth the effort. Not only will you enjoy fresh, delicious produce, but you’ll also gain a deeper understanding of plant science and sustainable gardening practices.
We’re confident that you’ll find this project both rewarding and enjoyable. So, gather your materials, follow our instructions, and get ready to experience the magic of hydroponics.
And most importantly, we want to hear about your experiences! Share your photos, tips, and challenges in the comments below. Let’s build a community of DIY hydroponic gardeners and learn from each other. Your insights could inspire others to embark on their own hydroponic journey. Happy growing!
Frequently Asked Questions (FAQ)
What exactly is hydroponics, and why should I consider it?
Hydroponics is a method of growing plants without soil, using mineral nutrient solutions in water. It’s a fantastic option for several reasons: it requires less space than traditional gardening, uses less water (as the water is recirculated), allows for faster growth rates, and eliminates the need for soil-borne pesticides and herbicides. Plus, you can grow year-round, regardless of the weather outside.
What are the easiest plants to grow in a DIY hydroponic garden?
For beginners, leafy greens like lettuce, spinach, kale, and herbs like basil, mint, and chives are excellent choices. They are relatively low-maintenance and thrive in hydroponic systems. Strawberries and peppers are also good options once you gain some experience. Avoid root vegetables like carrots and potatoes, as they require more space and specialized setups.
What kind of nutrient solution do I need for my hydroponic garden?
You’ll need a balanced hydroponic nutrient solution specifically formulated for the type of plants you’re growing. These solutions typically contain essential macronutrients (nitrogen, phosphorus, potassium) and micronutrients (iron, manganese, zinc, etc.). You can find pre-mixed solutions online or at your local garden center. Follow the instructions on the label carefully, as over-fertilizing can harm your plants. Remember to monitor the pH of your nutrient solution regularly and adjust it as needed to ensure optimal nutrient uptake. A pH between 5.5 and 6.5 is generally ideal for most hydroponic plants.
How much light do my hydroponic plants need?
The amount of light your plants need depends on the type of plant and its growth stage. Leafy greens generally require less light than fruiting plants like tomatoes or peppers. If you’re growing indoors, you’ll likely need to supplement natural light with grow lights. LED grow lights are a popular choice due to their energy efficiency and long lifespan. Aim for at least 14-16 hours of light per day for leafy greens and 16-18 hours for fruiting plants.
How often should I change the nutrient solution in my DIY hydroponic garden?
The frequency of nutrient solution changes depends on the size of your system and the number of plants you’re growing. As a general rule, you should change the nutrient solution every 1-2 weeks. This helps to prevent nutrient imbalances and the buildup of harmful bacteria or algae. Regularly monitor the nutrient levels and pH of your solution to determine if it needs to be changed more frequently.
What if I see algae growing in my hydroponic system?
Algae growth is a common problem in hydroponic systems, especially those exposed to light. To prevent algae growth, keep your nutrient solution covered and use opaque containers. If you do see algae, clean the affected areas with a mild bleach solution (1 part bleach to 10 parts water) and rinse thoroughly before refilling with fresh nutrient solution. You can also add a small amount of hydrogen peroxide to your nutrient solution to help control algae growth.
How do I prevent pests and diseases in my hydroponic garden?
Maintaining a clean and well-ventilated environment is crucial for preventing pests and diseases. Regularly inspect your plants for signs of infestation or disease. If you find any pests, you can try using insecticidal soap or neem oil. For diseases, remove affected leaves or plants immediately and consider using a fungicide. Avoid overwatering, as this can create a breeding ground for fungal diseases.
Can I use tap water for my hydroponic garden?
It depends on the quality of your tap water. If your tap water is heavily chlorinated or contains high levels of minerals, it’s best to use filtered or distilled water. You can also let tap water sit out for 24 hours to allow the chlorine to evaporate. Test your tap water to determine its pH and mineral content before using it in your hydroponic system.
What do I do if my plants start to look unhealthy?
If your plants start to look unhealthy, the first step is to identify the problem. Check for signs of nutrient deficiencies, pests, diseases, or improper pH levels. Adjust your nutrient solution, lighting, or watering schedule as needed. If you’re unsure what’s causing the problem, consult a hydroponics expert or online forum for advice.
Where can I find more information about DIY hydroponic gardening?
There are many resources available online and in libraries. Search for articles, videos, and forums dedicated to hydroponics. You can also join a local gardening club or attend a hydroponics workshop to learn from experienced growers. Don’t be afraid to experiment and learn from your mistakes. The key to successful DIY hydroponic gardening is patience, persistence, and a willingness to learn.
Leave a Comment