
Coconut shell lettuce growing – sounds intriguing, right? Forget those boring plastic pots! I’m about to show you how to transform humble coconut shells into adorable and eco-friendly homes for your leafy greens.
For centuries, coconuts have been a vital resource in tropical cultures, providing food, drink, and materials for shelter and crafts. While we often think of the delicious coconut water and flesh, the shell itself is often discarded. But what if I told you that this discarded treasure could be the secret to a thriving, miniature lettuce garden?
In today’s world, where sustainability is key and space is often limited, finding innovative ways to garden is more important than ever. Maybe you live in an apartment with a tiny balcony, or perhaps you’re simply looking for a fun and creative gardening project. Whatever your reason, coconut shell lettuce growing offers a unique and rewarding experience. It’s a fantastic way to reduce waste, add a touch of tropical charm to your space, and enjoy fresh, homegrown lettuce right at your fingertips. Plus, it’s a conversation starter! Who wouldn’t be impressed by your ingenuity? So, let’s dive in and discover how to turn those coconut shells into miniature lettuce paradises!
Coconut Shell Salad Garden: Your DIY Guide for Mini Greens
Hello dear garden friends! Have you ever wondered what to do with empty coconut shells after you’ve enjoyed the delicious coconut water and meat? Throw them away? Never! Let’s turn these natural containers into charming little salad gardens. I’ll show you how to grow your own mini-salad in coconut shells with a few simple steps and some creativity. It’s not only eco-friendly but also looks super cute!
What You Need:
- Empty coconut shells (halved)
- Drill with a small drill bit
- Potting soil (preferably organic quality)
- Lettuce seeds (different varieties for more fun!)
- Small trowel or spoon
- Watering can or spray bottle
- Optional: Coconut coir substrate or perlite to improve drainage
- Optional: Acrylic paints and brushes to decorate the shells
Preparing the Coconut Shells
Before we start planting, we need to prepare the coconut shells. This is an important step to ensure that our lettuce grows well.
- Cleaning the shells: After you have removed the coconut meat, rinse the shells thoroughly with warm water and soap. Remove all residues to avoid attracting pests. Then let them dry completely.
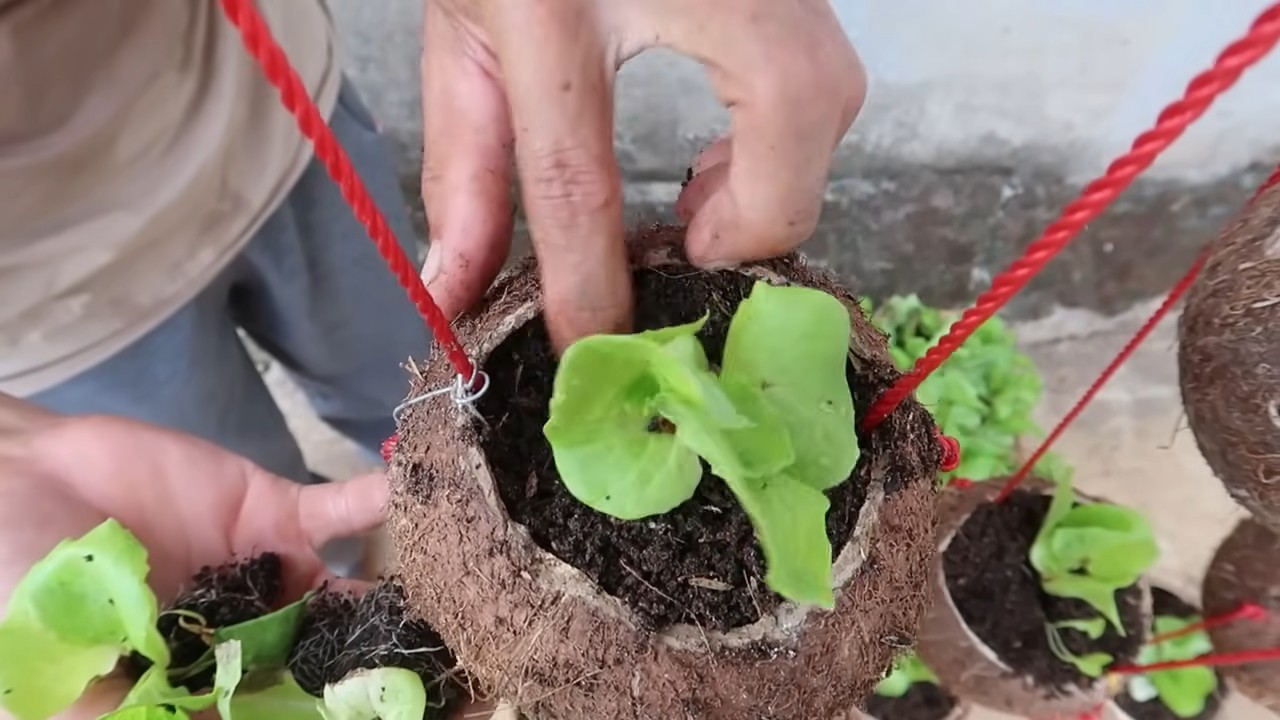
- Drilling drainage holes: This is crucial! Lettuce does not like waterlogging. Take your drill and carefully drill 3-4 small holes in the bottom of each coconut shell. Be careful not to apply too much pressure, so the shell doesn’t break. The holes should be about 5-8 mm in diameter.
- Optional: Decorating the shells: Now comes the fun part! If you want, you can paint the coconut shells with acrylic paints. Let your creativity run wild! I personally like to decorate them with colorful patterns or small plant motifs. Let the paint dry completely before you continue.
Planting the Lettuce
Now for the main event! Here I’ll show you how to plant lettuce in the prepared coconut shells.
- Preparing the soil: Fill the coconut shells with potting soil. Make sure the soil is loose and well-draining. If you want, you can mix in some coconut coir substrate or perlite to improve drainage. This is especially important if you live in an area with high humidity.
- Sowing the seeds: Distribute the lettuce seeds evenly on the soil. Be careful not to sow the seeds too densely, as the plants will otherwise have too little space to grow. I recommend sowing about 5-10 seeds per shell, depending on the size of the seeds and the shell.
- Covering the seeds: Cover the seeds with a thin layer of soil (about 0.5 cm). Press the soil down lightly.
- Watering: Water the soil gently with a watering can or spray bottle. Be careful not to flood the soil. The soil should be moist, but not wet.
Caring for Your Coconut Salad Garden
Care is just as important as preparation and planting. Here are my tips to help your lettuce thrive.
- Location: Place the coconut shells in a bright spot, but avoid direct sunlight, especially during the hottest hours of the day. An east or west-facing window is ideal.
- Watering: Keep the soil moist, but not wet. Water regularly, but avoid waterlogging. Check the soil daily and water when the top layer feels dry.
- Fertilizing: Lettuce is a heavy feeder. Fertilize your lettuce every 2-3 weeks with an organic liquid fertilizer. Be sure to follow the instructions on the package.
- Thinning: If the lettuce plants are growing too densely, you will need to thin them. Remove the weakest plants to give the stronger plants more room to grow.
- Pest protection: Watch out for pests like aphids or slugs. If you discover pests, you can combat them with a natural insecticide or by picking them off.
Harvest Time!
This is the best part! After about 4-6 weeks, depending on the lettuce variety, you can harvest your own lettuce.
- Harvest: Cut the outer leaves of the lettuce when they are large enough. Let the inner leaves grow so you can continue to harvest.
- Enjoy: Enjoy your freshly harvested lettuce! It tastes especially good in salads, sandwiches, or as a side dish to your favorite meals.
Additional Tips and Tricks
- Different lettuce varieties: Experiment with different lettuce varieties to find out which ones you like best. There are so many delicious varieties like romaine, loose-leaf, corn salad, and many more!
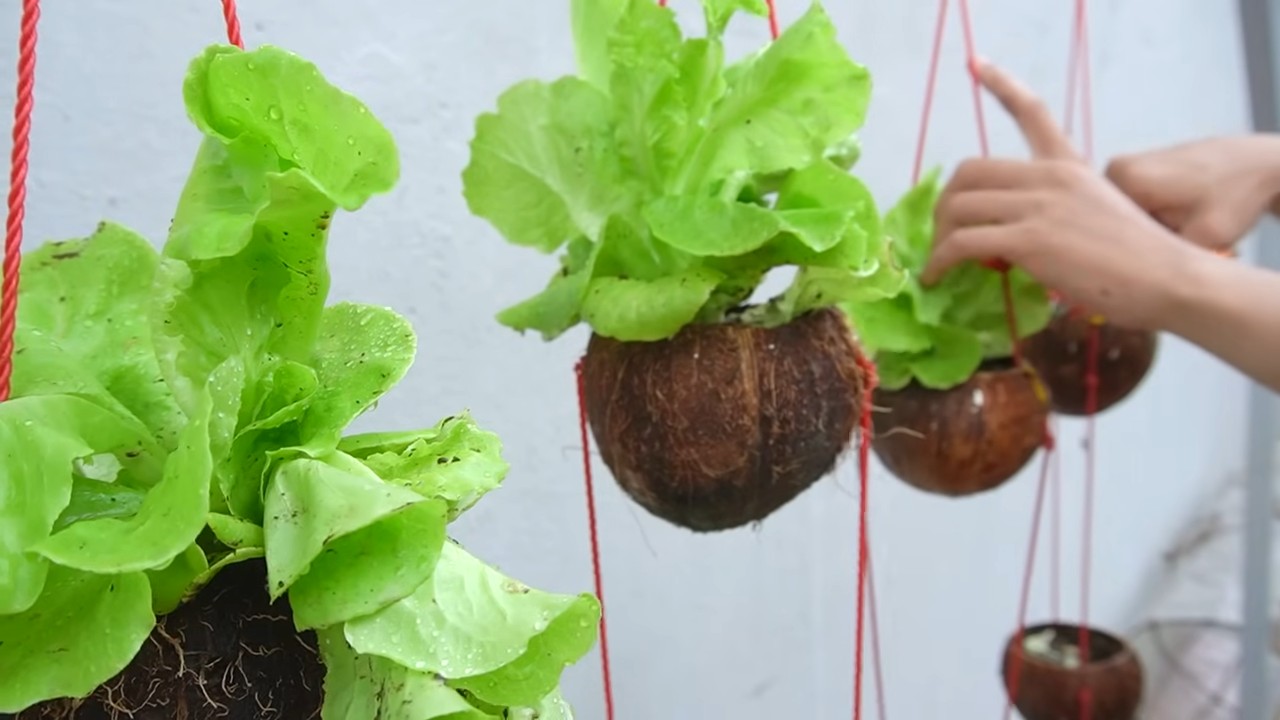
- Vertical gardens: If you have limited space, you can attach the coconut shells to a wall or a fence to create a vertical garden.
- Combination with other herbs: Plant other herbs like parsley, chives, or basil in the coconut shells alongside the lettuce. This not only looks beautiful but also provides aromatic diversity.
- Upcycling: Use old T-shirts or fabric scraps to make small hammocks for the coconut shells. This adds an extra touch of creativity to your garden.
- Involve children: Let your children help with planting and caring for the salad garden. This is a great way to bring them closer to nature and get them excited about healthy eating.
Common Problems and Solutions
- Yellow leaves: Yellow leaves can be a sign of overwatering or nutrient deficiency. Reduce watering and fertilize the lettuce.
- Mold: Mold can occur if the soil is too moist or the air circulation is poor. Ensure better ventilation and reduce watering.
- Pests: Regularly check for pests and combat them with natural means if necessary.
Why Coconut Shells?
Coconut shells are not only environmentally friendly but also a great material for small gardens. They are biodegradable, lightweight, and provide good drainage. Plus, they just look great!
Conclusion
I hope this guide has inspired you to create your own coconut shell salad garden. It’s a simple, fun, and eco-friendly project that rewards you with fresh, homegrown lettuce. Happy gardening! And don’t forget to share your creations with me! I’m excited to see your coconut salad gardens
Conclusion
So, there you have it! Transforming discarded coconut shells into charming and functional lettuce planters is not just a sustainable practice; it’s a rewarding and visually appealing way to bring fresh, homegrown greens right to your doorstep. We’ve explored the simple steps involved in creating these eco-friendly containers, highlighting the benefits for both your garden and the environment.
Why is this DIY trick a must-try? Because it’s a win-win! You’re reducing waste by repurposing coconut shells, creating a unique and aesthetically pleasing garden feature, and enjoying the satisfaction of growing your own delicious lettuce. Store-bought lettuce simply can’t compare to the vibrant flavor and freshness of lettuce harvested straight from your own coconut shell garden. Plus, it’s a fantastic conversation starter! Imagine the delight of sharing your homegrown salad with friends and family, knowing that the lettuce came from a planter you crafted yourself.
But the beauty of this project lies in its adaptability. Feel free to experiment with different types of lettuce. Romaine, butter lettuce, and even loose-leaf varieties thrive in these small containers. Consider adding companion plants like basil or chives to your coconut shell planters for added flavor and pest control. You can also personalize your planters with paint, carvings, or other decorative elements to match your personal style and garden aesthetic. Think vibrant colors, intricate patterns, or even simple, rustic designs – the possibilities are endless!
For a more advanced approach, you could even explore creating a vertical garden using multiple coconut shell planters. This is a great option for those with limited space, allowing you to maximize your growing area and create a stunning visual display. Simply hang the planters at different heights using sturdy rope or wire, ensuring they receive adequate sunlight and water.
Don’t be afraid to get creative with your potting mix, too. While a standard potting mix works well, you can also incorporate compost, worm castings, or other organic amendments to boost the nutrient content and promote healthy lettuce growth. Remember to choose a well-draining mix to prevent waterlogging, which can lead to root rot.
We are confident that you’ll find this DIY project both enjoyable and rewarding. The process of transforming a discarded coconut shell into a thriving lettuce garden is incredibly satisfying, and the end result is a beautiful and functional addition to any home.
So, what are you waiting for? Gather your coconut shells, grab your gardening tools, and get ready to embark on this exciting DIY adventure! We encourage you to try this **coconut shell lettuce growing** method and experience the joy of homegrown goodness. And most importantly, we want to hear about your experiences! Share your photos, tips, and variations on social media using [Your Hashtag Here]. Let’s inspire others to embrace sustainable gardening practices and create beautiful, eco-friendly spaces. We can’t wait to see what you create!
Frequently Asked Questions (FAQ)
1. Where can I get coconut shells?
The easiest way is to save the shells from coconuts you consume. If you don’t regularly use coconuts, check with local grocery stores, Asian markets, or restaurants that serve coconut-based dishes. They may be willing to give you their discarded shells. Online retailers also sell cleaned and prepared coconut shells specifically for crafting and gardening.
2. How do I clean the coconut shells properly?
Cleaning coconut shells is crucial to prevent mold and bacteria growth. After removing the coconut meat, scrub the inside of the shell thoroughly with warm, soapy water. Use a stiff brush to remove any remaining residue. Rinse the shell well and allow it to dry completely in the sun. For extra sanitation, you can soak the shell in a diluted bleach solution (1 part bleach to 10 parts water) for about 30 minutes, then rinse thoroughly and dry.
3. What kind of drainage holes should I create?
Adequate drainage is essential for healthy lettuce growth. Drill at least three to four holes, each about ¼ to ½ inch in diameter, in the bottom of the coconut shell. This will allow excess water to drain freely, preventing waterlogging and root rot. You can also add a layer of gravel or small stones to the bottom of the planter to further improve drainage.
4. What type of potting mix is best for growing lettuce in coconut shells?
A well-draining potting mix is ideal. A standard potting mix amended with compost or other organic matter works well. Avoid using heavy garden soil, as it can compact and restrict drainage. You can also create your own potting mix by combining equal parts of peat moss, perlite, and vermiculite.
5. How often should I water my lettuce plants in coconut shells?
The frequency of watering depends on the climate, the type of potting mix, and the size of the lettuce plants. Generally, you should water when the top inch of soil feels dry to the touch. Avoid overwatering, as this can lead to root rot. Water thoroughly until water drains out of the drainage holes.
6. How much sunlight do lettuce plants need?
Lettuce prefers partial shade, especially during the hottest part of the day. Aim for at least 4-6 hours of sunlight per day. If you live in a hot climate, provide afternoon shade to prevent the leaves from scorching.
7. What kind of fertilizer should I use for my lettuce plants?
A balanced, water-soluble fertilizer is a good option. Follow the instructions on the fertilizer package for application rates. You can also use organic fertilizers like compost tea or fish emulsion. Fertilize every 2-3 weeks during the growing season.
8. How do I protect my lettuce plants from pests?
Common lettuce pests include aphids, slugs, and snails. Inspect your plants regularly for signs of infestation. You can remove aphids with a strong spray of water or by hand. Use slug and snail bait or traps to control these pests. Companion planting with herbs like basil or mint can also help deter pests.
9. How long does it take for lettuce to grow in coconut shells?
The time it takes for lettuce to mature depends on the variety and growing conditions. Generally, you can expect to harvest lettuce leaves in about 30-60 days from planting. Loose-leaf varieties can be harvested earlier, as you can pick individual leaves as needed.
10. Can I reuse the coconut shells for planting other vegetables?
Yes, you can reuse the coconut shells for planting other vegetables or herbs. Clean the shells thoroughly after harvesting the lettuce and replenish the potting mix. Coconut shells are durable and can last for several seasons with proper care.
11. Can I grow other plants besides lettuce in coconut shells?
Absolutely! Coconut shells are versatile planters suitable for various small plants, including herbs like basil, mint, and thyme, as well as flowers like pansies and petunias. Consider the plant’s specific needs for sunlight, water, and soil when choosing what to grow.
12. How do I prevent the coconut shell from rotting?
While coconut shells are naturally durable, prolonged exposure to moisture can eventually lead to decomposition. To prolong the life of your coconut shell planters, ensure proper drainage, avoid overwatering, and consider applying a sealant or varnish to the exterior of the shell. This will help protect it from moisture and prevent rot.
13. Can I use coconut coir as a growing medium in the coconut shell?
Yes, coconut coir is an excellent growing medium for coconut shell planters. It’s a sustainable alternative to peat moss, providing good drainage and aeration. You can use coconut coir alone or mix it with other ingredients like compost and perlite to create a nutrient-rich growing medium.
14. How do I handle the coconut shell planter during winter?
If you live in an area with cold winters, it’s best to bring your coconut shell lettuce planters indoors. Lettuce is a cool-season crop, but it can’t tolerate freezing temperatures. Place the planters in a sunny location indoors or under grow lights.
15. Is growing lettuce in coconut shells truly sustainable?
Yes, growing lettuce in coconut shells is a sustainable practice. It repurposes waste materials, reduces the need for plastic pots, and promotes local food production. By choosing organic seeds and fertilizers, you can further minimize your environmental impact. This method of **coconut shell lettuce growing** is a small but significant step towards a more sustainable lifestyle.
Leave a Comment