
Grow Celery Indoors? Absolutely! Imagine fresh, crisp celery stalks just steps away from your kitchen, ready to be added to your favorite soups, salads, or enjoyed as a healthy snack. No more last-minute grocery store runs when you realize you’re out of this essential ingredient. This DIY guide will unlock the secrets to cultivating your own thriving celery patch, right inside your home.
Celery, with its satisfying crunch and subtle flavor, has been enjoyed for centuries. Originating in the Mediterranean, it was initially valued for its medicinal properties before becoming a culinary staple. Now, you can connect with this rich history by nurturing your own celery plants.
But why bother learning to grow celery indoors? Well, for starters, it gives you complete control over the growing environment, shielding your plants from pests, diseases, and unpredictable weather. Plus, it’s incredibly rewarding to watch something you’ve nurtured from a small seedling flourish and provide you with fresh produce. I’m excited to share these simple yet effective DIY tricks and hacks that will empower you to enjoy homegrown celery all year round, regardless of your outdoor space or gardening experience. Let’s get started!
Growing Bok Choy at Home: A Beginner’s Guide
Hey there, fellow gardening enthusiasts! I’m so excited to share my experience with growing bok choy at home. It’s surprisingly easy, even if you’re a complete newbie like I was not too long ago. Bok choy, also known as pak choi, is a delicious and nutritious leafy green that’s perfect for stir-fries, soups, and salads. Plus, it grows relatively quickly, so you’ll be enjoying your homegrown harvest in no time!
Choosing the Right Bok Choy Variety
Before we dive into the nitty-gritty, let’s talk about choosing the right variety. There are several types of bok choy, each with its own unique characteristics. Here are a few popular options:
* Shanghai Bok Choy: This variety has light green stems and spoon-shaped leaves. It’s known for its mild flavor and tender texture. I personally love this one for quick stir-fries.
* Baby Bok Choy: As the name suggests, this is a smaller version of regular bok choy. It’s incredibly tender and cooks up quickly. Perfect for single servings!
* Canton Bok Choy: This variety has dark green leaves and thick, white stems. It has a slightly stronger flavor than Shanghai bok choy.
* Purple Lady Bok Choy: If you want to add a pop of color to your garden, this is the one for you! It has beautiful purple leaves and a mild, sweet flavor.
I recommend starting with Shanghai or Baby Bok Choy if you’re a beginner. They’re both relatively easy to grow and have a mild flavor that most people enjoy.
Getting Started: Seeds vs. Seedlings
You have two options when it comes to starting your bok choy: seeds or seedlings.
* Seeds: Starting from seeds is the most economical option, and it gives you more control over the entire growing process. However, it requires a bit more patience and attention.
* Seedlings: Buying seedlings from a local nursery is a quicker and easier option. It’s a great choice if you’re short on time or don’t have a lot of experience with starting seeds.
I’ve tried both methods, and I personally prefer starting from seeds. It’s just so rewarding to watch those tiny seeds sprout and grow into beautiful bok choy plants!
Step-by-Step Guide: Growing Bok Choy from Seeds
Okay, let’s get down to business! Here’s my step-by-step guide to growing bok choy from seeds:
1. Gather Your Supplies:
* Bok choy seeds
* Seed starting trays or small pots
* Seed starting mix (a light, well-draining soil mix)
* Watering can or spray bottle
* Grow lights (optional, but recommended if you’re starting seeds indoors)
* Plant labels
* Permanent marker
2. Sow the Seeds:
* Fill your seed starting trays or pots with seed starting mix.
* Moisten the soil gently with a watering can or spray bottle.
* Sow the seeds about ¼ inch deep and 1 inch apart. I usually plant 2-3 seeds per cell or pot to increase my chances of germination.
* Cover the seeds with a thin layer of soil.
* Gently water the soil again.
* Label each tray or pot with the variety of bok choy and the date you planted it. This will help you keep track of your seedlings.
3. Provide the Right Conditions:
* Place the seed starting trays or pots in a warm location with plenty of light. If you’re starting seeds indoors, grow lights are essential. I keep my grow lights on for about 14-16 hours per day.
* Keep the soil consistently moist, but not soggy. Water whenever the top inch of soil feels dry to the touch.
* Maintain a temperature of around 60-70°F (15-21°C).
4. Thin the Seedlings:
* Once the seedlings have emerged and have a couple of true leaves (the first leaves that look like miniature bok choy leaves), it’s time to thin them out.
* Carefully snip off the weaker seedlings at the soil line, leaving only the strongest seedling in each cell or pot. This will give the remaining seedlings plenty of room to grow.
5. Harden Off the Seedlings:
* Before transplanting your seedlings outdoors, you need to harden them off. This process gradually acclimates the seedlings to outdoor conditions, preventing them from getting shocked when you transplant them.
* Start by placing the seedlings outdoors in a sheltered location for a few hours each day. Gradually increase the amount of time they spend outdoors over the course of a week or two.
* Protect the seedlings from direct sunlight and strong winds during the hardening off process.
Transplanting Your Bok Choy Seedlings
Now that your seedlings are hardened off, it’s time to transplant them into your garden!
1. Choose the Right Location:
* Bok choy prefers a sunny location with well-drained soil. It can tolerate partial shade, especially in hot climates.
* Make sure the soil is rich in organic matter. Amend the soil with compost or well-rotted manure before planting.
2. Prepare the Soil:
* Loosen the soil with a garden fork or tiller.
* Remove any rocks, weeds, or debris.
* Incorporate compost or well-rotted manure into the soil.
3. Transplant the Seedlings:
* Dig holes that are slightly larger than the root balls of the seedlings.
* Gently remove the seedlings from their trays or pots.
* Place the seedlings in the holes and backfill with soil.
* Space the seedlings about 6-12 inches apart, depending on the variety.
* Water the seedlings thoroughly.
4. Mulch the Soil:
* Apply a layer of mulch around the plants to help retain moisture, suppress weeds, and regulate soil temperature. I like to use straw or shredded leaves.
Caring for Your Bok Choy Plants
Once your bok choy plants are in the ground, it’s important to provide them with the care they need to thrive.
1. Watering:
* Bok choy needs consistent moisture to grow well. Water the plants regularly, especially during dry periods.
* Aim to keep the soil consistently moist, but not soggy.
* Water deeply and less frequently, rather than shallowly and more often.
2. Fertilizing:
* Bok choy is a heavy feeder, so it benefits from regular fertilization.
* Apply a balanced fertilizer every 2-3 weeks. I like to use a liquid fertilizer diluted to half strength.
* You can also side-dress the plants with compost or well-rotted manure.
3. Weeding:
* Keep the area around your bok choy plants free of weeds. Weeds compete with the plants for nutrients and water.
* Hand-pull weeds regularly or use a hoe to cultivate the soil.
4. Pest Control:
* Bok choy can be susceptible to certain pests, such as aphids, cabbage worms, and flea beetles.
* Inspect your plants regularly for signs of pests.
* If you find pests, you can try hand-picking them off the plants or using an organic insecticide, such as neem oil or insecticidal soap.
5. Bolting:
* Bolting is when a plant prematurely flowers and goes to seed. This can happen when bok choy is exposed to hot weather or stress.
* To prevent bolting, try to plant your bok choy in early spring or late summer, when the weather is cooler.
* Provide the plants with plenty of water and fertilizer to keep them healthy and stress-free.
* If your bok choy starts to bolt, you can still harvest the leaves, but they may be a bit more bitter.
Harvesting Your Bok Choy
The best part of growing bok choy is, of course, harvesting it!
1. When to Harvest:
* You can start harvesting bok choy when the leaves are about 6-8 inches long.
* You can harvest the entire plant at once or harvest individual leaves as needed.
2. How to Harvest:
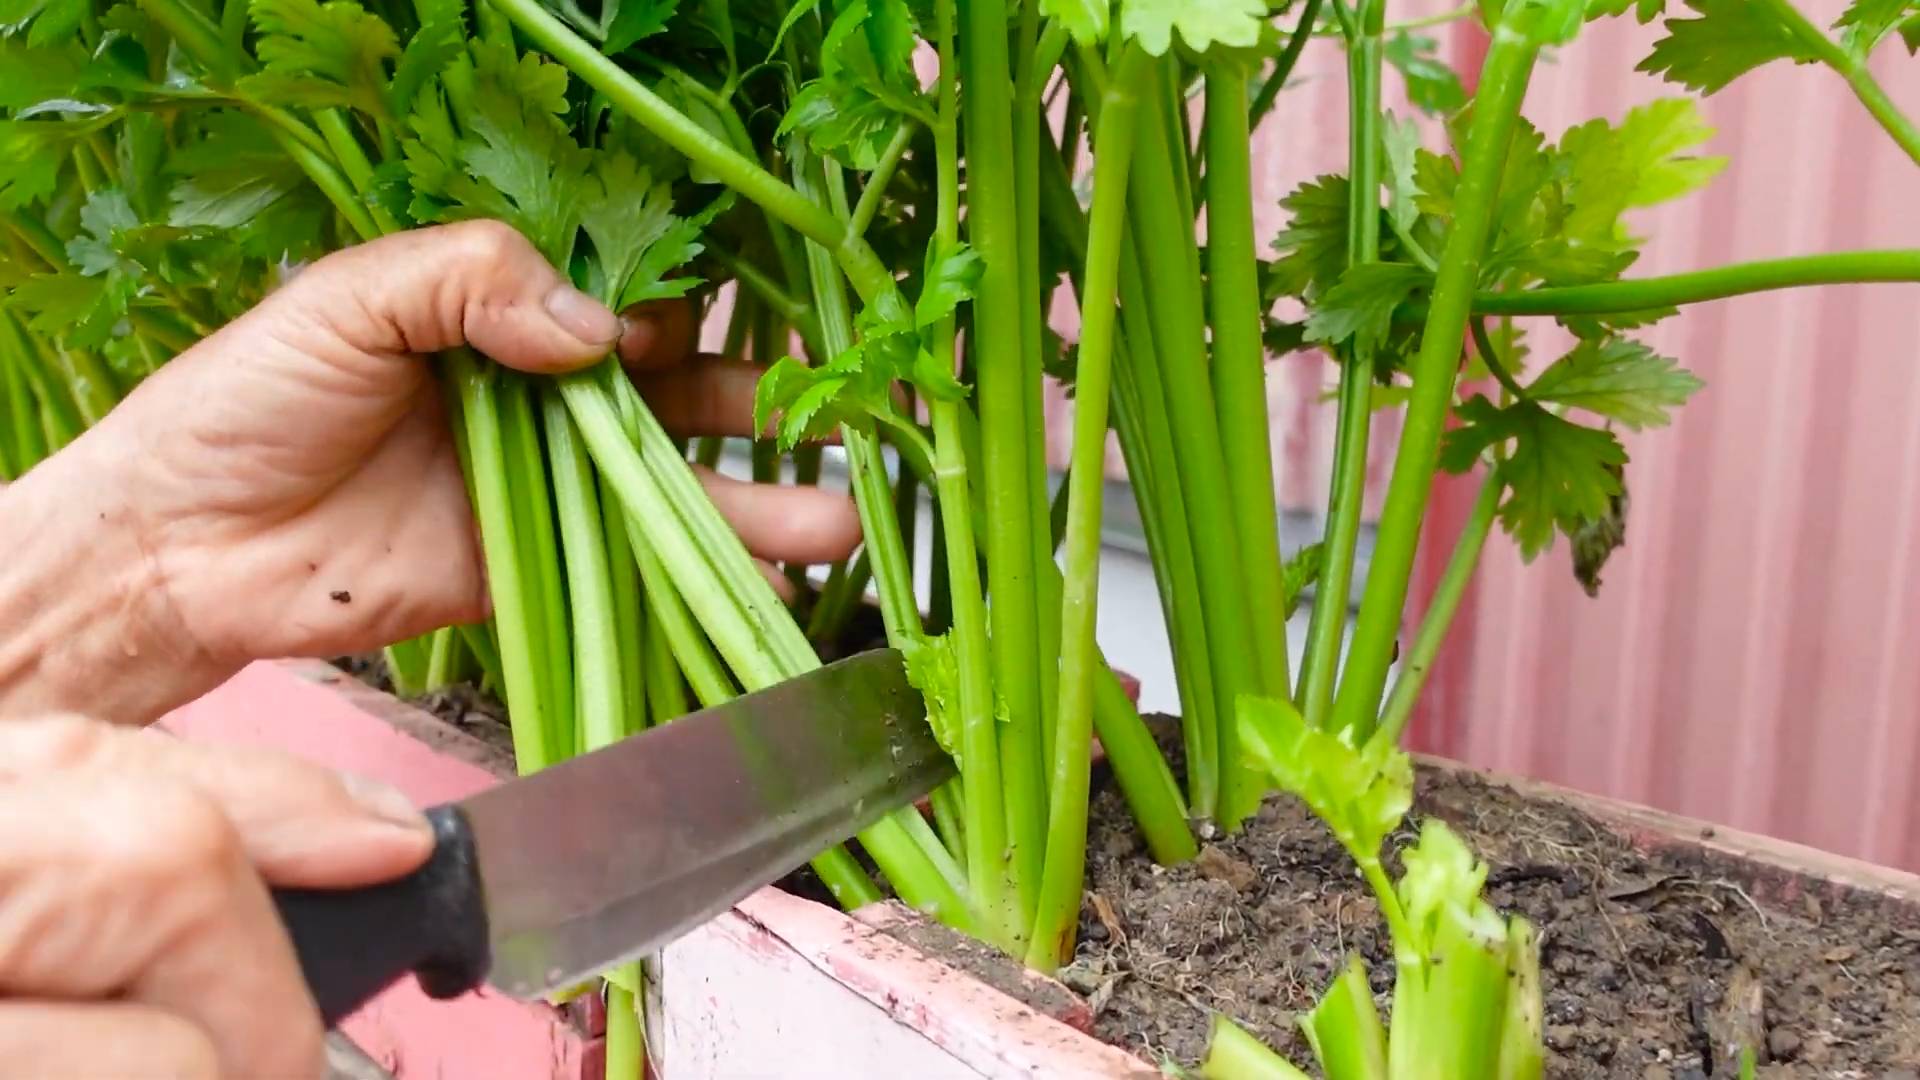
* To harvest the entire plant, cut it off at the base with a sharp knife.
* To harvest individual leaves, simply snap them off near the base of the plant.
3. Storing Your Harvest:
* Bok choy is best used fresh, but it can be stored in

Conclusion
So, there you have it! Growing celery indoors from scraps isn’t just a fun experiment; it’s a sustainable way to reduce food waste, enjoy fresh celery, and add a touch of green to your home. It’s a surprisingly simple process that yields tangible results, making it incredibly rewarding, especially for beginner gardeners or those with limited outdoor space.
Why is this a must-try? Because it transforms something destined for the compost bin into a thriving plant, offering a continuous supply of celery for your soups, salads, and snacks. Think about it: no more last-minute grocery store runs for a single stalk of celery! Plus, it’s a fantastic educational opportunity for kids (and adults!) to learn about plant propagation and the magic of nature.
But the benefits don’t stop there. Growing your own celery allows you to control the growing environment, ensuring your celery is free from harmful pesticides and chemicals. You know exactly what you’re putting into your body, and that peace of mind is priceless.
Ready to take your indoor celery growing to the next level? Consider these variations:
* Experiment with different celery varieties: While standard celery is a great starting point, explore other types like Pascal celery or even celeriac (celery root) for a unique flavor profile.
* Hydroponic celery: For a more advanced approach, try growing your celery in a hydroponic system. This method can accelerate growth and maximize yields.
* Companion planting: Place your celery near other herbs like parsley or basil. These companion plants can help deter pests and enhance the flavor of your celery.
* Celery Juice Focus: If you are a celery juice enthusiast, growing your own celery indoors ensures you have a fresh, organic supply readily available. This is especially beneficial if you consume celery juice regularly for its health benefits.
Don’t be intimidated by the idea of growing celery indoors. It’s a forgiving plant that adapts well to indoor conditions. With a little patience and the right care, you’ll be harvesting your own homegrown celery in no time.
We’re confident that you’ll find this DIY trick both enjoyable and beneficial. So, grab that celery base, follow our simple steps, and get ready to witness the magic of regrowth!
Now, we want to hear from you! Have you tried growing celery indoors before? What were your experiences? Share your tips, tricks, and photos in the comments below. Let’s create a community of indoor celery growers and inspire others to embrace this sustainable and rewarding practice. We can’t wait to see your celery success stories!
Frequently Asked Questions (FAQ)
How long does it take to regrow celery from a base?
The initial regrowth phase, where you see new leaves emerging from the celery base, typically takes about 1-2 weeks. After that, it will take several months to grow a full-sized celery stalk. The exact timeframe depends on factors like light, temperature, and nutrient availability. Be patient, and you’ll be rewarded with fresh celery!
What kind of light does indoor celery need?
Celery thrives in bright, indirect light. A spot near a sunny window (east or west-facing is ideal) is perfect. If you don’t have access to sufficient natural light, consider using a grow light to supplement. Aim for at least 6-8 hours of light per day. Insufficient light can lead to leggy growth and a less flavorful celery.
How often should I water my regrowing celery?
Keep the soil consistently moist but not waterlogged. Water when the top inch of soil feels dry to the touch. Overwatering can lead to root rot, so ensure your pot has good drainage. During warmer months, you may need to water more frequently.
What kind of soil is best for growing celery indoors?
A well-draining potting mix is essential. A mix of peat moss, perlite, and vermiculite works well. You can also add some compost to provide extra nutrients. Avoid heavy clay soils, as they can retain too much moisture and suffocate the roots.
Do I need to fertilize my indoor celery?
Yes, celery is a heavy feeder and benefits from regular fertilization. Use a balanced liquid fertilizer diluted to half strength every 2-3 weeks. Look for a fertilizer with a ratio of 10-10-10 or similar. Avoid over-fertilizing, as this can burn the roots.
Can I grow celery from seed indoors?
Yes, you can absolutely grow celery from seed indoors. Start the seeds in seed trays or small pots filled with seed-starting mix. Keep the soil moist and warm (around 70-75°F). Celery seeds are slow to germinate, so be patient. Once the seedlings are large enough to handle, transplant them into larger pots.
Is it better to grow celery from seed or from a base?
Growing from a base is faster and easier, especially for beginners. It allows you to skip the germination stage and get straight to the regrowth process. Growing from seed gives you more control over the variety of celery you grow, but it requires more time and effort.
How do I prevent pests and diseases on my indoor celery?
Inspect your celery regularly for signs of pests like aphids or spider mites. If you spot any, wash them off with a strong stream of water or use insecticidal soap. Ensure good air circulation to prevent fungal diseases. Avoid overwatering, as this can create a favorable environment for disease.
Can I eat the celery that I regrow from a base?
Yes, absolutely! The celery that you regrow from a base is perfectly edible. However, it may not be as large or as robust as celery grown from seed or in a field. The flavor will be similar, though, and it’s a great way to enjoy fresh, homegrown celery.
What if my celery starts to bolt (flower)?
Bolting is when a plant prematurely flowers, usually due to stress or temperature fluctuations. If your celery starts to bolt, the stalks may become bitter. You can still harvest and eat the celery, but the flavor may not be as desirable. To prevent bolting, try to keep the temperature consistent and avoid stressing the plant.
How do I harvest my indoor celery?
You can harvest individual stalks as needed or harvest the entire plant at once. To harvest individual stalks, simply cut them off at the base of the plant. To harvest the entire plant, cut it off at the base, leaving the roots intact if you want to try regrowing it again.
My celery is growing tall but the stalks are thin. What am I doing wrong?
Thin stalks can be a sign of insufficient light or nutrients. Make sure your celery is getting enough bright, indirect light. Also, ensure you are fertilizing regularly with a balanced fertilizer. You might also consider repotting into a larger container to give the roots more room to grow.
Can I grow celery indoors year-round?
Yes, you can grow celery indoors year-round, provided you provide the right conditions. Consistent light, temperature, and moisture are key. You may need to adjust your watering and fertilizing schedule depending on the season.
What are the health benefits of growing and eating my own celery?
Growing your own celery ensures you have access to fresh, organic celery free from pesticides and herbicides. Celery is a good source of vitamins A, C, and K, as well as folate and potassium. It’s also low in calories and high in fiber, making it a healthy addition to your diet. Plus, the act of gardening itself can be therapeutic and stress-relieving!


Leave a Comment