
Bell Peppers in Plastic Bottles: Sounds a little crazy, right? But trust me, this simple DIY trick can revolutionize your home garden and bring you a bountiful harvest of vibrant bell peppers! I’m so excited to share this with you because it’s not just about growing peppers; it’s about resourcefulness, sustainability, and connecting with nature in a fun, innovative way.
For centuries, humans have sought clever ways to cultivate food, adapting to various environments and making the most of available resources. While the exact origin of using plastic bottles for gardening is hard to pinpoint, the spirit of upcycling and resourceful gardening has always been a part of human history. Think about ancient civilizations using terracing to maximize land use or indigenous cultures employing companion planting techniques. This method of growing bell peppers in plastic bottles is a modern take on that same ingenuity.
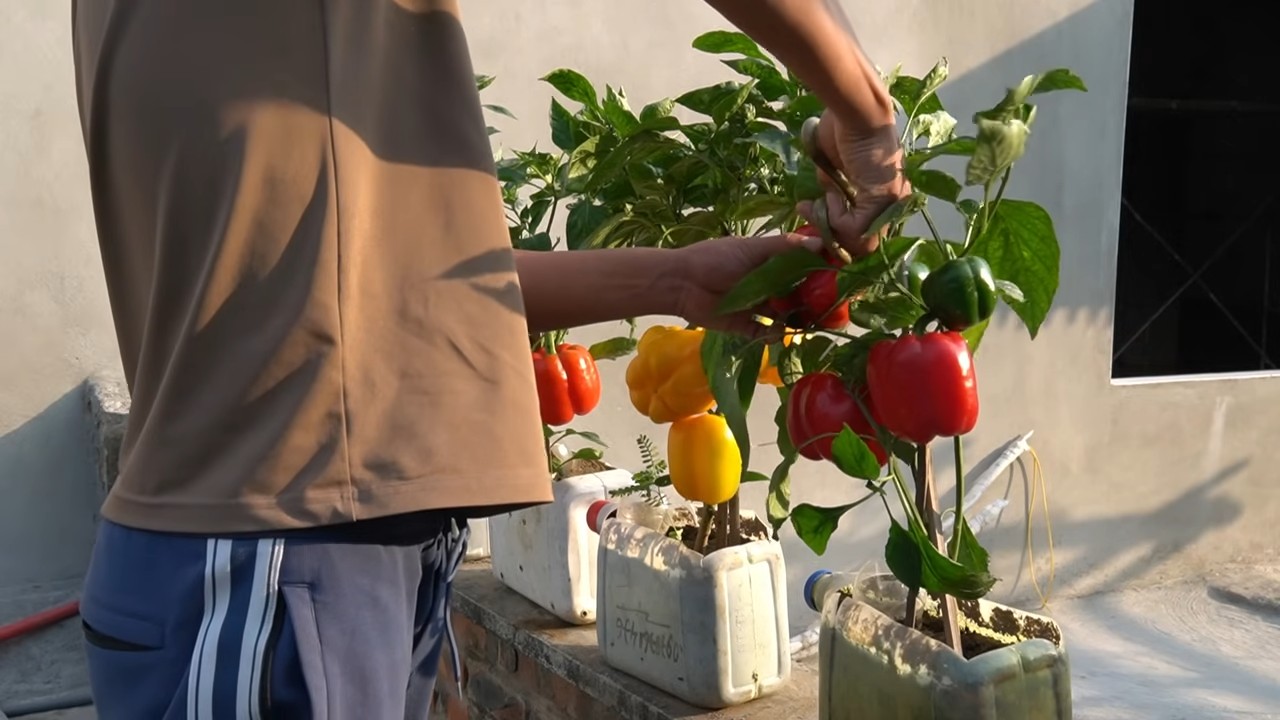
Why should you try this? Well, for starters, it’s incredibly space-saving, perfect for balconies, patios, or even small indoor spaces. Plus, it’s a fantastic way to recycle those plastic bottles that might otherwise end up in a landfill. But the real magic lies in how this method helps control the growing environment, providing better drainage and protection for your precious pepper plants. Imagine enjoying fresh, homegrown bell peppers in your salads, stir-fries, and snacks, all thanks to a simple, eco-friendly hack. Let’s dive in and discover how you can easily grow your own delicious bell peppers using this amazing DIY technique!
Growing Bell Peppers in Plastic Bottles: A DIY Guide
Hey there, fellow gardening enthusiasts! I’m so excited to share this super cool and surprisingly effective method for growing bell peppers using recycled plastic bottles. Not only is it a fantastic way to reuse materials and reduce waste, but it also creates a controlled environment that can lead to healthier, more productive pepper plants. Trust me, once you try this, you’ll be hooked!
Why Grow Peppers in Plastic Bottles?
Before we dive into the nitty-gritty, let’s talk about why this method is so awesome:
* Space Saving: Perfect for balconies, patios, or small gardens. You can arrange the bottles vertically, maximizing your growing area.
* Improved Drainage: The bottle design allows for excellent drainage, preventing root rot, a common problem with peppers.
* Temperature Control: Plastic bottles can help retain heat, which is especially beneficial in cooler climates or during early spring.
* Pest Protection: The enclosed environment can offer some protection against common garden pests.
* Upcycling at its Finest: You’re giving those plastic bottles a new life, contributing to a more sustainable lifestyle.
* Easy to Move: Need to chase the sun or protect your plants from a sudden frost? No problem! The bottles are lightweight and easy to relocate.
Materials You’ll Need
Okay, let’s gather our supplies. Here’s what you’ll need to get started:
* Plastic Bottles: Lots of them! I recommend using 2-liter soda bottles or larger water bottles. The more, the merrier, as you’ll need one bottle per plant, plus some for creating a drainage system.
* Bell Pepper Seeds or Seedlings: Choose your favorite bell pepper variety! I personally love growing both green and red bell peppers for a colorful harvest.
* Potting Soil: Use a high-quality potting mix that’s well-draining and rich in nutrients.
* Scissors or Utility Knife: For cutting the plastic bottles. Be careful!
* Drill or Nail: To create drainage holes.
* Gravel or Small Stones: For the bottom layer of the bottles to improve drainage.
* Watering Can or Hose: For watering your pepper plants.
* Optional: Plant labels, fertilizer, gloves.
Preparing the Plastic Bottles
This is where the fun begins! We’re going to transform those ordinary plastic bottles into mini pepper paradises.
1. Clean the Bottles: Thoroughly wash the plastic bottles with soap and water to remove any residue. Rinse them well and let them dry completely. This is crucial to prevent any contamination that could harm your plants.
2. Cut the Bottles: This step depends on how you want to set up your bottles. There are a few options:
* Option 1: Single Bottle Planter: Cut the top third of the bottle off. You can discard the top or use it as a mini greenhouse cover later on.
* Option 2: Stacked Bottle System: Cut the bottom off one bottle and the top off another. This allows you to stack bottles, creating a taller growing space. I personally prefer this method for peppers as they can get quite tall.
* Option 3: Horizontal Planter: Cut a large rectangular opening in the side of the bottle, leaving the top and bottom intact. This is great for maximizing surface area.
Important Safety Tip: Always use caution when using scissors or a utility knife. Cut away from yourself and use a cutting board or other protective surface.
3. Create Drainage Holes: Using a drill or nail, carefully create several drainage holes in the bottom of each bottle. This is essential to prevent waterlogging and root rot. I usually make about 5-6 holes, evenly spaced.
4. Prepare the Drainage Layer: Add a layer of gravel or small stones to the bottom of each bottle. This will further improve drainage and prevent the potting soil from clogging the drainage holes. I usually add about an inch or two of gravel.
Planting Your Bell Peppers
Now for the exciting part – planting your pepper plants!
1. Fill the Bottles with Potting Soil: Fill each bottle with high-quality potting soil, leaving about an inch of space at the top. Gently press down on the soil to remove any air pockets.
2. Plant the Seeds or Seedlings:
* From Seed: Sow the bell pepper seeds about ¼ inch deep in the potting soil. Water gently and keep the soil consistently moist. It can take 1-2 weeks for the seeds to germinate.
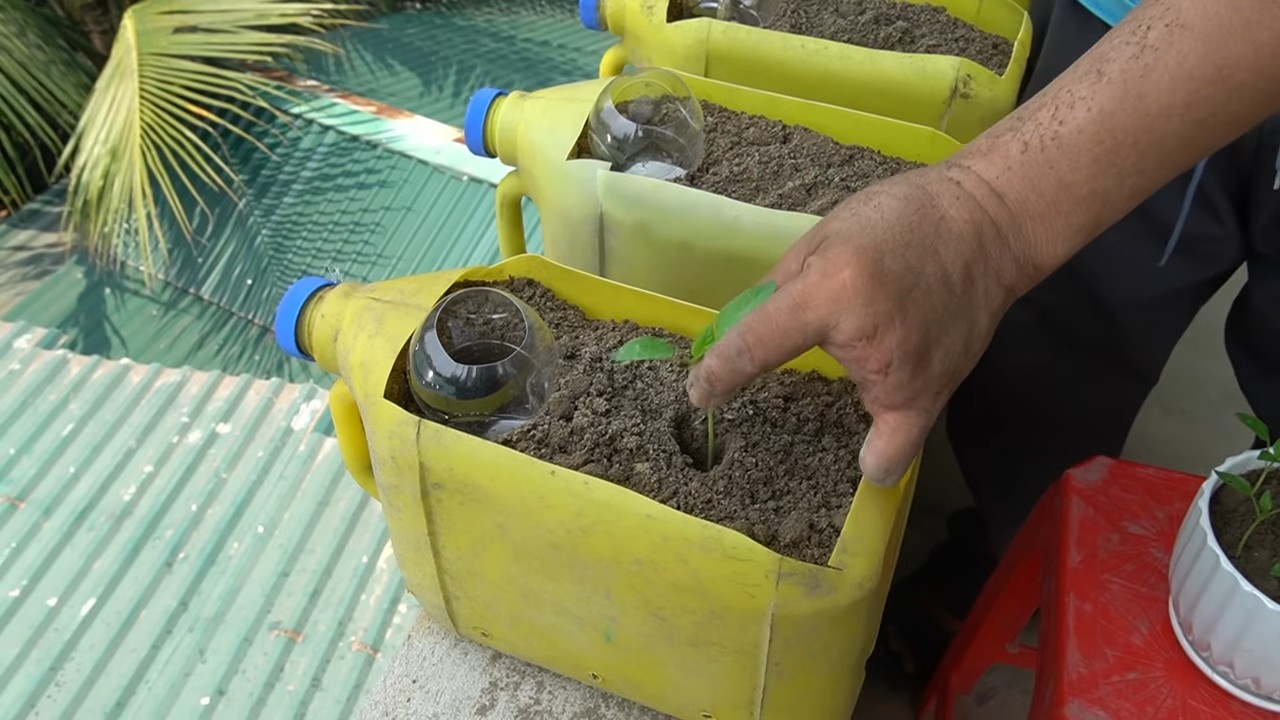
* From Seedling: Carefully remove the bell pepper seedling from its container. Gently loosen the roots and place the seedling in the center of the bottle. Fill in around the seedling with potting soil, ensuring that the top of the root ball is level with the soil surface.
3. Water Thoroughly: After planting, water the bell pepper plants thoroughly until water drains out of the drainage holes. This will help settle the soil and ensure that the roots are well-hydrated.
4. Label Your Plants (Optional): If you’re growing multiple varieties of bell peppers, label each bottle with the name of the variety. This will help you keep track of your plants and ensure that you harvest the correct peppers.
Caring for Your Bell Pepper Plants
Now that your bell pepper plants are happily nestled in their plastic bottle homes, it’s time to provide them with the care they need to thrive.
1. Sunlight: Bell peppers need at least 6-8 hours of sunlight per day. Place your bottles in a sunny location where they will receive plenty of direct sunlight. If you don’t have a sunny spot, you can supplement with grow lights.
2. Watering: Water your bell pepper plants regularly, especially during hot, dry weather. Check the soil moisture by sticking your finger into the soil. If the top inch of soil feels dry, it’s time to water. Avoid overwatering, as this can lead to root rot.
3. Fertilizing: Bell peppers are heavy feeders, so they need regular fertilization. Use a balanced fertilizer that’s specifically formulated for vegetables. Follow the instructions on the fertilizer package for application rates and frequency. I usually fertilize my pepper plants every 2-3 weeks.
4. Support: As your bell pepper plants grow, they may need support to prevent them from falling over. You can use stakes, trellises, or cages to support the plants. I often use bamboo stakes and tie the plants to the stakes with soft twine.
5. Pruning: Pruning can help improve air circulation and encourage fruit production. Remove any suckers (small shoots that grow from the base of the plant) and any yellowing or dead leaves.
6. Pest and Disease Control: Keep an eye out for common bell pepper pests, such as aphids, whiteflies, and spider mites. You can control these pests with insecticidal soap or neem oil. Also, watch out for diseases like blossom end rot, which is caused by calcium deficiency. You can prevent blossom end rot by adding calcium to the soil or using a calcium-rich fertilizer.
Harvesting Your Bell Peppers
The moment you’ve been waiting for – harvesting your delicious bell peppers!
1. Timing: Bell peppers are typically ready to harvest 60-90 days after transplanting, depending on the variety. The peppers should be firm, glossy, and fully colored.
2. Harvesting: Use a sharp knife or scissors to cut the bell peppers from the plant. Leave a small stem attached to the pepper.
3. Enjoy! Enjoy your homegrown bell peppers in salads, stir-fries, stuffed peppers, or any other dish you can imagine!
Troubleshooting
Even with the best care, you might encounter some challenges along the way. Here are a few common problems and how to address them:
* Yellowing Leaves: Could be a sign of overwatering, nutrient deficiency, or pest infestation. Adjust watering, fertilize, and inspect for pests.
* Blossom End Rot: As mentioned earlier, this is caused by calcium deficiency. Add calcium to the soil or use a calcium-rich fertilizer.
* Lack of Fruit Production: Could be due to insufficient sunlight, poor pollination, or nutrient deficiency. Ensure your plants are getting enough sunlight, hand-pollinate if necessary, and fertilize regularly.
* Pest Infestation: Treat with insecticidal soap, neem oil, or other appropriate pest control methods.
Advanced Techniques
Want to take your plastic bottle pepper growing to the next level? Here are a few advanced techniques to try:
* Hydroponics: You can adapt this method for hydroponic growing by using a nutrient solution instead of potting soil.
* Aquaponics: Combine your pepper plants with a fish tank to create a self-sustaining ecosystem.
* Vertical Gardening: Create a stunning vertical garden by stacking multiple plastic bottle planters.
* Companion
Conclusion
So, there you have it! Transforming ordinary plastic bottles into miniature greenhouses for your bell peppers is not just a quirky gardening hack; it’s a game-changer. This simple, cost-effective method offers a multitude of benefits, from extending the growing season and protecting your precious plants from harsh weather to maximizing space and minimizing waste. It’s a win-win for both your garden and the environment.
Why is this DIY trick a must-try? Because it empowers you to take control of your bell pepper cultivation like never before. Imagine enjoying fresh, vibrant bell peppers weeks earlier than your neighbors, all thanks to a few repurposed plastic bottles. The increased warmth and humidity trapped within the bottles create an ideal microclimate, fostering faster growth and healthier plants. Plus, the protection from wind, pests, and unexpected frosts ensures a more bountiful harvest.
But the beauty of this method lies in its adaptability. Feel free to experiment with different types of plastic bottles – larger bottles for bigger pepper varieties, or colored bottles to filter sunlight in specific ways. You can also adjust the ventilation by creating more or fewer holes, depending on your local climate and the specific needs of your bell peppers. Consider adding a layer of mulch around the base of the bottles to further insulate the soil and retain moisture.
Don’t be afraid to get creative! You could even paint the bottles with fun designs to add a touch of personality to your garden. The possibilities are endless.
We wholeheartedly encourage you to give this DIY bell pepper growing trick a try. It’s a rewarding and sustainable way to enhance your gardening experience and enjoy the delicious taste of homegrown bell peppers. And most importantly, we want to hear about your results! Share your photos, tips, and experiences in the comments below. Let’s build a community of bell pepper enthusiasts and learn from each other’s successes (and even the occasional mishap!). Your feedback will help others discover the joys of growing bell peppers in plastic bottles and inspire them to embrace this innovative technique. Let’s revolutionize the way we grow bell peppers, one plastic bottle at a time! This method is a fantastic way to ensure a healthy and productive bell pepper harvest.
Frequently Asked Questions (FAQ)
Q: What type of plastic bottles are best for this method?
A: Ideally, you should use clear plastic bottles, such as those from water or soda. Clear bottles allow the maximum amount of sunlight to reach the plants. Avoid using dark-colored bottles, as they can overheat and potentially harm the bell peppers. The size of the bottle will depend on the size of your bell pepper plants; larger varieties will require larger bottles. Make sure the bottles are clean and free of any residue before using them.
Q: How do I prepare the plastic bottles for planting?
A: First, thoroughly clean the bottles with soap and water to remove any dirt or residue. Then, cut off the bottom of the bottle, leaving enough of the bottle intact to create a protective enclosure around the bell pepper plant. You can also create small drainage holes near the bottom of the bottle to prevent waterlogging. Additionally, consider adding ventilation holes near the top of the bottle to regulate temperature and humidity.
Q: When is the best time to start bell peppers in plastic bottles?
A: The best time to start bell peppers in plastic bottles is typically in early spring, a few weeks before the last expected frost. This allows the plants to get a head start in a protected environment. You can also use this method to extend the growing season in the fall by protecting the plants from early frosts. Monitor the weather conditions and adjust the timing accordingly.
Q: How do I water bell peppers growing in plastic bottles?
A: Watering bell peppers in plastic bottles is similar to watering them in the ground. Water the plants regularly, ensuring that the soil remains moist but not waterlogged. You can water directly into the bottle, allowing the water to seep into the soil. Be careful not to overwater, as this can lead to root rot. Check the soil moisture regularly and adjust the watering frequency as needed.
Q: How do I ventilate the plastic bottles to prevent overheating?
A: Ventilation is crucial to prevent overheating, especially during hot weather. You can create ventilation holes near the top of the bottle to allow hot air to escape. The number and size of the holes will depend on your local climate and the temperature inside the bottle. Monitor the temperature inside the bottle regularly and adjust the ventilation accordingly. You can also temporarily remove the bottles during the hottest part of the day to provide additional ventilation.
Q: Can I use this method for other types of plants besides bell peppers?
A: Yes, this method can be used for other types of plants that benefit from a warm, protected environment, such as tomatoes, eggplants, and cucumbers. The specific requirements for each plant may vary, so research the optimal conditions for the plants you are growing. Adjust the size of the bottle, the ventilation, and the watering frequency accordingly.
Q: How do I protect the bell peppers from pests and diseases when using plastic bottles?
A: While plastic bottles offer some protection from pests, it’s still important to monitor the plants regularly for any signs of infestation or disease. You can use organic pest control methods, such as insecticidal soap or neem oil, to treat any problems. Ensure good air circulation around the plants to prevent fungal diseases. Remove any infected leaves or plants promptly to prevent the spread of disease.
Q: What do I do when the bell pepper plants outgrow the plastic bottles?
A: When the bell pepper plants outgrow the plastic bottles, you have a few options. You can either transplant the plants into larger containers or remove the bottles entirely and allow the plants to grow freely in the ground. If you choose to transplant, make sure to choose a container that is large enough to accommodate the plant’s root system. If you remove the bottles, be prepared to provide additional support for the plants, such as staking or caging.
Q: Are there any downsides to using plastic bottles for growing bell peppers?
A: While this method offers many benefits, there are a few potential downsides to consider. Plastic bottles can trap heat and humidity, which can lead to overheating or fungal diseases if not properly managed. It’s important to monitor the plants regularly and adjust the ventilation and watering accordingly. Additionally, plastic bottles can be unsightly, so you may want to consider painting them or decorating them to make them more visually appealing. Finally, it’s important to dispose of the plastic bottles responsibly after use.
Q: How does using plastic bottles contribute to sustainable gardening?
A: Using plastic bottles for growing bell peppers is a great way to promote sustainable gardening practices. It reduces waste by repurposing materials that would otherwise end up in landfills. It also reduces the need for purchasing new gardening supplies, such as greenhouses or row covers. By growing your own bell peppers, you can also reduce your carbon footprint by minimizing the transportation of food. This method is a simple and effective way to make your garden more environmentally friendly.
Leave a Comment