
All Season Asparagus Routine: Dreaming of tender, homegrown asparagus spears gracing your plate throughout the year? You’re not alone! For centuries, asparagus has been a culinary delicacy, enjoyed by everyone from Roman emperors to modern-day foodies. Its delicate flavor and nutritional benefits have made it a prized vegetable, and the good news is, you don’t need a sprawling farm to cultivate your own patch.
But let’s be honest, getting a consistent harvest of asparagus can feel like a challenge. That’s where this DIY guide comes in! I’m going to share my tried-and-true all season asparagus routine, packed with simple yet effective tricks and hacks to maximize your yield and extend your harvest. Forget those fleeting spring harvests – with a little know-how, you can enjoy fresh asparagus for a much longer period.
Why is this so important? Because store-bought asparagus simply can’t compare to the taste and satisfaction of harvesting your own. Plus, knowing exactly where your food comes from and how it’s grown is incredibly rewarding. So, whether you’re a seasoned gardener or just starting out, get ready to unlock the secrets to a thriving asparagus patch that will keep you enjoying this delicious vegetable all season long. Let’s get started!
All-Season Asparagus: A DIY Guide to Continuous Harvests
Hey there, fellow gardeners! Asparagus is a fantastic perennial vegetable, and with a little planning, you can enjoy fresh spears almost year-round. I’m going to walk you through my method for extending the asparagus season, ensuring a steady supply for your kitchen. This isn’t about forcing growth unnaturally; it’s about understanding asparagus’s natural cycles and manipulating them to our advantage.
Understanding Asparagus Growth Cycles
Before we dive into the how-to, let’s quickly cover the basics. Asparagus has two main phases:
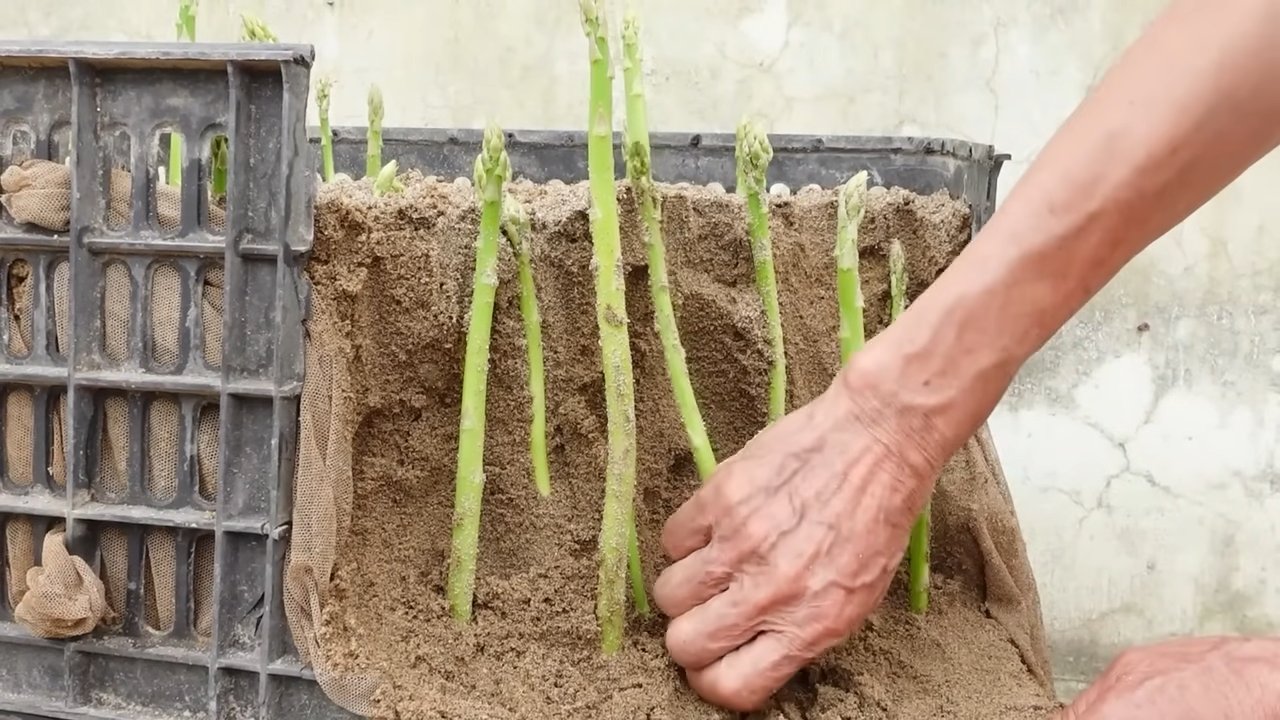
* **Spear Production:** This is when we harvest those delicious stalks. It typically occurs in spring and early summer.
* **Fern Growth:** After harvesting, the plant focuses on growing tall, feathery ferns. These ferns are crucial because they photosynthesize and store energy in the roots for the next year’s spear production.
Our goal is to encourage spear production at different times of the year by strategically managing these phases.
Extending the Harvest: The Three-Zone Approach
I use a three-zone approach to achieve an extended asparagus harvest. This involves dividing your asparagus patch (or planting new patches) into three distinct areas, each managed differently.
* **Zone 1: Spring Harvest (Traditional)** This zone is managed for a typical spring harvest.
* **Zone 2: Summer/Early Fall Harvest (Delayed)** This zone is manipulated to delay spear production until later in the season.
* **Zone 3: Winter/Early Spring Harvest (Forced)** This zone utilizes a cold frame or greenhouse to force early spear production.
Materials You’ll Need
* Asparagus crowns (1-year-old are best)
* Well-draining soil (amended with compost)
* Garden fork or shovel
* Mulch (straw, wood chips, or compost)
* Nitrogen-rich fertilizer (optional)
* Cold frame or greenhouse (for Zone 3)
* Row covers (optional, for Zone 2)
* Gardening gloves
* Watering can or hose
Zone 1: The Traditional Spring Harvest
This is your standard asparagus patch. We’ll treat it like most gardeners do, focusing on a healthy spring harvest.
**Step-by-Step Instructions:**
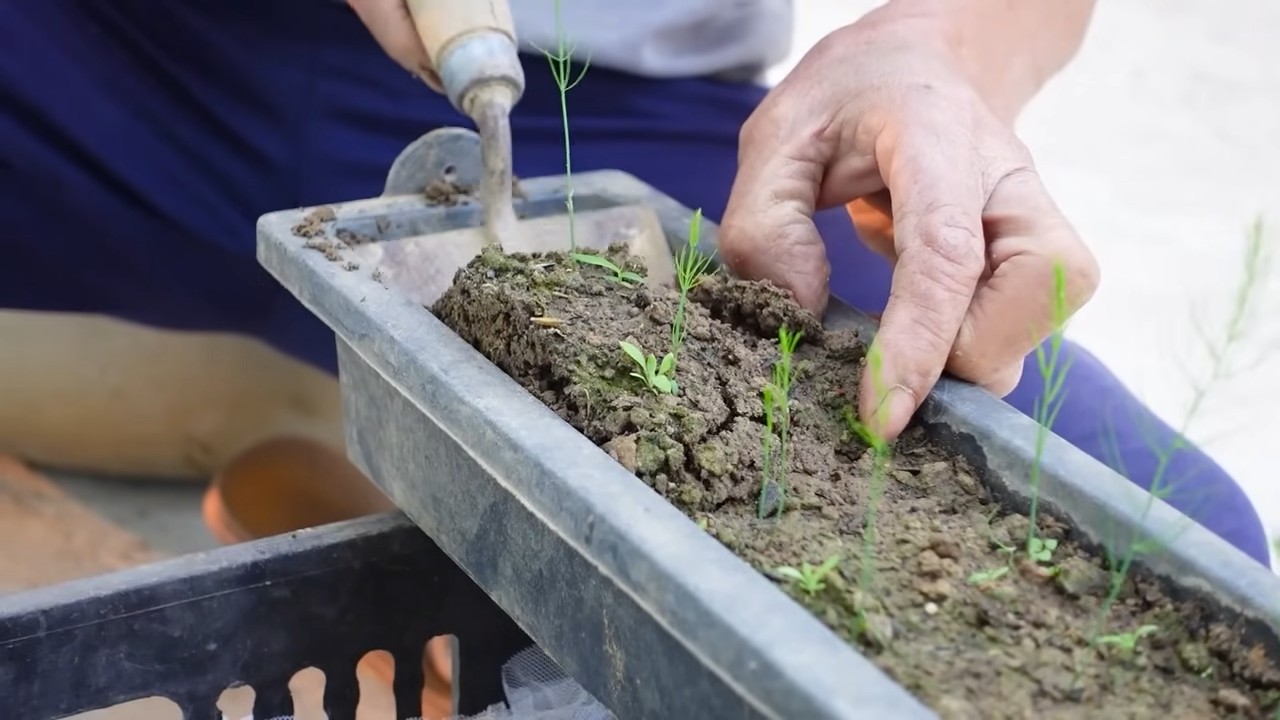
1. **Planting (if starting a new patch):** Dig trenches about 6-8 inches deep and 12 inches wide. Space the trenches about 4 feet apart.
2. **Crown Placement:** Place the asparagus crowns in the trenches, spacing them about 12-18 inches apart. Make sure the buds are facing upwards.
3. **Covering the Crowns:** Gently cover the crowns with about 2 inches of soil. As the spears emerge, gradually fill in the trench until it’s level with the surrounding ground.
4. **Watering:** Water thoroughly after planting and keep the soil consistently moist, but not waterlogged.
5. **Fertilizing (Optional):** Apply a nitrogen-rich fertilizer in early spring to encourage growth. Follow the instructions on the fertilizer package.
6. **Harvesting:** In the second year after planting (or third year for best results), you can begin harvesting spears. Harvest when the spears are about 6-8 inches tall and about as thick as your finger. Snap them off at ground level.
7. **Harvesting Period:** Harvest spears for about 4-6 weeks in the spring. After that, let the ferns grow.
8. **Fern Care:** Allow the ferns to grow and mature throughout the summer and fall. They will provide energy for next year’s spear production.
9. **Winter Preparation:** In late fall or early winter, cut back the ferns to ground level. Mulch the area to protect the crowns from freezing temperatures.
Zone 2: Delaying the Harvest for Summer/Early Fall
This is where things get interesting! We’re going to trick the asparagus into thinking it’s still winter, delaying spear production until later in the season.
**Step-by-Step Instructions:**
1. **Planting (if starting a new patch):** Follow the same planting instructions as Zone 1.
2. **Early Spring Management:** In early spring, as soon as the soil thaws, cover this zone with a thick layer of mulch (4-6 inches). This will help keep the soil cool and delay spear emergence.
3. **Row Covers (Optional):** For added protection and to further delay growth, you can also cover the mulched area with row covers.
4. **Monitoring:** Check under the mulch periodically. Once you see spears starting to emerge, remove the mulch and row covers (if used).
5. **Harvesting:** Harvest spears as they emerge in the summer or early fall.
6. **Harvesting Period:** Harvest spears for about 4-6 weeks.
7. **Fern Care:** Allow the ferns to grow and mature throughout the fall.
8. **Winter Preparation:** In late fall or early winter, cut back the ferns to ground level and mulch the area.
Zone 3: Forcing an Early Winter/Spring Harvest
This zone requires a cold frame or greenhouse. We’re essentially creating a mini-spring environment to encourage early spear production.
**Step-by-Step Instructions:**
1. **Planting (if starting a new patch):** Follow the same planting instructions as Zone 1. You can plant directly in the ground inside the cold frame/greenhouse or in raised beds.
2. **Cold Frame/Greenhouse Preparation:** In late fall or early winter, prepare your cold frame or greenhouse. Make sure it’s clean and well-ventilated.
3. **Warming the Soil:** Begin warming the soil inside the cold frame/greenhouse in late winter (January/February). You can use a soil heating cable or simply rely on solar heat.
4. **Watering:** Keep the soil consistently moist.
5. **Ventilation:** On sunny days, open the cold frame/greenhouse to prevent overheating.
6. **Harvesting:** As the spears emerge, harvest them as you would in Zone 1.
7. **Harvesting Period:** Harvest spears for about 4-6 weeks.
8. **Transitioning to Fern Growth:** After harvesting, gradually reduce the temperature inside the cold frame/greenhouse and allow the ferns to grow.
9. **Summer Management:** In the summer, you can remove the cold frame/greenhouse cover to allow for better ventilation and sunlight.
10. **Winter Preparation:** In late fall, cut back the ferns and prepare for another round of forcing.
Tips for Success
* Soil Preparation is Key: Asparagus thrives in well-draining soil that is rich in organic matter. Amend your soil with plenty of compost before planting.
* Patience is a Virtue: It takes a few years for asparagus to become fully established. Don’t be discouraged if you don’t get a large harvest in the first year or two.
* Water Wisely: Asparagus needs consistent moisture, especially during spear production. Water deeply and regularly, but avoid overwatering.
* Fertilize Judiciously: A balanced fertilizer can help boost growth, but avoid over-fertilizing, which can lead to leggy growth.
* Weed Control: Keep your asparagus patch free of weeds, as they can compete for nutrients and water.
* Pest and Disease Management: Asparagus is relatively pest-resistant, but keep an eye out for common pests like asparagus beetles. Treat any infestations promptly.
* Record Keeping: Keep track of your planting dates, harvesting times, and any other relevant information. This will help you fine-tune your asparagus growing strategy over time.
* Crown Selection: When buying asparagus crowns, choose 1-year-old crowns. They establish faster and are less likely to be diseased than older crowns.
* Mulch Matters: Mulch helps retain moisture, suppress weeds, and regulate soil temperature. Use a generous layer of organic mulch around your asparagus plants.
* Don’t Over-Harvest Young Plants: In the first few years, limit your harvesting to a few weeks to allow the plants to establish strong root systems.
* Consider Asparagus Varieties: Different asparagus varieties have different characteristics, such as spear size, disease resistance, and cold hardiness. Choose varieties that are well-suited to your climate and growing conditions. ‘Jersey Knight’ and ‘Millennium’ are popular choices.
* Observe Your Plants: Pay close attention to your asparagus plants and adjust your management practices as needed. If you notice any signs of stress or disease, take action promptly.
Troubleshooting
* **Thin Spears:** If your asparagus spears are thin, it could be a sign of nutrient deficiency, overcrowding, or over-harvesting. Fertilize, thin out the plants, and reduce your harvesting period.
* **Yellowing Ferns:** Yellowing ferns can indicate a variety of problems, including nutrient deficiency, disease, or pest infestation. Inspect your plants carefully
Conclusion
So, there you have it! Mastering the art of preserving asparagus for year-round enjoyment is not only achievable but surprisingly simple. We’ve walked you through a method that ensures you can savor the fresh, vibrant taste of asparagus, regardless of the season. This isn’t just about having asparagus on hand; it’s about reclaiming control over your food supply, reducing waste, and enjoying the satisfaction of a truly homemade experience.
Why is this DIY asparagus preservation trick a must-try? Because it empowers you to break free from the limitations of seasonal availability and the often-questionable quality of store-bought, out-of-season produce. Imagine the possibilities: a creamy asparagus soup in the dead of winter, a vibrant asparagus and lemon risotto in the spring, or perfectly grilled asparagus alongside your summer barbecue – all made possible with asparagus you preserved yourself.
Beyond the convenience and quality, this method offers a significant cost-saving benefit. Buying asparagus in bulk during its peak season, when prices are at their lowest, and preserving it allows you to avoid the inflated prices of out-of-season asparagus. Think of all the delicious meals you can create without breaking the bank!
But the benefits don’t stop there. Preserving your own asparagus allows you to control exactly what goes into your food. No unwanted additives, preservatives, or artificial flavors – just pure, unadulterated asparagus goodness. This is especially important for those with dietary restrictions or preferences.
Variations and Suggestions:
While we’ve focused on a specific method, feel free to experiment and adapt it to your own preferences. Consider these variations:
* Blanching Time: Adjust the blanching time based on the thickness of your asparagus spears. Thicker spears may require a slightly longer blanching time to ensure proper preservation.
* Flavor Infusions: Add a touch of flavor to your preserved asparagus by including herbs like dill, thyme, or rosemary in the jars. A clove of garlic or a pinch of red pepper flakes can also add a delightful kick.
* Pickled Asparagus: Transform your preserved asparagus into a tangy treat by using a pickling brine instead of plain water. Experiment with different vinegar varieties and spices to create your own unique pickled asparagus recipe.
* Freezing: While we focused on canning, freezing blanched asparagus is another excellent option. Simply blanch, cool, and freeze in airtight bags or containers.
We are confident that this DIY asparagus preservation method will revolutionize the way you enjoy this delicious vegetable. It’s a simple, cost-effective, and rewarding way to extend the asparagus season and enjoy its fresh flavor all year round.
Now, it’s your turn! We encourage you to try this DIY asparagus preservation trick and experience the satisfaction of enjoying homegrown or locally sourced asparagus whenever you desire. Don’t be afraid to experiment with different variations and flavor combinations to create your own signature preserved asparagus.
Most importantly, we want to hear about your experience! Share your tips, tricks, and successes in the comments below. Let us know what worked for you, what challenges you encountered, and what delicious recipes you created with your preserved asparagus. Together, we can build a community of asparagus enthusiasts who are passionate about preserving the flavors of the season. So, grab your asparagus, gather your supplies, and get ready to embark on a culinary adventure that will transform the way you think about asparagus forever! Let’s make every season an asparagus season!
FAQ
Frequently Asked Questions About Preserving Asparagus
Q: What kind of asparagus is best for preserving?
A: Fresh, firm asparagus spears are ideal for preserving. Look for spears that are bright green, with tightly closed tips and a smooth, unblemished surface. Avoid asparagus that is wilted, limp, or has signs of damage. The fresher the asparagus, the better the quality of the preserved product.
Q: Do I really need to blanch the asparagus before preserving it?
A: Yes, blanching is a crucial step in the preservation process. Blanching helps to stop enzyme activity that can cause the asparagus to lose its color, flavor, and texture during storage. It also helps to reduce the number of microorganisms that can cause spoilage. Skipping the blanching step can result in a less desirable and potentially unsafe product.
Q: How long should I blanch the asparagus?
A: The blanching time depends on the thickness of the asparagus spears. For thin spears, blanch for 2 minutes. For medium spears, blanch for 3 minutes. And for thick spears, blanch for 4 minutes. Be sure to cool the asparagus immediately after blanching to stop the cooking process.
Q: Can I use a water bath canner instead of a pressure canner for asparagus?
A: No, asparagus is a low-acid vegetable and must be processed in a pressure canner to ensure its safety. Water bath canning does not reach a high enough temperature to kill the bacteria that can cause botulism, a potentially fatal foodborne illness. Always follow the recommended processing times and pressures for your specific pressure canner model.
Q: What if I don’t have a pressure canner?
A: If you don’t have a pressure canner, you can freeze the blanched asparagus instead. Freezing is a safe and effective way to preserve asparagus without the need for a pressure canner. Simply blanch the asparagus, cool it, and then freeze it in airtight bags or containers.
Q: How long will preserved asparagus last?
A: Properly canned asparagus can last for up to a year or more when stored in a cool, dark, and dry place. However, it’s best to use it within a year for optimal quality. Frozen asparagus can also last for up to a year, but its quality may start to decline after that.
Q: How do I know if my canned asparagus is safe to eat?
A: Before opening a jar of canned asparagus, check for any signs of spoilage, such as bulging lids, leaks, or unusual odors. If the jar shows any of these signs, discard it immediately. When you open the jar, listen for a popping sound, which indicates a good seal. If the asparagus looks or smells off, do not taste it. Discard it immediately.
Q: Can I add salt to the jars when preserving asparagus?
A: Yes, you can add salt to the jars for flavor. However, it is not necessary for preservation. If you choose to add salt, use canning salt or sea salt, as table salt may contain additives that can cloud the brine. A general guideline is to add 1/2 teaspoon of salt per pint jar or 1 teaspoon of salt per quart jar.
Q: Can I use different herbs or spices to flavor the preserved asparagus?
A: Absolutely! Feel free to experiment with different herbs and spices to create your own unique flavor combinations. Some popular options include dill, thyme, rosemary, garlic, red pepper flakes, and lemon zest. Add the herbs and spices to the jars before adding the asparagus and brine.
Q: What are some ways to use preserved asparagus?
A: Preserved asparagus can be used in a variety of dishes, just like fresh asparagus. It can be added to soups, stews, salads, omelets, and stir-fries. It can also be served as a side dish, grilled, roasted, or sautéed. Get creative and experiment with different recipes to find your favorite ways to enjoy preserved asparagus.
Q: My preserved asparagus turned out mushy. What did I do wrong?
A: Mushy asparagus can be caused by over-blanching, over-processing, or using asparagus that was not fresh to begin with. Be sure to follow the recommended blanching and processing times carefully. Also, use the freshest asparagus possible for the best results.
Q: Can I re-process jars of asparagus that didn’t seal properly?
A: Yes, you can re-process jars of asparagus that didn’t seal properly within 24 hours. Remove the lids, check the jar rims for any nicks or cracks, and replace the lids with new, sterilized lids. Re-process the jars according to the original instructions. If the jars still don’t seal after re-processing, it’s best to refrigerate the asparagus and use it within a few days.
Q: Is it safe to can asparagus that I grew myself, even if I used pesticides?
A: Yes, it is generally safe to can asparagus that you grew yourself, even if you used pesticides, as long as you follow proper washing and preparation procedures. Thoroughly wash the asparagus to remove any pesticide residue before blanching and canning. Consider using organic gardening practices to minimize the use of pesticides in the future.
Q: Where can I find more information about safe canning practices?
A: The National Center for Home Food Preservation (NCHFP) is a great resource for information about safe canning practices. You can find their website at nchfp.uga.edu. Your local extension office is another valuable resource for canning information and advice. Always follow safe canning practices to ensure the safety of your preserved food.
Leave a Comment