
Mushroom Bucket Gardening: Ever dreamt of harvesting your own delicious, earthy mushrooms right in your backyard, or even on your balcony? I know I have! Forget those expensive grocery store prices and the mystery of where your fungi actually came from. This isn’t just about growing food; it’s about connecting with nature and experiencing the magic of mycology firsthand.
For centuries, cultivating mushrooms has been a revered practice in many cultures. From ancient Chinese medicinal traditions to European foraging expeditions, mushrooms have held a special place in our history. Now, you can bring that tradition home with a simple, space-saving, and incredibly rewarding technique: mushroom bucket gardening.
Why do you need this DIY trick? Well, let’s face it, traditional mushroom farming can seem intimidating. It often involves complex setups and specialized knowledge. But with mushroom bucket gardening, we’re simplifying the process, making it accessible to everyone, regardless of their gardening experience or available space. Imagine the satisfaction of harvesting fresh, organic mushrooms for your favorite recipes, knowing you grew them yourself. Plus, it’s a fantastic way to recycle old buckets and contribute to a more sustainable lifestyle. So, let’s dive in and unlock the secrets to successful mushroom bucket gardening!
Transforming Waste: Your Guide to Mushroom Bucket Gardening
Hey there, fellow gardening enthusiasts! Ever thought about turning those empty buckets into thriving mushroom farms? It’s easier than you think, and I’m here to guide you through the process. This method is perfect for small spaces, recycles materials, and provides you with delicious, homegrown mushrooms. Let’s dive in!
What You’ll Need: Gathering Your Supplies
Before we get our hands dirty, let’s make sure we have everything we need. This is crucial for a smooth and successful mushroom-growing experience.
* Buckets: 5-gallon buckets are ideal, but any food-grade bucket will work. Make sure they’re clean!
* Mushroom Spawn: This is the “seed” of your mushrooms. Oyster mushrooms are a great choice for beginners because they’re relatively easy to grow. You can find spawn online or at local gardening supply stores.
* Substrate: This is the food source for your mushrooms. Straw is a popular and readily available option. You can also use hardwood sawdust, but straw is generally easier to work with.
* Lime: Hydrated lime (also known as garden lime) is used to pasteurize the straw.
* Large Pot or Container: For pasteurizing the straw. A large stockpot or even a clean trash can will do.
* Drill with Drill Bits: You’ll need a drill to create drainage and ventilation holes in your buckets.
* Gloves: To protect your hands during the pasteurization and inoculation process.
* Spray Bottle: For misting the mushrooms as they grow.
* Thermometer: To monitor the temperature of the water during pasteurization.
* Measuring Cup or Scale: To accurately measure the lime.
* Clean Workspace: A clean environment is essential to prevent contamination.
Step-by-Step Instructions: From Bucket to Bounty
Now for the fun part! Follow these steps carefully, and you’ll be enjoying fresh mushrooms in no time.
1. Preparing the Buckets: Drainage and Ventilation
First things first, we need to prepare our buckets. This involves creating drainage and ventilation holes.
1. Drill Drainage Holes: Using a 1/4-inch drill bit, drill about 6-8 drainage holes in the bottom of each bucket. These holes will prevent the substrate from becoming waterlogged.
2. Drill Ventilation Holes: Using a 1/2-inch drill bit, drill holes around the sides of the bucket, spaced about 4-6 inches apart. These holes will provide ventilation for the mushrooms to grow. I usually drill 3-4 rows of holes, staggering them for even air circulation.
2. Pasteurizing the Straw: Eliminating Competition
Pasteurization is crucial to kill off any competing organisms in the straw, giving your mushroom spawn a head start.
1. Chop the Straw: Cut the straw into smaller pieces, about 2-4 inches long. This will make it easier to pack into the buckets and allow the mushroom mycelium to colonize it more effectively.
2. Prepare the Lime Water: In your large pot or container, mix water and hydrated lime. The ratio is typically 1 tablespoon of lime per gallon of water. Make sure the lime is fully dissolved.
3. Soak the Straw: Submerge the chopped straw in the lime water. Ensure that all the straw is completely covered. You might need to weigh it down with a brick or a heavy object.
4. Heat the Water: Heat the water to around 160-180°F (71-82°C) and maintain that temperature for about 60-90 minutes. Use your thermometer to monitor the temperature. This process kills off unwanted bacteria and fungi.
5. Drain and Cool: After pasteurization, carefully drain the hot water from the straw. Allow the straw to cool down to room temperature before proceeding to the next step. This is important because hot straw can kill the mushroom spawn.
3. Inoculating the Buckets: Planting Your Mushrooms
Now comes the exciting part – introducing the mushroom spawn to the prepared straw.
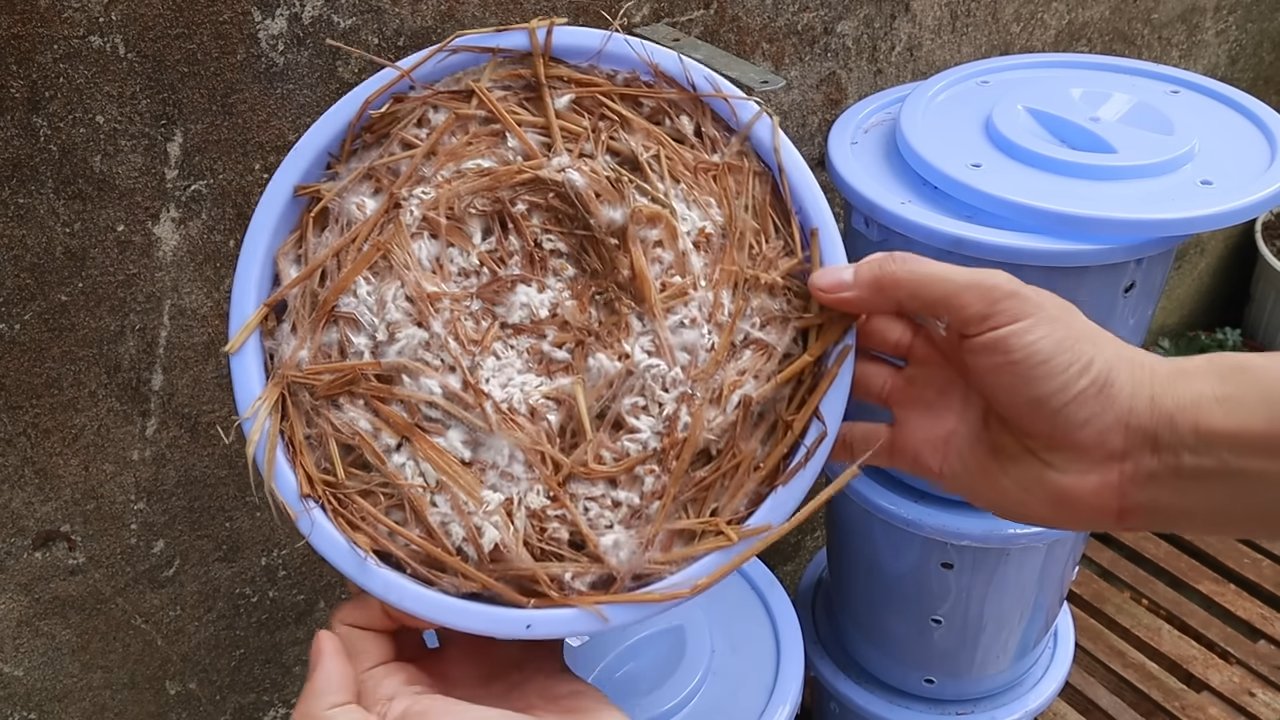
1. Layering the Substrate and Spawn: In a clean workspace, begin layering the pasteurized straw and mushroom spawn in the buckets. Start with a layer of straw at the bottom, then sprinkle a layer of mushroom spawn on top.
2. Continue Layering: Repeat this process, alternating layers of straw and spawn, until the bucket is almost full. Make sure the final layer is straw. I usually aim for about 4-6 inches of straw per layer, and a generous sprinkling of spawn.
3. Pack Lightly: Gently pack the straw down as you layer it, but don’t compress it too much. The mycelium needs air to grow.
4. Top Layer: Finish with a final layer of straw on top.
4. Incubation: Letting the Mycelium Grow
This is the waiting game. The mycelium needs time to colonize the straw.
1. Find a Suitable Location: Place the inoculated buckets in a dark, humid location with a temperature between 65-75°F (18-24°C). A basement, garage, or closet works well.
2. Maintain Humidity: Keep the substrate moist by misting it with water every few days. You want the straw to be damp, but not soaking wet.
3. Monitor for Colonization: Over the next few weeks, you should see white, fuzzy mycelium spreading throughout the straw. This is a good sign! It means the mushroom spawn is colonizing the substrate.
4. Patience is Key: The incubation period can take anywhere from 2-4 weeks, depending on the type of mushroom spawn and the environmental conditions.
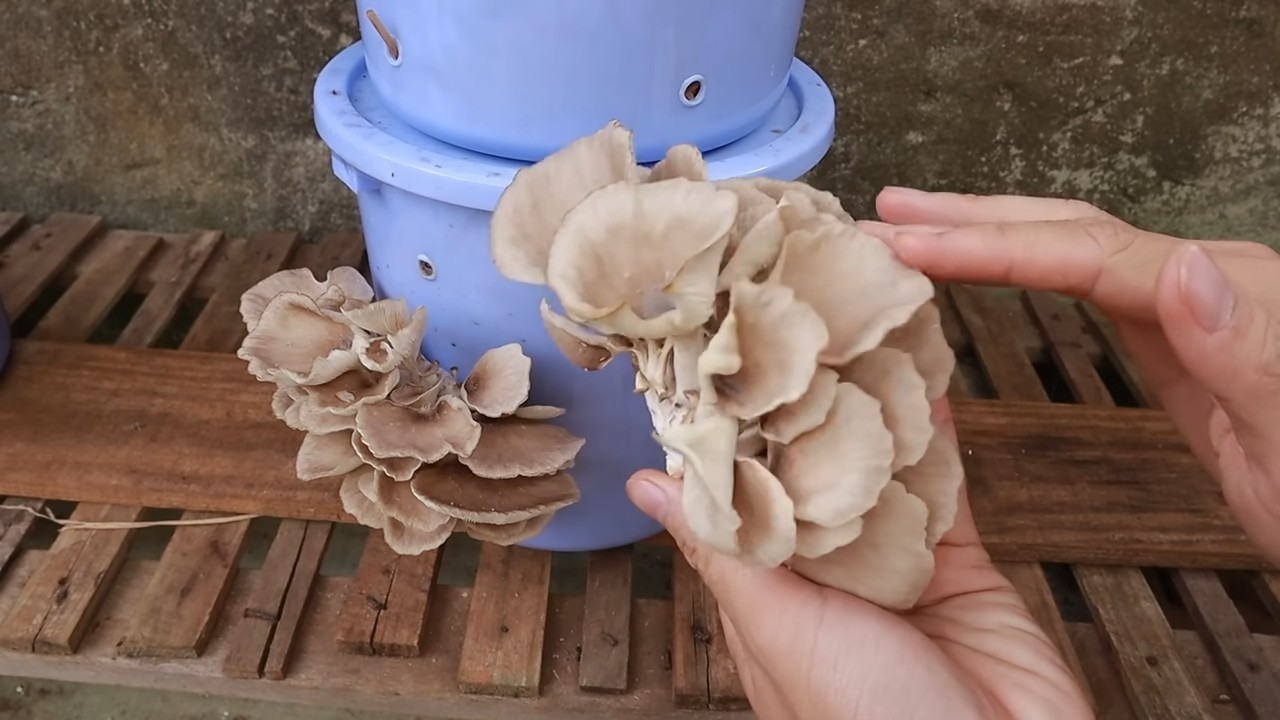
5. Fruiting: Harvesting Your Mushrooms
The moment you’ve been waiting for! Time to harvest your delicious, homegrown mushrooms.
1. Introduce Light and Fresh Air: Once the straw is fully colonized (covered in white mycelium), it’s time to introduce light and fresh air. Move the buckets to a location with indirect light and good ventilation.
2. Maintain Humidity: Continue to mist the buckets regularly to maintain high humidity. You can also cover the buckets with a clear plastic bag to create a mini-greenhouse effect. Just make sure to vent the bag regularly to prevent condensation buildup.
3. Watch for Pinheads: After a few days, you should start to see small mushroom “pinheads” forming on the surface of the straw and around the ventilation holes.
4. Harvesting: When the mushrooms are fully grown, but before they start to drop spores (you’ll see a powdery substance), it’s time to harvest. Gently twist or cut the mushrooms off the substrate.
5. Multiple Flushes: You can usually get several “flushes” of mushrooms from each bucket. After harvesting, continue to mist the buckets and maintain humidity. You should see another flush of mushrooms in a week or two.
Troubleshooting: Addressing Common Issues
Even with the best planning, things can sometimes go wrong. Here are some common issues and how to address them:
* Contamination: If you see green, black, or other colored molds growing in your buckets, it’s likely contamination. Unfortunately, there’s not much you can do at this point except discard the contaminated substrate. To prevent contamination, make sure to pasteurize the straw properly and work in a clean environment.
* Slow Colonization: If the mycelium is taking a long time to colonize the straw, it could be due to low temperatures or insufficient humidity. Make sure the buckets are in a warm, humid location.
* No Mushrooms: If you’re not seeing any mushrooms after the incubation period, it could be due to a lack of light or fresh air. Move the buckets to a location with indirect light and good ventilation.
* Dry Substrate: If the substrate is drying out, mist it more frequently. You can also cover the buckets with a clear plastic bag to help retain moisture.
* Pests: Sometimes, small flies or other pests can be attracted to the mushrooms. To prevent pests, keep the growing area clean and well-ventilated. You can also use sticky traps to catch any pests that do appear.
Tips and Tricks: Maximizing Your Mushroom Harvest
Here are a few extra tips to help you get the most out of your mushroom bucket garden:
* Choose the Right Mushroom Species: Oyster mushrooms are a great choice for beginners, but there are many other types of mushrooms you can grow in buckets, such as shiitake, lion’s mane, and wine cap mushrooms. Research different species and choose one that suits your climate and growing conditions.
* Experiment with Different Substrates: While straw is a popular choice, you can also experiment with other substrates, such as hardwood sawdust, coffee grounds, and cardboard. Each substrate will produce different results, so it’s worth trying a few different
Conclusion
So, there you have it! Transforming a simple bucket into a thriving mushroom garden is not just a fun project; it’s a sustainable and rewarding way to bring fresh, delicious mushrooms right to your kitchen. We’ve walked through the process, highlighting the simplicity and cost-effectiveness of this DIY approach. Forget expensive store-bought mushrooms that may have traveled miles to reach you. With mushroom bucket gardening, you control the quality, freshness, and even the variety of mushrooms you enjoy.
This method is a must-try for several reasons. First, it’s incredibly space-efficient. Whether you have a sprawling backyard or a small balcony, a bucket garden can fit almost anywhere. Second, it’s a fantastic way to recycle and repurpose materials, reducing waste and contributing to a more eco-friendly lifestyle. Third, and perhaps most importantly, it provides a constant supply of fresh, flavorful mushrooms that are far superior to anything you can buy in a store. The taste difference alone is worth the effort!
But don’t stop there! Experiment with different mushroom varieties. Oyster mushrooms are a great starting point, but once you’ve mastered the basics, consider branching out to shiitake, lion’s mane, or even wine cap mushrooms. Each variety offers a unique flavor profile and texture, adding exciting new dimensions to your culinary creations. You can also experiment with different substrates. While straw and coffee grounds are popular choices, consider adding wood chips, cardboard, or even cotton waste to the mix. Just be sure to research the specific needs of the mushroom variety you’re growing.
Consider these variations for your mushroom bucket gardening adventure:
* Vertical Gardening: Stack multiple buckets on top of each other to create a vertical mushroom garden, maximizing space and adding a visually appealing element to your growing area.
* Indoor vs. Outdoor: While this guide focuses on outdoor gardening, you can easily adapt the method for indoor cultivation. Just ensure you provide adequate humidity and ventilation. A simple humidity tent or a well-ventilated basement can work wonders.
* Companion Planting: Consider planting herbs or vegetables around your mushroom buckets to create a symbiotic relationship. Some plants can help improve soil health and deter pests, benefiting both your mushrooms and your other crops.
* Substrate Sterilization: While pasteurization is often sufficient, sterilizing your substrate can significantly reduce the risk of contamination. This is especially important if you’re using materials that may harbor harmful bacteria or fungi.
We are confident that you will find mushroom bucket gardening to be a fulfilling and delicious experience. It’s a fantastic way to connect with nature, learn about the fascinating world of fungi, and enjoy the fruits (or rather, mushrooms) of your labor.
So, grab a bucket, gather your supplies, and get ready to embark on your mushroom-growing journey! We encourage you to try this DIY trick and share your experiences with us. Post photos of your mushroom gardens, share your tips and tricks, and let us know what varieties you’re growing. We can’t wait to see what you create! Happy growing!
Frequently Asked Questions (FAQ)
What kind of bucket should I use?
Almost any food-grade plastic bucket will work for mushroom bucket gardening. A 5-gallon bucket is a good starting size, but you can use larger or smaller buckets depending on your space and desired yield. Make sure the bucket is clean and free of any harmful chemicals. Avoid using buckets that have previously contained toxic substances. Drill drainage holes in the bottom of the bucket to prevent waterlogging.
What is the best substrate for growing mushrooms in a bucket?
The best substrate depends on the type of mushroom you’re growing. Oyster mushrooms thrive on straw, coffee grounds, and cardboard. Shiitake mushrooms prefer hardwood sawdust or wood chips. Wine cap mushrooms do well in wood chips and straw. Research the specific needs of the mushroom variety you’re growing and choose a substrate accordingly. Pasteurize or sterilize your substrate to kill any competing organisms.
How do I pasteurize or sterilize my substrate?
Pasteurization involves heating the substrate to a temperature that kills most harmful organisms without destroying beneficial ones. You can pasteurize straw by soaking it in hot water (around 160-180°F) for an hour. Sterilization involves heating the substrate to a higher temperature (around 250°F) to kill all organisms. You can sterilize substrate in a pressure cooker or autoclave. Sterilization is more effective but also more energy-intensive.
How much mushroom spawn do I need?
A general rule of thumb is to use about 5-10% spawn by weight of the substrate. So, if you have 10 pounds of substrate, you’ll need about 0.5-1 pound of spawn. More spawn can lead to faster colonization and a higher yield, but it’s not always necessary.
How often should I water my mushroom bucket?
The frequency of watering depends on the humidity and temperature of your environment. The substrate should be moist but not waterlogged. Check the moisture level regularly by squeezing a handful of substrate. If water drips out, it’s too wet. If it feels dry, it needs watering. Mist the substrate with water as needed to maintain adequate moisture.
How long does it take for mushrooms to grow?
The time it takes for mushrooms to grow depends on the variety, the substrate, and the environmental conditions. Oyster mushrooms typically start fruiting within a few weeks of colonization. Shiitake mushrooms can take several months to fruit. Be patient and monitor your mushroom bucket regularly.
What if my mushroom bucket gets contaminated?
Contamination can occur if harmful bacteria or fungi invade your mushroom bucket. Signs of contamination include mold, discoloration, and foul odors. If you suspect contamination, remove the affected area immediately. If the contamination is widespread, it’s best to discard the entire bucket and start over. To prevent contamination, use clean materials, pasteurize or sterilize your substrate, and maintain a clean growing environment.
Can I grow mushrooms indoors?
Yes, you can grow mushrooms indoors using the bucket method. Just ensure you provide adequate humidity, ventilation, and light. A simple humidity tent or a well-ventilated basement can work wonders. You may also need to supplement with artificial light, especially if you’re growing mushrooms in a dark room.
How many flushes of mushrooms can I expect from one bucket?
You can typically get several flushes of mushrooms from one bucket. After each harvest, allow the substrate to rest for a few weeks and then rehydrate it by soaking it in water. This will encourage another flush of mushrooms. The number of flushes you can get depends on the variety of mushroom and the quality of the substrate.
What do I do with the spent substrate after I’m done growing mushrooms?
The spent substrate is a valuable resource that can be used as compost in your garden. It’s rich in nutrients and beneficial microorganisms that can improve soil health. You can also use it as mulch around your plants. Alternatively, you can add it to your compost pile.

Leave a Comment