
Grow Okra on Rooftop gardens? Absolutely! Imagine stepping onto your rooftop and harvesting fresh, vibrant okra – a taste of the South right in your own urban oasis. Forget those bland, store-bought vegetables; with a few clever tricks and a little elbow grease, you can cultivate your own thriving okra patch high above the city streets.
Okra, also known as “lady’s fingers,” has a rich history, tracing back to ancient Ethiopia and Egypt. It traveled across continents, becoming a staple in Southern cuisine and beyond. For generations, gardeners have cherished okra for its unique flavor and versatility. But who says you need acres of land to enjoy this Southern gem?
In today’s world, where space is a premium and access to fresh produce can be limited, rooftop gardening offers a fantastic solution. Growing your own food, especially something as rewarding as okra, connects you to nature, reduces your carbon footprint, and provides you with healthy, delicious ingredients. Plus, let’s be honest, there’s something incredibly satisfying about nurturing a plant from seed to harvest. This DIY guide will equip you with the knowledge and simple hacks you need to successfully grow okra on rooftop, even if you’re a complete beginner. I’m excited to share my tips and tricks to help you transform your rooftop into a flourishing edible landscape!
Growing Okra on Your Rooftop: A Beginner’s Guide
Hey there, fellow gardening enthusiasts! Ever thought about turning your rooftop into a thriving vegetable garden? Well, let me tell you, it’s totally doable, and growing okra up there is a fantastic project. Okra loves sunshine, and rooftops usually get plenty of it. Plus, fresh, homegrown okra is just unbeatable. So, let’s dive into how you can successfully grow okra on your rooftop!
Choosing the Right Okra Variety
First things first, you need to pick the right okra variety. Not all okra plants are created equal, especially when it comes to container gardening. Here are a few of my favorites that do well in pots:
* Clemson Spineless: This is a classic for a reason. It’s productive, relatively compact, and the pods are tender.
* Burgundy: If you want something a little different, Burgundy okra has beautiful red pods and stalks. It adds a pop of color to your rooftop garden!
* Dwarf Green Long Pod: As the name suggests, this variety stays relatively small, making it perfect for containers.
* Emerald: Known for its smooth, spineless pods and excellent flavor.
Preparing Your Rooftop Garden
Before you even think about planting, you need to make sure your rooftop is ready. This involves a few key steps:
* Assess Weight Capacity: This is super important! Rooftops have weight limits, so consult with a structural engineer or building professional to ensure your roof can handle the weight of the soil, containers, and water. Safety first!
* Waterproofing: Make sure your rooftop has proper waterproofing to prevent leaks. You don’t want to damage your building.
* Sunlight: Okra needs at least 6-8 hours of direct sunlight per day. Observe your rooftop throughout the day to see where the sunniest spots are.
* Wind Protection: Rooftops can be windy, which can damage your plants. Consider installing windbreaks, like trellises or screens, to protect your okra.
* Accessibility: Think about how you’ll access your garden for watering, weeding, and harvesting. A clear pathway is essential.
Gathering Your Supplies
Now for the fun part – gathering your supplies! Here’s what you’ll need:
* Okra Seeds: Choose your variety and buy seeds from a reputable source.
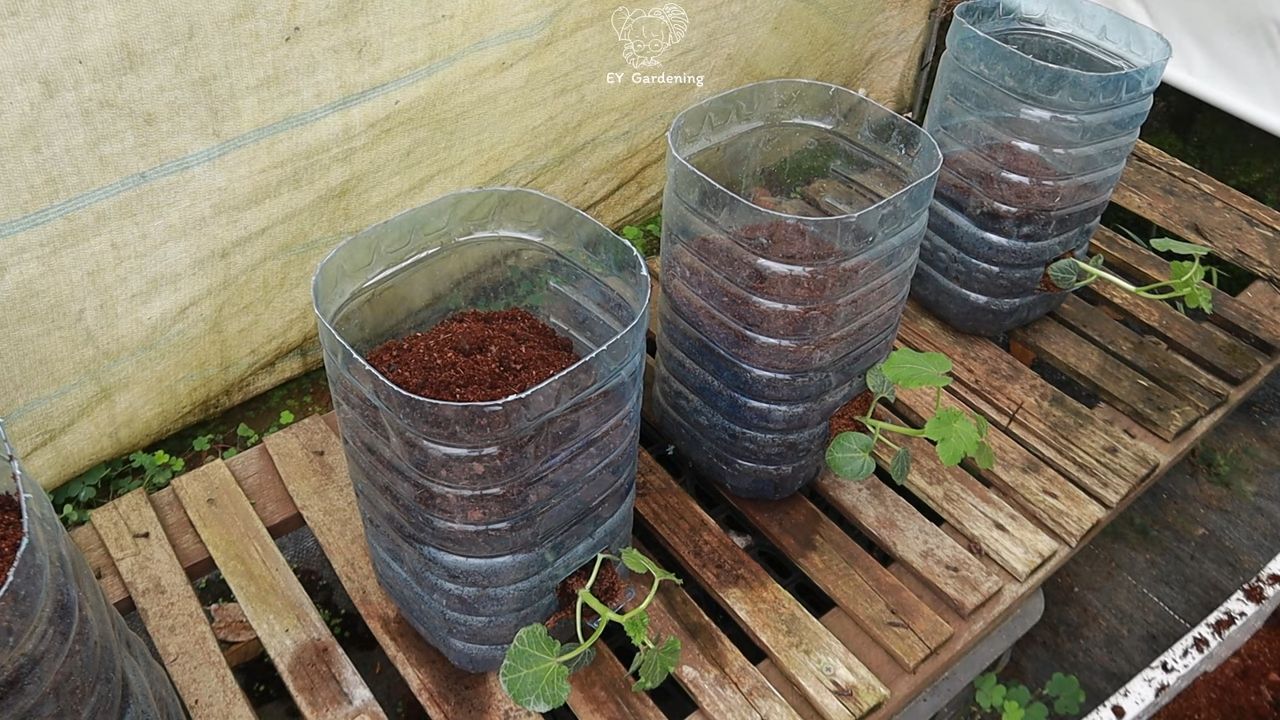
* Large Containers: Okra plants need plenty of room for their roots. I recommend containers that are at least 15-20 gallons in size. Make sure they have drainage holes!
* Potting Mix: Don’t use garden soil in containers. It’s too heavy and doesn’t drain well. Use a high-quality potting mix that’s specifically designed for containers.
* Fertilizer: Okra is a heavy feeder, so you’ll need a good fertilizer. I like to use a slow-release fertilizer at planting time and then supplement with a liquid fertilizer every few weeks.
* Watering Can or Hose: You’ll need a way to water your plants regularly.
* Trowel or Shovel: For planting and transplanting.
* Gloves: To protect your hands.
* Mulch: To help retain moisture and suppress weeds.
* Optional: Stakes or cages to support the plants as they grow.
Planting Your Okra
Okay, let’s get those seeds in the ground!
1. Start Seeds Indoors (Optional): You can start okra seeds indoors about 4-6 weeks before the last expected frost. This gives them a head start. Sow the seeds about ½ inch deep in seed-starting trays or small pots. Keep the soil moist and warm (around 70-80°F). Once the seedlings have a few sets of true leaves, you can transplant them into larger containers.
2. Direct Sowing: If you live in a warm climate with a long growing season, you can direct sow okra seeds directly into your containers. Wait until the soil has warmed up to at least 65°F. Soak the seeds in water for 24 hours before planting to help them germinate. Plant the seeds about ½ inch deep and 6-12 inches apart.
3. Fill Your Containers: Fill your containers with potting mix, leaving a few inches of space at the top.
4. Plant the Seedlings or Seeds: If you started seeds indoors, gently remove the seedlings from their trays and plant them in the containers. If you’re direct sowing, plant the seeds according to the spacing recommendations.
5. Water Thoroughly: After planting, water the containers thoroughly until the water drains out of the bottom.
6. Mulch: Add a layer of mulch around the plants to help retain moisture and suppress weeds.
Caring for Your Okra Plants
Now that your okra plants are in the ground, it’s time to take care of them. Here’s what you need to do:
1. Watering: Okra needs consistent moisture, especially during hot weather. Water deeply whenever the top inch of soil feels dry. Avoid overwatering, as this can lead to root rot.
2. Fertilizing: As I mentioned earlier, okra is a heavy feeder. Fertilize your plants every 2-3 weeks with a liquid fertilizer that’s high in phosphorus and potassium.
3. Weeding: Keep your containers free of weeds. Weeds compete with your okra plants for nutrients and water.
4. Pruning: You can prune your okra plants to encourage bushier growth. Simply pinch off the top of the plant when it’s about 12 inches tall. You can also remove any yellowing or dead leaves.
5. Pest Control: Keep an eye out for pests like aphids, spider mites, and okra worms. If you see any pests, treat them with an organic insecticide like neem oil or insecticidal soap.
6. Support: As your okra plants grow, they may need support. Use stakes or cages to keep them from falling over, especially in windy conditions.
Harvesting Your Okra
The best part of growing okra is harvesting it! Here’s how to do it:
1. Timing: Okra pods are ready to harvest about 50-60 days after planting. The pods should be about 2-4 inches long and tender. If you wait too long, the pods will become tough and fibrous.
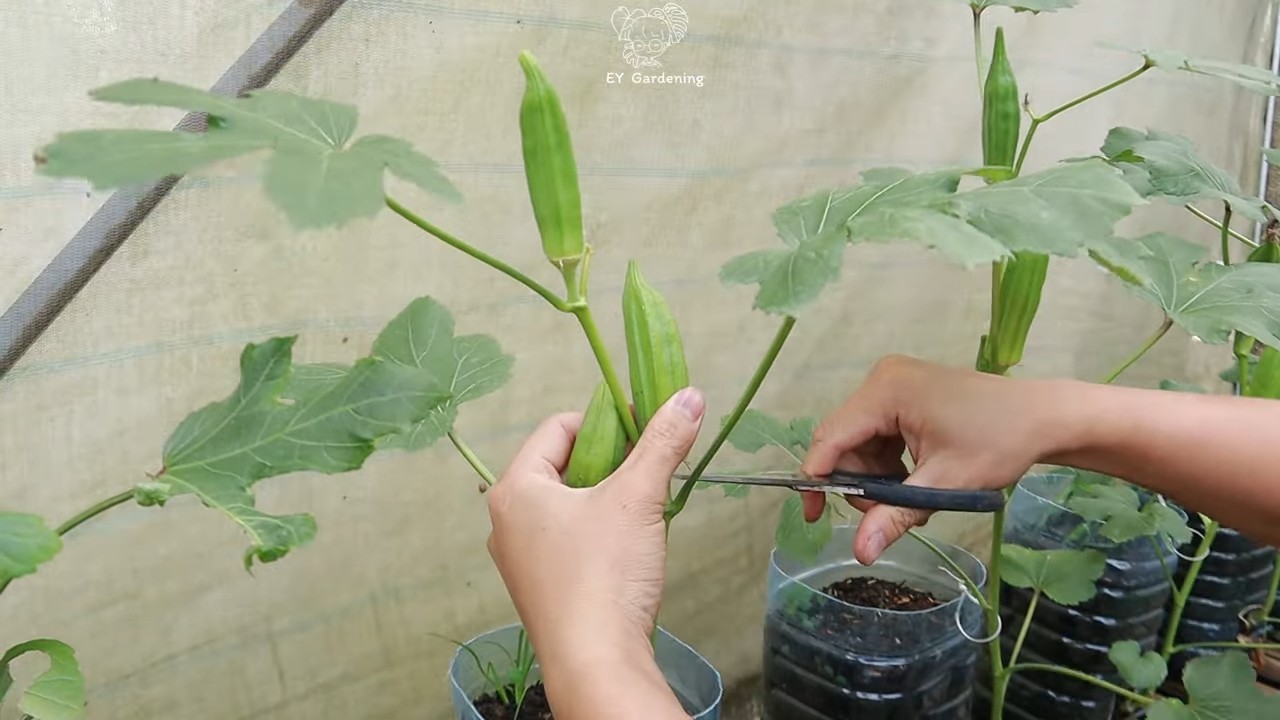
2. Harvesting Technique: Use a sharp knife or pruning shears to cut the pods from the plant. Be careful not to damage the plant. Wear gloves, as some okra varieties have spines that can irritate your skin.
3. Frequency: Harvest okra pods every 1-2 days to encourage continued production. The more you harvest, the more the plant will produce.
4. Storage: Okra pods are best used fresh. You can store them in the refrigerator for a few days. You can also freeze or pickle them for longer storage.
Troubleshooting Common Problems
Even with the best care, you might encounter some problems when growing okra. Here are a few common issues and how to fix them:
* Yellowing Leaves: This could be a sign of overwatering, nutrient deficiency, or pest infestation. Check the soil moisture, fertilize your plants, and inspect them for pests.
* Lack of Pod Production: This could be due to insufficient sunlight, poor pollination, or nutrient deficiency. Make sure your plants are getting enough sunlight, hand-pollinate the flowers if necessary, and fertilize your plants.
* Tough Pods: This is usually a sign that you’re waiting too long to harvest the pods. Harvest them when they’re young and tender.
* Pest Infestations: Treat pest infestations with organic insecticides like neem oil or insecticidal soap.
Extra Tips for Rooftop Okra Success
Here are a few extra tips to help you succeed with your rooftop okra garden:
* Choose the Right Container Size: I can’t stress this enough! Okra needs plenty of room for its roots. Use containers that are at least 15-20 gallons in size.
* Use High-Quality Potting Mix: Don’t skimp on the potting mix. Use a high-quality mix that’s specifically designed for containers.
* Water Regularly: Okra needs consistent moisture, especially during hot weather.
* Fertilize Regularly: Okra is a heavy feeder, so fertilize your plants every 2-3 weeks.
* Protect from Wind: Rooftops can be windy, which can damage your plants. Install windbreaks to protect your okra.
* Monitor for Pests: Keep an eye out for pests and treat them promptly.
* Harvest Frequently: Harvest okra pods every 1-2 days to encourage continued production.
Growing okra on your rooftop can be a rewarding experience. With a little planning and care
Conclusion
So, there you have it! Growing okra on your rooftop isn’t just a whimsical idea; it’s a surprisingly achievable and rewarding endeavor. We’ve walked you through the essential steps, from selecting the right container and soil to nurturing your okra plants and harvesting those delicious pods. But why should you actually take the plunge and transform your rooftop into a miniature okra farm?
Firstly, consider the unparalleled freshness. Imagine stepping onto your rooftop, snipping off a few okra pods, and incorporating them directly into your dinner. The flavor and texture will be noticeably superior to anything you can find at the grocery store. Plus, you’ll have the satisfaction of knowing exactly where your food came from and how it was grown – free from harmful pesticides and chemicals.
Secondly, rooftop gardening, especially growing okra, is incredibly space-efficient. Even if you have a small balcony or terrace, you can still cultivate a thriving okra patch. The vertical growth habit of okra plants makes them ideal for container gardening, maximizing your yield in a limited area. This is especially beneficial for urban dwellers who may not have access to traditional garden plots.
Thirdly, growing okra is a fantastic way to connect with nature and de-stress. The simple act of tending to your plants, watching them grow, and harvesting your own food can be incredibly therapeutic. It’s a chance to escape the hustle and bustle of city life and reconnect with the natural world.
But the benefits don’t stop there. Growing your own okra can also be a cost-effective way to supplement your grocery bill. Okra can be expensive to buy, especially if you prefer organic varieties. By growing your own, you can save money and enjoy a steady supply of fresh, healthy okra throughout the growing season.
Now, let’s talk about variations. While we’ve focused on the basics, there are plenty of ways to customize your rooftop okra garden. Consider experimenting with different varieties of okra. Clemson Spineless is a popular choice for its smooth pods and high yield, but there are also red okra varieties like Burgundy okra that add a splash of color to your garden. You can also try growing dwarf okra varieties if you have limited space.
Another variation is to incorporate companion plants into your okra garden. Basil, marigolds, and peppers are all excellent companions for okra, helping to deter pests and improve soil health. You can also add a trellis or support system to encourage vertical growth and maximize your yield.
Don’t be afraid to experiment and find what works best for you and your rooftop environment. The key is to start small, be patient, and learn from your mistakes.
We truly believe that growing okra on your rooftop is a must-try for any gardening enthusiast, food lover, or urban dweller looking to connect with nature. It’s a rewarding, sustainable, and delicious way to transform your rooftop into a thriving oasis.
So, what are you waiting for? Grab some seeds, find a sunny spot on your rooftop, and get started today! We’re confident that you’ll be amazed at what you can achieve.
And most importantly, we want to hear about your experiences! Share your photos, tips, and stories with us. Let us know what challenges you faced, what successes you celebrated, and what delicious okra dishes you created. Together, we can inspire others to embrace the joy of rooftop gardening and the magic of growing their own food. Let’s cultivate a community of rooftop okra growers!
Frequently Asked Questions (FAQ)
What type of container is best for growing okra on a rooftop?
The ideal container for growing okra on a rooftop should be large enough to accommodate the plant’s root system and provide adequate drainage. A container that is at least 12 inches in diameter and 12 inches deep is generally recommended. Larger containers, such as half-barrels or large grow bags, are even better, as they provide more room for the roots to spread and allow the plant to access more nutrients and water. Ensure the container has drainage holes to prevent waterlogging, which can lead to root rot. Consider the weight of the container when filled with soil, as rooftops have weight limits. Lightweight containers made of plastic or fabric are often preferred.
What kind of soil should I use for growing okra in containers?
Okra thrives in well-draining, fertile soil. A good potting mix specifically formulated for vegetables is an excellent choice. You can also create your own soil mix by combining equal parts of potting soil, compost, and perlite or vermiculite. Compost provides essential nutrients, while perlite or vermiculite improves drainage and aeration. Avoid using garden soil in containers, as it can become compacted and doesn’t drain well. The pH of the soil should be slightly acidic to neutral, around 6.0 to 7.0.
How much sunlight does okra need to grow on a rooftop?
Okra requires at least 6-8 hours of direct sunlight per day to thrive. Choose a location on your rooftop that receives ample sunlight throughout the day. If your rooftop doesn’t receive enough sunlight, you may need to supplement with grow lights. Rotate the containers regularly to ensure that all sides of the plant receive adequate sunlight.
How often should I water okra plants on a rooftop?
Water okra plants deeply and regularly, especially during hot, dry weather. The soil should be kept consistently moist but not waterlogged. Check the soil moisture level regularly by sticking your finger into the soil. If the top inch of soil feels dry, it’s time to water. Water early in the morning to allow the foliage to dry before nightfall, which can help prevent fungal diseases. Container-grown okra tends to dry out faster than okra grown in the ground, so you may need to water more frequently.
How do I fertilize okra plants growing on a rooftop?
Okra plants are heavy feeders and benefit from regular fertilization. Start by incorporating compost into the soil before planting. Then, fertilize every 2-3 weeks with a balanced fertilizer, such as a 10-10-10 or 5-10-5. You can also use a liquid fertilizer diluted according to the package instructions. Avoid over-fertilizing, as this can lead to excessive foliage growth and reduced pod production.
What are some common pests and diseases that affect okra plants, and how can I control them?
Common pests that affect okra plants include aphids, flea beetles, and okra stink bugs. You can control these pests by handpicking them off the plants, spraying them with insecticidal soap, or using neem oil. Common diseases that affect okra plants include powdery mildew and root rot. Prevent powdery mildew by ensuring good air circulation and avoiding overhead watering. Prevent root rot by ensuring good drainage and avoiding overwatering.
When is the best time to harvest okra pods?
Okra pods should be harvested when they are young and tender, typically 2-4 inches long. Harvest okra pods every 1-2 days, as they can become tough and fibrous if left on the plant for too long. Use a sharp knife or scissors to cut the pods from the plant, leaving a small stem attached.
Can I grow okra in a small container on my rooftop?
While okra plants can grow quite large, you can successfully grow them in smaller containers if you choose a dwarf variety and provide adequate care. Look for okra varieties specifically bred for container gardening. Ensure the container is at least 10 inches deep and wide. Regular watering and fertilization are crucial for okra grown in smaller containers.
How do I deal with the prickly hairs on okra pods?
Some okra varieties have prickly hairs on their pods that can cause skin irritation. Wear gloves when harvesting okra to protect your hands. You can also rub the pods with a cloth or brush to remove the hairs before cooking. Cooking the okra will also soften the hairs.
What are some delicious ways to cook okra that I’ve grown on my rooftop?
There are countless delicious ways to cook okra! Some popular methods include frying, grilling, roasting, and adding it to soups and stews. Okra is also a key ingredient in gumbo and other Southern dishes. Experiment with different recipes and find your favorite way to enjoy your homegrown okra. Consider pickling some of your harvest for a tangy treat that lasts.

Leave a Comment