
Grow peanuts indoors? Absolutely! Forget the sprawling fields and sweltering summer heat you might associate with peanut farming. I’m here to tell you that you can cultivate these delicious legumes right in the comfort of your own home, regardless of your outdoor space.
For centuries, peanuts have been a staple food in cultures around the globe, from South America where they originated, to Asia and Africa. They’re not just tasty; they’re packed with protein and essential nutrients. But did you know that growing them can be a rewarding and surprisingly easy DIY project?
In today’s world, where access to fresh, healthy food is more important than ever, learning to grow peanuts indoors offers a fantastic opportunity to connect with your food source and enjoy the satisfaction of nurturing something from seed to harvest. Plus, it’s a great way to introduce children to the wonders of gardening and teach them about where their food comes from.
This article will guide you through simple, step-by-step instructions and clever hacks to successfully grow peanuts indoors, even if you’ve never gardened before. So, grab your gardening gloves, and let’s get started on this exciting DIY adventure!
Growing Peanuts Indoors: A Nutty Adventure!
Hey there, fellow plant enthusiasts! Ever thought about growing your own peanuts? It’s a fun and surprisingly rewarding project, and you don’t even need a sprawling farm to do it. I’m going to walk you through how to cultivate these little legumes right inside your home. Get ready to impress your friends with your homegrown peanut butter ingredients!
What You’ll Need
Before we dive in, let’s gather our supplies. This is crucial for a smooth and successful peanut-growing journey.
* Peanut Seeds (Raw, Unshelled): This is the most important ingredient! Make sure you get raw, unshelled peanuts. Roasted or salted peanuts won’t sprout. You can usually find these at health food stores or online. Look for varieties specifically labeled for planting if possible.
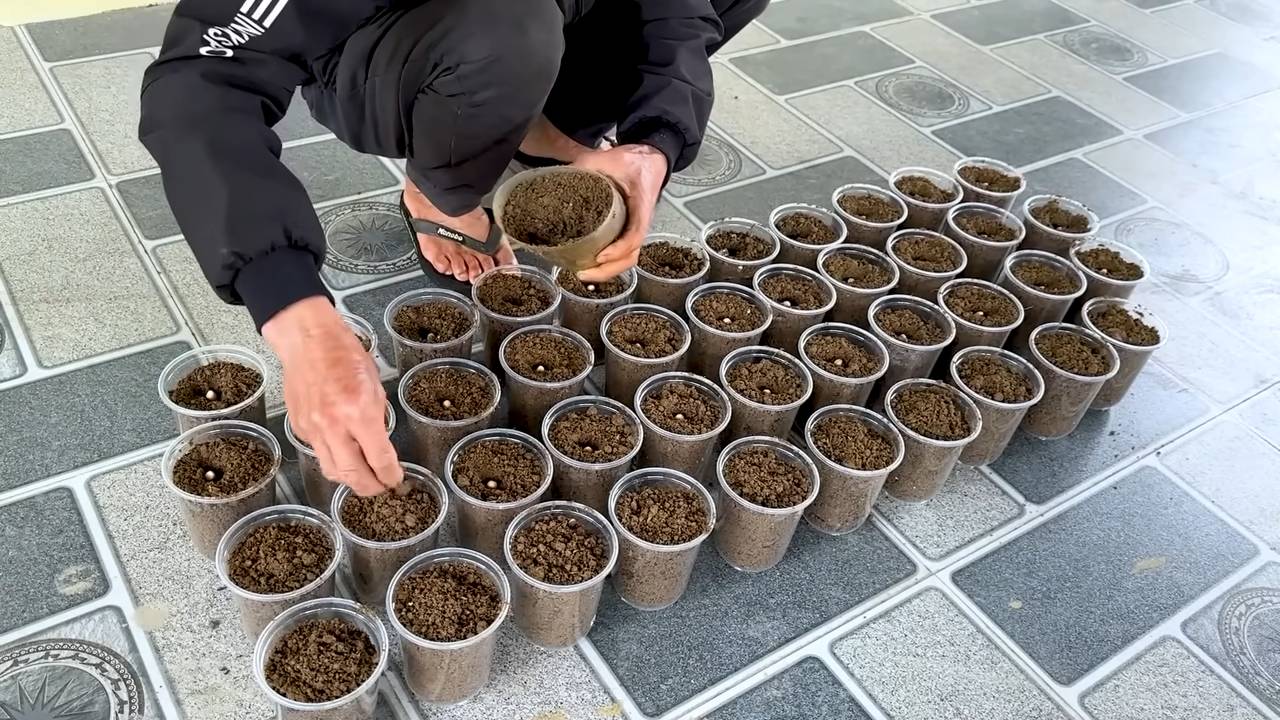
* Large Container: Peanuts need room to spread their roots and for the “pegs” (where the peanuts develop) to bury themselves. A container at least 12 inches deep and 18 inches wide is ideal. The bigger, the better, really!
* Well-Draining Potting Mix: Good drainage is essential to prevent root rot. A mix of potting soil, perlite, and vermiculite works wonders. You can also use a soilless mix designed for containers.
* Grow Lights (Optional but Recommended): While peanuts can grow indoors with sufficient natural light, grow lights will significantly improve your chances of a bountiful harvest, especially during winter months or in dimly lit homes.
* Watering Can or Spray Bottle: For gentle and even watering.
* Small Shovel or Trowel: For planting and transplanting.
* Fertilizer (Optional): A balanced, slow-release fertilizer can give your peanut plants a boost.
* Patience: Growing peanuts takes time and care. Don’t get discouraged if you don’t see results immediately!
Getting Started: Planting Your Peanut Seeds
Okay, let’s get our hands dirty! This is where the magic begins.
1. Soaking the Seeds: To kickstart germination, soak your peanut seeds in lukewarm water for 12-24 hours. This helps soften the shells and encourages sprouting. I usually put them in a small bowl on the counter.
2. Preparing the Container: Fill your large container with the well-draining potting mix, leaving about an inch or two of space at the top. Gently pat down the soil to remove any large air pockets.
3. Planting the Seeds: Make small holes about 1-2 inches deep and 4-6 inches apart in the soil. Place one peanut seed in each hole and cover it gently with soil.
4. Watering: Water the soil thoroughly until it’s evenly moist but not soggy. You want the soil to feel like a wrung-out sponge.
5. Finding the Right Spot: Place the container in a warm, sunny location. Peanuts need at least 6-8 hours of direct sunlight per day. If you’re using grow lights, position them about 6-12 inches above the soil surface.
Nurturing Your Peanut Plants: Care and Maintenance
Now that your peanuts are planted, it’s time to provide them with the TLC they need to thrive.
1. Watering: Keep the soil consistently moist, but avoid overwatering. Check the soil moisture regularly by sticking your finger about an inch into the soil. If it feels dry, it’s time to water. During hot weather, you may need to water more frequently.
2. Fertilizing (Optional): If you choose to fertilize, apply a balanced, slow-release fertilizer according to the package instructions. Avoid over-fertilizing, as this can lead to excessive foliage growth at the expense of peanut production. I usually fertilize every 4-6 weeks.
3. Providing Support (If Needed): As your peanut plants grow, they may become a bit leggy. You can provide support by gently staking them with small bamboo sticks or plant supports.
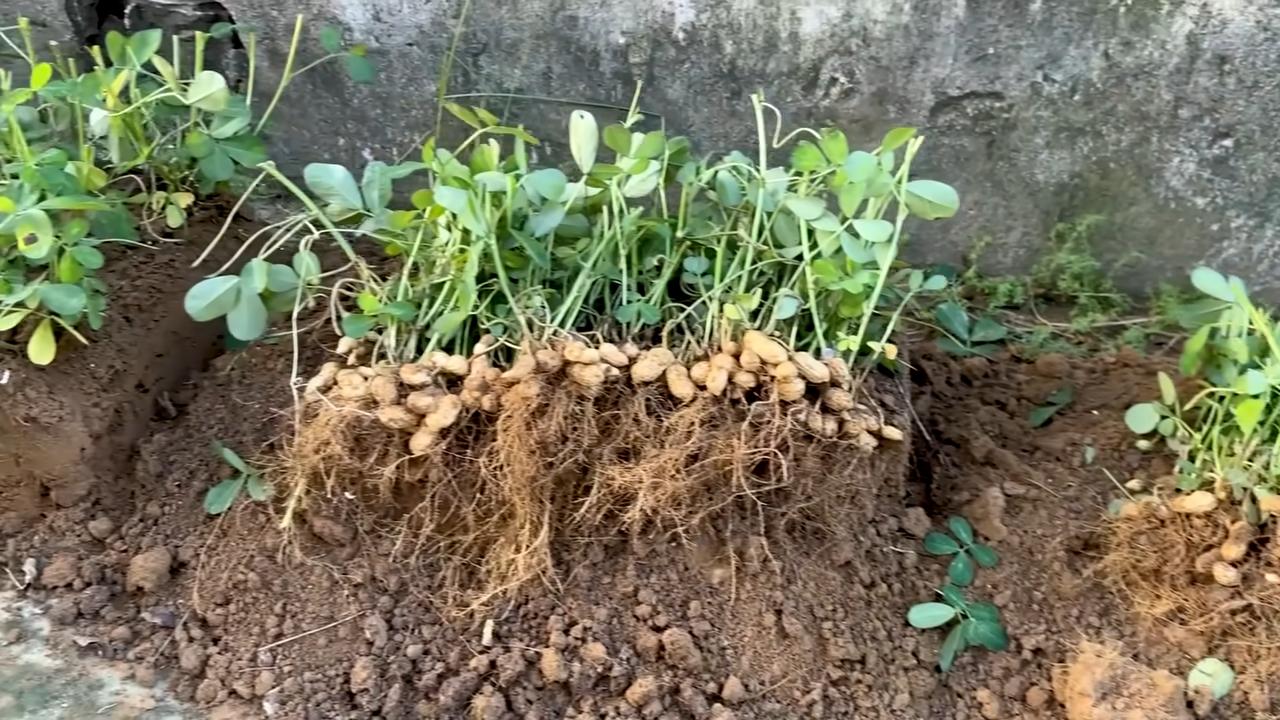
4. “Hilling” the Soil: This is a crucial step for peanut production. As the peanut plants flower, they will send down “pegs” (also called gynophores) from the base of the flowers. These pegs need to bury themselves in the soil to develop into peanuts. To encourage this, gently mound soil around the base of the plants as they grow. This provides a loose, easy-to-penetrate medium for the pegs to enter. Do this every few weeks as the plants grow.
5. Pest Control: Keep an eye out for common pests like aphids or spider mites. If you spot any, you can treat them with insecticidal soap or neem oil. I prefer to use organic methods whenever possible.
6. Temperature Control: Peanuts thrive in warm temperatures, ideally between 70-80°F (21-27°C). Avoid exposing your plants to temperatures below 60°F (15°C).
Harvest Time: Digging Up Your Peanut Treasure!
This is the most exciting part! After about 4-5 months, your peanut plants should be ready for harvest.
1. Knowing When to Harvest: The leaves of your peanut plants will start to turn yellow and brown, indicating that the peanuts are mature. This usually happens in the fall.
2. Testing a Few: To be sure, you can carefully dig up a few plants and check the peanuts. The shells should be well-formed and the kernels inside should be plump and fully developed.
3. Digging Up the Plants: Once you’re confident that the peanuts are ready, gently dig up the entire plant, being careful not to damage the peanuts. I use a garden fork to loosen the soil around the plant before pulling it up.
4. Cleaning the Peanuts: Shake off any excess soil from the peanuts and roots.
5. Curing the Peanuts: This is an important step to ensure the peanuts are properly dried and stored. Hang the entire plant upside down in a warm, dry, and well-ventilated area for about 2-4 weeks. This allows the peanuts to dry slowly and develop their flavor. I usually hang them in my garage.
6. Separating the Peanuts: Once the plants are fully dried, you can separate the peanuts from the roots and vines.
7. Storing the Peanuts: Store the dried peanuts in a cool, dry place in an airtight container. They can be stored for several months.
Troubleshooting: Common Issues and Solutions
Even with the best care, you might encounter some challenges along the way. Here are a few common issues and how to address them:
* Poor Germination: If your peanut seeds don’t sprout, it could be due to several factors. Make sure you’re using raw, unshelled peanuts. Check the soil temperature – it should be warm enough for germination. Also, ensure the soil is consistently moist but not waterlogged.
* Yellowing Leaves: Yellowing leaves can indicate a nutrient deficiency. Try fertilizing with a balanced fertilizer. It could also be a sign of overwatering or poor drainage.
* Lack of Peanut Production: If your plants are growing well but not producing peanuts, it could be due to insufficient sunlight or inadequate “hilling.” Make sure your plants are getting enough sunlight and that you’re mounding soil around the base of the plants as they grow.
* Pest Infestations: Keep an eye out for common pests like aphids or spider mites. Treat them with insecticidal soap or neem oil.
Peanut Varieties to Consider for Indoor Growing
While most peanut varieties can be grown indoors, some are better suited for container gardening due to their size and growth habits. Here are a few to consider:
* Valencia: These peanuts are known for their sweet flavor and are often used for roasting. They tend to have a more upright growth habit, making them suitable for containers.
* Spanish: Spanish peanuts are smaller and have a reddish-brown skin. They are also relatively compact and well-suited for indoor growing.
* Virginia: While Virginia peanuts are typically larger and more sprawling, some smaller varieties may still be suitable for containers.
Enjoying Your Homegrown Peanuts
Now that you’ve successfully grown your own peanuts, it’s time to enjoy the fruits (or rather, the nuts!) of your labor. You can roast them, boil them, make peanut butter, or simply snack on them raw. The possibilities are endless! There’s nothing quite like the taste of homegrown peanuts.
Growing peanuts indoors is a rewarding and educational experience. It’s a great way to connect with nature and learn about the life cycle of plants. So, grab some peanut seeds, get your hands dirty, and embark on this nutty adventure! You might just surprise yourself with what you can grow. Happy gardening!
Conclusion
So, there you have it! Growing peanuts indoors is not only achievable, but it can be a surprisingly rewarding experience. Forget the store-bought, often bland, peanuts and imagine the satisfaction of harvesting your own fresh, flavorful crop right from your living room. This DIY project offers a unique connection to your food, allowing you to witness the entire life cycle of the peanut plant from seed to delicious snack.
Why is this a must-try? Because it’s more than just growing food; it’s an educational adventure, a conversation starter, and a testament to your green thumb (even if it’s just starting to sprout!). It’s a fantastic way to introduce children to the wonders of botany and the origins of their favorite snacks. Plus, let’s be honest, who wouldn’t want to impress their friends with homegrown peanuts?
But the fun doesn’t stop there! Feel free to experiment with different peanut varieties. Virginia peanuts, known for their large size, might be a good choice if you have ample space. Valencia peanuts, with their multiple small nuts per shell, could be a fun option for a more abundant harvest. And if you’re feeling adventurous, try roasting your homegrown peanuts with different spices like chili powder, smoked paprika, or even a touch of maple syrup for a sweet and savory treat. You can also incorporate your freshly harvested peanuts into homemade peanut butter, trail mixes, or even Asian-inspired stir-fries. The possibilities are endless!
Remember to pay close attention to the specific needs of your chosen peanut variety, adjusting watering and lighting as necessary. Don’t be discouraged if your first attempt isn’t perfect. Gardening is a learning process, and every experience, successful or not, provides valuable insights.
We wholeheartedly encourage you to embark on this exciting journey of growing peanuts indoors. It’s a project that combines the joy of gardening with the satisfaction of creating something delicious and unique. Once you’ve harvested your first batch, we’d love to hear about your experience! Share your tips, tricks, and photos with us in the comments below. Let’s build a community of indoor peanut growers and inspire others to discover the magic of homegrown goodness. So, grab your seeds, prepare your pots, and get ready to experience the joy of growing your own peanuts indoors! You won’t regret it.
Frequently Asked Questions (FAQ)
1. What kind of peanuts should I use to start growing peanuts indoors?
You can use raw, unsalted peanuts from a health food store or online retailer. Make sure they are specifically labeled as “raw” or “unroasted” as roasted peanuts will not germinate. Avoid peanuts that have been treated with chemicals or preservatives, as these can inhibit growth. Virginia peanuts are a popular choice due to their large size, but Valencia or Spanish peanuts can also be grown successfully indoors. Consider the size of your growing space when selecting a variety. Smaller spaces might be better suited for smaller peanut types.
2. How much sunlight do indoor peanut plants need?
Peanut plants thrive in bright, direct sunlight. Aim for at least 6-8 hours of sunlight per day. If you don’t have a south-facing window that provides sufficient sunlight, you’ll need to supplement with artificial grow lights. Fluorescent or LED grow lights are excellent options. Position the lights a few inches above the plants and adjust as they grow. Rotate the plants regularly to ensure even light exposure on all sides. Insufficient light can lead to leggy growth and reduced peanut production.
3. What type of soil is best for growing peanuts indoors?
Peanuts prefer well-draining, sandy loam soil. A mixture of potting soil, sand, and compost works well. The soil should be slightly acidic to neutral, with a pH between 6.0 and 7.0. Avoid heavy clay soils, as they can become waterlogged and hinder root development. Ensure your pots have drainage holes to prevent water from pooling at the bottom. Good drainage is crucial for preventing root rot and promoting healthy growth.
4. How often should I water my indoor peanut plants?
Water your peanut plants regularly, keeping the soil consistently moist but not waterlogged. Water deeply when the top inch of soil feels dry to the touch. Avoid overhead watering, as this can promote fungal diseases. Instead, water at the base of the plant. Reduce watering slightly during the cooler months. Monitor the soil moisture levels closely and adjust your watering schedule accordingly. Overwatering is a common mistake that can lead to root rot and plant death.
5. How long does it take to grow peanuts indoors?
It typically takes around 120-150 days (4-5 months) from planting to harvest. The exact time will depend on the variety of peanut, the growing conditions, and the amount of sunlight the plants receive. Be patient and monitor your plants closely. You’ll know it’s time to harvest when the leaves start to turn yellow and the pods begin to mature.
6. How do I harvest peanuts grown indoors?
When the leaves start to yellow and the plant begins to die back, it’s time to harvest. Gently dig up the entire plant, being careful not to damage the peanut pods. Shake off any excess soil and allow the plants to dry in a well-ventilated area for a few days. Once the plants are dry, you can remove the peanuts from the pods.
7. Can I grow peanuts indoors in containers? What size container is needed?
Yes, peanuts are well-suited for container gardening. Choose a container that is at least 12 inches deep and 12 inches wide to allow ample space for root development and peanut pod formation. Larger containers are generally better, as they provide more room for the plants to grow and reduce the need for frequent watering. Make sure the container has drainage holes to prevent waterlogging.
8. What are some common problems when growing peanuts indoors and how can I prevent them?
Some common problems include:
* **Lack of Sunlight:** Provide adequate sunlight or supplement with grow lights.
* **Overwatering/Underwatering:** Monitor soil moisture and adjust watering accordingly.
* **Pests:** Inspect plants regularly for pests like aphids or spider mites. Treat infestations with insecticidal soap or neem oil.
* **Root Rot:** Ensure good drainage and avoid overwatering.
* **Poor Soil:** Use well-draining, sandy loam soil.
Regularly inspect your plants and address any issues promptly to ensure healthy growth.
9. Do I need to fertilize my indoor peanut plants?
Yes, peanut plants benefit from regular fertilization. Use a balanced fertilizer (e.g., 10-10-10) every 2-3 weeks during the growing season. Follow the instructions on the fertilizer package carefully. Avoid over-fertilizing, as this can damage the plants. You can also use organic fertilizers like compost tea or fish emulsion.
10. How do I cure and store my homegrown peanuts?
After harvesting and removing the peanuts from the pods, cure them by drying them in a well-ventilated area for 1-2 weeks. Spread the peanuts out in a single layer on a screen or tray. Once the peanuts are completely dry, store them in an airtight container in a cool, dry place. Properly cured and stored peanuts can last for several months. You can also roast your peanuts for a more intense flavor and longer shelf life.
Leave a Comment