
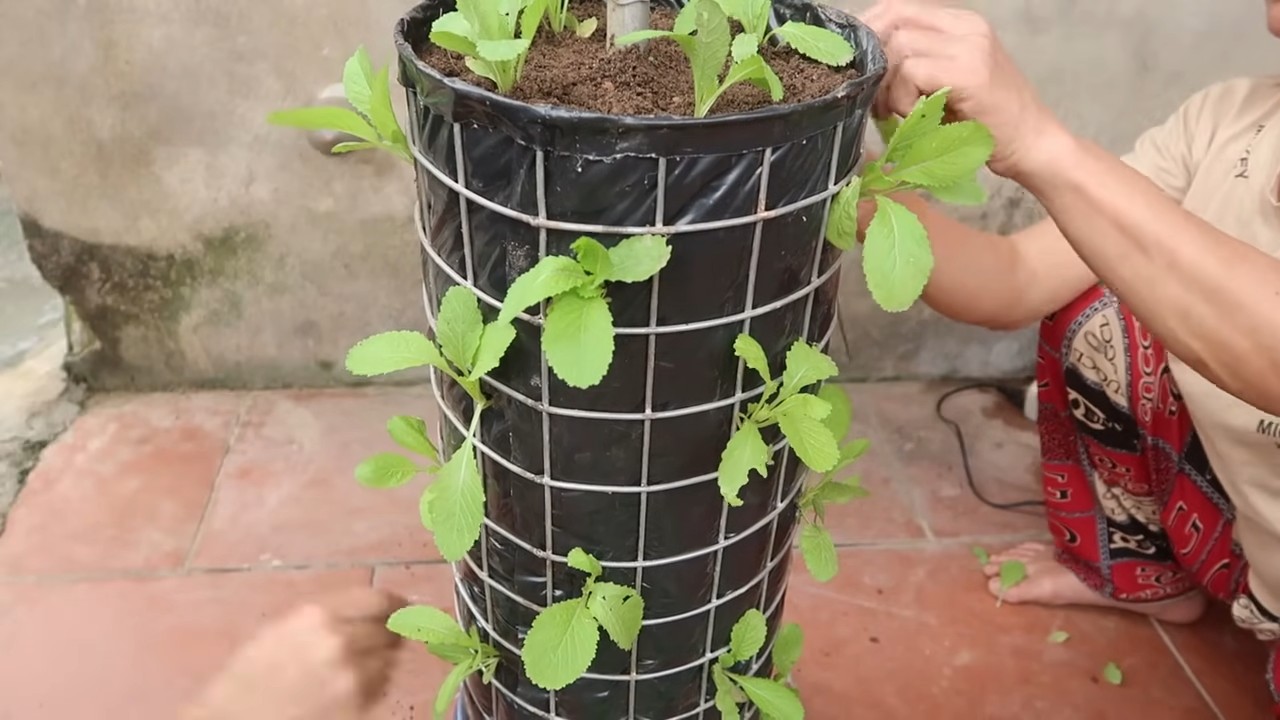
DIY Vertical Garden Self Watering: Imagine lush greenery cascading down your balcony, vibrant herbs thriving on your patio, or a wall of flowers transforming your drab fence into a living masterpiece. Sounds dreamy, right? Well, it doesn’t have to be just a dream! In this article, I’m going to show you how to create your very own DIY vertical garden with a self-watering system – a project that’s both incredibly rewarding and surprisingly easy.
Vertical gardening, while seemingly modern, has roots stretching back centuries. Think of the Hanging Gardens of Babylon, one of the Seven Wonders of the Ancient World! While we might not be building anything quite that grand, the principle remains the same: maximizing space and bringing nature closer to our living spaces. In modern times, with shrinking urban gardens and a growing desire for fresh, homegrown produce, vertical gardens have experienced a massive resurgence.
But why a self-watering system? Let’s face it, life gets busy! We all have those moments when watering the plants slips our minds. A self-watering system takes the guesswork out of gardening, ensuring your plants receive consistent hydration, even when you’re away on vacation or simply caught up in the daily grind. This DIY trick is especially useful for those of us who struggle to keep our plants alive (guilty as charged!). Plus, creating a DIY Vertical Garden Self Watering system is a fantastic way to recycle materials, save money, and add a unique, personalized touch to your home. So, grab your tools, and let’s get started on this exciting project!

DIY Vertical Self-Watering Garden: A Step-by-Step Guide
Hello plant friends! Do you have little space but still fancy a green thumb? Then a vertical garden is just the thing for you! And the best part: we’ll build it ourselves, with a clever self-watering system. This means less work for you, and your plants will always be perfectly supplied. Let’s get started!
What you need:
- For the frame:
- Wooden boards (e.g., spruce or larch) in the desired size for the frame. I recommend a height of about 1.50m (5 feet) and a width of 60cm (2 feet), but feel free to adjust it to your needs.
- Wood screws (matching the wood thickness)
- Wood glue (waterproof)
- Wood stain or paint (for outdoor use)
- Sandpaper (various grits)
- For the planting pockets:
- Sturdy fabric panels (e.g., felt, jute, or a robust outdoor fabric). The amount depends on the number and size of the pockets.
- Sewing machine or needle and thread (for sturdy seams)
- Scissors
- Measuring tape
- Pins
- For the self-watering system:
- PVC pipe (approx. 2-3 cm / 0.8-1.2 inches in diameter) the length of the frame
- End caps for the PVC pipe
- Drill with a small drill bit (for the holes in the PVC pipe)
- Garden fleece or filter fleece
- Expanded clay or gravel (for drainage)
- Water container (e.g., an old bucket or a watering can)
- Hose (to connect the water container to the PVC pipe)
- Cable ties or pipe clamps (to attach the PVC pipe)
- Miscellaneous:
- Potting soil
- Plants (herbs, strawberries, lettuce, flowers – whatever you like!)
- Gloves
- Safety glasses
- Pencil
- Folding ruler or measuring tape
The Frame: The Basic Structure
- Sawing the boards: First, we saw the wooden boards for the frame. I decided on four boards: two for the sides, one for the top, and one for the bottom. Make sure the boards are cut at right angles so the frame is stable.
- Sanding: Before we assemble the boards, we sand them thoroughly. Start with a coarser grit (e.g., 80) and then move to a finer grit (e.g., 120 or 180). This will make the surface nice and smooth and help the stain or paint adhere better.
- Assembly: Now for the exciting part: assembling the frame. Apply wood glue to the contact surfaces of the boards and then screw them together with the wood screws. Make sure the screws are not too long, so they don’t come out the other side. I recommend pre-drilling the holes to avoid splitting the wood.
- Let it dry: Let the frame dry well before proceeding to the next step. The drying time depends on the wood glue used.
- Wood protection: To protect the frame from the elements, we apply a wood stain or paint. Make sure the stain or paint is suitable for outdoor use. It’s best to apply two coats and let each coat dry well.
The Planting Pockets: Where it Grows!
- Cutting the fabric: Cut the fabric for the planting pockets. The size of the pockets depends on the plants you want to put in them. I recommend making the pockets a bit larger so the plants have enough room to grow. Also, plan for a seam allowance of about 2 cm (0.8 inches).
- Sewing the pockets: Now we sew the planting pockets. Fold the fabric in half and sew the sides and bottom together. Make sure the seams are strong so the pockets can support the weight of the soil and plants. If you don’t have a sewing machine, you can also sew the pockets by hand with a needle and thread. Use a sturdy thread and make firm stitches.
- Attaching the pockets: Attach the planting pockets to the frame. You can either sew them on, glue them, or attach them with staples. I chose to sew them on, as it is the most stable solution. Make sure the pockets are evenly distributed and have enough space between them so the plants get enough light.
The Self-Watering System: Clever and Simple
- Preparing the PVC pipe: Drill small holes in the PVC pipe. The holes should not be too large, so the water doesn’t run out too quickly. I drilled a hole every 5 cm (2 inches).
- Sealing the pipe: Seal the ends of the PVC pipe with the end caps.
- Wrapping the pipe: Wrap the PVC pipe with garden fleece or filter fleece. The fleece prevents soil from getting into the holes and clogging the system.
- Positioning the pipe: Position the PVC pipe at the top of the frame, directly above the planting pockets. Secure it with cable ties or pipe clamps.
- Connecting to the water container: Connect the PVC pipe to the water container. Use a hose for this. Make sure the hose is firmly attached and no water leaks out.
- Drainage: Fill a layer of expanded clay or gravel into the planting pockets. This ensures good drainage and prevents waterlogging.
Planting: The Green Finish
- Filling the pockets: Fill the planting pockets with potting soil.
- Inserting the plants: Place the plants in the pockets. Make sure the plants have enough space and the soil is well pressed down.
- Initial watering: Water the plants thoroughly.
- Filling the water
Hello plant friends! Do you have little space but still fancy a green thumb? Then a vertical garden is just the thing for you! And the best part: we’ll build it ourselves, with a clever self-watering system. This means less work for you, and your plants will always be perfectly supplied. Let’s get started!
What you need:
- For the frame:
- Wooden boards (e.g., spruce or larch) in the desired size for the frame. I recommend a height of about 1.50m (5 feet) and a width of 60cm (2 feet), but feel free to adjust it to your needs.
- Wood screws (matching the wood thickness)
- Wood glue (waterproof)
- Wood stain or paint (for outdoor use)
- Sandpaper (various grits)
- For the planting pockets:
- Sturdy fabric panels (e.g., felt, jute, or a robust outdoor fabric). The amount depends on the number and size of the pockets.
- Sewing machine or needle and thread (for sturdy seams)
- Scissors
- Measuring tape
- Pins
- For the self-watering system:
- PVC pipe (approx. 2-3 cm / 0.8-1.2 inches in diameter) the length of the frame
- End caps for the PVC pipe
- Drill with a small drill bit (for the holes in the PVC pipe)
- Garden fleece or filter fleece
- Expanded clay or gravel (for drainage)
- Water container (e.g., an old bucket or a watering can)
- Hose (to connect the water container to the PVC pipe)
- Cable ties or pipe clamps (to attach the PVC pipe)
- Miscellaneous:
- Potting soil
- Plants (herbs, strawberries, lettuce, flowers – whatever you like!)
- Gloves
- Safety glasses
- Pencil
- Folding ruler or measuring tape
The Frame: The Basic Structure
- Sawing the boards: First, we saw the wooden boards for the frame. I decided on four boards: two for the sides, one for the top, and one for the bottom. Make sure the boards are cut at right angles so the frame is stable.
- Sanding: Before we assemble the boards, we sand them thoroughly. Start with a coarser grit (e.g., 80) and then move to a finer grit (e.g., 120 or 180). This will make the surface nice and smooth and help the stain or paint adhere better.
- Assembly: Now for the exciting part: assembling the frame. Apply wood glue to the contact surfaces of the boards and then screw them together with the wood screws. Make sure the screws are not too long, so they don’t come out the other side. I recommend pre-drilling the holes to avoid splitting the wood.
- Let it dry: Let the frame dry well before proceeding to the next step. The drying time depends on the wood glue used.
- Wood protection: To protect the frame from the elements, we apply a wood stain or paint. Make sure the stain or paint is suitable for outdoor use. It’s best to apply two coats and let each coat dry well.
The Planting Pockets: Where it Grows!
- Cutting the fabric: Cut the fabric for the planting pockets. The size of the pockets depends on the plants you want to put in them. I recommend making the pockets a bit larger so the plants have enough room to grow. Also, plan for a seam allowance of about 2 cm (0.8 inches).
- Sewing the pockets: Now we sew the planting pockets. Fold the fabric in half and sew the sides and bottom together. Make sure the seams are strong so the pockets can support the weight of the soil and plants. If you don’t have a sewing machine, you can also sew the pockets by hand with a needle and thread. Use a sturdy thread and make firm stitches.
- Attaching the pockets: Attach the planting pockets to the frame. You can either sew them on, glue them, or attach them with staples. I chose to sew them on, as it is the most stable solution. Make sure the pockets are evenly distributed and have enough space between them so the plants get enough light.
The Self-Watering System: Clever and Simple
- Preparing the PVC pipe: Drill small holes in the PVC pipe. The holes should not be too large, so the water doesn’t run out too quickly. I drilled a hole every 5 cm (2 inches).
- Sealing the pipe: Seal the ends of the PVC pipe with the end caps.
- Wrapping the pipe: Wrap the PVC pipe with garden fleece or filter fleece. The fleece prevents soil from getting into the holes and clogging the system.
- Positioning the pipe: Position the PVC pipe at the top of the frame, directly above the planting pockets. Secure it with cable ties or pipe clamps.
- Connecting to the water container: Connect the PVC pipe to the water container. Use a hose for this. Make sure the hose is firmly attached and no water leaks out.
- Drainage: Fill a layer of expanded clay or gravel into the planting pockets. This ensures good drainage and prevents waterlogging.
Planting: The Green Finish
- Filling the pockets: Fill the planting pockets with potting soil.
- Inserting the plants: Place the plants in the pockets. Make sure the plants have enough space and the soil is well pressed down.
- Initial watering: Water the plants thoroughly.
- Filling the water container: Fill the water container. The water will now slowly seep through the PVC pipe into the planting pockets and water the plants.
Important Tips and Tricks:
Adjusting the system: Observe how well the self-watering system is working and adjust it if necessary. You may need to enlarge or reduce the holes in the PVC pipe to regulate the amount of water.
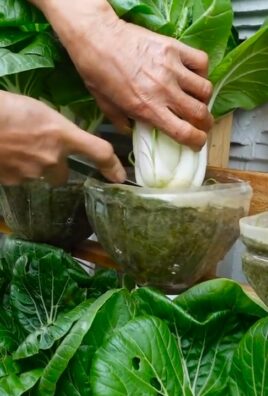
The right plant selection: When selecting plants, make sure they have similar requirements for light and water. Herbs like basil, parsley, and chives are well-suited for a vertical garden. Strawberries, lettuce, and small flowers are also a good choice.
The right soil: Use high-quality potting soil that retains water well but is also loose.
Regular watering: Even if your vertical garden has a self-watering system, you should check the plants regularly and water them additionally if necessary.
Fertilizing: Fertilize the plants regularly to provide them with sufficient nutrients. It is best to use an organic fertilizer.
Sunlight: Make sure your vertical garden gets enough sunlight. Most plants need at least six hours of sunlight per day.
Protection from wind and weather: If your vertical garden is outdoors, you should protect it from strong wind and weather. a sheltered location is ideal.
Conclusion
So, there you have it! Creating your own DIY vertical garden self watering system is not just a fun project; it’s a game-changer for anyone looking to maximize their gardening space, minimize their watering chores, and add a touch of green elegance to their home. We’ve walked you through the steps, highlighted the benefits, and hopefully, inspired you to take the plunge.
Why is this a must-try? Because it’s efficient, customizable, and incredibly rewarding. Imagine fresh herbs readily available right outside your kitchen door, vibrant flowers cascading down your balcony wall, or a lush green screen transforming a dull fence into a living masterpiece. This isn’t just about gardening; it’s about creating a more beautiful, sustainable, and enjoyable living space.
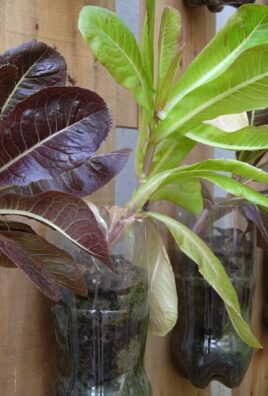
But the beauty of this project lies in its adaptability. Feel free to experiment with different container types. Upcycle plastic bottles, repurpose old gutters, or even get creative with fabric pockets. The possibilities are truly endless. Consider incorporating a timer for your pump to automate the watering process even further, ensuring your plants receive consistent hydration even when you’re away. You could also explore different growing mediums. While we suggested a standard potting mix, coco coir or a blend of perlite and vermiculite can offer excellent drainage and aeration, especially beneficial for certain plant varieties.
Don’t be afraid to tailor the system to your specific needs and preferences. If you live in a particularly sunny area, consider using shade cloth to protect your plants from excessive heat. If you’re growing herbs, plant them near your kitchen for easy access. And if you’re feeling ambitious, you could even integrate a rainwater harvesting system to make your vertical garden even more eco-friendly.
The key is to start small, experiment, and learn as you go. Gardening is a journey, not a destination, and every mistake is an opportunity to learn and improve. Embrace the process, enjoy the creativity, and revel in the satisfaction of creating something beautiful and functional with your own two hands.
We are incredibly confident that you’ll find this DIY vertical garden self watering project to be both enjoyable and beneficial. But more than that, we want to hear about your experience! Share your photos, tips, and challenges in the comments below. Let’s build a community of vertical gardeners, sharing our knowledge and inspiring each other to create even more amazing green spaces. What plants did you choose? What modifications did you make to the design? What challenges did you encounter, and how did you overcome them? Your insights could be invaluable to other readers embarking on their own vertical gardening adventures. So, get your hands dirty, unleash your creativity, and let’s grow something amazing together!
Frequently Asked Questions (FAQ)
What types of plants are best suited for a DIY vertical garden self watering system?
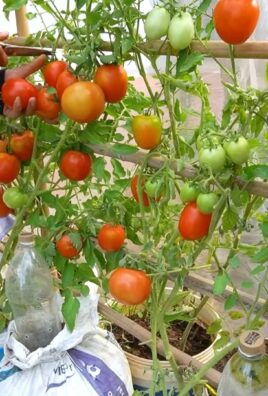
The beauty of a vertical garden is its versatility! However, some plants thrive better than others in this environment. Herbs like basil, mint, chives, and oregano are excellent choices due to their shallow root systems and relatively low water requirements. Leafy greens such as lettuce, spinach, and kale also do well, especially in shadier locations. Strawberries are another popular option, adding a touch of sweetness to your vertical garden. For flowering plants, consider petunias, impatiens, and begonias, which offer vibrant colors and cascading growth habits. Avoid plants with deep root systems or those that require a lot of space, such as tomatoes or large shrubs, as they may not thrive in the confined space of a vertical garden. When selecting plants, consider their light requirements, water needs, and growth habits to ensure they are compatible with your chosen system and location.
How often should I refill the water reservoir in my DIY vertical garden self watering system?
The frequency of refilling the water reservoir depends on several factors, including the size of the reservoir, the type of plants you’re growing, the weather conditions, and the efficiency of your self-watering system. As a general rule, check the water level in the reservoir every few days, especially during hot or dry periods. You’ll likely need to refill it more frequently during the summer months when plants are actively growing and transpiring. Conversely, you may be able to go longer between refills during cooler or wetter periods. Observe your plants closely for signs of underwatering, such as wilting leaves or dry soil. If you notice these signs, increase the frequency of refilling the reservoir. A good practice is to establish a regular watering schedule based on your specific conditions and adjust it as needed.
What type of pump should I use for my DIY vertical garden self watering system?
Choosing the right pump is crucial for the success of your self-watering system. A small submersible pump designed for aquariums or fountains is typically a good choice. Look for a pump with adjustable flow control, allowing you to regulate the amount of water delivered to your plants. The pump’s flow rate (measured in gallons per hour or liters per hour) should be appropriate for the size of your vertical garden. A pump that’s too powerful can overwater your plants, while one that’s too weak may not provide sufficient water. Consider the height of your vertical garden when selecting a pump, as the pump needs to be able to lift the water to the top level. Read reviews and compare different models to find a pump that’s reliable, energy-efficient, and suitable for your specific needs.
How do I prevent algae growth in my DIY vertical garden self watering system?
Algae growth is a common problem in self-watering systems, especially those exposed to sunlight. Algae can clog the pump and tubing, reducing the efficiency of the system and potentially harming your plants. To prevent algae growth, try to minimize the amount of sunlight that reaches the water reservoir. Use opaque containers for the reservoir and tubing, or cover them with dark-colored material. You can also add a small amount of hydrogen peroxide to the water reservoir to inhibit algae growth. Be careful not to add too much, as it can harm your plants. Regularly clean the reservoir and tubing to remove any algae that does accumulate.
Can I use fertilizer in my DIY vertical garden self watering system?
Yes, you can and should use fertilizer in your self-watering system to provide your plants with the nutrients they need to thrive. Use a water-soluble fertilizer specifically formulated for the types of plants you’re growing. Follow the instructions on the fertilizer package carefully, as over-fertilizing can damage your plants. Add the fertilizer to the water reservoir when you refill it, ensuring it’s properly diluted. Avoid using slow-release fertilizers, as they may not dissolve evenly in the water and can clog the system. Monitor your plants for signs of nutrient deficiencies, such as yellowing leaves or stunted growth, and adjust the fertilizer dosage accordingly.
How do I winterize my DIY vertical garden self watering system?
Winterizing your vertical garden is essential if you live in an area with freezing temperatures. Before the first frost, disconnect the pump and drain the water from the reservoir and tubing to prevent them from freezing and cracking. If you’re growing plants that are not cold-hardy, bring them indoors or protect them with frost blankets. You can also disassemble the vertical garden and store the components indoors during the winter months. If you choose to leave the vertical garden in place, cover it with a tarp or other protective material to shield it from the elements. Remember to check on your plants regularly throughout the winter and water them as needed, even if the self-watering system is not in use.
What if my DIY vertical garden self watering system is leaking?
Leaks can be frustrating, but they’re often easy to fix. First, identify the source of the leak. Check the connections between the tubing and the containers, as well as the connections to the pump. Make sure all connections are tight and secure. If you find a crack or hole in the tubing or containers, you can repair it with waterproof tape or sealant. You may also need to replace damaged components. Ensure the water reservoir is not overfilled, as this can cause leaks. If the leak is coming from the pump, check the seals and connections to make sure they’re properly aligned and tightened.
Leave a Comment